VNCは「VirtualNetworkComputing」の略で、ネットワークを介して他のコンピューターにアクセスして制御するために使用できるGUIデスクトップ共有アプリケーションです。リモートフレームバッファプロトコルを使用し、クライアント/サーバーモデルで動作します。通常、テクニカルサポート担当者は、デスクトップ、サーバー、その他のネットワークデバイスをリモートで管理およびトラブルシューティングするために使用します。
このチュートリアルでは、CentOS8にVNCサーバーをインストールする方法を紹介します。
- CentOS8デスクトップオペレーティングシステムを実行しているシステム。
- ルートパスワードはサーバーで構成されています。
デフォルトでは、SELinuxはCentOS 8オペレーティングシステムで有効になっており、SELinuxが有効になっている場合、VNCサーバーは正しく機能しません。したがって、システムでSELinuxを無効にすることをお勧めします。次のファイルを編集して無効にできます:
nano /etc/sysconfig/selinux
次の行を見つけます:
SELINUX=enforcing
そして、それを次の行に置き換えます:
SELINUX=disabled
終了したら、ファイルを保存して閉じます。次に、システムを再起動して変更を実装します。
VNCサーバーをインストールする
デフォルトでは、TigerVNCはCentOS8のデフォルトリポジトリで利用できます。次のコマンドを実行してインストールできます:
dnf install tigervnc-server tigervnc-server-module -y
インストールが完了したら、次の手順に進むことができます。
次に、VNCリモートデスクトップセッション用の新しいユーザーを作成する必要があります。以下に示すように、hiteshという名前の新しいユーザーを作成できます。
useradd hitesh
次に、次のコマンドを使用して、このユーザーのパスワードを設定します。
passwd hitesh
次に、ユーザーをhiteshに切り替え、次のコマンドを使用してこのユーザーのVNCパスワードを設定します。
su - hitesh
 vncpasswd
希望のパスワードを入力し、Enterキーを押して、以下に示すようにパスワードを作成します。
Password:
Verify:
Would you like to enter a view-only password (y/n)? n
A view-only password is not used
次に、次のコマンドを使用して、hiteshユーザーを終了します。
exit
VNC用のSystemdサービスファイルを作成する
次に、VNC用のsystemdサービスファイルを作成する必要があります。次のコマンドで作成できます:
nano /etc/systemd/system/[email protected]
次の行を追加します:
[Unit]
Description=Remote Desktop VNC Service
After=syslog.target network.target

[Service]
Type=forking
WorkingDirectory=/home/hitesh
User=hitesh
Group=hitesh

ExecStartPre=/bin/sh -c '/usr/bin/vncserver -kill %i > /dev/null 2>&1 || :'
ExecStart=/usr/bin/vncserver -autokill %i
ExecStop=/usr/bin/vncserver -kill %i

[Install]
WantedBy=multi-user.target
終了したら、ファイルを保存して閉じます。次に、次のコマンドを使用してsystemdデーモンをリロードします。
systemctl daemon-reload
次に、ディスプレイ1でVNCサービスを開始し、次のコマンドを使用してシステムの再起動後に開始できるようにします。
systemctl start [email protected]:1.service
 systemctl enable [email protected]:1.service
これで、次のコマンドを使用してVNCサービスのステータスを確認できます。
systemctl status [email protected]:1.service
次の出力が得られるはずです:
? [email protected]:1.service - Remote Desktop VNC Service
   Loaded: loaded (/etc/systemd/system/[email protected]; disabled; vendor preset: disabled)
   Active: active (running) since Fri 2020-03-06 03:45:50 EST; 45s ago
  Process: 2196 ExecStart=/usr/bin/vncserver -autokill :1 (code=exited, status=0/SUCCESS)
  Process: 2190 ExecStartPre=/bin/sh -c /usr/bin/vncserver -kill :1 > /dev/null 2>&1 || : (code=exited, status=0/SUCCESS)
    Tasks: 180 (limit: 12537)
   Memory: 347.3M
   CGroup: /system.slice/system-vncserver.slice/[email protected]:1.service
           ??2203 /usr/bin/Xvnc :1 -auth /home/hitesh/.Xauthority -desktop centos8:1 (hitesh) -fp catalogue:/etc/X11/fontpath.d -geometry 1024>
           ??2210 sh -c (/home/hitesh/.vnc/xstartup; /usr/bin/vncserver -kill :1) >> '/home/hitesh/.vnc/centos8:1.log' 2>&1 &
           ??2211 /bin/sh /home/hitesh/.vnc/xstartup
           ??2212 /usr/libexec/gnome-session-binary
           ??2221 dbus-launch --sh-syntax --exit-with-session
           ??2222 /usr/bin/dbus-daemon --syslog --fork --print-pid 6 --print-address 8 --session
           ??2230 /usr/bin/ssh-agent /etc/X11/xinit/Xclients
           ??2246 /usr/libexec/at-spi-bus-launcher
           ??2251 /usr/bin/dbus-daemon --config-file=/usr/share/defaults/at-spi2/accessibility.conf --nofork --print-address 3
           ??2253 /usr/libexec/at-spi2-registryd --use-gnome-session
           ??2257 /usr/libexec/gvfsd
           ??2264 /usr/libexec/gvfsd-fuse /home/hitesh/.gvfs -f -o big_writes
           ??2292 /usr/bin/gnome-keyring-daemon --start --components=secrets
           ??2336 /usr/libexec/gsd-power
これで、VNCサーバーが起動し、ポート5901でリッスンします。次のコマンドで確認できます。
netstat -tunlp | grep 5901
次の出力が得られるはずです:
tcp        0      0 0.0.0.0:5901            0.0.0.0:*               LISTEN      2203/Xvnc
tcp6       0      0 :::5901                 :::*                    LISTEN      2203/Xvnc
これでVNCサーバーがインストールおよび構成されたので、リモートコンピューターからVNCサーバーにアクセスします。
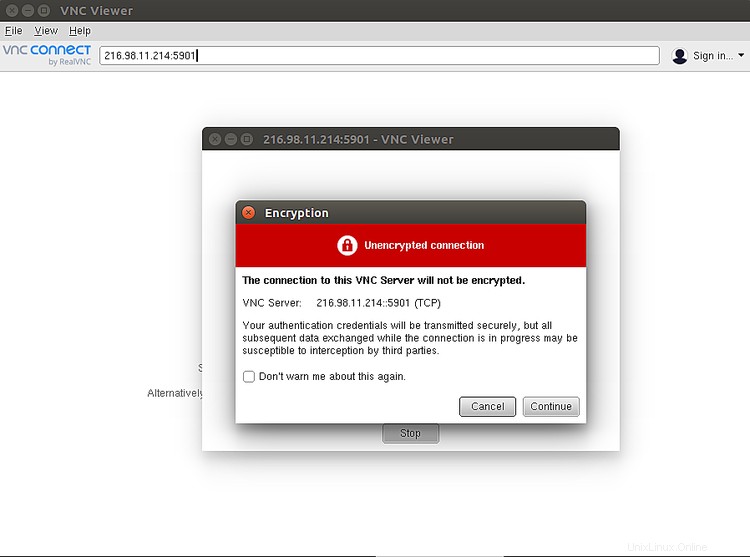
Windows / Linuxマシンで、VNC Viewerアプリケーションを開き、以下に示すようにVNCサーバーアドレスを入力します。
Your-server-ip:5901

続行をクリックします ボタン。次の画面が表示されます。

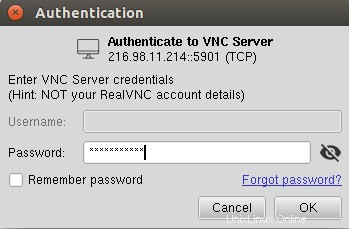
VNCパスワードを入力し、 OKをクリックします ボタン。接続すると、CentOSデスクトップが次の画面に表示されます。

おめでとう! CentOS 8にVNCサーバーを正常にインストールして構成しました。これにより、ネットワーク経由でリモートコンピューターを簡単に管理できるようになることを願っています。