Askbotは、PythonとDjangoで記述された、無料のオープンソースで高度にカスタマイズ可能な質問と回答のフォーラムソフトウェアです。シンプルで軽量で、他のフォーラムソフトウェアStackOverflowやYahooAnswersと非常によく似ています。 Askbotは、タグとカテゴリ、電子メール通知、カルマベースのシステム、投票、コンテンツのモデレーションなど、多数の機能を提供します。
このチュートリアルでは、Let'sEncryptSSLを使用してCentOS8にAskbotフォーラムソフトウェアをインストールする方法を示します。
- CentOS8を実行しているサーバー。
- ルートパスワードがサーバーに設定されています。
開始する前に、必要な依存関係をシステムにインストールする必要があります。
まず、次のコマンドを使用して「開発ツール」をインストールします。
dnf group install 'Development Tools'
次に、次のコマンドを使用してEPELリポジトリとその他のPython依存関係をインストールします。
dnf install epel-release -y
dnf install python2-pip python2-devel python2-six -y
必要なパッケージがすべてインストールされたら、次のステップに進むことができます。
PostgreSQLのインストールと構成
AskbotはPostgreSQLを使用してデータを保存します。したがって、システムにインストールする必要があります。次のコマンドでインストールできます:
dnf install postgresql-server postgresql-devel postgresql-contrib -y
インストールしたら、次のコマンドを使用してデータベースを初期化します。
postgresql-setup initdb
次の出力が得られるはずです:
WARNING: using obsoleted argument syntax, try --help
WARNING: arguments transformed to: postgresql-setup --initdb --unit postgresql
 * Initializing database in '/var/lib/pgsql/data'
 * Initialized, logs are in /var/lib/pgsql/initdb_postgresql.log
次に、PostgreSQLサービスを開始し、次のコマンドを使用してシステムの再起動後に開始できるようにします。
systemctl start postgresql
systemctl enable postgresql
次に、次のコマンドを使用してPostgreSQLシェルにログインします。
su - postgres
[[email protected] ~]$ psql
出力:
psql (10.6)
Type "help" for help.
postgres=#
次に、次のコマンドを使用して、Askbotのデータベースとユーザーを作成します。
postgres=# create database askbot;
postgres=# create user askbot with password 'password';
次に、次のコマンドを使用して、askbotにすべての権限を付与します。
postgres=# grant all privileges on database askbot to askbot;
最後に、次のコマンドを使用してPostgreSQLシェルを終了します。
postgres=# \q
次に、PostgreSQLのローカルユーザー認証を構成する必要があります。 pg_hba.confファイルを編集することでそれを行うことができます:
nano /var/lib/pgsql/data/pg_hba.conf
次の行でpeerをmd5に置き換えます。
local   all             all                                    md5
host    all             all             127.0.0.1/32           md5
host    all             all             ::1/128                md5
終了したら、ファイルを保存して閉じます。次に、PostgreSQLサービスを再起動して、変更を適用します。
systemctl restart postgresql
Askbotのインストールと構成
Askbotをインストールする前に、Askbotのユーザーを作成する必要があります。次のコマンドを使用して、新しいAskbotユーザーを作成し、パスワードを設定できます。
useradd -m -s /bin/bash askbot
passwd askbot
次に、sudoコマンドアクセス用のホイールグループにAskbotユーザーを追加します。
usermod -a -G wheel askbot
次に、次のコマンドを使用してpythonvirtualenvパッケージをインストールします。
pip2 install virtualenv six
インストールしたら、ユーザーをaskbotに変更し、次のコマンドを使用してAskbotの新しい仮想環境を作成します。
su - askbot
virtualenv askbot
次の出力が表示されます。
created virtual environment CPython2.7.16.final.0-64 in 663ms
  creator CPython2Posix(dest=/home/askbot/askbot, clear=False, global=False)
  seeder FromAppData(download=False, pip=latest, setuptools=latest, wheel=latest, via=copy, app_data_dir=/tmp/tmp9YFr7B/seed-app-data/v1)
  activators PythonActivator,CShellActivator,FishActivator,PowerShellActivator,BashActivator
次に、ディレクトリをaskbotに変更し、次のコマンドを使用して仮想環境をアクティブ化します。
cd askbot
source bin/activate
出力:
(askbot) [[email protected] askbot]$
次に、次のコマンドを使用して、Askbotおよびその他の必要な依存関係をインストールします。
pip2 install six==1.10.0
pip2 install askbot psycopg2
次に、アプリケーション用の新しいディレクトリを作成し、ディレクトリをアプリケーションに変更して、次のコマンドでAskbotをセットアップします。
mkdir myapp
cd myapp
askbot-setup
次の出力が表示されます。
Deploying Askbot - Django Q&A forum application
Problems installing? -> please email [email protected]

To CANCEL - hit Ctr-C at any time

Enter directory path (absolute or relative) to deploy
askbot. To choose current directory - enter "."
> .
と入力します。
タイプ "。" Enterを押します 続ける。次の出力が表示されます。
Please select database engine:
1 - for postgresql, 2 - for sqlite, 3 - for mysql, 4 - oracle
type 1/2/3/4: 1
1と入力してpostgresqlデータベースエンジンを選択し、Enterキーを押して続行します。次の出力が表示されます。
Please enter database name (required)
> askbot

Please enter database user (required)
> askbot

Please enter database password (required)
> password
Askbotデータベースの詳細を入力し、 Enterを押します 。インストールが完了すると、次の出力が表示されます。
Copying files:
* __init__.py
* manage.py
* urls.py
* django.wsgi
Creating settings file
settings file created

copying directories:  * doc
* cron
* upfiles

Done. Please find further instructions at http://askbot.org/doc/
をご覧ください。
次に、次のコマンドを使用して、AskbotDjango静的ファイルとデータベースを生成します。
python manage.py collectstatic
python manage.py syncdb
以下に示すように、希望する管理者のユーザー名、電子メール、およびパスワードを入力します。
You have installed Django's auth system, and don't have any superusers defined.
Would you like to create one now? (yes/no): yes
Username (leave blank to use 'askbot'): askbotadmin
Email address: [email protected]
Password:
Password (again):
Superuser created successfully.
uWSGIのインストールと構成
次に、uWSGIをシステムにインストールする必要があります。 uWSGIは、PythonベースのWebアプリケーションを実行するために使用されるソフトウェアツールです。次のコマンドでインストールできます:
pip2 install uwsgi
uWSGIをインストールした後、次のコマンドを使用してuWSGIの新しいディレクトリを作成します。
mkdir -p /etc/uwsgi/sites
次に、以下に示すように、新しいuWSGI構成ファイルを作成します。
nano /etc/uwsgi/sites/askbot.ini
次の行を追加します:
[uwsgi]

chdir = /home/askbot/askbot/myapp
home = /home/askbot/askbot
static-map = /m=/home/askbot/askbot/myapp/static
wsgi-file = /home/askbot/askbot/myapp/django.wsgi
master = true
processes = 5
# Askbot will running under the sock file
socket = /run/uwsgi/askbot.sock
chmod-socket = 664
uid = askbot
gid = nginx
vacuum = true
# uWSGI Log file
ogto = /var/log/uwsgi.log
uWSGI用のsystemdサービスファイルを作成する
次に、uWSGIサービスを管理するためのsystemdサービスファイルを作成する必要があります。次のコマンドで作成できます:
nano /etc/systemd/system/uwsgi.service
次の行を追加します:
[Unit]
Description=uWSGI service

[Service]
ExecStartPre=/bin/bash -c 'mkdir -p /run/uwsgi; chown askbot:nginx /run/uwsgi'
ExecStart=/bin/uwsgi --emperor /etc/uwsgi/sites
Restart=always
KillSignal=SIGQUIT
Type=notify
NotifyAccess=all

[Install]
WantedBy=multi-user.target
終了したら、ファイルを保存して閉じます。次に、次のコマンドを使用してsystemdデーモンをリロードします。
systemctl daemon-reload
Nginxのインストールと構成
次に、Askbotアプリケーションを提供するためにNginxをインストールして構成する必要があります。
まず、次のコマンドを使用してNginxWebサーバーをインストールします。
dnf install nginx -y
インストールしたら、Askbotの新しい仮想ホスト構成ファイルを作成します。
nano /etc/nginx/conf.d/askbot.conf
次の行を追加します:
server {
         listen 80;
         server_name askbot.linuxbuz.com;
         location / {
         include         uwsgi_params;
         uwsgi_pass	 unix:/run/uwsgi/askbot.sock;
    }
 }
ファイルを保存して閉じます。次に、NginxおよびuWSGIサービスを開始し、次のコマンドを使用してシステムの再起動後に開始できるようにします。
systemctl start nginx
systemctl enable nginx
systemctl start uwsgi
systemctl enable uwsgi
次に、システムにCertbotユーティリティをインストールして、Let's Encrypt SSLforAskbotドメインをダウンロードしてインストールする必要があります。
次のコマンドを使用して、Certbotクライアントをインストールできます。
wget https://dl.eff.org/certbot-auto
mv certbot-auto /usr/local/bin/certbot-auto
chown root /usr/local/bin/certbot-auto
chmod 0755 /usr/local/bin/certbot-auto
次に、次のコマンドを使用して、AskbotドメインのSSL証明書を取得してインストールします。
certbot-auto --nginx -d askbot.linuxbuz.com
上記のコマンドは、最初に必要なすべての依存関係をサーバーにインストールします。インストールすると、以下に示すように、メールアドレスを入力して利用規約に同意するよう求められます。
Saving debug log to /var/log/letsencrypt/letsencrypt.log
Plugins selected: Authenticator nginx, Installer nginx
Enter email address (used for urgent renewal and security notices) (Enter 'c' to
cancel): [email protected]

- - - - - - - - - - - - - - - - - - - - - - - - - - - - - - - - - - - - - - - -
Please read the Terms of Service at
https://letsencrypt.org/documents/LE-SA-v1.2-November-15-2017.pdf. You must
agree in order to register with the ACME server at
https://acme-v02.api.letsencrypt.org/directory
- - - - - - - - - - - - - - - - - - - - - - - - - - - - - - - - - - - - - - - -
(A)gree/(C)ancel: A

- - - - - - - - - - - - - - - - - - - - - - - - - - - - - - - - - - - - - - - -
Would you be willing to share your email address with the Electronic Frontier
Foundation, a founding partner of the Let's Encrypt project and the non-profit
organization that develops Certbot? We'd like to send you email about our work
encrypting the web, EFF news, campaigns, and ways to support digital freedom.
- - - - - - - - - - - - - - - - - - - - - - - - - - - - - - - - - - - - - - - -
(Y)es/(N)o: Y

Obtaining a new certificate
Performing the following challenges:
http-01 challenge for askbot.linuxbuz.com
Waiting for verification...
Cleaning up challenges
Deploying Certificate to VirtualHost /etc/nginx/conf.d/askbot.conf
次に、以下に示すように、HTTPトラフィックをHTTPSにリダイレクトするかどうかを選択します。
Please choose whether or not to redirect HTTP traffic to HTTPS, removing HTTP access.
- - - - - - - - - - - - - - - - - - - - - - - - - - - - - - - - - - - - - - - -
1: No redirect - Make no further changes to the webserver configuration.
2: Redirect - Make all requests redirect to secure HTTPS access. Choose this for
new sites, or if you're confident your site works on HTTPS. You can undo this
change by editing your web server's configuration.
- - - - - - - - - - - - - - - - - - - - - - - - - - - - - - - - - - - - - - - -
Select the appropriate number [1-2] then [enter] (press 'c' to cancel): 2
2と入力します Enterを押します 続ける。インストールが完了すると、次の出力が表示されます。
Redirecting all traffic on port 80 to ssl in /etc/nginx/conf.d/askbot.conf

- - - - - - - - - - - - - - - - - - - - - - - - - - - - - - - - - - - - - - - -
Congratulations! You have successfully enabled https://askbot.linuxbuz.com

You should test your configuration at:
https://www.ssllabs.com/ssltest/analyze.html?d=askbot.linuxbuz.com
- - - - - - - - - - - - - - - - - - - - - - - - - - - - - - - - - - - - - - - -

IMPORTANT NOTES:
 - Congratulations! Your certificate and chain have been saved at:
   /etc/letsencrypt/live/askbot.linuxbuz.com/fullchain.pem
   Your key file has been saved at:
   /etc/letsencrypt/live/askbot.linuxbuz.com/privkey.pem
   Your cert will expire on 2020-06-11. To obtain a new or tweaked
   version of this certificate in the future, simply run certbot-auto
   again with the "certonly" option. To non-interactively renew *all*
   of your certificates, run "certbot-auto renew"
 - If you like Certbot, please consider supporting our work by:

   Donating to ISRG / Let's Encrypt:   https://letsencrypt.org/donate
   Donating to EFF:                    https://eff.org/donate-le
次に、外部ネットワークからのHTTPおよびHTTPSサービスを許可するファイアウォールルールを作成する必要があります。次のコマンドで許可できます:
firewall-cmd --permanent --add-service=http
firewall-cmd --permanent --add-service=https
firewall-cmd --reload
デフォルトでは、SELinuxはCentOS 8で有効になっています。Askbotを正しく動作させるために、SELinuxを無効にすることをお勧めします。 / etc / selinux /configファイルを編集して無効にすることができます:
nano /etc/selinux/config
次の行を見つけます:
SELINUX=enforcing
そして、それを次の行に置き換えます:
SELINUX=disabled
ファイルを保存して閉じます。次に、システムを再起動して変更を適用します。
次に、Webブラウザーを開き、URLhttps://askbot.linuxbuz.comを入力します。次の画面にリダイレクトされます:

記号をクリックします で ボタン。次の画面にAskbotのログインページが表示されます。
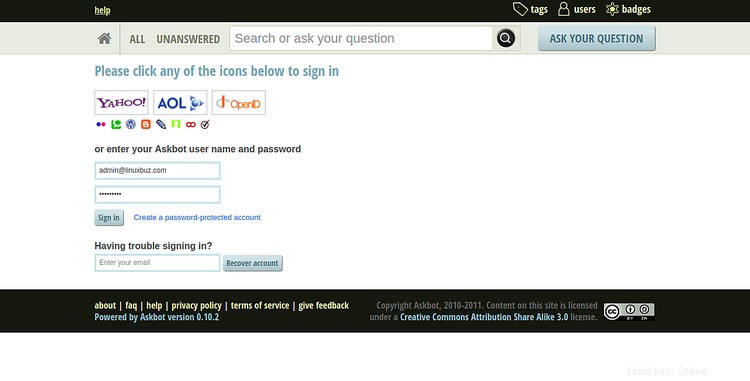
Askbot管理者のユーザー名とパスワードを入力し、署名をクリックします で ボタン。次の画面にAskbotダッシュボードが表示されます。
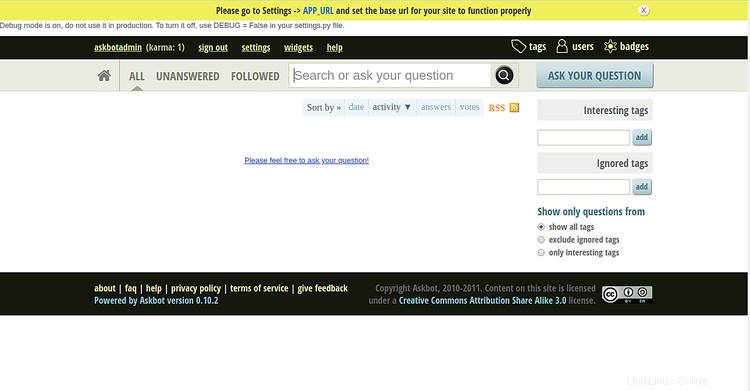
おめでとう! CentOS 8にAskbotフォーラムを正常にインストールして構成し、Let'sEncryptSSLで保護しました。これで、Askbotを使用して質問と回答の作成を開始できます。