WonderCMSは、無料のオープンソースフラットファイルCMSであり、非常に小さく、軽く、シンプルにすることを目的としています。 PHP、jQuery、HTML / CSSで構築され、2008年から開発されています。初期構成は必要ありません。インストールプロセスは非常に簡単です。5つのファイルを解凍してアップロードします。すべてのファイルを別の場所にコピー/貼り付けすることで、すべてのファイルを簡単に移動、バックアップ、および復元できます。それらを別のホストに移動するために再構成する必要はありません。 WonderCMSは、MySQLのような従来の/リレーショナルデータベースも必要としません。フラットファイルテクノロジーにより、WonderCMSはすべてのデータをJSON形式で構造化されたdatabase.jsと呼ばれるテキストファイル(フラットファイル)に保存できます。このチュートリアルでは、Nginxをウェブサーバーとして使用してCentOS 7システムにWonderCMSをインストールしてセットアップします。オプションで、Acme.shクライアントとLet'sEncrypt認証局を使用してSSLサポートを追加することでトランスポート層を保護できます。
WonderCMSをインストールして実行するための要件は次のとおりです。
- PHPバージョン7.1以降、curl、mbstring、およびzip拡張子が付いています。
- Webサーバー(
mod_rewriteを使用したApache モジュールが有効、Nginx、IIS)。
- CentOS7オペレーティングシステム。
-
sudoを持つroot以外のユーザー 特権。
CentOSのバージョンを確認してください:
cat /etc/centos-release
# CentOS Linux release 7.6.1810 (Core)
タイムゾーンを設定します:
timedatectl list-timezones
sudo timedatectl set-timezone 'Region/City'
オペレーティングシステムパッケージ(ソフトウェア)を更新します。これは、オペレーティングシステムのデフォルトのソフトウェアパッケージの最新の更新とセキュリティ修正を確実に行うための重要な最初のステップです。
sudo yum update -y
CentOSオペレーティングシステムの基本的な管理に必要ないくつかの重要なパッケージをインストールします。
sudo yum install -y curl wget vim git unzip socat bash-completion epel-release
Webtatic YUMリポジトリをセットアップします:
sudo rpm -Uvh https://mirror.webtatic.com/yum/el7/webtatic-release.rpm
PHPと必要なPHP拡張機能をインストールします:
sudo yum install -y php72w php72w-cli php72w-fpm php72w-common php72w-curl php72w-zip php72w-mbstring php72w-json
モジュールにコンパイルされたPHPを表示するには、次のコマンドを実行できます。
php -m

ctype
curl
exif
fileinfo
. . .
. . .
PHPのバージョンを確認してください:
php --version
PHP-FPMサービスを開始して有効にします:
sudo systemctl start php-fpm.service
sudo systemctl enable php-fpm.service
ステップ2-acme.shクライアントをインストールし、Let's Encrypt証明書を取得します(オプション)
HTTPSでフォーラムを保護する必要はありませんが、サイトのトラフィックを保護することをお勧めします。 Let's EncryptからTLS証明書を取得するには、acme.shクライアントを使用します。 Acme.shは、依存関係がゼロのLet'sEncryptからTLS証明書を取得するための純粋なUNIXシェルソフトウェアです。
acme.shをダウンロードしてインストールします:
sudo su - root
git clone https://github.com/Neilpang/acme.sh.git
cd acme.sh
./acme.sh --install --accountemail [email protected]
source ~/.bashrc
cd ~
acme.shのバージョンを確認してください:
acme.sh --version
# v2.8.0
RSAを取得する およびECC/ ECCSA ドメイン/ホスト名の証明書:
# RSA 2048
acme.sh --issue --standalone -d example.com --keylength 2048
# ECDSA
acme.sh --issue --standalone -d example.com --keylength ec-256
テスト用の偽の証明書が必要な場合は、--stagingを追加できます。 上記のコマンドにフラグを立てます。
上記のコマンドを実行した後、証明書 およびキー になります:
- RSAの場合 :
/home/username/example.comディレクトリ。 - ECC/ECDSAの場合 :
/home/username/example.com_eccディレクトリ。
発行された証明書を一覧表示するには、次のコマンドを実行できます:
acme.sh --list
証明書を保存するディレクトリを作成します。 /etc/letsencryptを使用します ディレクトリ。
mkdir -p /etc/letsecnrypt/example.comsudo mkdir -p /etc/letsencrypt/example.com_ecc
証明書を/etc/letsencryptディレクトリにインストール/コピーします。
# RSA
acme.sh --install-cert -d example.com --cert-file /etc/letsencrypt/example.com/cert.pem --key-file /etc/letsencrypt/example.com/private.key --fullchain-file /etc/letsencrypt/example.com/fullchain.pem --reloadcmd "sudo systemctl reload nginx.service"
# ECC/ECDSA
acme.sh --install-cert -d example.com --ecc --cert-file /etc/letsencrypt/example.com_ecc/cert.pem --key-file /etc/letsencrypt/example.com_ecc/private.key --fullchain-file /etc/letsencrypt/example.com_ecc/fullchain.pem --reloadcmd "sudo systemctl reload nginx.service"
すべての証明書は60日ごとに自動的に更新されます。
証明書を取得したら、rootユーザーを終了し、通常のsudoユーザーに戻ります。
exit
WonderCMSは、多くの一般的なWebサーバーソフトウェアで正常に動作します。このチュートリアルでは、NGINXを選択しました。
NGINXをインストールします:
sudo yum install -y nginx
NGINXのバージョンを確認してください:
nginx -v
# nginx version: nginx/1.12.2
NGINXサービスを開始して有効にします:
sudo systemctl start nginx.service
sudo systemctl enable nginx.service
次に、WonderCMS用にNGINXを構成します。 sudo vim /etc/nginx/conf.d/wondercms.confを実行します 次の構成を追加します:
server {

  listen 80;
  listen 443 ssl;

  server_name example.com;
  root /var/www/wondercms;

  ssl_certificate /etc/letsencrypt/example.com/fullchain.pem;
  ssl_certificate_key /etc/letsencrypt/example.com/private.key;
  ssl_certificate /etc/letsencrypt/example.com_ecc/fullchain.pem;
  ssl_certificate_key /etc/letsencrypt/example.com_ecc/private.key;

  index index.php;


  location / {
    if (!-e $request_filename) {
      rewrite ^/(.+)$ /index.php?page=$1 last;
    }
  }
  location ~ database.js {
    return 403;
  }

  location ~ \.php(/|$) {
    try_files $uri =404;
    fastcgi_pass http://127.0.0.1:9000;
    fastcgi_split_path_info ^(.+\.php)(/.+)$;
    fastcgi_index index.php;
    include fastcgi_params;
    fastcgi_param SCRIPT_FILENAME $document_root$fastcgi_script_name;
  }

}
構文エラーがないかNGINX構成を確認してください:
sudo nginx -t
NGINXサービスをリロードします:
sudo systemctl reload nginx.service
WonderCMSのドキュメントルートディレクトリを作成します。
sudo mkdir -p /var/www/wondercms
/var/www/wondercmsの所有権を変更します [jour_username]. The string [ jour_username] must be replaced with the name of the Linux user that you are currently logged in.
sudo chown -R [your_username]:[your_username] /var/www/wondercms
ドキュメントのルートディレクトリに移動します:
cd /var/www/wondercms
WonderCMSソースをダウンロードして解凍します:
wget https://github.com/robiso/wondercms/releases/download/2.7.0/WonderCMS-2.7.0.zip
unzip WonderCMS-2.7.0.zip
rm WonderCMS-2.7.0.zip
WonderCMSファイルをドキュメントのルートディレクトリに移動します。
mv wondercms/* . && mv wondercms/.*.
rmdir wondercms
/var/www/wondercmsの所有権を変更します nginx:へのディレクトリ
sudo chown -R nginx:nginx /var/www/wondercms
sudo vim /etc/php-fpm.d/www.confを実行します ユーザーとグループをnginxに設定します 。
sudo vim /etc/php-fpm.d/www.conf
user = nginx
group = nginx
#が前にある場合は、ユーザーとグループの行の前にある#を削除します。
次に、PHP-FPMサービスを再起動します。
sudo systemctl restart php-fpm.service
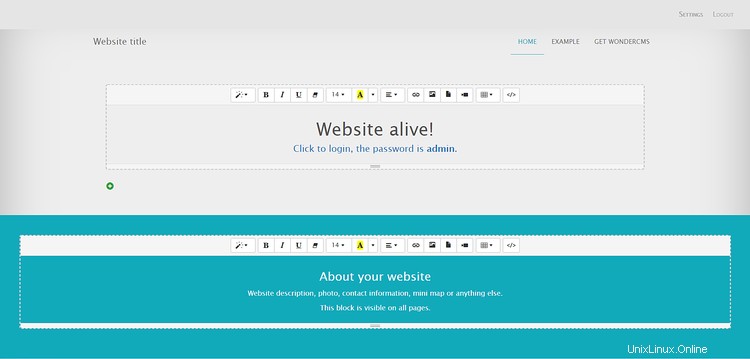
Webブラウザーでサイトを開き、デフォルトのパスワードadminでログインします。 後でデフォルトのパスワードを変更します。

- https://www.wondercms.com/
- https://github.com/robiso/wondercms