WordPressは、無料のオープンソースであり、世界で最も広く使用されているコンテンツ管理システムです。これは、ブログ、ポートフォリオWebサイト、およびeコマースプラットフォームをホストするために使用できる非常に強力なブログプラットフォームです。 WordPressは、Apache / Nginxをウェブサーバーとして、MariaDB / MySQLをデータベースとして、PHP処理を使用します。 WordPressは、その機能をカスタマイズするために使用できる膨大な数のテーマとプラグインを提供します。
このチュートリアルでは、CentOS 8サーバーにNginxを使用してWordPressをインストールし、無料のLet'sEncryptSSL証明書を使用してサーバーを保護する方法を説明します。
- CentOS8を実行しているサーバー。
- ルートパスワードはサーバーで構成されています。
- 有効なドメイン名がサーバーのIPアドレスを指している。
デフォルトでは、SELinuxはCentOS8サーバーで有効になっています。したがって、最初に無効にする必要があります。
これを行うには、/ etc / selinux/configファイルを編集します。
nano /etc/selinux/config
次の変更を行います:
SELINUX=disabled
ファイルを保存して閉じます。次に、サーバーを再起動して変更を適用します。
LEMPサーバーをインストールする
開始する前に、サーバーにNginx、MariaDB、PHP、およびその他の必要なパッケージをインストールする必要があります。次のコマンドを実行して、それらすべてをインストールできます。
yum install nginx php php-cli php-curl php-zip php-mbstring php-mysqlnd php-fpm curl unzip mariadb-server -y
すべてのパッケージがインストールされたら、Nginx、PHP-FPM、MariaDBサービスを開始し、システムの再起動後にそれらを開始できるようにします。
systemctl start nginx
 systemctl enable nginx
 systemctl start mariadb
 systemctl enable mariadb
 systemctl start php-fpm
 systemctl enable php-fpm
次のコマンドを使用して、PHP-FPMサービスのステータスを確認することもできます。
systemctl status php-fpm
次の出力が得られるはずです:
? php-fpm.service - The PHP FastCGI Process Manager
   Loaded: loaded (/usr/lib/systemd/system/php-fpm.service; disabled; vendor preset: disabled)
   Active: active (running) since Thu 2019-10-17 05:39:11 EDT; 4min 40s ago
 Main PID: 1475 (php-fpm)
   Status: "Processes active: 0, idle: 5, Requests: 0, slow: 0, Traffic: 0req/sec"
    Tasks: 6 (limit: 5060)
   Memory: 28.5M
   CGroup: /system.slice/php-fpm.service
           ??1475 php-fpm: master process (/etc/php-fpm.conf)
           ??1478 php-fpm: pool www
           ??1479 php-fpm: pool www
           ??1480 php-fpm: pool www
           ??1481 php-fpm: pool www
           ??1482 php-fpm: pool www

Oct 17 05:39:10 centos8 systemd[1]: Starting The PHP FastCGI Process Manager...
Oct 17 05:39:11 centos8 systemd[1]: Started The PHP FastCGI Process Manager.
完了したら、次のステップに進むことができます。
デフォルトでは、MariaDBサーバーは保護されていません。したがって、最初にそれを保護する必要があります。次のコマンドで保護できます:
mysql_secure_installation
以下に示すように、すべての質問に答えてください。
Enter current password for root (enter for none):
Set root password? [Y/n] n
Remove anonymous users? [Y/n] Y
Disallow root login remotely? [Y/n] Y
Remove test database and access to it? [Y/n] Y
Reload privilege tables now? [Y/n] Y
保護すると、次の出力が得られます。
Cleaning up...

All done!  If you've completed all of the above steps, your MariaDB
installation should now be secure.

Thanks for using MariaDB!
次に、次のコマンドを使用してMariaDBシェルにログインします。
mysql -u root -p
プロンプトが表示されたらrootパスワードを入力し、次のコマンドを使用してWordPressのデータベースとユーザーを作成します。
MariaDB [(none)]> CREATE DATABASE wpdb;
 MariaDB [(none)]> GRANT ALL PRIVILEGES on wpdb.* to 'wpuser'@'localhost' identified by 'password';
次に、特権をフラッシュし、次のコマンドを使用してMariaDBシェルを終了します。
MariaDB [(none)]> FLUSH PRIVILEGES;
 MariaDB [(none)]> EXIT;
データベースを構成したら、次のステップに進むことができます。
次のコマンドを使用して、最新バージョンのWordPressをダウンロードできます。
cd /var/www/html
 wget https://wordpress.org/latest.tar.gz
ダウンロードしたら、次のコマンドを使用してダウンロードしたファイルを抽出します。
tar -xvzf latest.tar.gz
次に、wordpressディレクトリの所有権をnginxに変更します:
chown -R nginx: /var/www/html/wordpress/
次に、ディレクトリをwordpressに変更し、wordpressのデフォルト構成ファイルの名前を変更します。
cd /var/www/html/wordpress
 cp wp-config-sample.php wp-config.php
次に、お気に入りのテキストエディタでファイルwp-config.phpを編集します。
nano wp-config.php
以下に示すようにデータベース情報を定義します。
/** The name of the database for WordPress */
define( 'DB_NAME', 'wpdb' );

/** MySQL database username */
define( 'DB_USER', 'wpuser' );

/** MySQL database password */
define( 'DB_PASSWORD', 'password' );

/** MySQL hostname */
define( 'DB_HOST', 'localhost' );
終了したら、ファイルを保存して閉じます。
WordPress用にNginxを構成する
次に、WordPressを提供するためのNginx仮想ホスト構成ファイルを作成する必要があります。次のコマンドで作成できます:
nano /etc/nginx/conf.d/wordpress.conf
次の行を追加します:
server {
    listen 80;
    server_name example.com;
    root /var/www/html/wordpress;
    index index.php;

    access_log /var/log/nginx/example.com.access.log;
    error_log /var/log/nginx/example.com.error.log;

    location = /favicon.ico {
        log_not_found off;
        access_log off;
    }

    location = /robots.txt {
        allow all;
        log_not_found off;
        access_log off;
    }

    location / {
        try_files $uri $uri/ /index.php?$args;
    }

    location ~ \.php$ {
        try_files $uri =404;
        fastcgi_pass unix:/run/php-fpm/www.sock;
        fastcgi_index   index.php;
        fastcgi_param SCRIPT_FILENAME $document_root$fastcgi_script_name;
        include fastcgi_params;
    }
    location ~* \.(js|css|png|jpg|jpeg|gif|ico|svg)$ {
        expires max;
        log_not_found off;
    }

}
ファイルを保存して閉じます。次に、次のコマンドを使用して、nginxに構文エラーがないか確認します。
nginx -t
次の出力が得られるはずです:
nginx: the configuration file /etc/nginx/nginx.conf syntax is ok
nginx: configuration file /etc/nginx/nginx.conf test is successful
最後に、Nginxサービスを再起動して、構成の変更を適用します。
systemctl restart nginx
WordPressがインストールおよび構成されたので、Webインターフェイスにアクセスします。
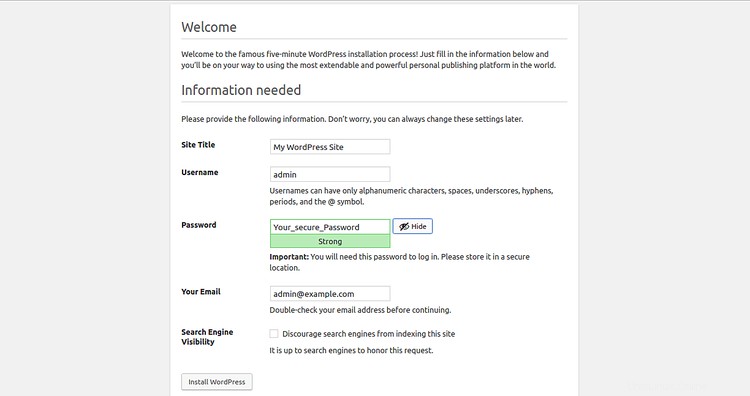
Webブラウザーを開き、URL http://example.comを入力します 。次のページにリダイレクトされます:

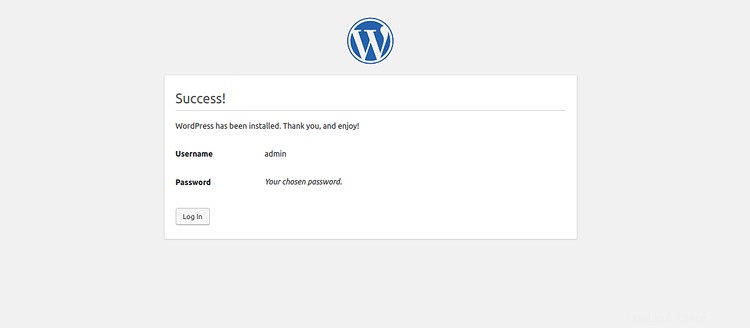
サイト名、管理者ユーザー名、パスワード、管理者メールなどの必要な情報をすべて入力し、WordPressのインストールをクリックします。 ボタン。インストールが完了したら。次のページが表示されます:

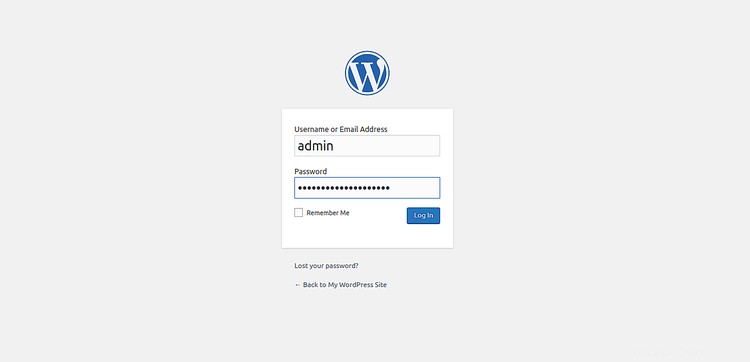
ログインをクリックします ボタン。 WordPressのログインページにリダイレクトされます:

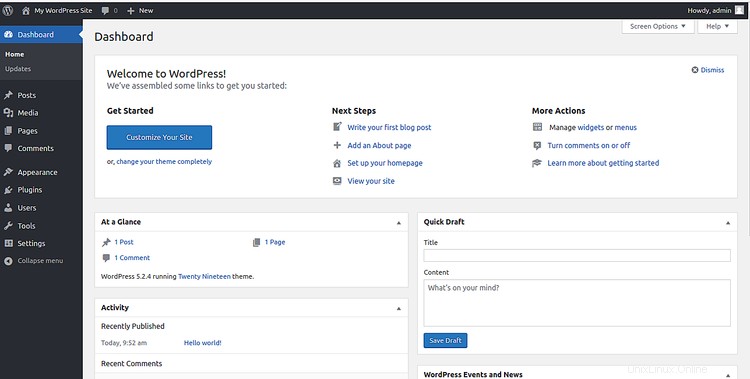
管理者のユーザー名とパスワードを入力し、ログインをクリックします ボタン。次のページにWordPressダッシュボードが表示されます:

Let's Encryptの無料SSLでWordPressサイトを保護するには、システムにCertbotLet'sEncryptクライアントをインストールする必要があります。デフォルトでは、CertbotはCentOS8のデフォルトリポジトリでは使用できません。そのため、Certbotの公式Webサイトからダウンロードする必要があります。
次のコマンドを使用して、Certbotをダウンロードしてインストールできます。
wget https://dl.eff.org/certbot-auto
 mv certbot-auto /usr/local/bin/certbot-auto
 chown root /usr/local/bin/certbot-auto
 chmod 0755 /usr/local/bin/certbot-auto
次に、次のコマンドを実行して、WordPressWebサイトのSSL証明書を取得してインストールします。
certbot-auto --apache -d example.com
メールアドレスを入力し、利用規約に同意するよう求められます。また、HTTPトラフィックをHTTPSにリダイレクトするかどうかを選択する必要があります。適切なオプションを選択して、Enterキーを押してください。インストールが正常に完了すると、次の出力が表示されます。
IMPORTANT NOTES:
 - Congratulations! Your certificate and chain have been saved at:
   /etc/letsencrypt/live/example.com/fullchain.pem
   Your key file has been saved at:
   /etc/letsencrypt/live/example.com/privkey.pem
   Your cert will expire on 2019-08-14. To obtain a new or tweaked
   version of this certificate in the future, simply run certbot again
   with the "certonly" option. To non-interactively renew *all* of
   your certificates, run "certbot renew"
 - If you like Certbot, please consider supporting our work by:

   Donating to ISRG / Let's Encrypt:   https://letsencrypt.org/donate
   Donating to EFF:                    https://eff.org/donate-le
Let'sEncrypt証明書は90日間有効です。したがって、有効期限が切れる前に証明書を更新することをお勧めします。証明書を自動的に更新するようにCronジョブを設定できます。
これを行うには、次のコマンドを使用してcrontabを作成します。
crontab -e
次の行を追加します:
0 0,12 * * * root python -c 'import random; import time; time.sleep(random.random() * 3600)' && /usr/local/bin/certbot-auto renew
終了したら、ファイルを保存して閉じます。
上記のチュートリアルでは、CentOSサーバーにNginxを使用してWordPressをインストールおよび構成する方法を学習しました。 Let'sEncryptの無料SSLでWordPressサイトを保護する方法も学びました。自分のWordPressWebサイトを簡単にホストできるようになったことを願っています。