Spacewalkは、ファイアウォールの背後で、Fedora、CentOS、ScientificLinuxなどのRedHat派生ディストリビューションのソフトウェアコンテンツの更新を管理します。これは、RedHatサテライト5のオープンソースバージョンです。RedHatサテライト6があり、オープンソースバージョンはkatelloです。これを構成する方法の詳細については、次のチュートリアルで説明します。 Spacewalkは、インフラストラクチャの管理に関して非常に強力なツールであり、非常に安定しており、適切に構築されています。
Spacewalkのインストールについて詳しく説明し、本番環境に対応するように構成する方法と、Spacewalkで使用できるすべての機能について詳しく説明します。組み込みのPostgresインストールを使用します。
このチュートリアルでは、3台のサーバーを使用します:
- 192.168.1.20-spacewalkサーバー-centos7
- 192.168.1.21-船外活動クライアント-centos6
- 192.168.1.22-船外活動クライアント-centos7
最小インストールのCentOS7:
cat /etc/redhat-release
結果:
CentOS Linux release 7.3.1611(Core)
強制モードのSELinux:
sestatus
SELinux status: enabled
SELinuxfs mount: /sys/fs/selinux
SELinux rootdirectory: /etc/selinux
Loaded policy name: targeted
Current mode:enforcing
Mode from config file: enforcing
Policy MLS status: enabled
Policy deny_unknown status: allowed
Max kernel policy version: 28
[[email protected] ~]#
ホストエントリ/etc/ hosts
を追加します192.168.1.20 spacewalk.sunil.cc spacewalk
SpacewalkCentOSリポジトリのインストール。
rpm -Uvh http://yum.spacewalkproject.org/2.6/RHEL/7/x86_64/spacewalk-repo-2.6-0.el7.noarch.rpm
cat > /etc/yum.repos.d/jpackage-generic.repo << EOF
[jpackage-generic]
name=JPackage generic
baseurl=http://vesta.informatik.rwth-aachen.de/ftp/pub/comp/Linux/jpackage/5.0/generic/free/
#mirrorlist=http://www.jpackage.org/mirrorlist.php?dist=generic&type=free&release=5.0
enabled=1
gpgcheck=1
gpgkey=http://www.jpackage.org/jpackage.asc
EOF
rpm -Uvh https://dl.fedoraproject.org/pub/epel/epel-release-latest-7.noarch.rpm
船外活動のためのPostgreSQLのインストール:
yum install -y spacewalk-setup-postgresql spacewalk-postgresql
ファイアウォールルールの追加。
firewall-cmd --add-service=http --permanent; firewall-cmd --add-service=https --permanent; firewall-cmd --add-port=5222/tcp --permanent;firewall-cmd --add-port=5269/tcp --permanent;firewall-cmd --add-port=69 â??permanent; firewall-cmd --add-port=5222/udp --permanent;firewall-cmd --add-port=5269/udp --permanent
そしてファイアウォールをリロードします。
firewall-cmd --reload
Firewalldを有効にします。
systemctl enable firewalld
systemctl restart firewalld
PostgreSQLサーバーを構成します。
ここでは、DB名をspacewalk、ユーザー名をspacewalkuser、パスワードをspacewalkuserとしました。
spacewalk-setup-postgresql create --db spacewalk --user spacewalkuser --password spacewalkuser
/usr/bin/spacewalk-setup-postgresql: line 87: isSUSE: command not found
/usr/bin/spacewalk-setup-postgresql: line 100: isSUSE: command not found
Note: Forwarding request to 'systemctl enable postgresql.service'.
Created symlink from /etc/systemd/system/multi-user.target.wants/postgresql.service to /usr/lib/systemd/system/postgresql.service.
Hint: the preferred way to do this is now "postgresql-setup initdb"
Initializing database ... OK
/usr/bin/spacewalk-setup-postgresql: line 154: [: 018446744073692774399: integer expression expected
Redirecting to /bin/systemctl start  postgresql.service
Redirecting to /bin/systemctl reload  postgresql.service
Spacewalkサーバーのセットアップ。
spacewalk-setup --skip-db-install
* Setting up SELinux..
** Database: Setting up database connection for PostgreSQL backend.
** Database: Embedded database installation SKIPPED.
Could not connect to the database.  Your connection information may be incorrect.  Error: DBI connect('dbname=rhnschema','rhnuser',...) failed: FATAL:  no pg_hba.conf entry for host "[local]", user "rhnuser", database "rhnschema", SSL off at /usr/share/perl5/vendor_perl/Spacewalk/Setup.pm line 1686.

Hostname (leave empty for local)?
Database? spacewalk
Username? spacewalkuser
Password?
** Database: Populating database.
*** Progress: ###########################
* Configuring tomcat.
* Setting up users and groups.
** GPG: Initializing GPG and importing key.
** GPG: Creating /root/.gnupg directory
You must enter an email address.
Admin Email Address? [email protected]
* Performing initial configuration.
* Configuring apache SSL virtual host.
Should setup configure apache's default ssl server for you (saves original ssl.conf) [Y]?
** /etc/httpd/conf.d/ssl.conf has been backed up to ssl.conf-swsave
* Configuring jabberd.
* Creating SSL certificates.
CA certificate password?
You must enter a password.
CA certificate password?
Re-enter CA certificate password?
Organization? IT
Organization Unit [spacewalk.sunil.cc]?
Email Address [[email protected]]?
City? Den Haag
State?
State? Zuid-Holland
Country code (Examples: "US", "JP", "IN", or type "?" to see a list)? NL
** SSL: Generating CA certificate.
** SSL: Deploying CA certificate.
** SSL: Generating server certificate.
** SSL: Storing SSL certificates.
* Deploying configuration files.
* Update configuration in database.
* Setting up Cobbler..
Cobbler requires tftp and xinetd services be turned on for PXE provisioning functionality. Enable these services [Y]? Y
* Restarting services.
Installation complete.
Visit https://spacewalk.sunil.cc to create the Spacewalk administrator account.
[[email protected] ~]#
船外活動を再開します。
spacewalk-service restart
Shutting down spacewalk services...
Redirecting to /bin/systemctl stop  taskomatic.service
Stopping cobblerd (via systemctl):                         [  OK  ]
Redirecting to /bin/systemctl stop  rhn-search.service
Redirecting to /bin/systemctl stop  osa-dispatcher.service
Redirecting to /bin/systemctl stop  httpd.service
Redirecting to /bin/systemctl stop  tomcat.service
Redirecting to /bin/systemctl stop  jabberd.service
Redirecting to /bin/systemctl stop  postgresql.service
Done.
Starting spacewalk services...
Redirecting to /bin/systemctl start  postgresql.service
Redirecting to /bin/systemctl start  jabberd.service
Redirecting to /bin/systemctl start  tomcat.service
Waiting for tomcat to be ready ...
Redirecting to /bin/systemctl start  httpd.service
Redirecting to /bin/systemctl start  osa-dispatcher.service
Redirecting to /bin/systemctl start  rhn-search.service
Starting cobblerd (via systemctl):                         [  OK  ]
Redirecting to /bin/systemctl start  taskomatic.service
Done.
[[email protected] ~]#
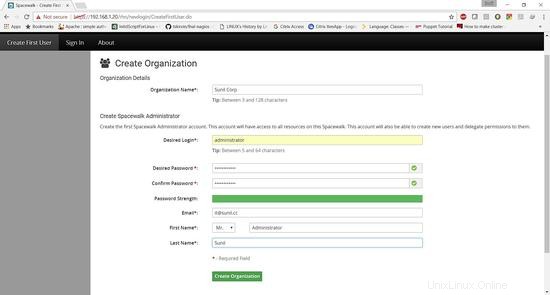
ユーザー船外活動の構成
ブラウザからURLにアクセスしますhttp://192.168.1.20
組織の詳細を入力します。
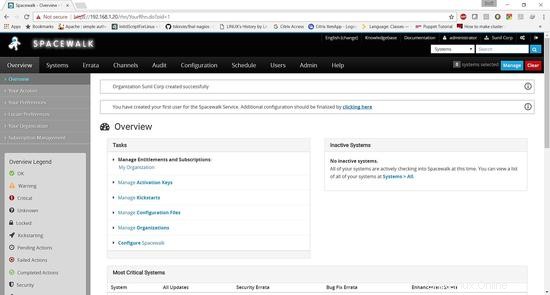
Spacewalkが正常にインストールされました。
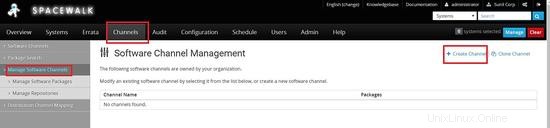
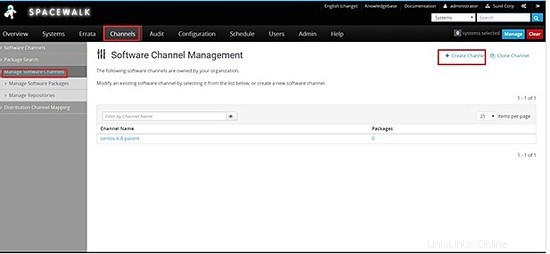
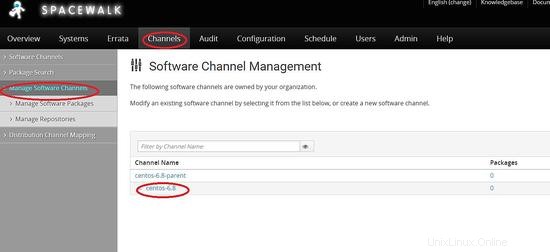
チャネルをクリック->ソフトウェアチャネルの管理->チャネルの作成
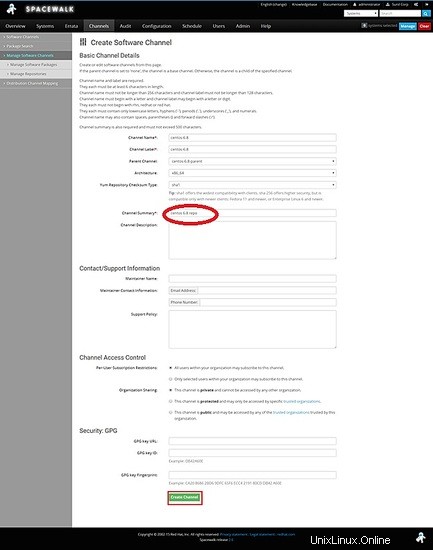
親チャネルを作成する->centos6.8-parent
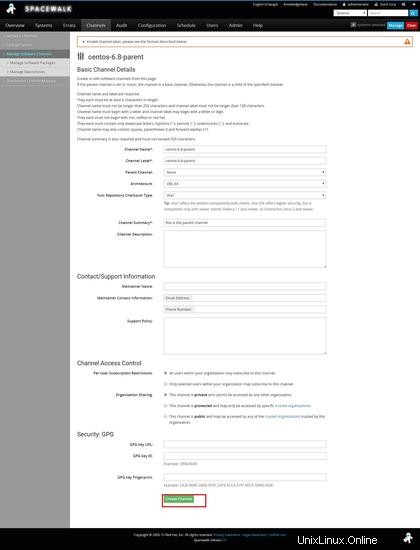
次に、子チャネルを作成する必要があります
チャネル->チャネルの管理->チャネルの作成
親チャネルをcentos-6.8-parentに選択します
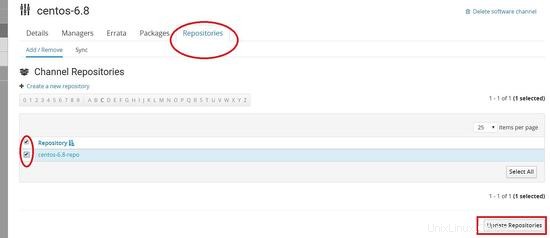
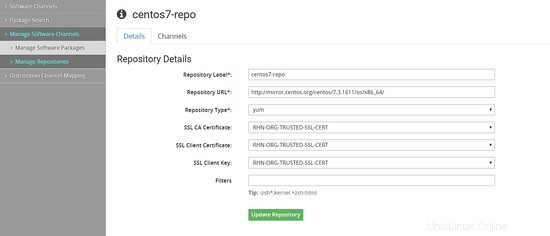
次に、centos6.8のリポジトリを作成します
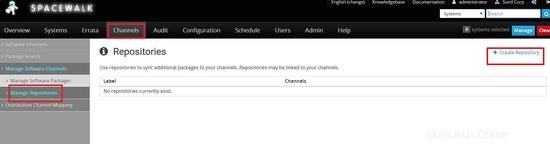
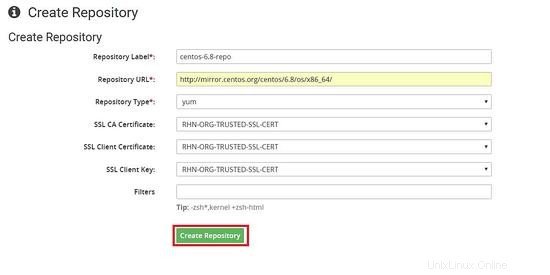
以前に作成した子チャネルにリポジトリをリンクする
CentOS7でのチャネル作成と同じ手順を複製する必要があります。
次に、リポジトリからパッケージをダウンロードする必要があります。コマンドラインまたはダッシュボードから実行できます。
コマンドライン
[[email protected] ~]# spacewalk-repo-sync --list
00:01:23 ======================================
00:01:23 |   Channel Label   |   Repository   |
00:01:23 ======================================
00:01:23 centos-7-child | http://mirror.centos.org/centos/7.3.1611/os/x86_64/
00:01:23 centos-6.8 | http://mirror.centos.org/centos/6.8/os/x86_64/
00:01:23 centos-7 | No repository set
00:01:23 centos-6.8-parent | No repository set
[[email protected] ~]#

[[email protected] ~]# spacewalk-repo-sync -c centos-6.8
00:02:18 ======================================
00:02:18 | Channel: centos-6.8
00:02:18 ======================================
00:02:18 Sync of channel started.
00:02:18 Repo URL: http://mirror.centos.org/centos/6.8/os/x86_64/
00:02:30 Packages in repo:              6696
00:02:40 Packages already synced:          0
00:02:40 Packages to sync:              6696
00:02:40 1/6696 : 389-ds-base-1.2.11.15-74.el6-0.x86_64
00:02:43 2/6696 : 389-ds-base-devel-1.2.11.15-74.el6-0.i686
00:02:43 3/6696 : 389-ds-base-devel-1.2.11.15-74.el6-0.x86_64
00:02:44 4/6696 : 389-ds-base-libs-1.2.11.15-74.el6-0.i686
00:02:45 5/6696 : 389-ds-base-libs-1.2.11.15-74.el6-0.x86_64
00:02:46 6/6696 : ConsoleKit-0.4.1-6.el6-0.x86_64
00:02:47 7/6696 : ConsoleKit-devel-0.4.1-6.el6-0.x86_64
完了すると、次のようになります
[[email protected] ~]# spacewalk-repo-sync -c centos-6.8
08:44:57 ======================================
08:44:57 | Channel: centos-6.8
08:44:57 ======================================
08:44:57 Sync of channel started.
08:44:57 Repo URL: http://mirror.centos.org/centos/6.8/os/x86_64/
08:44:58 Packages in repo:              6696
08:45:47 No new packages to sync.
08:45:47 Repo http://mirror.centos.org/centos/6.8/os/x86_64/ has comps file comps.xml.
08:45:47 Repo http://mirror.centos.org/centos/6.8/os/x86_64/ has 0 errata.
08:45:47 Sync of channel completed in 0:00:49.
08:45:47 Total time: 0:00:49
[[email protected] ~]#
>
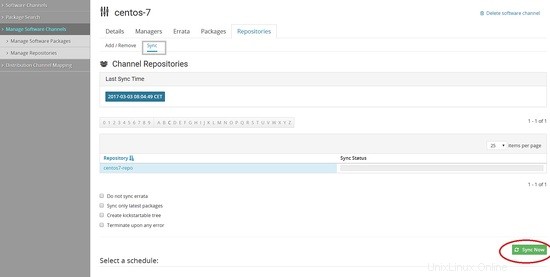
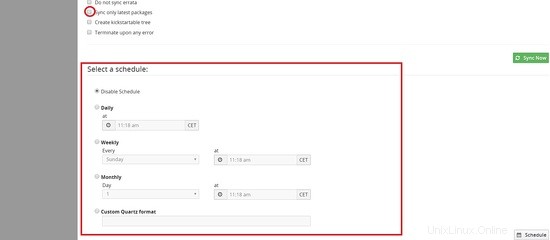
Webブラウザから
このページで自動同期の同期を毎日または毎週スケジュールすることもできます。また、最新のパッケージのみを同期することを選択することもできます
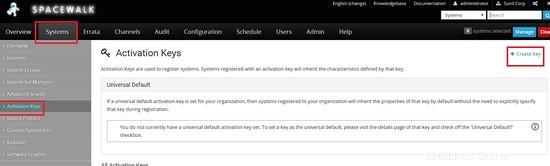
Spacewalkサーバーで認証するためのCentos6およびCentos7ホストのアクティベーションキーの作成
[システム]->[アクティベーションキー]->[キーの作成]
に移動します
次に、centos 6のキーを作成する必要があります。ここでは、キーをcentos-6として使用し、以前に作成した親チャネルを選択します。centos-6.8-parent
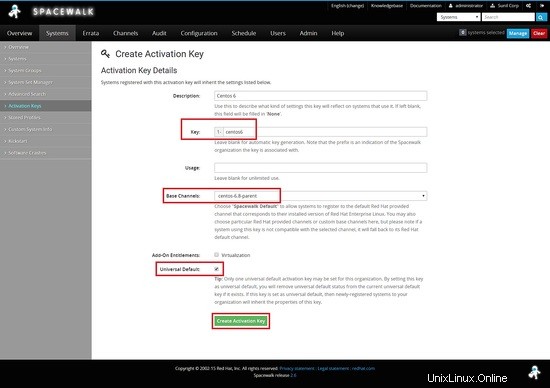
CentOS7についても同じようにします
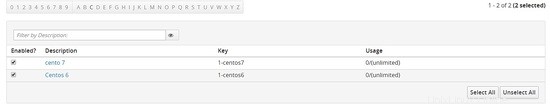
2つのキーが表示されます。1つはcentos6用で、もう1つはcentos7用です
この章では、船外活動サーバーを使用してクライアントをインストールおよび構成する方法を説明します。
Cento6-192.168.1.21
Cento7-192.168.1.22
yumクライアントリポジトリを構成する
Centos 6
[[email protected] ~]# rpm -Uvh http://yum.spacewalkproject.org/2.6-client/RHEL/6/x86_64/spacewalk-client-repo-2.6-0.el6.noarch.rpm
Centos 7
[[email protected] ~]# rpm -Uvh http://yum.spacewalkproject.org/2.6-client/RHEL/7/x86_64/spacewalk-client-repo-2.6-0.el7.noarch.rpm
必要なパッケージをインストールします。
Centos 6
centos6ノードとcentos7ノードの両方にepelリポジトリと次のパッケージの両方をインストールします。
epelリポジトリを有効にする
[[email protected] ~]# yum install epel-release -y
[[email protected] ~]# yum install rhn-client-tools rhn-check rhn-setup rhnsd m2crypto yum-rhn-plugin osad rhncfg-actions rhncfg-management -y
SpacewalkServerに登録する
spacewalkサーバーに接続する前に、spacewalkサーバーからSSL証明書をダウンロードする必要があります。
[[email protected] ~]# wget -O /usr/share/rhn/RHN-ORG-TRUSTED-SSL-CERT http://spacewalk.sunil.cc/pub/RHN-ORG-TRUSTED-SSL-CERT
--2017-03-04 21:54:16--  http://spacewalk.sunil.cc/pub/RHN-ORG-TRUSTED-SSL-CERT
Resolving spacewalk.sunil.cc... 192.168.1.20
Connecting to spacewalk.sunil.cc|192.168.1.20|:80... connected.
HTTP request sent, awaiting response... 200 OK
Length: 5291 (5.2K)
Saving to: /usr/share/rhn/RHN-ORG-TRUSTED-SSL-CERT

100%[===================================================================================================================>] 5,291       --.-K/s   in 0s

2017-03-04 21:54:17 (630 MB/s) - /usr/share/rhn/RHN-ORG-TRUSTED-SSL-CERT saved [5291/5291]

[[email protected] ~]#
ここで、前に作成したアクティベーションキーで登録する必要があります。centos6には1-centos6を、centos7には1-centos7を作成しました。
Centos 6
[[email protected] ~]# rhnreg_ks --force --activationkey="1-centos6" --serverUrl=http://spacewalk.sunil.cc/XMLRPC --sslCACert=/usr/share/rhn/RHN-ORG-TRUSTED-SSL-CERT --profilename=$HOSTNAME
Centos 7
[[email protected] ~]# rhnreg_ks --force --activationkey="1-centos7" --serverUrl=http://spacewalk.sunil.cc/XMLRPC --sslCACert=/usr/share/rhn/RHN-ORG-TRUSTED-SSL-CERT --profilename=$HOSTNAME
プロファイルを船外活動と同期し、centos6ノードとcentos7ノードの両方で実行します。
[[email protected] ~]# rhn-profile-sync
これは、spacewalkからのリモートコマンドとファイル転送を実行するために使用でき、spacewalkサーバーを使用することの優れた機能の1つです。
    [[email protected] ~]# chkconfig osad on
[[email protected] ~]# service osad restart
Shutting down osad:                                        [  OK  ]
Starting osad:                                             [  OK  ]
[[email protected] ~]# rhn-actions-control --enable-all
[[email protected] ~]#
[[email protected] ~]# systemctl enable osad
Created symlink from /etc/systemd/system/multi-user.target.wants/osad.service to /usr/lib/systemd/system/osad.service.
[[email protected] ~]# systemctl restart osad
[[email protected] ~]# rhn-actions-control --enable-all
[[email protected] ~]#
これで、プロファイルの同期を行うことができます。
    [[email protected] ~]# rhn-profile-sync
Updating package profile...
Updating hardware profile...
[[email protected] ~]#
   [[email protected] ~]# rhn-profile-sync
Updating package profile...
Updating hardware profile...
[[email protected] ~]#
船外活動のダッシュボードで同じことを確認できるようになりました。
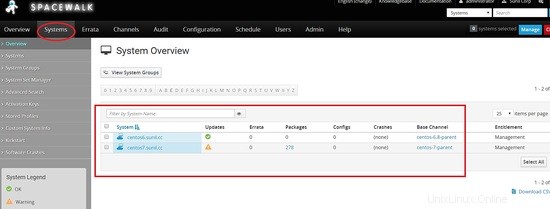
リモートコマンドの実行と船外活動によるファイルの管理。
この章では、リモートコマンドの実行と構成ファイルの管理に関して、船外活動がいかに強力であるかを説明します。
リモートコマンドを実行するには、spacewalkダッシュボードにログインし、リモートコマンドを実行する必要があるホストを検索します。
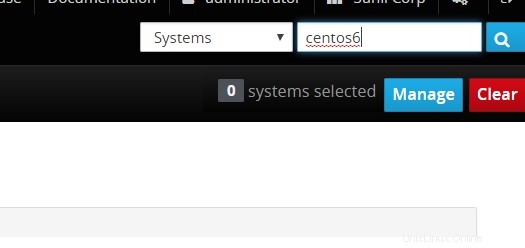
リモートコマンドをクリックして、実行する必要のあるコマンドを入力します。
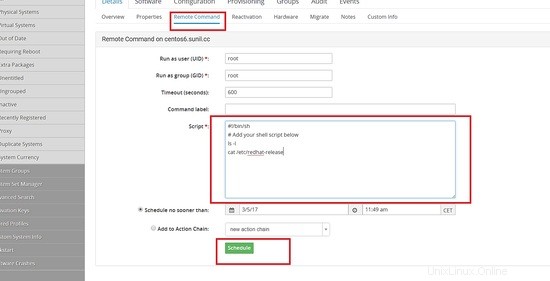
スケジュールが設定されたら、[スケジュール]タブに移動して、ステータスを確認できます。
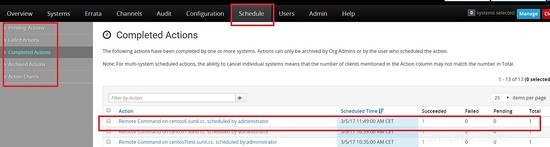
ホストをクリックして結果を確認してください。
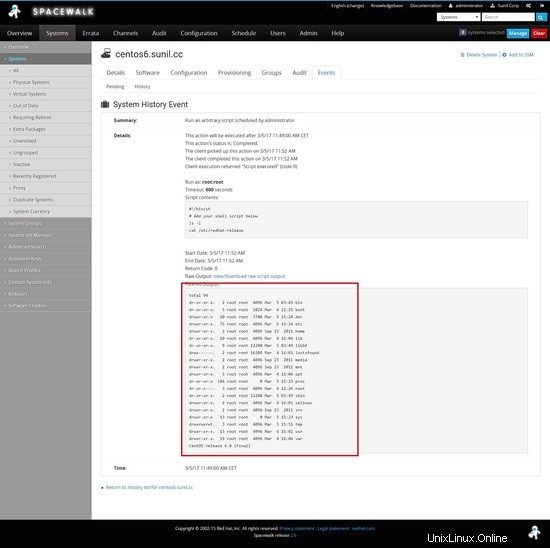
船外活動からのリモートコマンドの実行。
リモートコマンドを実行するには、spacecmdをインストールする必要があります。
[[email protected] ~]# yum install spacecmd -y
最初にssmを使用してシステムを追加します。その前に、ログインを許可します。フロントエンドと同じ資格情報を使用できます。
[[email protected] ~]# spacecmd
Welcome to spacecmd, a command-line interface to Spacewalk.

Type: 'help' for a list of commands
      'help ' for command-specific help
      'quit' to quit

Spacewalk Username: administrator
Spacewalk Password:
INFO: Connected to https://spacewalk.sunil.cc/rpc/api as administrator
spacecmd {SSM:0}> system_list
centos6.sunil.cc
centos7.sunil.cc
centos7test.sunil.cc
spacecmd {SSM:0}> ssm_add centos6.sunil.cc
spacecmd {SSM:1}> ssm_list
centos6.sunil.cc
spacecmd {SSM:1}> exit
ここで任意の名前で呼び出されるスクリプトを作成します。ff.shという名前を付けました。
    [[email protected] ~]# cat ff.sh
#!/bin/bash
cat /etc/redhat-release
[[email protected] ~]#
次に、リモートコマンドを実行します。
[[email protected] ~]# spacecmd -y system_runscript "ssm -f ff.sh"
INFO: Connected to https://spacewalk.sunil.cc/rpc/api as administrator

User:       root
Group:      root
Timeout:    600 seconds
Start Time: 20170305T12:16:17
p
Script Contents
---------------
#!/bin/bash
cat /etc/redhat-release

Systems
-------
centos6.sunil.cc
INFO: Action ID: 33
INFO: Scheduled: 1 system(s)
[[email protected] ~]#
出力を確認するには、以下のコマンドを実行できます。
    [[email protected] ~]# spacecmd schedule_getoutput 33
INFO: Connected to https://spacewalk.sunil.cc/rpc/api as administrator
System:      centos6.sunil.cc
Start Time:  20170305T12:16:19
Stop Time:   20170305T12:16:19
Return Code: 0

Output
------
CentOS release 6.8 (Final)

[[email protected] ~]#
コマンドが長期間保留状態になっている場合は、次の手順を実行してこの問題を修正できます。
osa-dispatcherがspacewalkサーバーで実行されていることを確認してください。
    [[email protected] ~]# systemctl status osa-dispatcher
? osa-dispatcher.service - OSA Dispatcher daemon
   Loaded: loaded (/usr/lib/systemd/system/osa-dispatcher.service; enabled; vendor preset: disabled)
   Active: active (running) since Sun 2017-03-05 09:59:55 CET; 2h 21min ago
  Process: 3470 ExecStart=/usr/sbin/osa-dispatcher --pid-file /var/run/osa-dispatcher.pid (code=exited, status=0/SUCCESS)
  Process: 3469 ExecStartPre=/bin/rm -f /var/run/osa-dispatcher.pid (code=exited, status=0/SUCCESS)
 Main PID: 3474 (osa-dispatcher)
   CGroup: /system.slice/osa-dispatcher.service
           ??3474 /usr/bin/python -s /usr/sbin/osa-dispatcher --pid-file /var/run/osa-dispatcher.pid

Mar 05 09:59:55 spacewalk.sunil.cc systemd[1]: Starting OSA Dispatcher daemon...
Mar 05 09:59:55 spacewalk.sunil.cc systemd[1]: PID file /var/run/osa-dispatcher.pid not readable (yet?) after start.
Mar 05 09:59:55 spacewalk.sunil.cc systemd[1]: Started OSA Dispatcher daemon.
[[email protected] ~]#
実行されていない場合は、船外活動を再開してください。
[[email protected] ~]# spacewalk-service restart
5222のファイアウォールポートが開いていることを確認してください。
クライアント側で次の手順を実行してください。
    [[email protected] ~]# systemctl stop osad
    [[email protected] ~]# rm -rf /etc/sysconfig/rhn/osad-auth.conf
    [[email protected] ~]# rhn_check -vvv
[[email protected] ~]# systemctl start osad
[[email protected] ~]# systemctl status osad
? osad.service - OSAD daemon
   Loaded: loaded (/usr/lib/systemd/system/osad.service; enabled; vendor preset: disabled)
   Active: active (running) since Sun 2017-03-05 13:54:46 CET; 26s ago
  Process: 18696 ExecStart=/usr/sbin/osad --pid-file /var/run/osad.pid (code=exited, status=0/SUCCESS)
 Main PID: 18697 (osad)
   CGroup: /system.slice/osad.service
           ??18697 /usr/bin/python -s /usr/sbin/osad --pid-file /var/run/osad.pid

Mar 05 13:54:46 centos7test.sunil.cc systemd[1]: Starting OSAD daemon...
Mar 05 13:54:46 centos7test.sunil.cc systemd[1]: PID file /var/run/osad.pid not readable (yet?) after start.
Mar 05 13:54:46 centos7test.sunil.cc systemd[1]: Started OSAD daemon.
[[email protected] ~]# netstat -aunltp|grep 5222
tcp     1698      0 192.168.1.23:48127      192.168.1.20:5222       ESTABLISHED 18697/python
[[email protected] ~]#
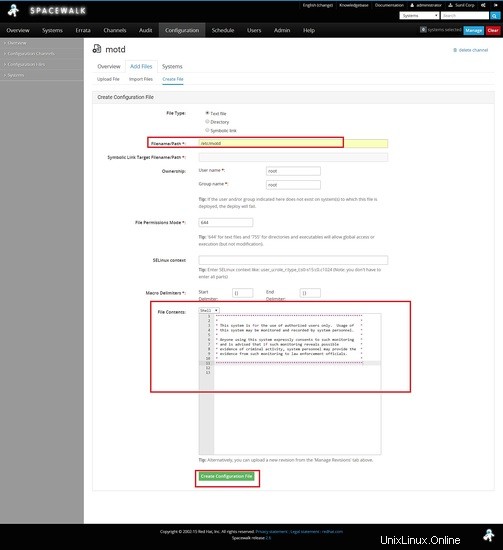
船外活動を通じてファイルを展開します。
この例では、centos6サーバーのmotdを変更します。
最初に構成チャネルを作成します。
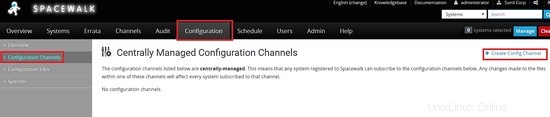
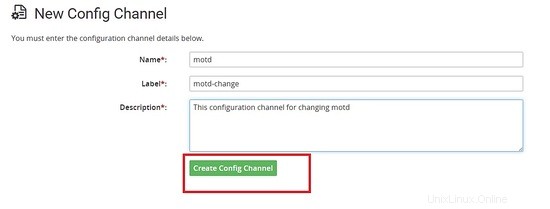
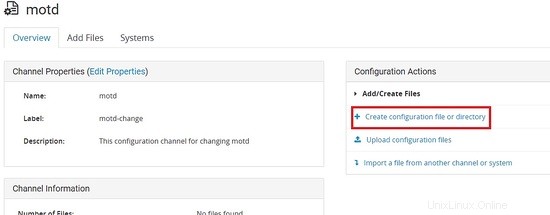
以下の内容でファイルを作成します。
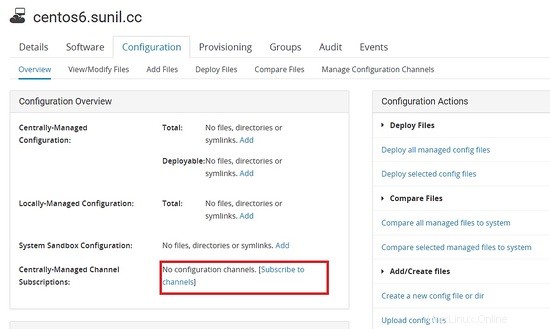
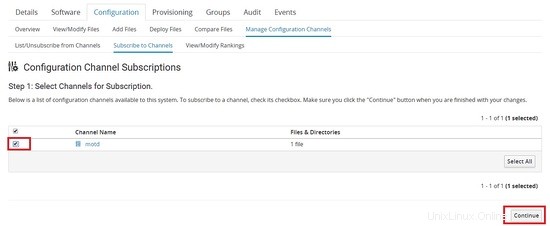
次に、サーバーをデプロイする必要があるチャネルにサブスクライブする必要があります。
ファイルはクライアントからプルできます。
    [[email protected] ~]# rhncfg-client channels
Using server name spacewalk.sunil.cc
Config channels:
Label                           Name
-----                           ----
motd-change                     motd
[[email protected] ~]#
[[email protected] ~]# rhncfg-client get
Using server name spacewalk.sunil.cc
Deploying /etc/motd
[[email protected] ~]#
[[email protected] ~]# ls -l /etc/motd
-rw-r--r-- 1 root root 760 Mar  5 14:29 /etc/motd
[[email protected] ~]# cat /etc/motd
********************************************************************
*                                                                  *
* This system is for the use of authorized users only.  Usage of   *
* this system may be monitored and recorded by system personnel.   *
*                                                                  *
* Anyone using this system expressly consents to such monitoring   *
* and is advised that if such monitoring reveals possible          *
* evidence of criminal activity, system personnel may provide the  *
* evidence from such monitoring to law enforcement officials.      *
*                                                                  *
********************************************************************

[[email protected] ~]#