Certbotは、WebサーバーのSSL/TLS証明書を取得して展開するユーザーフレンドリーな自動クライアントです。これは、Let's Encryptから証明書を取得し、サーバーでHTTPSを自動有効化するために使用されるEFFのツールです。つまり、公式の「Let’sEncryptクライアント」または「Let’sEncryptPythonクライアント」として機能します。 Automated Certificate Management Environment(ACME)を利用して、大多数のブラウザーで信頼されている無料のSSL証明書を自動的に展開します。したがって、ACMEプロトコルをサポートする他のCAで機能します。
この記事では、無料で入手してインストールする方法を説明します。Ubuntu18.04サーバーでApacheおよびNginx用のCertbotを使用してSSL証明書を暗号化しましょう。
前提条件
- 要件に従って必要なパッケージをインストールするためのroot権限を持つUbuntuBionicBeaver(18.04)サーバー。
- 登録され、適切なDNSレコードを持つ完全修飾ドメイン。この記事では、全体でドメインfosscloudy.comを使用しています。
Certbotのインストール
最初に、Letsencrypt SSL証明書を取得するには、Certbotソフトウェアをインストールする必要があります。 Certbotは最近Ubuntuで利用できるようになりましたが、パッケージはそこで古くなっている傾向があります。したがって、インストールには最新のソフトウェアを備えたUbuntuソフトウェアリポジトリを使用することをお勧めします。以下のコマンドを使用してCertbotをインストールできます。
#add-apt-repository ppa:certbot/certbot
#apt update
#apt install certbot
インストールされているCertbotのバージョンは、以下のコマンドで確認できます。
# certbot --version
certbot 0.23.0
さらに、このコマンド「certbot plugins」を使用して、サーバーにインストールされている利用可能なCertbotプラグインを知ることができます。
# certbot plugins
Saving debug log to /var/log/letsencrypt/letsencrypt.log

* standalone
Description: Spin up a temporary webserver
Interfaces: IAuthenticator, IPlugin
Entry point: standalone = certbot.plugins.standalone:Authenticator

* webroot
Description: Place files in webroot directory
Interfaces: IAuthenticator, IPlugin
Entry point: webroot = certbot.plugins.webroot:Authenticator
-------------------------------------------------------------------------------
デフォルトでは、スタンドアロンとwebrootプラグインのみがこのパッケージに含まれます。目的に応じて、必要なすべてのプラグインを1つずつさらに有効にすることができます。
ApacheでSSL証明書を暗号化する設定
Certbotは、このツールを使用してSSL証明書をより簡単に発行するためのApacheプラグインを提供します。以下のコマンドを実行して、このプラグインをインストールできます:
#apt install python-certbot-apacheこれでこのツールを使用する準備が整いましたが、ドメインのSSLを構成するには、Apache構成ファイルのいくつかを検証する必要があります。ドメインのSSL証明書を発行するために、CertbotはサーバーのApache構成で正確なドメイン仮想ホストをフェッチしようとします。ドメイン仮想ホストの設定に役立つ私の以前の記事を参照できます。ドメインに適切な仮想ホストが存在すると仮定すると、このコマンドを実行して、ドメインfosscloudy.comにSSLをインストールできます。
# certbot --apache -d fosscloudy.com -d www.fosscloudy.com
Saving debug log to /var/log/letsencrypt/letsencrypt.log
Plugins selected: Authenticator apache, Installer apache
Obtaining a new certificate
Performing the following challenges:
http-01 challenge for fosscloudy.com
http-01 challenge for www.fosscloudy.com
Enabled Apache rewrite module
Waiting for verification...
Cleaning up challenges
Created an SSL vhost at /etc/apache2/sites-available/fosscloudy.com-le-ssl.conf
Deploying Certificate to VirtualHost /etc/apache2/sites-available/fosscloudy.com-le-ssl.conf
Enabling available site: /etc/apache2/sites-available/fosscloudy.com-le-ssl.conf
Deploying Certificate to VirtualHost /etc/apache2/sites-available/fosscloudy.com-le-ssl.conf
Please choose whether or not to redirect HTTP traffic to HTTPS, removing HTTP access.
-------------------------------------------------------------------------------
1: No redirect - Make no further changes to the webserver configuration.
2: Redirect - Make all requests redirect to secure HTTPS access. Choose this for
new sites, or if you're confident your site works on HTTPS. You can undo this
change by editing your web server's configuration.
-------------------------------------------------------------------------------
Select the appropriate number [1-2] then [enter] (press 'c' to cancel): 2
Enabled Apache rewrite module
Redirecting vhost in /etc/apache2/sites-enabled/fosscloudy.com.conf to ssl vhost in /etc/apache2/sites-available/fosscloudy.com-le-ssl.conf
-------------------------------------------------------------------------------
Congratulations! You have successfully enabled https://fosscloudy.com and
https://www.fosscloudy.com
You should test your configuration at:
https://www.ssllabs.com/ssltest/analyze.html?d=fosscloudy.com
https://www.ssllabs.com/ssltest/analyze.html?d=www.fosscloudy.com
-------------------------------------------------------------------------------
IMPORTANT NOTES:
- Congratulations! Your certificate and chain have been saved at:
/etc/letsencrypt/live/fosscloudy.com-0002/fullchain.pem
Your key file has been saved at:
/etc/letsencrypt/live/fosscloudy.com-0002/privkey.pem
Your cert will expire on 2018-09-03. To obtain a new or tweaked
version of this certificate in the future, simply run certbot again
with the "certonly" option. To non-interactively renew *all* of
your certificates, run "certbot renew"
- If you like Certbot, please consider supporting our work by:
Donating to ISRG / Let's Encrypt: https://letsencrypt.org/donate
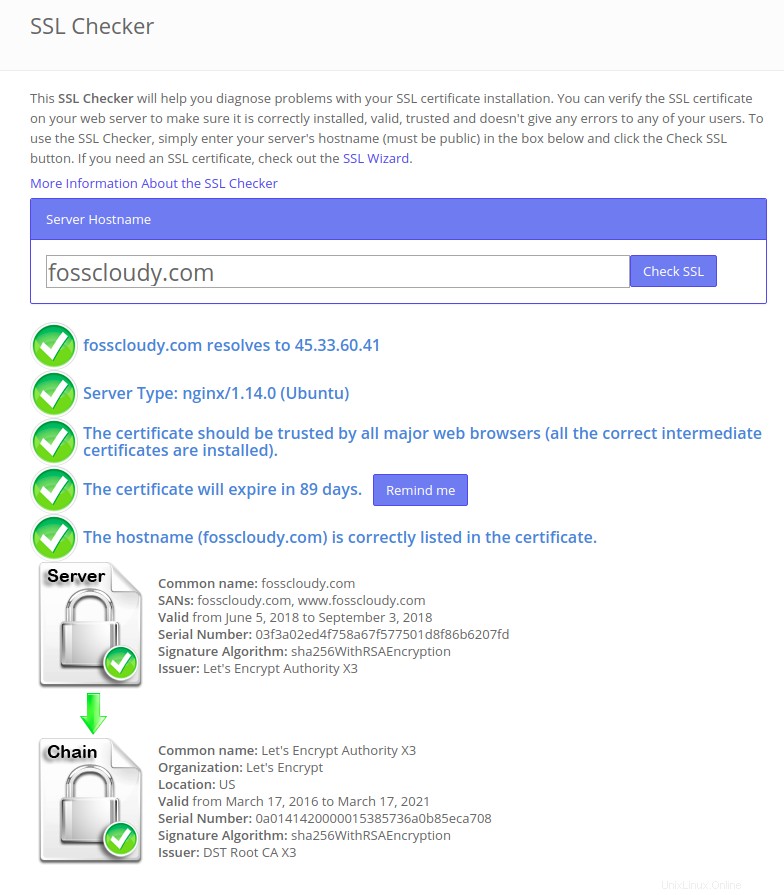
Donating to EFF: https://eff.org/donate-le上記のインタラクティブな手順では、選択したドメインの証明書に署名/インストールするために必要なすべての情報について説明します。このコマンドを実行すると、ドメインSSLがダウンロードされ、ドメイン仮想ホストに適切にインストールおよび構成されます。これで、HTTPSを使用してドメインにアクセスし、ドメインが機能していることを確認したり、SSLチェッカーでSSLステータスを確認したりできます。

オプションで、複数の仮想ホスト/ドメインを構成している場合は、以下のコマンドを使用してそれらのSSL証明書をインストールできます。
#certbot --apacheCertbotは、新しい証明書に含まれるドメインを選択するように求めます。
さらに、Certbotがドメイン仮想ホストを新しいSSL証明書で自動的にインストール/構成することを望まない場合は、次のコマンドを使用してSSL証明書を生成するだけです。後で手動で構成できます。
#certbot --apache certonlyNginxでSSL証明書を暗号化する設定
Nginx Webサーバーを実行しているサーバーの場合、Certbot Nginxプラグインを使用して、SSL証明書を自動的に取得してインストールできます。以下のコマンドを発行して、このプラグインをインストールできます。
#apt install python-certbot-nginxこれでこのツールを使用する準備が整いましたが、ドメインのSSLを構成するには、同じNginx構成ファイルのいくつかを確認する必要があります。ドメインのSSL証明書を発行するために、CertbotはサーバーのNginx構成で正確なドメイン仮想ホストを取得しようとします。ドメインに適切な仮想ホストが存在すると仮定すると、このコマンドを実行して、ドメインfosscloudy.comにSSLをインストールできます。
# certbot --nginx -d fosscloudy.com -d www.fosscloudy.com
Saving debug log to /var/log/letsencrypt/letsencrypt.log
Plugins selected: Authenticator nginx, Installer nginx
Enter email address (used for urgent renewal and security notices) (Enter 'c' to
cancel): admin_linoxide@gmail.com

-------------------------------------------------------------------------------
Please read the Terms of Service at
https://letsencrypt.org/documents/LE-SA-v1.2-November-15-2017.pdf. You must
agree in order to register with the ACME server at
https://acme-v01.api.letsencrypt.org/directory
-------------------------------------------------------------------------------
(A)gree/(C)ancel: A

-------------------------------------------------------------------------------
Would you be willing to share your email address with the Electronic Frontier
Foundation, a founding partner of the Let's Encrypt project and the non-profit
organization that develops Certbot? We'd like to send you email about EFF and
our work to encrypt the web, protect its users and defend digital rights.
-------------------------------------------------------------------------------
(Y)es/(N)o: N
Obtaining a new certificate
Performing the following challenges:
http-01 challenge for fosscloudy.com
http-01 challenge for www.fosscloudy.com
Waiting for verification...
Cleaning up challenges
Deploying Certificate to VirtualHost /etc/nginx/sites-enabled/fosscloudy.com.conf
Deploying Certificate to VirtualHost /etc/nginx/sites-enabled/fosscloudy.com.conf

Please choose whether or not to redirect HTTP traffic to HTTPS, removing HTTP access.
-------------------------------------------------------------------------------
1: No redirect - Make no further changes to the webserver configuration.
2: Redirect - Make all requests redirect to secure HTTPS access. Choose this for
new sites, or if you're confident your site works on HTTPS. You can undo this
change by editing your web server's configuration.
-------------------------------------------------------------------------------
Select the appropriate number [1-2] then [enter] (press 'c' to cancel): 2
Redirecting all traffic on port 80 to ssl in /etc/nginx/sites-enabled/fosscloudy.com.conf
Redirecting all traffic on port 80 to ssl in /etc/nginx/sites-enabled/fosscloudy.com.conf

-------------------------------------------------------------------------------
Congratulations! You have successfully enabled https://fosscloudy.com and
https://www.fosscloudy.com

You should test your configuration at:
https://www.ssllabs.com/ssltest/analyze.html?d=fosscloudy.com
https://www.ssllabs.com/ssltest/analyze.html?d=www.fosscloudy.com
-------------------------------------------------------------------------------

IMPORTANT NOTES:
- Congratulations! Your certificate and chain have been saved at:
/etc/letsencrypt/live/fosscloudy.com/fullchain.pem
Your key file has been saved at:
/etc/letsencrypt/live/fosscloudy.com/privkey.pem
Your cert will expire on 2018-09-03. To obtain a new or tweaked
version of this certificate in the future, simply run certbot again
with the "certonly" option. To non-interactively renew *all* of
your certificates, run "certbot renew"
- Your account credentials have been saved in your Certbot
configuration directory at /etc/letsencrypt. You should make a
secure backup of this folder now. This configuration directory will
also contain certificates and private keys obtained by Certbot so
making regular backups of this folder is ideal.
- If you like Certbot, please consider supporting our work by:

Donating to ISRG / Let's Encrypt: https://letsencrypt.org/donate
Donating to EFF: https://eff.org/donate-le
このわかりやすいインタラクティブな手順は、ドメインのSSL証明書を自動的に生成/インストール/構成するのに役立ちます。このコマンドを実行すると、ドメインSSLがダウンロードされ、ドメイン仮想ホストに適切にインストールおよび構成されます。これで、HTTPSを使用してドメインにアクセスし、ドメインが機能していることを確認したり、SSLチェッカーでSSLステータスを確認したりできます。私のドメインfosscloudy.comを自分のドメインに置き換え、同じコマンドを実行してSSL証明書を生成できます。
Apacheプラグインと同様に、複数の仮想ホスト/ドメインが構成されている場合は、以下のコマンドを使用して、それらすべてにSSL証明書をインストールできます。
#certbot --nginxCertbotは、新しい証明書に含まれるドメインを選択するように求めます。
さらに、Certbotがドメイン仮想ホストを新しいSSL証明書で自動的にインストール/構成することを望まない場合は、次のコマンドを使用してSSL証明書を生成するだけで、後で手動で構成できます。
#certbot --nginx certonlyCertbotを使用してワイルドカード証明書を暗号化する設定
Let's Encryptは最近、新しいACME2プロトコルを使用したワイルドカード証明書のサポートを開始しました。これは、*。fosscloudy.comのような単一のワイルドカード証明書を持ち、それをdocs.fosscloudy.com、blog.fosscloudy.com、mail.fosscloudy.comなどの他のすべてのドメインサブドメインで使用できることを意味します。多数のドメインサブドメインの証明書を効率的に管理するのは非常に簡単です。以下のコマンドを実行して、fosscloudy.comのこのワイルドカードSSL証明書を生成できます。このコマンドは、fosscloudy.comの代わりに優先ドメインを使用して変更できます。
# certbot certonly --manual -d *.fosscloudy.com --agree-tos --no-bootstrap --manual-public-ip-logging-ok --preferred-challenges dns-01 --server https://acme-v02.api.letsencrypt.org/directory
Saving debug log to /var/log/letsencrypt/letsencrypt.log
Plugins selected: Authenticator manual, Installer None
Obtaining a new certificate
Performing the following challenges:
dns-01 challenge for fosscloudy.com

-------------------------------------------------------------------------------
Please deploy a DNS TXT record under the name
_acme-challenge.fosscloudy.com with the following value:

z25SzIfe37x5va0ynh6KdmEYVjjuSvdUOGM_t_twsVk

Before continuing, verify the record is deployed.
-------------------------------------------------------------------------------
Press Enter to Continue
Waiting for verification...
Cleaning up challenges

IMPORTANT NOTES:
- Congratulations! Your certificate and chain have been saved at:
/etc/letsencrypt/live/fosscloudy.com-0001/fullchain.pem
Your key file has been saved at:
/etc/letsencrypt/live/fosscloudy.com-0001/privkey.pem
Your cert will expire on 2018-09-03. To obtain a new or tweaked
version of this certificate in the future, simply run certbot
again. To non-interactively renew *all* of your certificates, run
"certbot renew"
- If you like Certbot, please consider supporting our work by:

Donating to ISRG / Let's Encrypt: https://letsencrypt.org/donate
Donating to EFF: https://eff.org/donate-le
このインタラクティブな手順で説明したように、DNSレコードに特定のTXTレコードを追加するように求められます。私の場合、TXTを次のように設定すると報告されました:
-------------------------------------------------------------------------------
Please deploy a DNS TXT record under the name
_acme-challenge.fosscloudy.com with the following value:

z25SzIfe37x5va0ynh6KdmEYVjjuSvdUOGM_t_twsVk

Before continuing, verify the record is deployed.
-------------------------------------------------------------------------------
Press Enter to Continue
DNSプロバイダーで、次のコマンドを使用して新しいDNSTXTレコードを作成します。
Record Name: _acme-challenge (you may or may not need the .fosscloudy.com suffix depending on your DNS provider.
Record Value: z25SzIfe37x5va0ynh6KdmEYVjjuSvdUOGM_t_twsVk (replace this with the value provided by Certbot)
DNS設定を保存し、CertbotウィンドウでEnterキーを押してチェックをトリガーし、検証を完了します。新しいDNSレコードがインターネット上に伝播するまでしばらく待つ必要があります。 30分待ってEnterキーを押しました。 TTL値を低く設定して、このプロセスを高速化することもできます。
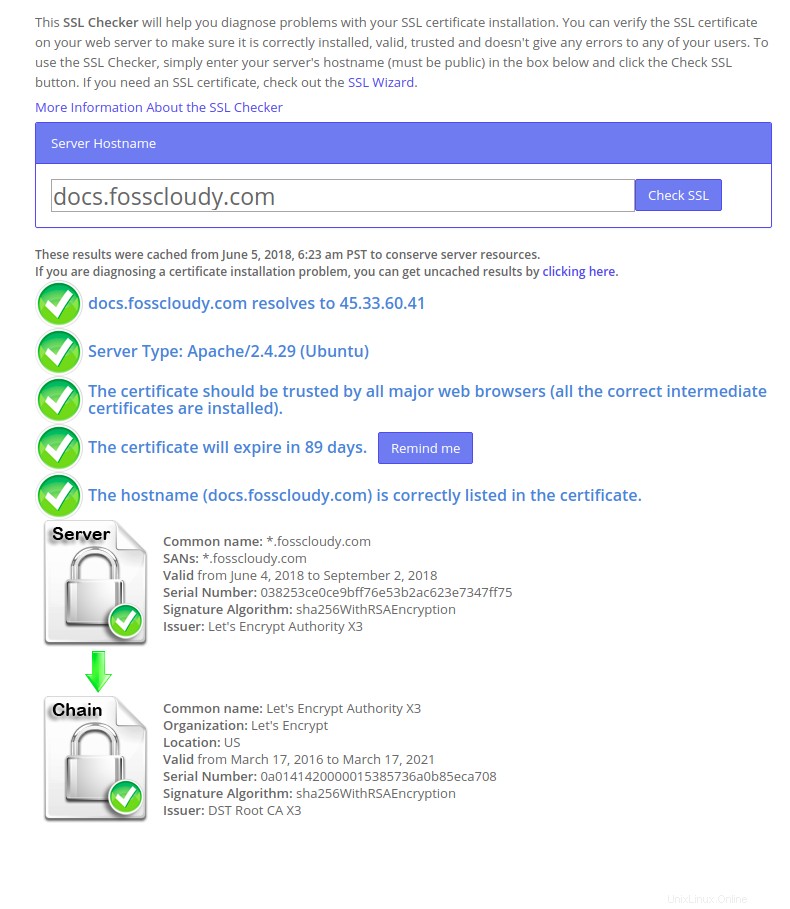
おめでとう!!ドメインfosscloudy.comのワイルドカード証明書が生成されます。これで、このワイルドカード証明書を、ドメイン名用に作成した任意のサブドメインで使用できます。たとえば、このドメインのサブドメイン、つまりdocs.fosscloudy.comを作成しました。メインドメインにインストールされているこのワイルドカードSSL証明書を使用します。ブラウザでHTTPSを使用してサブドメインにアクセスし、その動作を確認できます。
SSL証明書の自動更新
上記のいずれかの方法を使用して、SSL証明書を取得できます。ただし、これらのLet's Encrypt証明書はすべて短命であり、90日間のみ有効です。したがって、Webサイトの通常の機能を容易にするために、有効期限が切れる前にこれらの証明書を更新する必要があります。必要に応じて手動でこれを行うことも、cronjobsまたはCertbotクライアントを使用してこのプロセスを自動化することもできます。
上記のメソッドを実行して証明書が正常にインストールされると、次のようなメッセージが表示されます。
IMPORTANT NOTES:
- Congratulations! Your certificate and chain have been saved at:
/etc/letsencrypt/live/fosscloudy.com/fullchain.pem
Your key file has been saved at:
/etc/letsencrypt/live/fosscloudy.com/privkey.pem
Your cert will expire on 2018-09-03. To obtain a new or tweaked
version of this certificate in the future, simply run certbot again
with the "certonly" option. To non-interactively renew *all* of
your certificates, run "certbot renew"
このメッセージは、"certbot renew"を使用して将来的に証明書を更新する方法を明確に示しています。 コマンド。
次のコマンドを使用して、自動更新プロセスをテストしてみましょう。
#certbot renewこのコマンドは、ドメインSSLの更新期限があるかどうかを確認し、更新が必要なドメインSSLを更新します。
幸いなことに、サーバー上のCertbotパッケージには、有効期限が切れる前にSSL証明書を自動的に更新するcronジョブが付属しています。 Let's Encryptの証明書は90日間有効であるため、この機能を利用することを強くお勧めします。
# cat /etc/cron.d/certbot
# /etc/cron.d/certbot: crontab entries for the certbot package
#
# Upstream recommends attempting renewal twice a day
#
# Eventually, this will be an opportunity to validate certificates
# haven't been revoked, etc. Renewal will only occur if expiration
# is within 30 days.
SHELL=/bin/sh
PATH=/usr/local/sbin:/usr/local/bin:/sbin:/bin:/usr/sbin:/usr/bin

0 */12 * * * root test -x /usr/bin/certbot -a \! -d /run/systemd/system && perl -e 'sleep int(rand(43200))' && certbot -q renew
このcronは1日2回実行されますが、有効期限が切れるまで証明書を更新しません。
また読む:
- LetsencryptSSLを使用してDockerLEMPスタックにWordPressをインストールする
Let’s Encryptは、SSL証明書の生成、インストール、および使用方法を文字通り変更しました。 Certbotツールを使用した自動化された手順により、Let’s Encryptから無料のSSL証明書をわずか数秒で簡単に取得し、数分で自動的にインストールできることがわかります。この記事がお役に立てば幸いです。これに関する貴重なコメントや提案を投稿してください。