Vanilla Forumsは、PHPで記述された無料のオープンソースコミュニティフォーラムソフトウェアです。シンプルで柔軟性があり、カスタマイズ可能で多言語対応で、フォーラムを成功させるために必要なすべての機能を提供します。たくさんのアドオン、優れた統合オプション、および選択可能なテーマを提供します。シングルサインオン、埋め込み可能なフォーラム、ソーシャルメディアログイン、他のフォーラムからのインポート、他のFOSSプロジェクトとの統合など、豊富な機能セットが付属しています。
このチュートリアルでは、Apacheを使用してVanillaForumソフトウェアをインストールする方法とUbuntu20.04にLet'sEncryptを使用する方法を学習します。
- Ubuntu20.04を実行しているサーバー。
- サーバーで指定された有効なドメイン名。
- ルートパスワードはサーバーで構成されています。
LAMPサーバーをインストールする
まず、Apache Webサーバー、MariaDB、PHP、およびその他の必要な拡張機能をシステムにインストールする必要があります。次のコマンドですべてをインストールできます:
apt-get install apache2 mariadb-server php7.4 libapache2-mod-php7.4 php7.4-common php7.4-mysql php7.4-cli php7.4-opcache php7.4-gd php7.4.intl php7.4-curl php7.4-cli php7.4-imap php7.4-mbstring php7.4-soap php7.4-xmlrpc php7.4-xml php7.4-zip unzip git wget -y
すべてのパッケージがインストールされたら、php.iniを編集して、必要な値を設定します。
nano /etc/php/7.4/apache2/php.ini
次の行を変更します:
memory_limit = 256M
upload_max_filesize = 100M
max_execution_time = 360
date.timezone = America/Chicago
終了したら、ファイルを保存して閉じます。
MariaDBデータベースを構成する
次に、MariaDBのインストールを保護し、次のスクリプトを使用してMariaDBのrootパスワードを設定します。
mysql_secure_installation
以下に示すように、いくつかの質問が表示されます。
Enter current password for root (enter for none):
Set root password? [Y/n]: Y
New password: Enter password
Re-enter new password: Repeat password
Remove anonymous users? [Y/n]: Y
Disallow root login remotely? [Y/n]: Y
Remove test database and access to it? [Y/n]:  Y
Reload privilege tables now? [Y/n]:  Y
MariaDBが安全になったら、rootユーザーでMariaDBにログインします。
mysql -u root -p
ログインしたら、次のコマンドを使用してVanillaのデータベースとユーザーを作成します。
MariaDB [(none)]> CREATE DATABASE vanilladb;
MariaDB [(none)]> CREATE USER [email protected] IDENTIFIED BY 'password';
次に、次のコマンドを使用して、Vanillaデータベースにすべての権限を付与します。
MariaDB [(none)]> GRANT ALL PRIVILEGES ON vanilladb.* TO [email protected];
次に、特権をフラッシュし、次のコマンドを使用してMariaDBシェルを終了します。
MariaDB [(none)]> FLUSH PRIVILEGES;
MariaDB [(none)]> EXIT;
この時点で、MariaDBデータベースはVanilla用に構成されています。
まず、公式Webサイトから最新バージョンのVanillaをダウンロードする必要があります。このチュートリアルを書いている時点で、利用可能な最新バージョンはVanilla3.3です。次のコマンドでダウンロードできます:
wget https://open.vanillaforums.com/get/vanilla-core-3-3.zip
ダウンロードが完了したら、次のコマンドを使用してダウンロードしたファイルを解凍します。
unzip vanilla-core-3-3.zip
次に、パッケージディレクトリをApacheWebルートディレクトリに移動します。
mv package /var/www/html/vanilla
次に、vanillaディレクトリの所有権をwww-dataに変更し、次のコマンドを使用して適切な権限を付与します。
chown -R www-data:www-data /var/www/html/vanilla
chmod -R 755 /var/www/html/vanilla
完了したら、次のステップに進むことができます。
次に、VanillaForumにサービスを提供するための新しいApache仮想ホスト構成ファイルを作成する必要があります。
次のコマンドで作成できます:
nano /etc/apache2/sites-available/vanilla.conf
次の行を追加します:
<VirtualHost *:80>
     ServerAdmin [email protected]
     ServerName vanilla.linuxbuz.com
     DocumentRoot /var/www/html/vanilla/

     <Directory /var/www/html/vanilla/>
          Options +FollowSymlinks
          AllowOverride All
          Require all granted
     </Directory>

     ErrorLog /var/log/apache2/vanilla_error.log
     CustomLog /var/log/apache2/vanilla_access.log combined

</VirtualHost>
終了したら、ファイルを保存して閉じます。次に、仮想ホストファイルを有効にし、Apacheサービスを再起動して変更を実装します。
a2ensite vanilla.conf
systemctl reload apache2
次のコマンドを使用して、Apacheサービスのステータスを確認することもできます。
systemctl status apache2
次の出力が得られるはずです:
? apache2.service - The Apache HTTP Server
     Loaded: loaded (/lib/systemd/system/apache2.service; enabled; vendor preset: enabled)
     Active: active (running) since Thu 2020-06-25 07:42:29 UTC; 4min 35s ago
       Docs: https://httpd.apache.org/docs/2.4/
    Process: 16070 ExecReload=/usr/sbin/apachectl graceful (code=exited, status=0/SUCCESS)
   Main PID: 13697 (apache2)
      Tasks: 6 (limit: 2353)
     Memory: 23.5M
     CGroup: /system.slice/apache2.service
             ??13697 /usr/sbin/apache2 -k start
             ??16074 /usr/sbin/apache2 -k start
             ??16075 /usr/sbin/apache2 -k start
             ??16076 /usr/sbin/apache2 -k start
             ??16077 /usr/sbin/apache2 -k start
             ??16078 /usr/sbin/apache2 -k start

Jun 25 07:42:29 ubuntu20 systemd[1]: Starting The Apache HTTP Server...
この時点で、ApacheWebサーバーはVanillaForumにサービスを提供するように構成されています。
Let'sEncryptを使用したセキュアなバニラフォーラム
Let'sEncryptSSLを使用してVanillaForumWebサイトを保護することもできます。開始する前に、システムにCertbotをインストールする必要があります。 Certbotは、Let'sEncryptSSLのインストールと管理に使用されるLet'sEncryptクライアントです。
次のコマンドを実行して、Certbotクライアントをインストールできます。
apt-get install certbot python3-certbot-apache -y
Certbotをインストールしたら、次のコマンドを実行して、WebサイトにLet'sEncryptSSLをインストールします。
certbot --apache -d vanilla.linuxbuz.com
以下に示すように、有効なメールアドレスを入力し、利用規約に同意するよう求められます。
Saving debug log to /var/log/letsencrypt/letsencrypt.log
Plugins selected: Authenticator apache, Installer apache
Enter email address (used for urgent renewal and security notices) (Enter 'c' to
cancel): [email protected]

- - - - - - - - - - - - - - - - - - - - - - - - - - - - - - - - - - - - - - - -
Please read the Terms of Service at
https://letsencrypt.org/documents/LE-SA-v1.2-November-15-2017.pdf. You must
agree in order to register with the ACME server at
https://acme-v02.api.letsencrypt.org/directory
- - - - - - - - - - - - - - - - - - - - - - - - - - - - - - - - - - - - - - - -
(A)gree/(C)ancel: A

- - - - - - - - - - - - - - - - - - - - - - - - - - - - - - - - - - - - - - - -
Would you be willing to share your email address with the Electronic Frontier
Foundation, a founding partner of the Let's Encrypt project and the non-profit
organization that develops Certbot? We'd like to send you email about our work
encrypting the web, EFF news, campaigns, and ways to support digital freedom.
- - - - - - - - - - - - - - - - - - - - - - - - - - - - - - - - - - - - - - - -
(Y)es/(N)o: Y
Obtaining a new certificate
Performing the following challenges:
http-01 challenge for vanilla.linuxbuz.com
Enabled Apache rewrite module
Waiting for verification...
Cleaning up challenges
Created an SSL vhost at /etc/apache2/sites-available/vanilla-le-ssl.conf
Enabled Apache socache_shmcb module
Enabled Apache ssl module
Deploying Certificate to VirtualHost /etc/apache2/sites-available/vanilla-le-ssl.conf
Enabling available site: /etc/apache2/sites-available/vanilla-le-ssl.conf
次に、以下に示すように、HTTPトラフィックをHTTPSにリダイレクトするかどうかも選択する必要があります。
Please choose whether or not to redirect HTTP traffic to HTTPS, removing HTTP access.
- - - - - - - - - - - - - - - - - - - - - - - - - - - - - - - - - - - - - - - -
1: No redirect - Make no further changes to the webserver configuration.
2: Redirect - Make all requests redirect to secure HTTPS access. Choose this for
new sites, or if you're confident your site works on HTTPS. You can undo this
change by editing your web server's configuration.
- - - - - - - - - - - - - - - - - - - - - - - - - - - - - - - - - - - - - - - -
Select the appropriate number [1-2] then [enter] (press 'c' to cancel): 2
2と入力し、Enterキーを押して、ドメインにLet'sEncryptSSLをインストールします。
Enabled Apache rewrite module
Redirecting vhost in /etc/apache2/sites-enabled/vanilla.conf to ssl vhost in /etc/apache2/sites-available/vanilla-le-ssl.conf

- - - - - - - - - - - - - - - - - - - - - - - - - - - - - - - - - - - - - - - -
Congratulations! You have successfully enabled https://vanilla.linuxbuz.com

You should test your configuration at:
https://www.ssllabs.com/ssltest/analyze.html?d=vanilla.linuxbuz.com
- - - - - - - - - - - - - - - - - - - - - - - - - - - - - - - - - - - - - - - -

IMPORTANT NOTES:
 - Congratulations! Your certificate and chain have been saved at:
   /etc/letsencrypt/live/vanilla.linuxbuz.com/fullchain.pem
   Your key file has been saved at:
   /etc/letsencrypt/live/vanilla.linuxbuz.com/privkey.pem
   Your cert will expire on 2020-09-23. To obtain a new or tweaked
   version of this certificate in the future, simply run certbot again
   with the "certonly" option. To non-interactively renew *all* of
   your certificates, run "certbot renew"
 - Your account credentials have been saved in your Certbot
   configuration directory at /etc/letsencrypt. You should make a
   secure backup of this folder now. This configuration directory will
   also contain certificates and private keys obtained by Certbot so
   making regular backups of this folder is ideal.
 - If you like Certbot, please consider supporting our work by:

   Donating to ISRG / Let's Encrypt:   https://letsencrypt.org/donate
   Donating to EFF:                    https://eff.org/donate-le

 - We were unable to subscribe you the EFF mailing list because your
   e-mail address appears to be invalid. You can try again later by
   visiting https://act.eff.org.
これで、VanillaForumのWebサイトはLet'sEncryptSSLで保護されました。
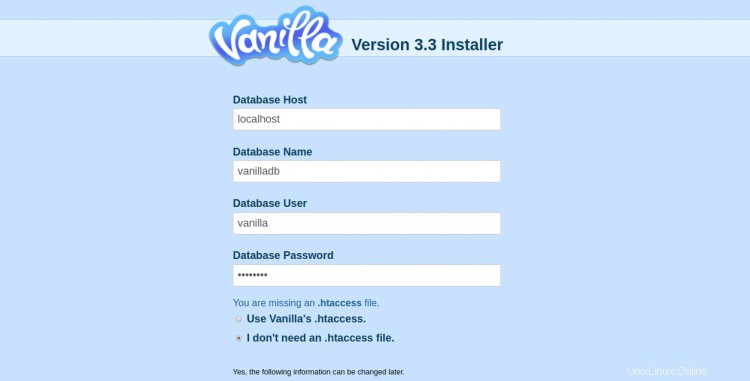
次に、Webブラウザーを開き、URLhttps://vanilla.linuxbuz.comを入力します。次の画面が表示されます。


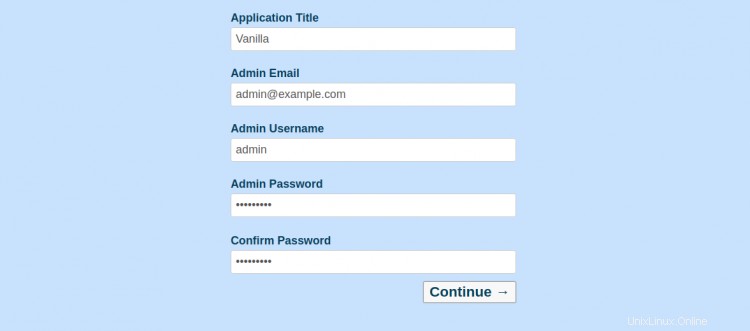
データベースの詳細、アプリケーションのタイトル、電子メール、管理者のユーザー名、パスワードを入力し、続行をクリックします ボタン。次の画面にVanillaダッシュボードが表示されます。

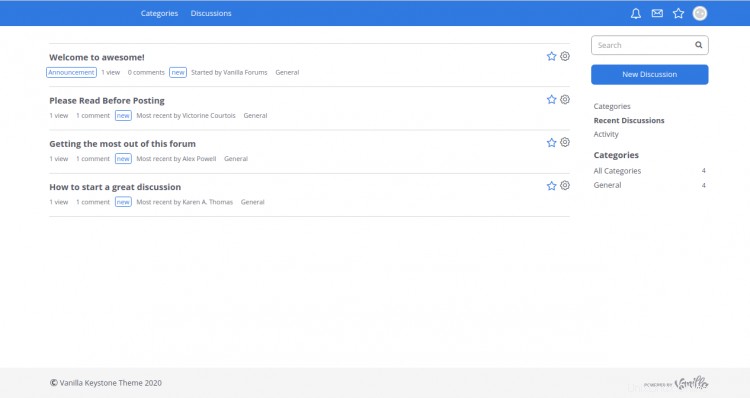
次に、サイトにアクセスをクリックします ボタン。次の画面が表示されます。

おめでとう!これで、Apacheを使用してVanilla Forumソフトウェアが正常にインストールされ、Let'sEncryptの無料SSLで保護されました。これで、1分以内に独自のコミュニティフォーラムをホストできます。ご不明な点がございましたら、お気軽にお問い合わせください。