Let’s Encryptは、2016年4月に開始された、ウェブサイトに無料のSSL証明書を提供する広く知られている認証局です。
Certbotクライアントの助けを借りて、証明書の作成、検証、署名、実装、および証明書の更新が完全に自動化されます。
前提条件
リンクをたどって、LAMPスタックまたはApacheWebサーバーのみをシステムにインストールします。
読む :CentOS 8 /RHEL8にLAMPスタックをインストールする方法
読む :CentOS 7 /RHEL7にLAMPスタックをインストールする方法
Certbotクライアントのインストール
ドメインの証明書を生成してインストールするには、ターミナルアクセスが必要であり、CertbotACMEクライアントがシステムにインストールされている必要があります。 Certbotクライアントは、ダウンタイムなしで証明書の発行とインストールを自動化します。
CertbotクライアントはCentOS7/ RHEL 7のEPELリポジトリで利用できます。ただし、CentOS 8 /RHEL8のCertbotクライアントを公式サイトから手動でダウンロードする必要があります。
### CentOS 8 / RHEL 8 ###

yum install -y httpd mod_ssl

curl -O https://dl.eff.org/certbot-auto

mv certbot-auto /usr/local/bin/certbot-auto

chmod 0755 /usr/local/bin/certbot-auto

### CentOS 7 ###

rpm -ivh https://dl.fedoraproject.org/pub/epel/epel-release-latest-7.noarch.rpm

yum install -y certbot python2-certbot-apache

### RHEL 7 ###

rpm -ivh https://dl.fedoraproject.org/pub/epel/epel-release-latest-7.noarch.rpm

subscription-manager repos --enable rhel-7-server-optional-rpms

yum install -y certbot python2-certbot-apache
仮想ホストの作成
ドメインの仮想ホストを作成します:www.itzgeek.net。
この仮想ホストは、ドメインのHTTPバージョンを処理します。vi /etc/httpd/conf.d/www.itzgeek.net.conf
以下の情報を使用してください。
<VirtualHost *:80>
  ServerName itzgeek.net
  ServerAlias www.itzgeek.net
  DocumentRoot /var/www/www.itzgeek.net

  <Directory /var/www/www.itzgeek.net>
      Options -Indexes +FollowSymLinks
      AllowOverride All
  </Directory>

  ErrorLog /var/log/httpd/www.itzgeek.net-error.log
  CustomLog /var/log/httpd/www.itzgeek.net-access.log combined
</VirtualHost>
HTMLファイルを配置するためのドキュメントルートを作成します。
mkdir -p /var/www/www.itzgeek.net
ドメインのドキュメントルート内にHTMLファイルを配置します。
echo "This is a test site @ www.itzgeek.net" > /var/www/www.itzgeek.net/index.html
ディレクトリの権限を変更します。
chown -R apache:apache /var/www/www.itzgeek.net
Apacheサービスを再起動します。
systemctl restart httpd
DNSレコードの作成/更新
ドメインレジストラに移動して、ドメインのA/CNAMEレコードを作成します。例:www.itzgeek.net。

レコードが伝播するまでしばらく待ちます。
Nslookup yum install-ybind-utilsユーティリティを使用してDNS伝播を確認します。

インストールLet'sEncryptSSL証明書
certbotコマンドを使用して、Let’sEncrypt証明書を生成してインストールします。
### RHEL 8 ###

/usr/local/bin/certbot-auto --apache

### CentOS 7 / RHEL 7 ###

certbot --apache
インタラクティブなプロンプトに従い、証明書をインストールします。
Saving debug log to /var/log/letsencrypt/letsencrypt.log
Plugins selected: Authenticator apache, Installer apache
Enter email address (used for urgent renewal and security notices) (Enter 'c' to
cancel): itzgeek.web@gmail.com  << Enter Email address to receive notifications

- - - - - - - - - - - - - - - - - - - - - - - - - - - - - - - - - - - - - - - -
Please read the Terms of Service at
https://letsencrypt.org/documents/LE-SA-v1.2-November-15-2017.pdf. You must
agree in order to register with the ACME server at
https://acme-v02.api.letsencrypt.org/directory
- - - - - - - - - - - - - - - - - - - - - - - - - - - - - - - - - - - - - - - -
(A)gree/(C)ancel: A  << Agree to Terms of Sevice

- - - - - - - - - - - - - - - - - - - - - - - - - - - - - - - - - - - - - - - -
Would you be willing to share your email address with the Electronic Frontier
Foundation, a founding partner of the Let's Encrypt project and the non-profit
organization that develops Certbot? We'd like to send you email about our work
encrypting the web, EFF news, campaigns, and ways to support digital freedom.
- - - - - - - - - - - - - - - - - - - - - - - - - - - - - - - - - - - - - - - -
(Y)es/(N)o: Y  << Subscribe to Newsletter

Which names would you like to activate HTTPS for?
- - - - - - - - - - - - - - - - - - - - - - - - - - - - - - - - - - - - - - - -
1: itzgeek.net
2: www.itzgeek.net
- - - - - - - - - - - - - - - - - - - - - - - - - - - - - - - - - - - - - - - -
Select the appropriate numbers separated by commas and/or spaces, or leave input
blank to select all options shown (Enter 'c' to cancel): 2  << Choose the domain to install Let's Encrypt SSL certificate
Obtaining a new certificate
Performing the following challenges:
http-01 challenge for www.itzgeek.net
Waiting for verification...
Cleaning up challenges
Created an SSL vhost at /etc/httpd/conf.d/www.itzgeek.net-le-ssl.conf
Deploying Certificate to VirtualHost /etc/httpd/conf.d/www.itzgeek.net-le-ssl.conf

Please choose whether or not to redirect HTTP traffic to HTTPS, removing HTTP access.
- - - - - - - - - - - - - - - - - - - - - - - - - - - - - - - - - - - - - - - -
1: No redirect - Make no further changes to the webserver configuration.
2: Redirect - Make all requests redirect to secure HTTPS access. Choose this for
new sites, or if you're confident your site works on HTTPS. You can undo this
change by editing your web server's configuration.
- - - - - - - - - - - - - - - - - - - - - - - - - - - - - - - - - - - - - - - -
Select the appropriate number [1-2] then [enter] (press 'c' to cancel): 2  << Redirect from HTTP to HTTPS
Redirecting vhost in /etc/httpd/conf.d/www.itzgeek.net.conf to ssl vhost in /etc/httpd/conf.d/www.itzgeek.net-le-ssl.conf

- - - - - - - - - - - - - - - - - - - - - - - - - - - - - - - - - - - - - - - -
Congratulations! You have successfully enabled https://www.itzgeek.net

You should test your configuration at:
https://www.ssllabs.com/ssltest/analyze.html?d=www.itzgeek.net
- - - - - - - - - - - - - - - - - - - - - - - - - - - - - - - - - - - - - - - -

IMPORTANT NOTES:
 - Congratulations! Your certificate and chain have been saved at:
   /etc/letsencrypt/live/www.itzgeek.net/fullchain.pem
   Your key file has been saved at:
   /etc/letsencrypt/live/www.itzgeek.net/privkey.pem
   Your cert will expire on 2019-11-10. To obtain a new or tweaked
   version of this certificate in the future, simply run certbot-auto
   again with the "certonly" option. To non-interactively renew *all*
   of your certificates, run "certbot-auto renew"
 - Your account credentials have been saved in your Certbot
   configuration directory at /etc/letsencrypt. You should make a
   secure backup of this folder now. This configuration directory will
   also contain certificates and private keys obtained by Certbot so
   making regular backups of this folder is ideal.
 - If you like Certbot, please consider supporting our work by:

   Donating to ISRG / Let's Encrypt:   https://letsencrypt.org/donate
   Donating to EFF:                    https://eff.org/donate-le
ファイアウォール
HTTPS要求を許可するようにファイアウォールを構成します。
firewall-cmd --permanent --add-port=443/tcp

firewall-cmd --reload
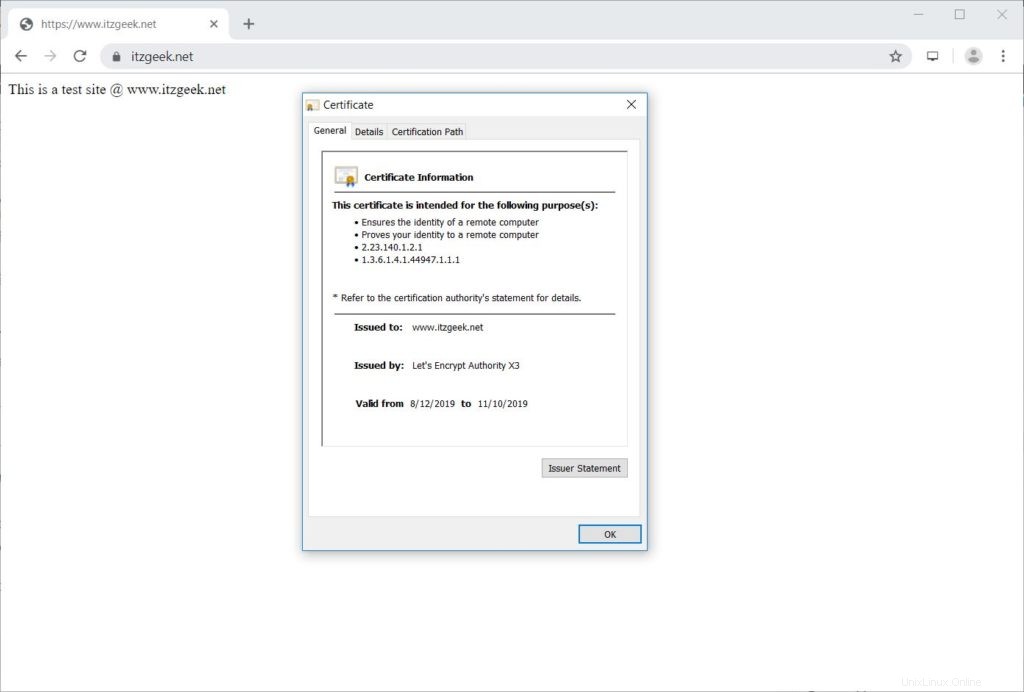
Let'sEncrypt証明書を確認する
ウェブサイトのHTTPSバージョンにアクセスして、Let’sEncrypt証明書を確認します。
http:// your-http-web-siteまたは
https:// your-https-web-siteこれで、サイトのHTTPSバージョンを取得する必要があります。
テストLet'sEncryptSSL証明書
以下のURLにアクセスして、SSL証明書の問題とそのセキュリティ評価をテストします。
https://www.ssllabs.com/ssltest/analyze.html?d=www.itzgeek.net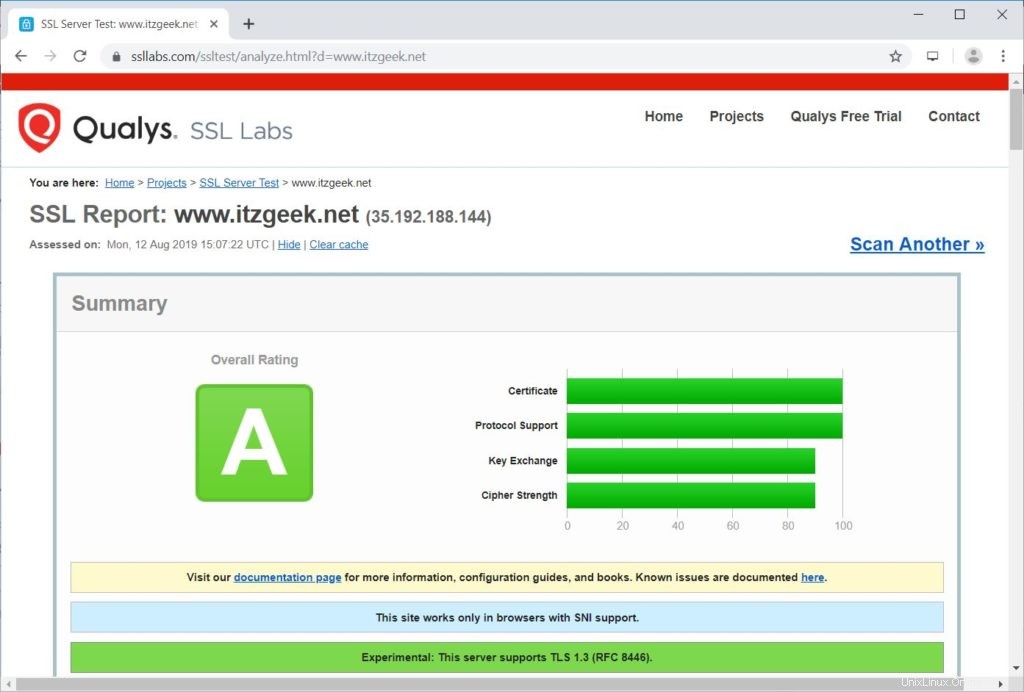
Let'sEncrypt証明書を更新
Let's Encryptの証明書は、発行日から90日間有効であり、有効期限が切れる前に更新する必要があります。
CentOS 7 / RHEL 7では、デフォルトで、certbotクライアントがcronスケジューラエントリを作成して、Let’sEncrypt証明書を自動的に更新します。
残念ながら、CentOS 8 / RHEL 8の場合、cronスケジューラを手動で構成する必要があります。
echo "0 0,12 * * * root python -c 'import random; import time; time.sleep(random.random() * 3600)' && /usr/local/bin/certbot-auto renew" | sudo tee -a /etc/crontab > /dev/null
以下のコマンドを使用して証明書の更新プロセスをシミュレートし、更新がスムーズに行われるようにすることもできます。
### CentOS 8 / RHEL 8 ###

/usr/local/bin/certbot-auto renew --dry-run

### CentOS 7 / RHEL 7 ###

certbot renew --dry-run
Let’s Encrypt証明書を更新するには、
--dry-runを指定せずに上記のコマンドを実行します。 オプション。 出力:
Saving debug log to /var/log/letsencrypt/letsencrypt.log

- - - - - - - - - - - - - - - - - - - - - - - - - - - - - - - - - - - - - - - -
Processing /etc/letsencrypt/renewal/www.itzgeek.net.conf
- - - - - - - - - - - - - - - - - - - - - - - - - - - - - - - - - - - - - - - -
Cert not due for renewal, but simulating renewal for dry run
Plugins selected: Authenticator apache, Installer apache
Renewing an existing certificate
Performing the following challenges:
http-01 challenge for www.itzgeek.net
Waiting for verification...
Cleaning up challenges

- - - - - - - - - - - - - - - - - - - - - - - - - - - - - - - - - - - - - - - -
new certificate deployed with reload of apache server; fullchain is
/etc/letsencrypt/live/www.itzgeek.net/fullchain.pem
- - - - - - - - - - - - - - - - - - - - - - - - - - - - - - - - - - - - - - - -

- - - - - - - - - - - - - - - - - - - - - - - - - - - - - - - - - - - - - - - -
** DRY RUN: simulating 'certbot renew' close to cert expiry
**          (The test certificates below have not been saved.)

Congratulations, all renewals succeeded. The following certs have been renewed:
  /etc/letsencrypt/live/www.itzgeek.net/fullchain.pem (success)
** DRY RUN: simulating 'certbot renew' close to cert expiry
**          (The test certificates above have not been saved.)
- - - - - - - - - - - - - - - - - - - - - - - - - - - - - - - - - - - - - - - -

IMPORTANT NOTES:
 - Your account credentials have been saved in your Certbot
   configuration directory at /etc/letsencrypt. You should make a
   secure backup of this folder now. This configuration directory will
   also contain certificates and private keys obtained by Certbot so
   making regular backups of this folder is ideal.
出力で問題が報告されない場合、証明書の更新は期待どおりに機能します。
結論
それで全部です。 CentOS 8 /RHEL8およびCentOS7/RHEL7でApacheを使用してSSL証明書を暗号化する方法を学習したことを願っています。コメントセクションでフィードバックを共有してください。