前回の記事では、 CentOS 7 /RHEL7でOpenLDAPサーバーをセットアップしました 一元化された認証用。続いて、 OpenLDAPを設定します。 安全な通信のためのSSLを使用。この設定では、LDAPクライアントの通信は、非セキュアポート389ではなくセキュアポート636を介して行われます。
このガイドに従って、 OpenLDAPを設定します SSLを使用します。
前提条件
1.OpenLDAPセットアップ。
2.クライアントマシンのLDAPサーバーのホストエントリを/etc/hostsに作成します 名前解決のため。
192.168.1.10 server.itzgeek.local server
または
IPアドレスの代わりにホスト名を使用する場合は、 CentOS 7 /RHEL7でDNSサーバーを構成する ホスト名を解決します。
LDAP証明書を作成する
LDAP over SSLの使用を計画している場合は、以下のいずれかの方法で実装できます。
1.自己署名証明書–これは単純な自己署名証明書です。 LDAPクライアントには、tls_reqcert allowが必要です。 /etc/nslcd.confにあります 証明書を検証しないようにします。
2. CA署名付き証明書–内部CAまたは外部CA署名証明書。 LDAPサーバー証明書に署名したCA証明書を/etc/openldap/cacerts/に配置する必要があります LDAPクライアントが証明書を検証できるようにするためのディレクトリ。
自己署名証明書
LDAPサーバーの自己署名証明書を作成しましょう。次のコマンドは、/etc/openldap/certs/に証明書と秘密鍵の両方を生成します ディレクトリ。
openssl req -new -x509 -nodes -out /etc/openldap/certs/itzgeekldap.crt -keyout /etc/openldap/certs/itzgeekldap.key -days 1460
出力:
Generating a 2048 bit RSA private key
...+++
.....................................+++
writing new private key to '/etc/openldap/certs/itzgeekldapkey.pem'
-----
You are about to be asked to enter information that will be incorporated
into your certificate request.
What you are about to enter is what is called a Distinguished Name or a DN.
There are quite a few fields but you can leave some blank
For some fields there will be a default value,
If you enter '.', the field will be left blank.
-----
Country Name (2 letter code) [XX]: XX
State or Province Name (full name) []: XX
Locality Name (eg, city) [Default City]: XXXXXX
Organization Name (eg, company) [Default Company Ltd]:ITzGeek
Organizational Unit Name (eg, section) []:IT Infra
Common Name (eg, your name or your server's hostname) []:server.itzgeek.local
Email Address []:admin@itzgeek.com
所有者とグループの権限を設定します。
chown -R ldap:ldap /etc/openldap/certs/itzgeek*
/etc/openldap/certs/で作成されたLDAP証明書を確認します ディレクトリ。
ll /etc/openldap/certs/itzgeek*
出力:
-rw-r--r--. 1 ldap ldap 1302 Apr 1 14:18 /etc/openldap/certs/itzgeekldap.crt
-rw-r--r--. 1 ldap ldap 1704 Apr 1 14:18 /etc/openldap/certs/itzgeekldap.key
certs.ldifを作成します 自己署名証明書を使用して安全な通信を使用するようにLDAPを構成するファイル。
vi certs.ldif
以下の情報を使用してください。
dn: cn=config
changetype: modify
replace: olcTLSCertificateFile
olcTLSCertificateFile: /etc/openldap/certs/itzgeekldap.crt

dn: cn=config
changetype: modify
replace: olcTLSCertificateKeyFile
olcTLSCertificateKeyFile: /etc/openldap/certs/itzgeekldap.key
構成をLDAPサーバーにインポートします。
ldapmodify -Y EXTERNAL -H ldapi:/// -f certs.ldif
構成を確認する
slaptest -u
検証が成功すると、次のメッセージが表示されます。
config file testing succeeded
カスタムCA署名付き証明書
次のコマンドを使用してルートキーを作成します。
cd  /etc/openldap/certs/
openssl genrsa -out itzgeekrootCA.key 2048
次に、自己署名ルート証明書を作成します。
openssl req -x509 -new -nodes -key itzgeekrootCA.key -sha256 -days 1024 -out itzgeekrootCA.pem
出力:
You are about to be asked to enter information that will be incorporated
into your certificate request.
What you are about to enter is what is called a Distinguished Name or a DN.
There are quite a few fields but you can leave some blank
For some fields there will be a default value,
If you enter '.', the field will be left blank.
-----
Country Name (2 letter code) [XX]:XX
State or Province Name (full name) []:XXX
Locality Name (eg, city) [Default City]:XXX
Organization Name (eg, company) [Default Company Ltd]:ITzGeek
Organizational Unit Name (eg, section) []:XXX
Common Name (eg, your name or your server's hostname) []:ITzGeek Root CA
Email Address []:admin@itzgeek.com
LDAPサーバーの秘密鍵を作成します。
openssl genrsa -out itzgeekldap.key 2048
秘密鍵を持っている場合は、証明書署名要求を作成します。
openssl req -new -key itzgeekldap.key -out itzgeekldap.csr
出力:
共通名がLDAPサーバーのホスト名またはIPアドレスと一致することを確認してください。
Generating RSA private key, 2048 bit long modulus
.........+++
.............................................................+++
e is 65537 (0x10001)
[root@server certs]# openssl req -new -key itzgeekldap.key -out itzgeekldap.csr
You are about to be asked to enter information that will be incorporated
into your certificate request.
What you are about to enter is what is called a Distinguished Name or a DN.
There are quite a few fields but you can leave some blank
For some fields there will be a default value,
If you enter '.', the field will be left blank.
-----
Country Name (2 letter code) [XX]:XX
State or Province Name (full name) []:XX
Locality Name (eg, city) [Default City]:XXX
Organization Name (eg, company) [Default Company Ltd]:ITzGeek
Organizational Unit Name (eg, section) []:IT
Common Name (eg, your name or your server's hostname) []:server.itzgeek.local
Email Address []:admin@itzgeek.com

Please enter the following 'extra' attributes
to be sent with your certificate request
A challenge password []:
An optional company name []:
次に、カスタムルートCAを使用して証明書署名要求に署名します。
openssl x509 -req -in itzgeekldap.csr -CA itzgeekrootCA.pem -CAkey itzgeekrootCA.key -CAcreateserial -out itzgeekldap.crt -days 1460 -sha256
所有者とグループの権限を設定します。
chown -R ldap:ldap /etc/openldap/certs/itzgeek*
/etc/openldap/certs/で作成されたLDAP証明書を確認します ディレクトリ。
ll /etc/openldap/certs/itzgeek*
出力:
-rw-r--r--. 1 ldap ldap 1285 Apr  1 16:54 /etc/openldap/certs/itzgeekldap.crt
-rw-r--r--. 1 ldap ldap 1050 Apr  1 16:53 /etc/openldap/certs/itzgeekldap.csr
-rw-r--r--. 1 ldap ldap 1675 Apr  1 16:51 /etc/openldap/certs/itzgeekldap.key
-rw-r--r--. 1 ldap ldap 1679 Apr  1 16:49 /etc/openldap/certs/itzgeekrootCA.key
-rw-r--r--. 1 ldap ldap 1399 Apr  1 16:49 /etc/openldap/certs/itzgeekrootCA.pem
-rw-r--r--. 1 ldap ldap   17 Apr  1 16:54 /etc/openldap/certs/itzgeekrootCA.srl
certs.ldifを作成します 自己署名証明書を使用して安全な通信を使用するようにLDAPを構成するファイル。
vi certs.ldif
以下の情報を使用してください。
dn: cn=config
changetype: modify
replace: olcTLSCACertificateFile
olcTLSCACertificateFile: /etc/openldap/certs/itzgeekrootCA.pem

dn: cn=config
changetype: modify
replace: olcTLSCertificateFile
olcTLSCertificateFile: /etc/openldap/certs/itzgeekldap.crt

dn: cn=config
changetype: modify
replace: olcTLSCertificateKeyFile
olcTLSCertificateKeyFile: /etc/openldap/certs/itzgeekldap.key
構成をLDAPサーバーにインポートします。
ldapmodify -Y EXTERNAL -H ldapi:/// -f certs.ldif
構成を確認する
slaptest -u
検証が成功すると、次のメッセージが表示されます。
config file testing succeeded
SSL経由でリッスンするようにOpenLDAPを設定
/etc/sysconfig/slapdを編集します ファイルを作成し、SSLを介してリッスンするようにOpenLDAPを設定します。
vi /etc/sysconfig/slapd
以下の行を更新してください。
SLAPD_URLS="ldapi:/// ldap:/// ldaps:///"
slapdサービスを再起動します。
systemctl restart slapd
LDAPサービスを確認します。 LDAPサービスはTCPポート636でもリッスンしているはずです。
netstat -antup | grep -i 636
出力:
tcp        0      0 0.0.0.0:636             0.0.0.0:*               LISTEN      11720/slapd
tcp6       0      0 :::636                  :::*                    LISTEN      11720/slapd
ファイアウォール
LDAPSサービスをファイアウォール(TCP 686)に追加します。
firewall-cmd --permanent --add-service=ldaps
firewall-cmd --reload
OpenLDAPoverSSLのOpenLDAPクライアント構成
yumコマンドを使用してクライアントパッケージをインストールします。
yum install -y openldap-clients nss-pam-ldapd
authconfigを実行します シングルサインオン用にクライアントマシンをLDAPサーバーに追加するコマンド。 「server.itzgeek.local」を置き換えます 」とLDAPサーバーのIPアドレスまたはホスト名。
OpenLDAPセットアップでカスタムCA署名証明書または外部CA署名証明書を使用した場合、ホスト名またはIPアドレスはLDAPサーバー証明書の一般名と一致する必要があります
authconfig --enableldap --enableldapauth --ldapserver=ldaps://server.itzgeek.local --ldapbasedn="dc=itzgeek,dc=local" --enablemkhomedir --disableldaptls --update
SSLを使用するようにOpenLDAPを設定した方法に基づいて、以下の手順を実行する必要があります。
自己署名証明書
nslcd.confを編集します ファイル。
vi /etc/nslcd.conf
nslcd.confに次の行を追加します ファイル。以下の設定では、自己署名証明書を使用しているため、クライアントによる証明書の検証が無効になります。
tls_reqcert allow
カスタムCA署名または外部CA署名
itzgeekrootCA.pemをコピーします LDAPサーバーから送信するか、外部CAから提供された中間証明書またはCAを/etc/openldap/cacertsに配置します。 ディレクトリ。
cd /etc/openldap/cacerts/
scp -pr 192.168.1.10:/etc/openldap/certs/itzgeekrootCA.pem /etc/openldap/cacerts
CA証明書のcハッシュを作成します。
/etc/pki/tls/misc/c_hash /etc/openldap/cacerts/itzgeekrootCA.pem
出力:
997ee4fb.0 => /etc/openldap/cacerts/itzgeekrootCA.pem
次に、rootCA.pemを表示されている8桁の16進数にシンボリックリンクします。
ln -s /etc/openldap/cacerts/itzgeekrootCA.pem 997ee4fb.0
LDAPクライアントサービスを再起動します。
systemctl restart nslcd
LDAPログインを確認する
getentコマンドを使用して、LDAPサーバーからLDAPエントリを取得します。
getent passwd raj
出力:
raj:x:9999:100:Raj [Admin (at) ITzGeek]:/home/raj:/bin/bash
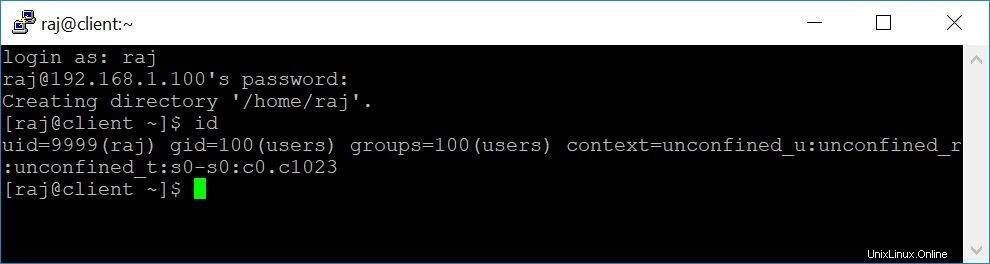
LDAPを確認するには、クライアントマシンでLDAPユーザー「raj」を使用してログインします。
スクリーンショット:
参照
OpenFusion –OpenLDAPのヒントとコツ
CentOS –フォーラム
以上です。