Giteaは、Goで記述されたオープンソースのセルフホストバージョン管理システムです。シンプルで軽量で、低電力システムにインストールできます。これはGogsのフォークであり、GitHubとGitLabの代替手段です。リポジトリファイルエディタ、プロジェクトの問題追跡、ユーザー管理、通知、組み込みのWikiなど、多くの機能が付属しています。 Linux、macOS、Windows、ARM、PowerPCアーキテクチャを含むすべての最新のオペレーティングシステムにインストールできます。
このチュートリアルでは、Ubuntu20.04にNginxとLet'sEncryptSSLを使用してGiteaGitサービスをインストールする方法を示します。
- Ubuntu20.04を実行しているサーバー。
- 有効なドメイン名はサーバーを指します。
- ルートパスワードはサーバーで構成されています。
まず、サーバーにGitパッケージをインストールする必要があります。次のコマンドを実行してインストールできます:
apt-get install git -y
Gitパッケージがインストールされたら、次のステップに進むことができます。
MariaDBのインストールと構成
デフォルトでは、MariaDBは保護されていません。したがって、最初にそれを保護する必要があります。 mysql_secure_installationスクリプトを実行することで保護できます:
mysql_secure_installation
このスクリプトは、以下に示すように、rootパスワードを設定し、匿名ユーザーを削除し、rootログインをリモートで禁止し、テストデータベースを削除します。
Enter current password for root (enter for none):
Set root password? [Y/n]: Y
Remove anonymous users? [Y/n]: Y
Disallow root login remotely? [Y/n]: Y
Remove test database and access to it? [Y/n]:  Y
Reload privilege tables now? [Y/n]:  Y
MariaDBが保護されたら、次のコマンドを使用してMariaDBシェルにログインします。
mysql -u root -p
プロンプトが表示されたら、rootパスワードを入力します。次に、GLOBAL innodeb_file_per_tableをOnに変更します:
MariaDB [(none)]>SET GLOBAL innodb_file_per_table = ON;
次に、次のコマンドを使用してGiteaのデータベースとユーザーを作成します。
MariaDB [(none)]>CREATE DATABASE giteadb;
MariaDB [(none)]>CREATE USER 'gitea'@'localhost' IDENTIFIED BY 'password';
次に、giteadbデータベースにすべての権限を付与します。
MariaDB [(none)]>GRANT ALL ON giteadb.* TO 'gitea'@'localhost' IDENTIFIED BY 'password' WITH GRANT OPTION;
次に、次のコマンドを使用してデータベースの文字セットを更新します。
MariaDB [(none)]>ALTER DATABASE giteadb CHARACTER SET = utf8mb4 COLLATE utf8mb4_unicode_ci;
最後に、特権をフラッシュし、次のコマンドでMariaDBシェルを終了します。
MariaDB [(none)]>FLUSH PRIVILEGES;
MariaDB [(none)]>EXIT;
次に、MariaDBのデフォルトの構成ファイルを編集し、innodbパラメーターを追加する必要があります。
nano /etc/mysql/mariadb.conf.d/50-server.cnf
[mysqld]セクション内に次の行を追加します:
innodb_file_format = Barracuda
innodb_large_prefix = 1
innodb_default_row_format = dynamic
ファイルを保存して閉じます。次に、MariaDBサービスを再起動して、変更を適用します。
systemctl restart mariadb
この時点で、MariaDBデータベースが構成されます。これで、次のステップに進むことができます。
まず、Gitリポジトリから最新バージョンのGiteaバイナリをダウンロードする必要があります。次のコマンドでダウンロードできます:
wget https://dl.gitea.io/gitea/1.12.1/gitea-1.12.1-linux-amd64
次に、ダウンロードしたファイルを/ usr / bin /ディレクトリにコピーし、実行権限を付与します。
cp gitea-1.12.1-linux-amd64 /usr/bin/gitea
chmod 755 /usr/bin/gitea
次に、次のコマンドを使用してGiteaのシステムユーザーを作成します。
adduser --system --shell /bin/bash --group --disabled-password --home /home/git git
次に、次のコマンドを使用してGiteaのディレクトリ構造を作成します。
mkdir -p /etc/gitea /var/lib/gitea/{custom,data,indexers,public,log}
chown git:git /etc/gitea /var/lib/gitea/{custom,data,indexers,public,log}
chmod 750 /var/lib/gitea/{data,indexers,log}
chmod 770 /etc/gitea
終了したら、次のステップに進むことができます。
GiteaSystemdサービスファイルを作成
次に、Giteaサービスを管理するためのsystemdサービスファイルを作成する必要があります。次のコマンドで作成できます:
nano /etc/systemd/system/gitea.service
次の行を追加します:
[Unit]
Description=Gitea
After=syslog.target
After=network.target
After=mysql.service

[Service]
RestartSec=2s
Type=simple
User=git
Group=git
WorkingDirectory=/var/lib/gitea/
ExecStart=/usr/bin/gitea web -c /etc/gitea/app.ini
Restart=always
Environment=USER=git HOME=/home/git GITEA_WORK_DIR=/var/lib/gitea

[Install]
WantedBy=multi-user.target
ファイルを保存して閉じます。次に、systemdデーモンをリロードし、次のコマンドでGiteaサービスを開始します。
systemctl daemon-reload
systemctl start gitea
次のコマンドでGiteaサービスのステータスを確認できるようになりました:
systemctl status gitea
次の出力が表示されます。
? gitea.service - Gitea
     Loaded: loaded (/etc/systemd/system/gitea.service; disabled; vendor preset: enabled)
     Active: active (running) since Thu 2020-06-25 08:23:01 UTC; 6s ago
   Main PID: 24046 (gitea)
      Tasks: 9 (limit: 2353)
     Memory: 134.3M
     CGroup: /system.slice/gitea.service
             ??24046 /usr/bin/gitea web -c /etc/gitea/app.ini

Jun 25 08:23:02 ubuntu20 gitea[24046]: 2020/06/25 08:23:02 routers/init.go:127:GlobalInit() [I] Delete all repository archives
Jun 25 08:23:02 ubuntu20 gitea[24046]: 2020/06/25 08:23:02 ...dules/setting/log.go:233:newLogService() [I] Gitea v1.12.1 built with GNU Make 4>
Jun 25 08:23:02 ubuntu20 gitea[24046]: 2020/06/25 08:23:02 ...dules/setting/log.go:279:newLogService() [I] Gitea Log Mode: Console(Console:inf>
Jun 25 08:23:02 ubuntu20 gitea[24046]: 2020/06/25 08:23:02 ...les/setting/cache.go:70:newCacheService() [I] Cache Service Enabled
Jun 25 08:23:02 ubuntu20 gitea[24046]: 2020/06/25 08:23:02 ...les/setting/cache.go:81:newCacheService() [I] Last Commit Cache Service Enabled
Jun 25 08:23:02 ubuntu20 gitea[24046]: 2020/06/25 08:23:02 ...s/setting/session.go:63:newSessionService() [I] Session Service Enabled
Jun 25 08:23:02 ubuntu20 gitea[24046]: 2020/06/25 08:23:02 routers/init.go:165:GlobalInit() [I] SQLite3 Supported
Jun 25 08:23:02 ubuntu20 gitea[24046]: 2020/06/25 08:23:02 routers/init.go:51:checkRunMode() [I] Run Mode: Development
Jun 25 08:23:03 ubuntu20 gitea[24046]: 2020/06/25 08:23:03 cmd/web.go:161:runWeb() [I] Listen: http://0.0.0.0:3000
Jun 25 08:23:03 ubuntu20 gitea[24046]: 2020/06/25 08:23:03 ...s/graceful/server.go:55:NewServer() [I] Starting new server: tcp:0.0.0.0:3000 on>
lines 1-19/19 (END)
次に、次のコマンドを使用して、システムの再起動時にGiteaサービスを開始できるようにします。
systemctl enable gitea
この時点で、Giteaが起動し、ポート3000でリッスンしています。これで次のステップに進むことができます。
Gitea用にNginxを構成する
デフォルトでは、Giteaはポート3000でリッスンします。したがって、ポートを指定せずにGiteaにアクセスするには、Nginxをリバースプロキシとして構成する必要があります。
まず、次のコマンドを実行してNginxWebサーバーをインストールします。
apt-get install nginx -y
インストールしたら、Gitea用の新しいNginx仮想ホスト構成ファイルを作成します。
nano /etc/nginx/sites-available/gitea
次の行を追加します:
upstream gitea {
    server 127.0.0.1:3000;
}

server {
    listen 80;
    server_name gitea.linuxbuz.com;
    root /var/lib/gitea/public;
    access_log off;
    error_log off;

    location / {
      try_files maintain.html $uri $uri/index.html @node;
    }

    location @node {
      client_max_body_size 0;
      proxy_pass http://localhost:3000;
      proxy_set_header X-Forwarded-For $proxy_add_x_forwarded_for;
      proxy_set_header X-Real-IP $remote_addr;
      proxy_set_header Host $http_host;
      proxy_set_header X-Forwarded-Proto $scheme;
      proxy_max_temp_file_size 0;
      proxy_redirect off;
      proxy_read_timeout 120;
    }
}
ファイルを保存して閉じます。次に、次のコマンドを使用してNginx仮想ホスト構成ファイルを有効にします。
ln -s /etc/nginx/sites-available/gitea /etc/nginx/sites-enabled/
最後に、次のコマンドを使用してNginxサービスを再起動します。
systemctl restart nginx
次のコマンドを使用して、Nginxサービスのステータスを確認することもできます。
systemctl status nginx
次の出力が得られるはずです:
? nginx.service - A high performance web server and a reverse proxy server
     Loaded: loaded (/lib/systemd/system/nginx.service; enabled; vendor preset: enabled)
     Active: active (running) since Thu 2020-06-25 08:26:00 UTC; 1min 24s ago
       Docs: man:nginx(8)
    Process: 24866 ExecStartPre=/usr/sbin/nginx -t -q -g daemon on; master_process on; (code=exited, status=0/SUCCESS)
    Process: 24877 ExecStart=/usr/sbin/nginx -g daemon on; master_process on; (code=exited, status=0/SUCCESS)
   Main PID: 24879 (nginx)
      Tasks: 3 (limit: 2353)
     Memory: 3.6M
     CGroup: /system.slice/nginx.service
             ??24879 nginx: master process /usr/sbin/nginx -g daemon on; master_process on;
             ??24880 nginx: worker process
             ??24881 nginx: worker process

Jun 25 08:25:59 ubuntu20 systemd[1]: Starting A high performance web server and a reverse proxy server...
Jun 25 08:26:00 ubuntu20 systemd[1]: Started A high performance web server and a reverse proxy server.
この時点で、NginxはGiteaにサービスを提供するように構成されています。これで、次のステップに進むことができます。
まず、システムにLet's Encrypt SSLをインストールして管理するために、Certbotクライアントをインストールする必要があります。次のコマンドを実行してインストールできます:
apt-get install certbot python3-certbot-nginx -y
Certbotがインストールされたら、次のコマンドを実行して、Let's Encrypt SSL forGiteaWebサイトをダウンロードしてインストールします。
certbot --nginx -d gitea.linuxbuz.com
以下に示すように、メールアドレスを入力し、利用規約に同意します。
Saving debug log to /var/log/letsencrypt/letsencrypt.log
Plugins selected: Authenticator nginx, Installer nginx
Enter email address (used for urgent renewal and security notices) (Enter 'c' to
cancel): [email protected]

- - - - - - - - - - - - - - - - - - - - - - - - - - - - - - - - - - - - - - - -
Please read the Terms of Service at
https://letsencrypt.org/documents/LE-SA-v1.2-November-15-2017.pdf. You must
agree in order to register with the ACME server at
https://acme-v02.api.letsencrypt.org/directory
- - - - - - - - - - - - - - - - - - - - - - - - - - - - - - - - - - - - - - - -
(A)gree/(C)ancel: A

- - - - - - - - - - - - - - - - - - - - - - - - - - - - - - - - - - - - - - - -
Would you be willing to share your email address with the Electronic Frontier
Foundation, a founding partner of the Let's Encrypt project and the non-profit
organization that develops Certbot? We'd like to send you email about our work
encrypting the web, EFF news, campaigns, and ways to support digital freedom.
- - - - - - - - - - - - - - - - - - - - - - - - - - - - - - - - - - - - - - - -
(Y)es/(N)o: Y
Obtaining a new certificate
Performing the following challenges:
http-01 challenge for gitea.linuxbuz.com
Waiting for verification...
Cleaning up challenges
Deploying Certificate to VirtualHost /etc/nginx/sites-enabled/gitea
次に、以下に示すように、HTTPトラフィックをHTTPSにリダイレクトするかどうかを選択します。
Please choose whether or not to redirect HTTP traffic to HTTPS, removing HTTP access.
- - - - - - - - - - - - - - - - - - - - - - - - - - - - - - - - - - - - - - - -
1: No redirect - Make no further changes to the webserver configuration.
2: Redirect - Make all requests redirect to secure HTTPS access. Choose this for
new sites, or if you're confident your site works on HTTPS. You can undo this
change by editing your web server's configuration.
- - - - - - - - - - - - - - - - - - - - - - - - - - - - - - - - - - - - - - - -
Select the appropriate number [1-2] then [enter] (press 'c' to cancel): 2
2と入力し、Enterキーを押して、以下に示すように証明書をインストールします。
Redirecting all traffic on port 80 to ssl in /etc/nginx/sites-enabled/gitea

- - - - - - - - - - - - - - - - - - - - - - - - - - - - - - - - - - - - - - - -
Congratulations! You have successfully enabled https://gitea.linuxbuz.com

You should test your configuration at:
https://www.ssllabs.com/ssltest/analyze.html?d=gitea.linuxbuz.com
- - - - - - - - - - - - - - - - - - - - - - - - - - - - - - - - - - - - - - - -

IMPORTANT NOTES:
 - Congratulations! Your certificate and chain have been saved at:
   /etc/letsencrypt/live/gitea.linuxbuz.com/fullchain.pem
   Your key file has been saved at:
   /etc/letsencrypt/live/gitea.linuxbuz.com/privkey.pem
   Your cert will expire on 2020-09-23. To obtain a new or tweaked
   version of this certificate in the future, simply run certbot again
   with the "certonly" option. To non-interactively renew *all* of
   your certificates, run "certbot renew"
 - If you like Certbot, please consider supporting our work by:

   Donating to ISRG / Let's Encrypt:   https://letsencrypt.org/donate
   Donating to EFF:                    https://eff.org/donate-le
これで、GiteaWebサイトはLet'sEncryptSSLで保護されます。これで、次のステップに進むことができます。
次に、Webブラウザーを開き、URLhttps://gitea.linuxbuz.com/installを入力します。次のページにリダイレクトされます:
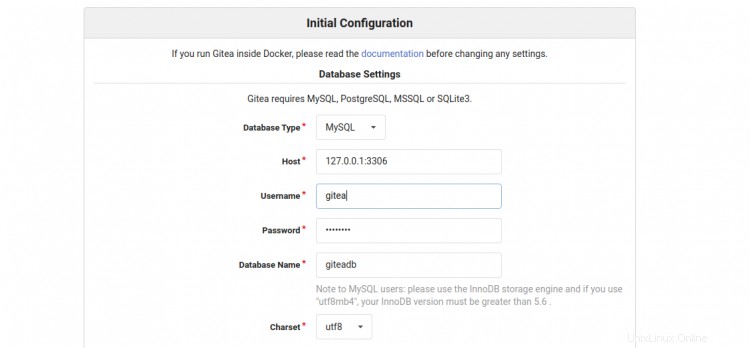
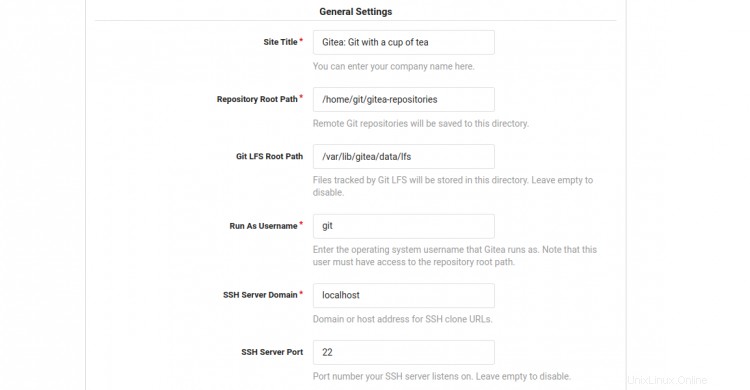

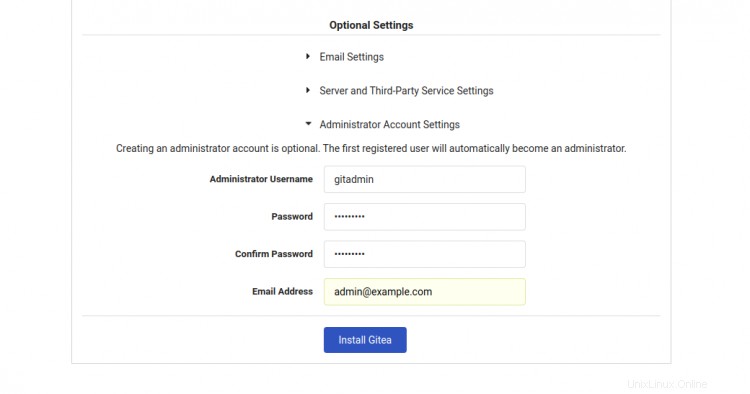
Giteaデータベース名、ユーザー名、パスワード、リポジトリパス、ユーザー名として実行、リスニングポート、GiteaベースURL、ログパス、Gitea管理者ユーザー名、パスワードを入力し、インストールをクリックします Gitea ボタン。インストールが完了すると、次の画面にGiteaダッシュボードが表示されます。
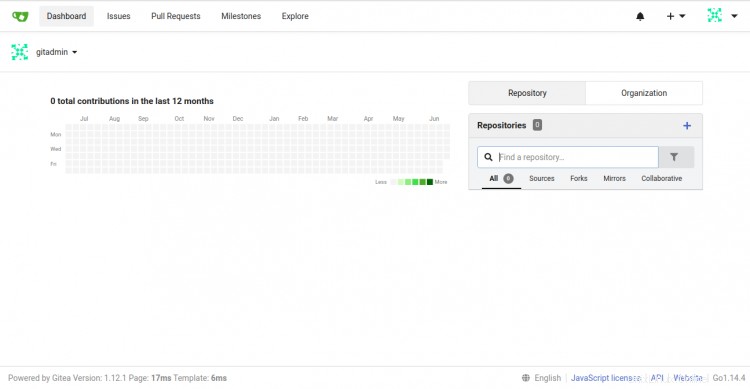
おめでとう!これで、Ubuntu20.04サーバーにNginxとLet'sEncryptSSLを使用してGiteaが正常にインストールされました。これで、Giteaを探索し、Giteaを使用して最初のリポジトリを作成できます。詳細については、Giteaのドキュメントをご覧ください。