Uptime-Kumaは、Nodejsで記述された「UptimeRobot」のようなオープンソースの監視ツールです。これは、豪華で美しいダッシュボードを備えた自己ホスト型の監視ツールであり、複数の通知方法をサポートしています。稼働時間-Kumaは、プロトコルHTTP(s)、TCP、およびPingを介してホストまたはサーバーの稼働時間を監視します。ホストがそのような間隔でこれらのプロトコルを介してラッシュできない場合、稼働時間のホストはWebhook、Telegram、Discord、Gotify、Slack、Pushover、Email(SMTP)などを介して通知を送信します。
このガイドでは、UbuntuサーバーにUptime-Kumaをインストールし、ApacheWebサーバーをリバースプロキシとして使用し、その前に無料のLet'sEncryptSSL証明書を配置する方法を学習します。インストール中に、nvm(ノードバージョンマネージャー)を介したnodejsのインストールについても学習します。
- Ubuntuサーバー20.04。
- root権限を持つユーザー。このユーザーは、新しいパッケージのインストールとシステム設定の変更に使用します。
まず、Ubuntuシステムに新しいユーザーを追加します。セキュリティ上の理由から、アプリケーションUptime-Kumaはroot以外のユーザーとして実行されます。
1.以下のコマンドを実行して、新しいユーザーを追加します。この例では、ユーザー名「 johndoe」を使用します "。必ず自分のユーザー名に変更してください。
useradd -m -s /bin/bash johndoe
知っておくべきオプション:
- -m =ユーザー名のホームディレクトリを自動的に作成します。これは「/home」ディレクトリの下にあります。
- -s =ユーザーのシェルのパスを定義します。ほとんどのLinuxには`/bin/bashシェルがあります。
2.その後、次のコマンドを実行して、ユーザー「johndoe」のパスワードを設定します。
passwd johndoe
ここで、新しい強力なパスワードを入力して繰り返し、[ Enter]を押します。 「確認します。
3.次に、ユーザー「johndoe」をグループ「 sudo」に追加します 「以下のコマンドを使用してください。
usermod -aG sudo johndoe
「sudo」にユーザーを追加する "グループ、ユーザーが" sudo su"を実行できるようにします コマンドを実行してroot権限を取得します。
NVM(ノードバージョンマネージャー)のインストール
NVMまたはNodeVersionManagerは、1つのシステムに複数のnodejsバージョンをインストールするためのコマンドラインツールです。このツールを使用すると、アプリケーションに特定のnodejsバージョンをインストールして、開発およびデプロイメント環境を柔軟にすることができます。
このフェーズでは、root以外のユーザー「johndoe」の下にnvmをインストールします。
1.ルートシェルから、次のコマンドを使用してユーザー「johndoe」にログインします。
su - johndoe
2.次のようにnvmインストーラスクリプトをダウンロードして実行します。
curl -o- https://raw.githubusercontent.com/nvm-sh/nvm/v0.38.0/install.sh | bash
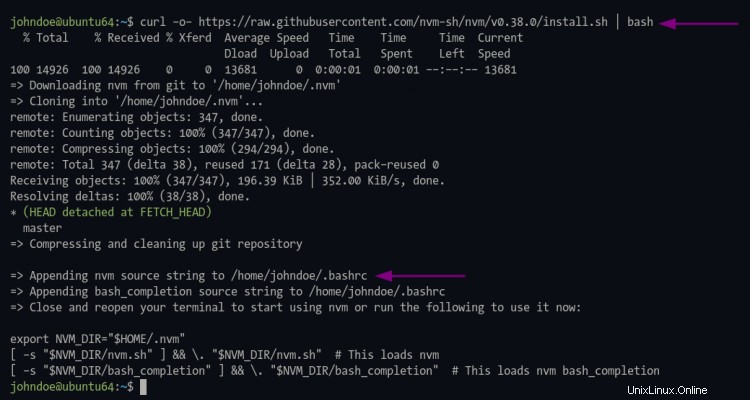
3.成功したら、以下のコマンドを使用してbash環境をリロードします。
source ~/.bashrc
4.次に、「 nvm」を確認します "以下のコマンドを実行してインストールします。
command -v nvm
インストールが成功すると、「 nvm」という結果が表示されます。 "。それ以外の場合は、何も表示されないか、空白の結果が表示されます。
次に、以下のようにnvmコマンドを実行します。
nvm --help
また、nvmコマンドの手動ヘルプページが表示されます。
Node Version Manager (v0.38.0)

Note: <version> refers to any version-like string nvm understands. This includes:
  - full or partial version numbers, starting with an optional "v" (0.10, v0.1.2, v1)
  - default (built-in) aliases: node, stable, unstable, iojs, system
  - custom aliases you define with `nvm alias foo`

 Any options that produce colorized output should respect the `--no-colors` option.

Usage:
  nvm --help                                  Show this message
    --no-colors                               Suppress colored output

.....

Note:
  to remove, delete, or uninstall nvm - just remove the `$NVM_DIR` folder (usually `~/.nvm`)
NodejsLTSバージョンをインストール
uptime-Kumaアプリケーションをインストールするには、 nodejs> =14をインストールする必要があります 、 git 、および pm2 。この時点で、nvmコマンドを使用してnodejsLTS最新バージョンをインストールします。
1.以下のnvmコマンドを実行して、nodejsLTSの最新バージョンをインストールします。
nvm install --lts
インストールが成功すると、以下のような出力が表示されます。

インストールした最初のnodejsバージョンが、開発環境のデフォルトバージョンになります。
2.次に、次のコマンドを実行して、nodejsのインストールを確認します。
node --version
npm --version
インストールが成功すると、以下のような出力が表示されます。
# nodejs version
v14.17.4

# npm version
6.14.14
この時点で、Uptime-Kumaアプリケーションをインストールする準備が整いました。
1.以下のgitコマンドを使用して、稼働時間-Kumaソースコードのクローンを作成します。
git clone https://github.com/louislam/uptime-kuma.git
2.その後、作業ディレクトリを「 uptime-kuma /」に変更します。 "そしてnpmコマンドを実行して、uptime-kumaに必要なすべてのパッケージをインストールします。
cd uptime-kuma/
npm run setup
そして、以下のような出力が表示されます。

pm2とは何ですか?これは、nodejsアプリケーションを管理して永久に存続させるのに役立つnodejsプロセスマネージャーです。 pm2には、nodejsアプリケーションのデプロイを簡単にするいくつかの組み込み機能があり、アプリケーションのステータスやログを監視したり、アプリケーションのサービスファイルを設定したりすることもできます。
1.以下のnpmコマンドを使用してpm2パッケージをインストールします。
npm install pm2
2.インストールが完了したら、以下のpm2コマンドを実行して、uptime-kumaアプリケーションを起動します。
pm2 start npm --name uptime-kuma -- run start-server -- --port=3001 --hostname=127.0.0.1
そして、以下のような出力メッセージが表示されます。

写真のように、アプリケーション名は「 uptime-kuma 「は「オンライン」のステータスで実行されています "。
3. pm2でアプリケーションのステータスを確認するには、以下のコマンドを実行します。
nodejsアプリケーションのステータスを確認してください。
pm2 status

nodejsアプリケーションログを確認してください。
pm2 logs

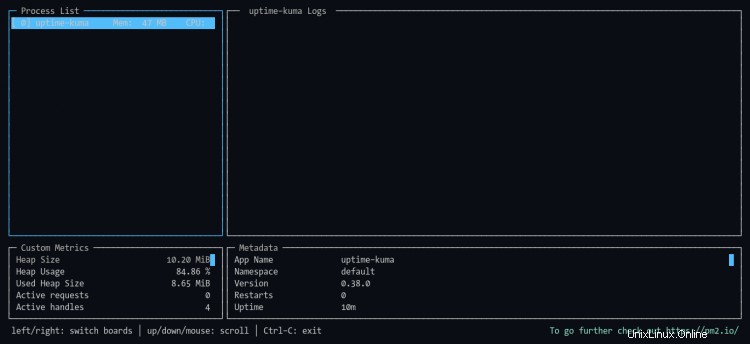
リアルタイムのnodejsアプリケーションの監視。
pm2 monit
4.次に、次のpm2コマンドを実行して、uptime-kumaアプリケーションのサービスファイルを生成します。
pm2 startup
その後、出力の順序に従ってコマンドを実行する必要があります。
sudo env PATH=$PATH:/home/johndoe/.nvm/versions/node/v14.17.4/bin /home/johndoe/.nvm/versions/node/v14.17.4/lib/node_modules/pm2/bin/pm2 startup systemd -u johndoe --hp /home/johndoe

必ず「sudo」を使用してください "コマンドを実行し、ユーザーに適切なパスワードを入力して、root権限を取得します。
コマンドが完了すると、次の出力が表示されます。

スクリーンショットに見られるように、pm2はユーザーに基づいてsystemdサービスを生成します。この例では、「 pm2-johndoe.service」です。 "。
次に、次のコマンドを実行して、uptime-kumaアプリケーションの状態を生成して保存します。このコマンドは、uptime-kumaアプリケーションを、システムの起動後も常にバックグラウンドで実行するために重要です。
pm2 save
5.サービスを確認するには'pm2-johndoe' 、以下のコマンドを実行します。
sudo systemctl is-enabled pm2-johndoe
「有効」という出力が表示されます `、つまり、uptime-kumaアプリケーションはシステムの起動後に自動的に実行されます。
さらに、システムを再起動してサーバーに再度ログインしてから、uptime-kumaサービスを確認することもできます。
sudo systemctl status pm2-johndoe
そして、以下のような出力が表示されるはずです。
? pm2-johndoe.service - PM2 process manager
     Loaded: loaded (/etc/systemd/system/pm2-johndoe.service; enabled; vendor preset: enabled)
     Active: active (running) since Tue 2021-08-10 01:52:37 UTC; 3min 57s ago
       Docs: https://pm2.keymetrics.io/
   Main PID: 745 (PM2 v5.1.0: God)
      Tasks: 34 (limit: 2343)
     Memory: 120.4M
     CGroup: /system.slice/pm2-johndoe.service
             ??745 PM2 v5.1.0: God Daemon (/home/johndoe/.pm2)
             ??772 npm
             ??873 sh -c node server/server.js "--port=3001" "--hostname=127.0.0.1"
             ??874 node server/server.js --port=3001 --hostname=127.0.0.1

Aug 10 01:52:36 ubuntu64 pm2[633]: [PM2] Spawning PM2 daemon with pm2_home=/home/johndoe/.pm2
Aug 10 01:52:37 ubuntu64 pm2[633]: [PM2] PM2 Successfully daemonized
Aug 10 01:52:37 ubuntu64 pm2[633]: [PM2] Resurrecting
Aug 10 01:52:37 ubuntu64 pm2[633]: [PM2] Restoring processes located in /home/johndoe/.pm2/dump.pm2
Aug 10 01:52:37 ubuntu64 pm2[633]: [PM2] Process /home/johndoe/.nvm/versions/node/v14.17.4/bin/npm restored
「pm2-johndoe.service "はシステムの起動時に稼働しています。
Apacheをリバースプロキシとして設定
このガイドでは、稼働時間のKumaアプリケーションのリバースプロキシとしてApacheWebサーバーをインストールして構成します。
1.次のコマンドを実行して、ApacheWebサーバーパッケージをインストールします。
sudo apt install apache2
"y"と入力します 「Enter」を押します "ApacheWebサーバーをインストールします。
2.その後、以下のコマンドを使用していくつかのapacheモジュールを有効にします。
sudo a2enmod ssl proxy proxy_ajp proxy_wstunnel proxy_http rewrite deflate headers proxy_balancer proxy_connect proxy_html
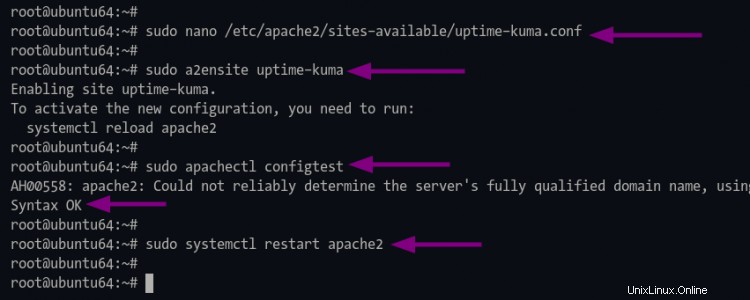
3.次に、新しい仮想ホスト構成を作成します' uptime-kuma.conf '以下のnanoエディターコマンドを使用します。
sudo nano /etc/apache2/sites-available/uptime-kuma.conf
次の構成をターミナルシェルに貼り付け、ドメイン名「 uptime.example.net」を変更します " domain.comなどのドメインで "。
<VirtualHost *:80>
  ServerName uptime.example.net

  ProxyPass / http://localhost:3001/
  RewriteEngine on
  RewriteCond %{HTTP:Upgrade} websocket [NC]
  RewriteCond %{HTTP:Connection} upgrade [NC]
  RewriteRule ^/?(.*) "ws://localhost:3001/$1" [P,L]
</VirtualHost>
「Ctrl+ x」を押します 「」と入力し、「 Y」と入力します "構成を保存します。
4.次に、以下のコマンドを使用して、apache仮想ホスト構成「uptime-kuma」をアクティブ化します。
sudo a2ensite uptime-kuma
その後、次のコマンドを実行してapacheの構成を確認し、エラーが発生していないことを確認します。
sudo apachectl configtest
5.次に、以下のコマンドを使用してapacheサービスを再起動し、新しい構成を適用します。
sudo systemctl restart apache2
SSLLetsencryptを使用したUptime-kumaの保護
Uptime-Kumaアクセスを保護するために、ApacheWebサーバー用にLetsencryptからSSLを設定します。
1.まず、次のコマンドを実行してcertbotツールをインストールします。
sudo apt install python3-certbot-apache
「y」と入力します 」を押して「Enter」を押します 「インストールを開始します。
2.インストールが完了したら、以下のcertbotコマンドを使用してSSLletsencryptを生成します。
sudo certbot --apache yourdomain.com
Letsencryptに登録するメールアドレスを入力し、「 Enter」を押します 「続行します。SSL証明書の有効期限が切れるたびに、Letsencryptはあなたのメールアドレスにメールを送信します。
```
Saving debug log to /var/log/letsencrypt/letsencrypt.log
Plugins selected: Authenticator apache, Installer apache
Enter email address (used for urgent renewal and security notices) (Enter 'c' to
cancel): [email protected]
Letsencrypt TOS(利用規約)には、「 A」と入力します 同意して「Enter」を押します 「続行します。
- - - - - - - - - - - - - - - - - - - - - - - - - - - - - - - - - - - - - - - -
Please read the Terms of Service at
https://letsencrypt.org/documents/LE-SA-v1.2-November-15-2017.pdf. You must
agree in order to register with the ACME server at
https://acme-v02.api.letsencrypt.org/directory
- - - - - - - - - - - - - - - - - - - - - - - - - - - - - - - - - - - - - - - -
(A)gree/(C)ancel: A
EFF(Electronic Frontier Foundation)とのメール共有には、「 Y」と入力できます。 「はい」および「N 「いいえ。この例では、EFFとメールアドレスを共有しません。
Would you be willing to share your email address with the Electronic Frontier
Foundation, a founding partner of the Let's Encrypt project and the non-profit
organization that develops Certbot? We'd like to send you email about our work
encrypting the web, EFF news, campaigns, and ways to support digital freedom.
- - - - - - - - - - - - - - - - - - - - - - - - - - - - - - - - - - - - - - - -
(Y)es/(N)o: N
これで、certbotツールはUptime-Kumaドメイン名のSSLLetsencryptを生成します。また、apache仮想ホスト構成の構成がいくつか追加されます。
HTTPからHTTPSへの自動リダイレクトを設定するように求められます。タイプ番号"2" Apacheの自動リダイレクトHTTPをHTTPSに設定し、[ Enter]を押します。 "。
```
Please choose whether or not to redirect HTTP traffic to HTTPS, removing HTTP access.
- - - - - - - - - - - - - - - - - - - - - - - - - - - - - - - - - - - - - - - -
1: No redirect - Make no further changes to the webserver configuration.
2: Redirect - Make all requests redirect to secure HTTPS access. Choose this for
new sites, or if you're confident your site works on HTTPS. You can undo this
change by editing your web server's configuration.
- - - - - - - - - - - - - - - - - - - - - - - - - - - - - - - - - - - - - - - -
Select the appropriate number [1-2] then [enter] (press 'c' to cancel): 2
デプロイプロセスが成功すると、以下のような出力が表示されます。
- - - - - - - - - - - - - - - - - - - - - - - - - - - - - - - - - - - - - - - -
Congratulations! You have successfully enabled https://uptime.example.net

You should test your configuration at:
https://www.ssllabs.com/ssltest/analyze.html?d=uptime.example.net
- - - - - - - - - - - - - - - - - - - - - - - - - - - - - - - - - - - - - - - -

IMPORTANT NOTES:
 - Congratulations! Your certificate and chain have been saved at:
   /etc/letsencrypt/live/uptime.example.net/fullchain.pem
   Your key file has been saved at:
   /etc/letsencrypt/live/uptime.example.net/privkey.pem
   Your cert will expire on 2021-10-10. To obtain a new or tweaked
   version of this certificate in the future, simply run certbot again
   with the "certonly" option. To non-interactively renew *all* of
   your certificates, run "certbot renew"
 - Your account credentials have been saved in your Certbot
   configuration directory at /etc/letsencrypt. You should make a
   secure backup of this folder now. This configuration directory will
   also contain certificates and private keys obtained by Certbot so
   making regular backups of this folder is ideal.
 - If you like Certbot, please consider supporting our work by:

   Donating to ISRG / Let's Encrypt:   https://letsencrypt.org/donate
   Donating to EFF:                    https://eff.org/donate-le

 - We were unable to subscribe you the EFF mailing list because your
   e-mail address appears to be invalid. You can try again later by
   visiting https://act.eff.org.
1. Webブラウザーを開き、アドレスバーにUptime-KumaURLインストールを入力します。
https://uptime.example.net/
HTTPSセキュア接続にリダイレクトされます。
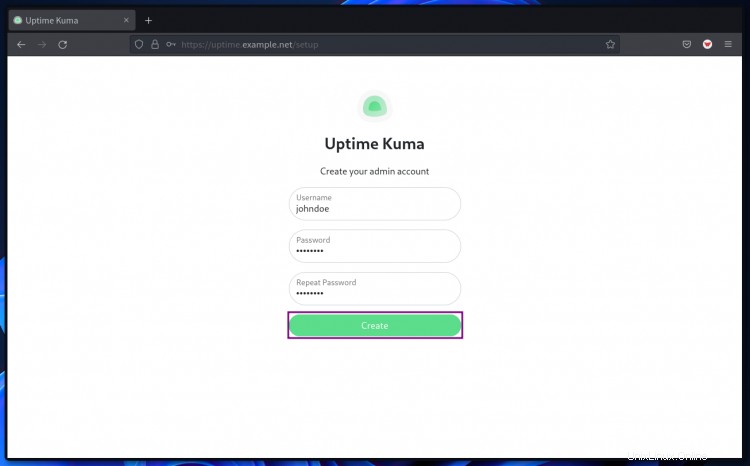
2.最初のページで、Uptime-kumaの新しい管理者ユーザーを作成します。管理者ユーザーとパスワードを入力し、[作成]をクリックします 「ボタン
3.その後、新しいユーザー名とパスワードでログインし、[ログイン]をクリックします 「ボタン。
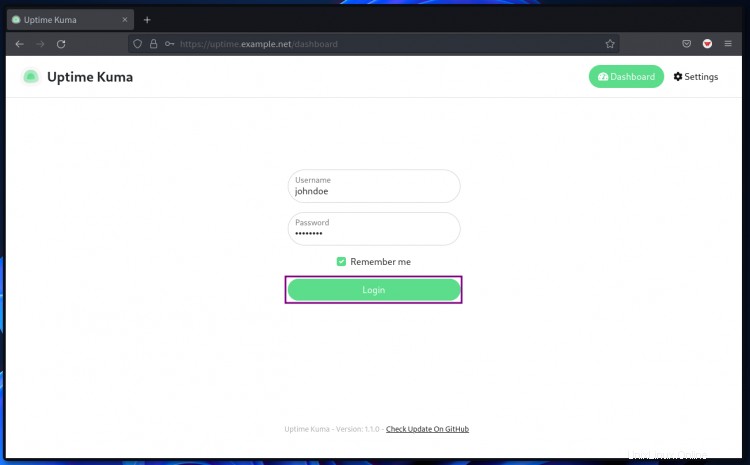
これで、uptime-kumaダッシュボードが表示されます。
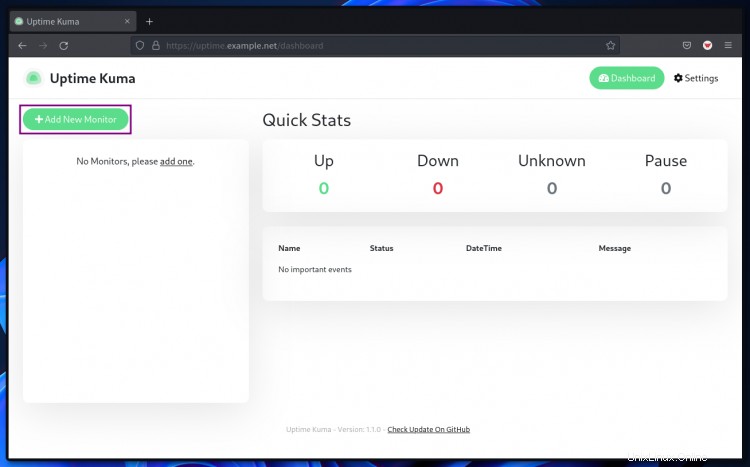
4.監視する新しいホストを追加するには、[新しいモニターを追加]ボタンをクリックします "。
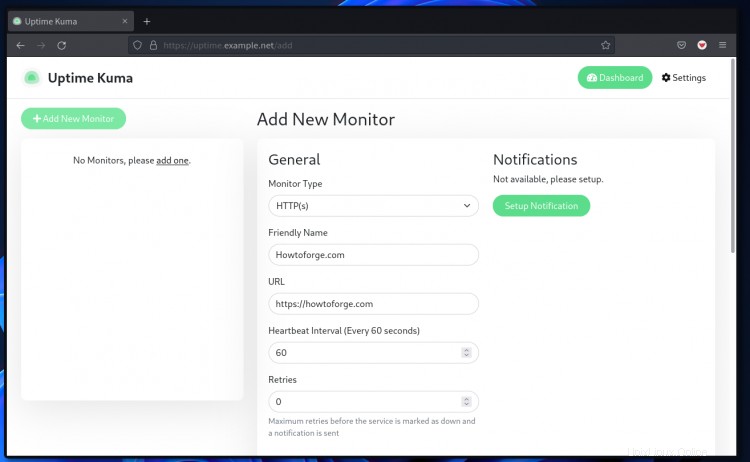
5.この例では、Webサイトを監視するため、「監視タイプ」を選択します。 "as" HTTP(s) "、ウェブサイトのURLアドレスを入力し、[セットアップ通知]をクリックします 通知サポートの場合は、[保存]をクリックします ページ下部の「」ボタン。
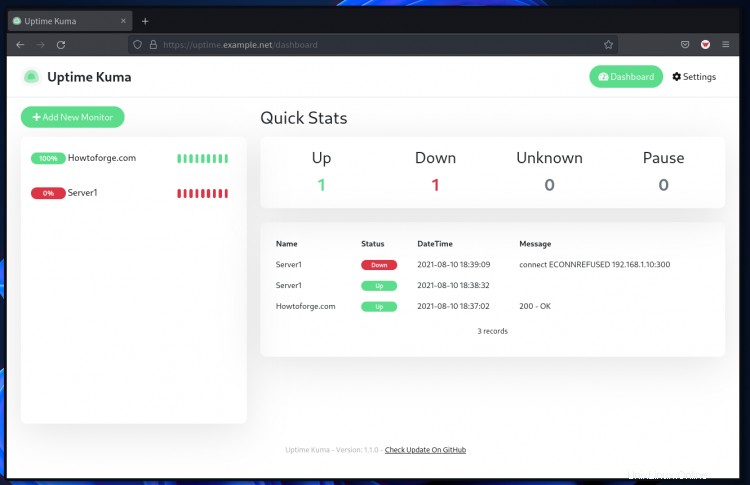
6.これで、稼働時間-Kumaダッシュボードにリダイレクトされ、ダッシュボードページにホストが表示されます。

以下は、新しいタイプ「 TCP / IP」を追加した後の別の例です。 "ポートが閉じている場合、結果は" ENCONNREFUSED "またはポートが拒否/閉じられたために接続エラーが発生しました。
おめでとう!これで、Uptime-Kuma with Apache Webサーバーがリバースプロキシとして正常にインストールされ、SSLLetsencryptを使用してUptime-Kumaの展開が保護されました。次のフェーズでは、ホストを追加して、ダウンインシデントの通知をアクティブ化できます。