SonarQubeは、アプリケーションのコード品質を継続的に検査するためのオープンソースプラットフォームです。 Java言語で記述されており、複数のデータベースをサポートしています。コードを検査し、Java、C、C ++、C#、PHP、およびJavaScript、HTML、CSSなどのWeb言語を含む20を超えるプログラミング言語のアプリケーションの状態を確認できます。 SonarQubeは、ソースコードを分析し、セキュリティの脆弱性を見つけ、バグを検出し、その結果をWebベースのダッシュボードに表示できます。 SonarQubeをMaven、Ant、Gradle、MSBuild、LDAP、Active Directory、GitHubと簡単に統合できます。
このチュートリアルでは、Ubuntu 18.04 LTS(Bionic Beaver)サーバーにSonarQubeをインストールする方法を学習します。
- Ubuntu18.04を実行しているサーバー。
- sudo権限を持つroot以外のユーザー。
開始する前に、システムを最新バージョンに更新する必要があります。これを行うには、次のコマンドを実行します。
sudo apt-get update -y
sudo apt-get upgrade -y
システムが更新されたら、システムを再起動して変更を適用します。
Javaのインストール
SonarQubeはJava言語で記述されているため、システムにJavaをインストールする必要があります。まず、次のコマンドを使用してJavaリポジトリを追加します。
sudo add-apt-repository ppa:webupd8team/java
次に、リポジトリを更新し、次のコマンドを使用してJavaをインストールします。
sudo apt-get update -y
sudo apt-get install oracle-java8-installer -y
Javaがインストールされたら、次のコマンドを使用してJavaのバージョンを確認します。
java -version
出力:
openjdk version "10.0.2" 2018-07-17
OpenJDK Runtime Environment (build 10.0.2+13-Ubuntu-1ubuntu0.18.04.3)
OpenJDK 64-Bit Server VM (build 10.0.2+13-Ubuntu-1ubuntu0.18.04.3, mixed mode)
PostgreSQLのインストールと構成
デフォルトでは、PostgreSQLの最新バージョンはUbuntu18.04のデフォルトリポジトリでは利用できません。そのため、PostgreSQLリポジトリをシステムに追加する必要があります。
これは、次のコマンドで実行できます。
sudo sh -c 'echo "deb http://apt.postgresql.org/pub/repos/apt/ `lsb_release -cs`-pgdg main" >> /etc/apt/sources.list.d/pgdg.list'
wget -q https://www.postgresql.org/media/keys/ACCC4CF8.asc -O - | sudo apt-key add -
次に、リポジトリを更新し、次のコマンドを使用してPostgreSQLをインストールします。
sudo apt-get update -y
sudo apt-get install postgresql postgresql-contrib
インストールが完了したら、次のコマンドを使用してPostgreSQLのステータスを確認します。
sudo systemctl status postgresql
出力:
? postgresql.service - PostgreSQL RDBMS
   Loaded: loaded (/lib/systemd/system/postgresql.service; enabled; vendor preset: enabled)
   Active: active (exited) since Sun 2018-12-02 08:49:29 UTC; 4h 30min ago
  Process: 1295 ExecStart=/bin/true (code=exited, status=0/SUCCESS)
 Main PID: 1295 (code=exited, status=0/SUCCESS)

Dec 02 08:49:29 ubuntu1804 systemd[1]: Starting PostgreSQL RDBMS...
Dec 02 08:49:29 ubuntu1804 systemd[1]: Started PostgreSQL RDBMS.
次に、次のコマンドを使用してpostgresユーザーに切り替えます。
su - postgres
次に、次のコマンドを使用してソナーユーザーを作成します。
createuser sonar
次に、次のコマンドを使用してPostgreSQLシェルに切り替えます。
psql
次に、ソナーユーザーのパスワードを設定し、次のコマンドでソナーデータベースを作成します。
ALTER USER sonar WITH ENCRYPTED password 'password';
CREATE DATABASE sonar OWNER sonar;
次に、PostgreSQLシェルからのexti:
\q
まず、次のコマンドを使用してSonarQubeのユーザーを作成します。
sudo adduser sonar
次に、次のコマンドを使用して最新バージョンのSonarQubeをダウンロードします。
wget https://binaries.sonarsource.com/Distribution/sonarqube/sonarqube-6.7.6.zip
ダウンロードが完了したら、次のコマンドを使用してダウンロードしたファイルを解凍します。
unzip sonarqube-6.7.6.zip
次に、次のコマンドを使用して、抽出したディレクトリを/optにコピーします。
sudo cp -r sonarqube-6.7.6 /opt/sonarqube
次に、次のコマンドを使用してソナーユーザーに所有権を付与します。
sudo chown -R sonar:sonar /opt/sonarqube
次に、ソナーユーザーとして実行するようにSonarQubeを構成する必要があります。これは、次のコマンドで実行できます。
sudo nano /opt/sonarqube/bin/linux-x86-64/sonar.sh
次の変更を行います:
RUN_AS_USER=sonar
ファイルを保存して閉じます。次に、SonarQubeのデフォルトの構成ファイルを開き、データベースのクレデンシャルを前に作成したもので変更します。
sudo nano /opt/sonarqube/conf/sonar.properties
次の変更を行います:
sonar.jdbc.username=sonar
sonar.jdbc.password=password
sonar.jdbc.url=jdbc:postgresql://localhost/sonar
sonar.web.host=127.0.0.1
sonar.search.javaOpts=-Xms512m  -Xmx512m
終了したら、ファイルを保存して閉じます。
SonarQubeのSystemdサービスファイルを作成
次に、SonarQubeサービスを管理するためのsystemdサービスファイルを作成する必要があります。これは、次のコマンドで実行できます。
sudo nano /etc/systemd/system/sonar.service
次の行を追加します:
[Unit]
Description=SonarQube service
After=syslog.target network.target

[Service]
Type=forking

ExecStart=/opt/sonarqube/bin/linux-x86-64/sonar.sh start
ExecStop=/opt/sonarqube/bin/linux-x86-64/sonar.sh stop

User=sonar
Group=sonar
Restart=always

[Install]
WantedBy=multi-user.target
終了したら、ファイルを保存して閉じます。次に、SonarQubeサービスを開始し、次のコマンドを使用して起動時に開始できるようにします。
sudo systemctl start sonar
sudo systemctl enable sonar
次のコマンドを使用して、SonarQubeサービスのステータスを確認できます。
sudo systemctl status sonar
出力:
? sonar.service - SonarQube service
   Loaded: loaded (/etc/systemd/system/sonar.service; disabled; vendor preset: enabled)
   Active: active (running) since Sun 2018-12-02 13:55:34 UTC; 2min 52s ago
  Process: 2339 ExecStart=/opt/sonarqube/bin/linux-x86-64/sonar.sh start (code=exited, status=0/SUCCESS)
 Main PID: 2396 (wrapper)
    Tasks: 133 (limit: 2323)
   CGroup: /system.slice/sonar.service
           ??2396 /opt/sonarqube/bin/linux-x86-64/./wrapper /opt/sonarqube/bin/linux-x86-64/../../conf/wrapper.conf wrapper.syslog.ident=SonarQ
           ??2399 java -Dsonar.wrapped=true -Djava.awt.headless=true -Xms8m -Xmx32m -Djava.library.path=./lib -classpath ../../lib/jsw/wrapper-
           ??2445 /usr/lib/jvm/java-8-oracle/jre/bin/java -XX:+UseConcMarkSweepGC -XX:CMSInitiatingOccupancyFraction=75 -XX:+UseCMSInitiatingOc
           ??2545 /usr/lib/jvm/java-8-oracle/jre/bin/java -Djava.awt.headless=true -Dfile.encoding=UTF-8 -Djava.io.tmpdir=/opt/sonarqube/temp -
           ??2622 /usr/lib/jvm/java-8-oracle/jre/bin/java -Djava.awt.headless=true -Dfile.encoding=UTF-8 -Djava.io.tmpdir=/opt/sonarqube/temp -

Dec 02 13:55:33 ubuntu1804 systemd[1]: Starting SonarQube service...
Dec 02 13:55:33 ubuntu1804 sonar.sh[2339]: Starting SonarQube...
Dec 02 13:55:34 ubuntu1804 sonar.sh[2339]: Started SonarQube.
Dec 02 13:55:34 ubuntu1804 systemd[1]: Started SonarQube service.
デフォルトでは、SonarQubeはポート9000でリッスンします。したがって、ポート80を使用してSonarQubeにアクセスするには、Apacheをリバースプロキシとしてインストールして構成する必要があります。
これを行うには、次のコマンドを使用してApacheをインストールします。
sudo apt-get install apache2 -y
次に、次のコマンドでmod_proxyモジュールを有効にします。
sudo a2enmod proxy
sudo a2enmod proxy_http
次に、次のコマンドを使用して、SonarQubeのApache仮想ホストファイルを作成します。
sudo nano /etc/apache2/sites-available/sonar.conf
次の行を追加します:
<VirtualHost *:80>
    ServerName example.com
    ServerAdmin [email protected]
    ProxyPreserveHost On
    ProxyPass / http://127.0.0.1:9000/
    ProxyPassReverse / http://127.0.0.1:9000/
    TransferLog /var/log/apache2/sonarm_access.log
    ErrorLog /var/log/apache2/sonar_error.log
</VirtualHost>
example.comを独自のドメイン名に置き換えます。ファイルを保存して閉じます。次に、次のコマンドを使用してSonarQube仮想ホストファイルを有効にします。
sudo a2ensite sonar
最後に、ApacheとSonarQubeサービスを再起動して、次のコマンドですべての変更を適用します。
sudo systemctl restart apache2
sudo systemctl restart sonar
デフォルトでは、SonarQubeはログを/ opt / sonarqube/logsディレクトリに保存します。次のコマンドでSonarQubeログを確認できます:
sudo tail -f /opt/sonarqube/logs/sonar.log
出力:
Launching a JVM...
Wrapper (Version 3.2.3) http://wrapper.tanukisoftware.org
  Copyright 1999-2006 Tanuki Software, Inc.  All Rights Reserved.

2018.12.02 13:55:43 INFO  app[][o.s.a.AppFileSystem] Cleaning or creating temp directory /opt/sonarqube/temp
2018.12.02 13:55:44 INFO  app[][o.s.a.es.EsSettings] Elasticsearch listening on /127.0.0.1:9001
2018.12.02 13:55:45 INFO  app[][o.s.a.p.ProcessLauncherImpl] Launch process[[key='es', ipcIndex=1, logFilenamePrefix=es]] from [/opt/sonarqube/elasticsearch]: /opt/sonarqube/elasticsearch/bin/elasticsearch -Epath.conf=/opt/sonarqube/temp/conf/es
2018.12.02 13:55:45 INFO  app[][o.s.a.SchedulerImpl] Waiting for Elasticsearch to be up and running
2018.12.02 13:55:48 INFO  app[][o.e.p.PluginsService] no modules loaded
2018.12.02 13:55:48 INFO  app[][o.e.p.PluginsService] loaded plugin [org.elasticsearch.transport.Netty4Plugin]
2018.12.02 13:56:34 INFO  app[][o.s.a.SchedulerImpl] Process[es] is up
2018.12.02 13:56:34 INFO  app[][o.s.a.p.ProcessLauncherImpl] Launch process[[key='web', ipcIndex=2, logFilenamePrefix=web]] from [/opt/sonarqube]: /usr/lib/jvm/java-8-oracle/jre/bin/java -Djava.awt.headless=true -Dfile.encoding=UTF-8 -Djava.io.tmpdir=/opt/sonarqube/temp -Xmx512m -Xms128m -XX:+HeapDumpOnOutOfMemoryError -cp ./lib/common/*:./lib/server/*:/opt/sonarqube/lib/jdbc/postgresql/postgresql-42.2.1.jar org.sonar.server.app.WebServer /opt/sonarqube/temp/sq-process420500314195865484properties
次のコマンドを使用して、SonarQubeWebログを確認することもできます。
sudo tail -f /opt/sonarqube/logs/web.log
出力:
2018.12.02 13:57:03 INFO  web[][o.s.s.p.ServerPluginRepository] Deploy plugin SonarJava / 4.15.0.12310 / 572454b93016ec73a53fe0e07b2ffdc356d21ba9
2018.12.02 13:57:03 INFO  web[][o.s.s.p.ServerPluginRepository] Deploy plugin SonarPHP / 2.11.0.2485 / 741861a29e5f9a26c6c99c06268facb6c4f4a882
2018.12.02 13:57:03 INFO  web[][o.s.s.p.ServerPluginRepository] Deploy plugin SonarPython / 1.8.0.1496 / 3fe3bc4d0273a5721ea2fb368dc45b1bb82fede3
2018.12.02 13:57:03 INFO  web[][o.s.s.p.ServerPluginRepository] Deploy plugin SonarQube :: Plugins :: SCM :: Git / 1.3.0.869 / 4da53e3f9e55f4f2e5796625cb0c5768ed152079
2018.12.02 13:57:03 INFO  web[][o.s.s.p.ServerPluginRepository] Deploy plugin SonarQube :: Plugins :: SCM :: SVN / 1.6.0.860 / 2111fdbd1dddda4ad6d4ed6486fd0b18c1010d3b
2018.12.02 13:57:03 INFO  web[][o.s.s.p.ServerPluginRepository] Deploy plugin SonarTS / 1.1.0.1079 / 042c9e65239a47d92d305f9767f730b3cc1e5ed3
2018.12.02 13:57:03 INFO  web[][o.s.s.p.ServerPluginRepository] Deploy plugin SonarXML / 1.4.3.1027 / 39588245cecf538bb27be4e496ff303b0143d20b
2018.12.02 13:57:07 INFO  web[][o.s.s.p.d.m.c.PostgresCharsetHandler] Verify that database charset supports UTF8
2018.12.02 13:57:09 INFO  web[][o.s.s.p.w.MasterServletFilter] Initializing servlet filter [email protected] [pattern=UrlPattern{inclusions=[/api/system/migrate_db/*, ...], exclusions=[/api/properties*, ...]}]
2018.12.02 13:57:09 INFO  web[][o.s.s.a.EmbeddedTomcat] HTTP connector enabled on port 9000
2018.12.02 13:57:16 INFO  web[][o.s.s.p.UpdateCenterClient] Update center: https://update.sonarsource.org/update-center.properties (no proxy)
これでSonarQubeがインストールおよび構成されました。 Webブラウザからアクセスするときが来ました。
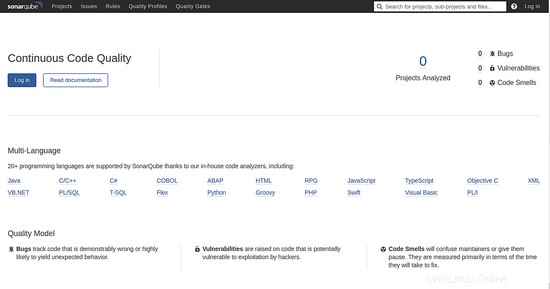
Webブラウザーを開き、URLhttp://example.comを入力します。次のページにリダイレクトされます:

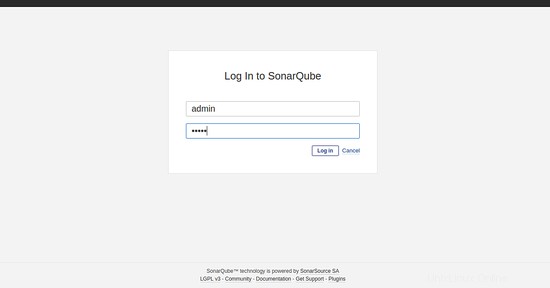
ここで、ログをクリックします で ボタン。次のページが表示されます:

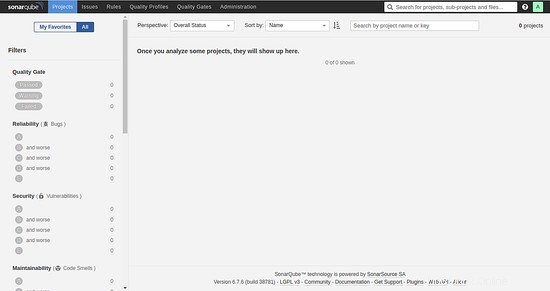
デフォルトの管理者アカウントのユーザー名とパスワードをadmin/adminとして入力し、ログをクリックします。 で ボタン。次のページにSonarQubeのデフォルトのダッシュボードが表示されます。

おめでとう!これで、Ubuntu18.04サーバーにSonarQubeが正常にインストールされました。 SonarQubeを使用して、自動レビューを簡単に実行し、アプリケーションの状態を確認できるようになりました。