パーフェクトサーバー-CentOS6.2x86_64 with nginx [ISPConfig 3]
このチュートリアルでは、ISPConfig3のインストール用にCentOS6.2 x86_64サーバーを準備する方法と、ISPConfig3をインストールする方法を示します。ISPConfig3は、Webブラウザーを介して次のサービスを構成できるWebホスティングコントロールパネルです。nginxWebサーバー、Postfixメールサーバー、MySQL、BINDネームサーバー、PureFTPd、SpamAssassin、ClamAV、Mailman、その他多数。バージョン3.0.4以降、ISPConfigには、Apacheに加えてnginxWebサーバーの完全なサポートが付属しています。このチュートリアルでは、Apacheではなくnginxを使用するサーバーのセットアップについて説明します。
この設定はISPConfig2では機能しないことに注意してください ! ISPConfig3でのみ有効です。
これがあなたのために働くという保証はありません!
ISPConfig3マニュアル
ISPConfig 3の使用方法を学ぶために、ISPConfig3マニュアルをダウンロードすることを強くお勧めします。
約300ページで、ISPConfig(管理者、再販業者、クライアント)の背後にある概念をカバーし、ISPConfig 3をインストールおよび更新する方法を説明し、有効な入力の例とともにISPConfigのすべてのフォームとフォームフィールドのリファレンスを含み、 ISPConfig 3で最も一般的なタスクです。また、サーバーをより安全にする方法を示し、最後にトラブルシューティングのセクションがあります。
Android用ISPConfigモニターアプリ
ISPConfig Monitor Appを使用すると、サーバーのステータスを確認し、すべてのサービスが期待どおりに実行されているかどうかを確認できます。 TCPおよびUDPポートを確認し、サーバーにpingを実行できます。さらに、このアプリを使用して、ISPConfigがインストールされているサーバーに詳細を要求できます(ISPConfigモニターアプリをサポートするインストール済みのISPConfig3の最小バージョンは3.0.3.3です! );これらの詳細には、ISPConfigコントロールパネルのモニターモジュールから知っているすべてのもの(サービス、メールとシステムのログ、メールキュー、CPUとメモリの情報、ディスク使用量、クォータ、OSの詳細、RKHunterログなど)が含まれます。 、ISPConfigはマルチサーバー対応であるため、ISPConfigマスターサーバーから制御されているすべてのサーバーを確認できます。
ダウンロードと使用方法については、http://www.ispconfig.org/ispconfig-3/ispconfig-monitor-app-for-android/にアクセスしてください。
1要件
このようなシステムをインストールするには、次のものが必要です。
- 隣のミラーから2枚のCentOS6.2DVDをダウンロードします(ミラーのリストはここにあります:http://isoredirect.centos.org/centos/6/isos/x86_64/)。
- 高速インターネット接続。
2予備メモ
このチュートリアルでは、ホスト名server1.example.comとIPアドレス192.168.0.100およびゲートウェイ192.168.0.1を使用します。これらの設定はユーザーによって異なる場合があるため、必要に応じて置き換える必要があります。
3ベースシステムのインストール
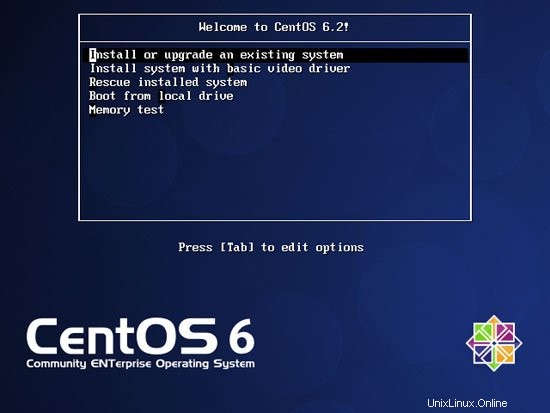
最初のCentOS6.2DVD(DVD 1)から起動します。 [既存のシステムのインストールまたはアップグレード]を選択します:
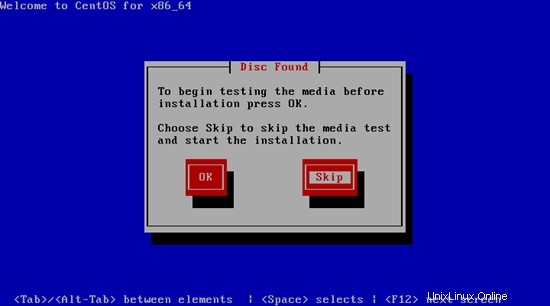
インストールメディアのテストには長い時間がかかる可能性があるため、ここではこのテストをスキップします:
CentOSインストーラーのウェルカム画面が表示されます。 [次へ]をクリックします:

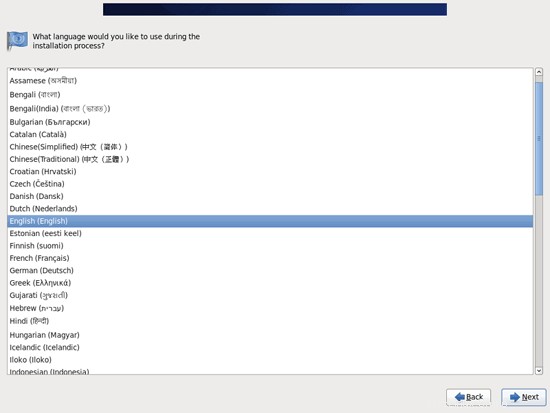
次に言語を選択してください:
キーボードレイアウトを選択します:
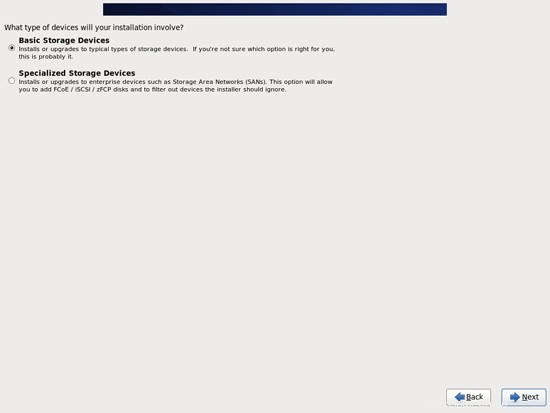
ローカルに接続されたハードドライブを使用していると想定しているため、ここで基本ストレージデバイスを選択する必要があります:
次の警告が表示される場合があります-ストレージデバイスの警告。これが表示された場合は、[はい、データを破棄します]ボタンをクリックして続行します:
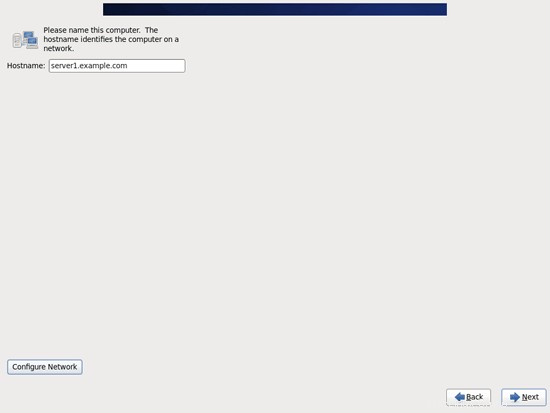
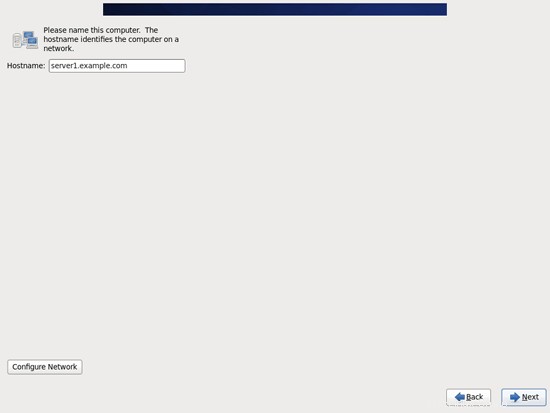
サーバーのホスト名(例:server1.example.com)を入力し、[ネットワークの構成]ボタンをクリックします。
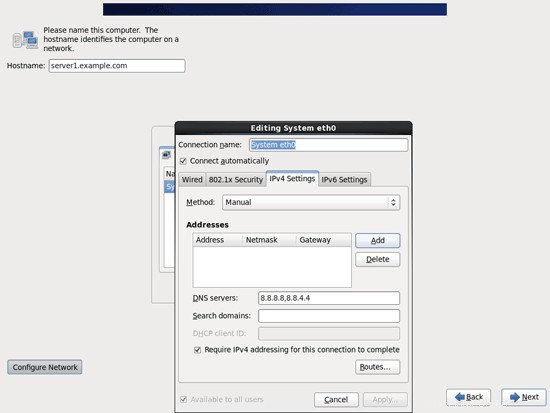
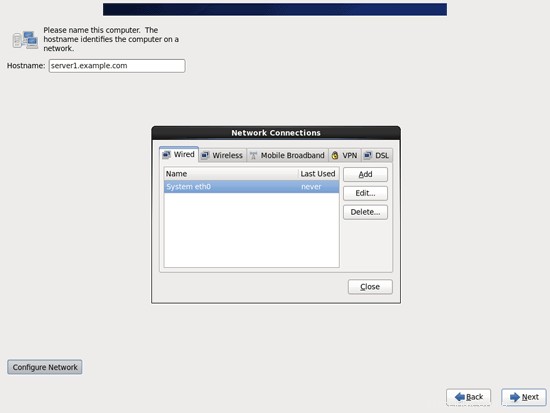
[有線]タブに移動し、ネットワークインターフェイス(おそらくeth0)を選択して、[編集...]をクリックします。:
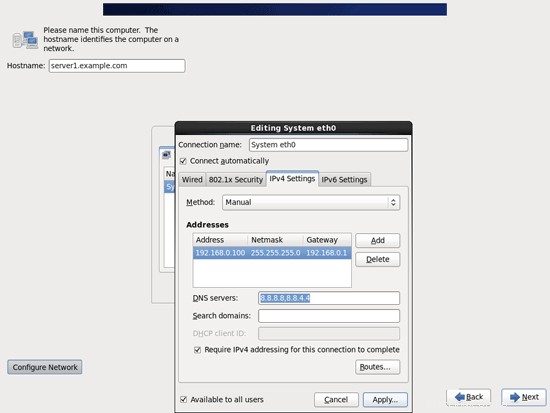
[自動的に接続する]チェックボックスをオンにして、[IPv4設定]タブに移動し、[方法]ドロップダウンメニューで[手動]を選択します。 [DNSサーバー]フィールド(例:8.8.8.8、8.8.4.4)に1つ、2つ、または3つのネームサーバー(コンマで区切って)を入力し、[アドレス]領域の横にある[追加]ボタンをクリックします。
次に、ネットワークカードに静的IPアドレスとネットマスクを指定します(このチュートリアルでは、デモンストレーションの目的でIPアドレス192.168.0.100とネットマスク255.255.255.0を使用しています。正しい値がわからない場合は、http://www。サブネットマスク.infoが役立つ場合があります)。また、ゲートウェイ(192.168.0.1など)に入力して、[適用...]ボタンをクリックします:
これでネットワーク構成は完了です。 [次へ]ボタンをクリックします:
完璧なサーバー-CentOS6.2x86_64 with nginx[ISPConfig3]-ページ2
4 / etc/hostsを調整します
次に、/ etc/hostsを編集します。次のようにします:
vi / etc / hosts
127.0.0.1 localhost localhost.localdomain localhost4 localhost4.localdomain4192.168.0.100 server1.example.com server1 ::1 localhost localhost.localdomainlocalhost6localhost6。 localdomain6 |
5ファイアウォールの構成
(基本的なシステムインストールの最後にファイアウォールをすでに無効にしている場合は、この章をスキップできます。)
このチュートリアルの最後に、独自のファイアウォールが付属しているISPConfigをインストールしたいと思います。そのため、今はデフォルトのCentOSファイアウォールを無効にしています。もちろん、そのままにして、必要に応じて構成することもできます(ただし、CentOSファイアウォールに干渉する可能性が高いため、後で他のファイアウォールを使用しないでください)。
実行
system-config-firewall
ファイアウォールを無効にします。
ファイアウォールが実際に無効になっていることを確認するには、
を実行できます。iptables -L
その後。出力は次のようになります。
[example@unixlinux.online〜]#iptables -L
Chain INPUT(policy ACCEPT)
target prot opt source destination
Chain FORWARD(policy ACCEPT)
target prot opt source destination
Chain OUTPUT(policy ACCEPT)
target prot opt source destination
[example@unixlinux.online〜]#
6SELinuxを無効にする
SELinuxはCentOSのセキュリティ拡張であり、拡張セキュリティを提供する必要があります。私の意見では、安全なシステムを構成するためにそれを必要とせず、通常、利点よりも多くの問題を引き起こします(一部のサービスが期待どおりに機能しなかったため、1週間のトラブルシューティングを行った後、それを考えてください。すべてが問題ないことを確認してください。SELinuxのみが問題を引き起こしていました)。したがって、無効にします(後でISPConfigをインストールする場合は必須です)。
/ etc / selinux / configを編集し、SELINUX =disableを設定します:
vi / etc / selinux / config
#このファイルは、システム上のSELinuxの状態を制御します。#SELINUX =は、次の3つの値のいずれかを取ることができます。 。#permissive-SELinuxは強制する代わりに警告を出力します。#disabled-SELinuxポリシーはロードされません。SELINUX=disable#SELINUXTYPE =は、次の2つの値のいずれかを取ることができます。 SELINUXTYPE =targeted |
その後、システムを再起動する必要があります:
再起動
7追加のリポジトリを有効にして、いくつかのソフトウェアをインストールする
まず、ソフトウェアパッケージのGPGキーをインポートします:
rpm --import / etc / pki / rpm-gpg / RPM-GPG-KEY *
次に、CentOSシステムでRPMforgeおよびEPELリポジトリを有効にします。これは、このチュートリアルの過程でインストールするパッケージの多くが、公式のCentOS6.2リポジトリでは利用できないためです。
rpm --import http://dag.wieers.com/rpm/packages/RPM-GPG-KEY.dag.txt
cd / tmp
wget http://pkgs.repoforge.org/rpmforge-release/rpmforge-release-0.5.2-2.el6.rf.x86_64.rpm
rpm -ivh rpmforge-release- 0.5.2-2.el6.rf.x86_64.rpm
(上記のリンクが機能しなくなった場合は、rpmforge-releaseの現在のバージョンをここで見つけることができます:http://packages.sw.be/rpmforge-release/)
rpm --import https://fedoraproject.org/static/0608B895.txt
wgethttp://dl.fedoraproject.org/pub/epel/6/x86_64/epel-release-6-5.noarch。 rpm
rpm -ivh epel-release-6-5.noarch.rpm
また、後でインストールするphp-fpmパッケージを含むRemiRPMリポジトリを有効にする必要があります。
rpm --import http://rpms.famillecollet.com/RPM-GPG-KEY-remi
rpm -ivh http://rpms.famillecollet.com/enterprise/remi-release-6.rpm
yum install yum-priorities
/etc/yum.repos.d/epel.repoを編集します...
vi /etc/yum.repos.d/epel.repo
...そして[epel]セクションにpriority=10という行を追加します:
[epel] name =Enterprise Linux6用の追加パッケージ-$basearch#baseurl =http://download.fedoraproject.org/pub/epel/ 6 / $ basearchmirrorlist =https://mirrors.fedoraproject.org/metalink?repo =epel-6&arch =$ basearchfailovermethod =priorityenabled =1priority =10gpgcheck =1gpgkey =file:/// etc / pki / rpm-gpg / RPM-GPG -KEY-EPEL-6 [...] |
次に、/ etc / yum.repos.d / remi.repoの[remi]セクションについても同じことを行い、さらに1に変更します。
vi /etc/yum.repos.d/remi.repo
[remi] name =Les RPM de remi pour Enterprise Linux $ releasever-$ basearch#baseurl =http://rpms.famillecollet.com/enterprise /$releasever/remi/$basearch/mirrorlist=http://rpms.famillecollet.com/enterprise/$releasever/remi/mirrorenabled=1priority=10gpgcheck=1gpgkey=file:/// etc / pki / rpm-gpg / RPM -GPG-KEY-remifailovermethod =priority [remi-test] name =Les RPM de remi en test pour Enterprise Linux $ releasever-$ basearch#baseurl =http://rpms.famillecollet.com/enterprise/$releasever/test/ $ basearch / mirrorlist =http://rpms.famillecollet.com/enterprise/$releasever/test/mirrorenabled=0gpgcheck=1gpgkey=file:/// etc / pki / rpm-gpg / RPM-GPG-KEY-remi> |
次に、システム上の既存のパッケージを更新します。
yumアップデート
次に、後で必要になるいくつかのソフトウェアパッケージをインストールします。
yumgroupinstall'開発ツール'
8クォータ
(私が行ったのとは異なるパーティションスキームを選択した場合は、この章を調整して、必要なパーティションにクォータが適用されるようにする必要があります。)
クォータをインストールするには、次のコマンドを実行します:
yumインストールクォータ
/ etc / fstabを編集し、、usrjquota =aquota.user、grpjquota =aquota.group、jqfmt =vfsv0を/パーティション(/ dev / mapper / vg_server1-lv_root)に追加します。
vi / etc / fstab
## / etc / fstab#2011年12月16日金曜日00:22:26にanacondaによって作成##アクセス可能なファイルシステムは、参照により、 '/ dev / disk'#詳細については、マニュアルページfstab(5)、findfs(8)、mount(8)、blkid(8)を参照してください#/ dev / mapper / vg_server1-lv_root / ext4 defaults、usrjquota =aquota .user、grpjquota =aquota.group、jqfmt =vfsv0 1 1UUID =d995c881-fbc7-409f-bcad-86d255331a3f / boot ext4 defaults 1 2 / dev / mapper / vg_server1-lv_swap swap swap defaults 0 0tmpfs / dev / shm tmpfs defaults 0 0devpts / dev / pts devpts gid =5、mode =620 0 0sysfs / sys sysfs defaults 0 0proc / proc proc defaults 0 0 |
次に実行します
mount -o remount /
quotacheck -avugm
quote-avug
クォータを有効にします。
9システム時計を同期する
システムクロックをNTP( n )と同期することをお勧めします etwork t ime p rotocol)インターネット上のサーバー。単に実行する
yum install ntp
システム時刻は常に同期されます。
10MySQLをインストール
次のようにMySQLをインストールします。
yum install mysql mysql-server
次に、MySQLのシステム起動リンクを作成して起動します:
chkconfig --levels 235 mysqld on
/etc/init.d/mysqld start
MySQLルートアカウントのパスワードを設定します:
mysql_secure_installation
[example@unixlinux.online tmp]#mysql_secure_installation
注:このスクリプトのすべての部分を実行することは、本番環境のすべてのMySQLに推奨されます
使用する!各ステップを注意深くお読みください。
MySQLにログインしてセキュリティで保護するには、rootユーザーの現在の
パスワードが必要です。 MySQLをインストールしたばかりで、
rootパスワードをまだ設定していない場合、パスワードは空白になります。
ここで、Enterキーを押すだけです。
Enter rootの現在のパスワード(noneの場合は入力):
OK、正常に使用されたパスワード、次に進みます...
rootパスワードを設定すると、誰もMySQLにログインできないようになります
root適切な権限のないユーザー。
rootパスワードを設定しますか? [Y / n] <-ENTER
新しいパスワード:<-yourrootsqlpassword
新しいパスワードを再入力:<-yourrootsqlpassword
パスワードが正常に更新されました!
特権テーブルを再読み込みしています。 。
...成功!
デフォルトでは、MySQLのインストールには匿名のユーザーが含まれているため、ユーザーアカウントを持たなくても誰でもMySQLにログインできます。
それらのために作成されました。これは、テストのみを目的としており、インストールを
少しスムーズにすることを目的としています。
本番環境に移動する前に、それらを削除する必要があります。
匿名ユーザーを削除しますか? [Y / n] <-ENTER
...成功!
通常、rootは「localhost」からの接続のみを許可する必要があります。これにより、
誰かが、ネットワークからのルートパスワードを推測できないようになります。
ルートログインをリモートで禁止しますか? [Y / n] <-ENTER
...成功!
デフォルトでは、MySQLには「test」という名前のデータベースが付属しており、誰でもアクセスできます。
これもテストのみを目的としており、
本番環境に移動する前に削除する必要があります。
テストデータベースを削除して、データベースにアクセスしますか? [Y / n] <-ENTER
-テストデータベースを削除しています...
...成功しました!
-テストデータベースの特権を削除しています...
...成功しました!
特権テーブルを再読み込みすると、これまでに行われたすべての変更が
すぐに有効になります。
特権テーブルを今すぐ再読み込みしますか? [Y / n] <-ENTER
...成功!
クリーンアップ...
すべて完了しました!上記のすべての手順を完了した場合、MySQLのインストールは安全になっているはずです。
MySQLをご利用いただきありがとうございます。
[example @ unixlinux.online tmp]#
完璧なサーバー-CentOS6.2x86_64 with nginx[ISPConfig3]-4ページ
11 Courier-IMAP、Courier-Authlib、およびMaildropをインストールします
残念ながら、Courier-IMAP、Courier-Authlib、およびMaildrop用のrpmパッケージはないため、自分で作成する必要があります。
最初にDovecotを削除します(CentOS6.2にはDovecot2.xが付属しています。残念ながら、ISPConfig3はDovecot1.2.xをサポートしていますが、2.xはサポートしていません):
yum remove dovecot dovecot-mysql
次に、Courierrpmパッケージをビルドするために必要な前提条件をインストールします。
yum install rpm-build gcc mysql-devel openssl-devel cyrus-sasl-devel pkgconfig zlib-devel pcre-devel openldap-devel postgresql-devel expected libtool-ltdl-devel openldap-servers libtool gdbm-devel pam-devel gamin -devel libidn-devel
RPMパッケージはrootとしてビルドしないでください。 courier-imapは、コンパイルがrootユーザーとして実行されていることを検出した場合でも、コンパイルを拒否します。したがって、ここで通常のユーザーアカウント(この例ではfalko)を作成し、パスワードを与えます:
useradd -m -s / bin / bash falko
passwd falko
ユーザーfalkoがrpmパッケージをコンパイルしてインストールできるように、後でsudoコマンドが必要になります。ただし、最初に、falkoがsudoを使用してすべてのコマンドを実行できるようにする必要があります:
実行
visudo
開いたファイルには、ルートALL =(ALL)ALLという行があります。その行のすぐ下にfalkoの同様の行を追加します:
[...]##rootが任意のコマンドをどこでも実行できるようにするrootALL=(ALL)ALLfalko ALL =(ALL)ALL [...] |
これで、rpmパッケージをビルドする準備が整いました。最初にユーザーfalkoになります:
su falko
次に、ビルド環境を作成します:
mkdir $ HOME / rpm
mkdir $ HOME / rpm / SOURCES
mkdir $ HOME / rpm / SPECS
mkdir $ HOME / rpm / BUILD
mkdir $ HOME / rpm / BUILDROOT
mkdir $ HOME / rpm / SRPMS
mkdir $ HOME / rpm / RPMS
mkdir $ HOME / rpm / RPMS / i386
mkdir $ HOME / rpm / RPMS / x86_64
echo "%_topdir $ HOME / rpm">> $ HOME / .rpmmacros
次に、ダウンロードディレクトリを作成し、http://www.courier-mta.org/download.phpからソースファイルをダウンロードします。
mkdir $ HOME / downloads
cd $ HOME / downloads
wget https://sourceforge.net/projects/courier/files/authlib/0.63.0/courier-authlib-0.63.0.tar.bz2/download
wget https://sourceforge.net/projects/courier /files/imap/4.9.3/courier-imap-4.9.3.tar.bz2/download
wget https://sourceforge.net/projects/courier/files/maildrop/2.5.5/maildrop-2.5 .5.tar.bz2/ダウンロード
(4.10.0はFedoraに存在するsystemctlに依存しますが、CentOSには依存しないため、ここでは新しい4.10.0の代わりにCourier-IMAP 4.9.3を使用していることに注意してください。)
これで(まだ$ HOME / downloadsにあります)、courier-authlibを作成できます:
sudo rpmbuild -ta courier-authlib-0.63.0.tar.bz2
ビルドプロセスの後、rpmパッケージは/ root / rpmbuild / RPMS / x86_64(i686システムを使用している場合は/ root / rpmbuild / RPMS / i686)にあります。コマンド
sudo ls -l / root / rpmbuild / RPMS / x86_64
利用可能なrpmパッケージを表示します:
[example@unixlinux.online downloads] $ sudo ls -l / root / rpmbuild / RPMS / x86_64
total 528
-rw-r--r-- 1 root root 124008 Dec 16 01:10 courier -authlib-0.63.0-1.el6.x86_64.rpm
-rw-r--r-- 1 root root 270860 Dec 1601:10courier-authlib-debuginfo-0.63.0-1.el6。 x86_64.rpm
-rw-r--r-- 1 root root 35072 Dec 16 01:10 courier-authlib-devel-0.63.0-1.el6.x86_64.rpm
-rw-r --r-- 1 root root 17368 Dec 16 01:10 courier-authlib-ldap-0.63.0-1.el6.x86_64.rpm
-rw-r--r-- 1 root root 13928 Dec 16 01:10 courier-authlib-mysql-0.63.0-1.el6.x86_64.rpm
-rw-r--r-- 1 root root 13076 Dec 1601:10courier-authlib-pgsql-0.63。 0-1.el6.x86_64.rpm
-rw-r--r-- 1 root root 8312 Dec 16 01:10 courier-authlib-pipe-0.63.0-1.el6.x86_64.rpm
-rw-r--r-- 1 root root 34064 Dec 16 01:10 courier-authlib-userdb-0.63.0-1.el6.x86_64.rpm
[example@unixlinux.online downloads] $
インストールするものを選択し、次のようにインストールします。
sudo rpm -ivh /root/rpmbuild/RPMS/x86_64/courier-authlib-0.63.0-1.el6.x86_64.rpm /root/rpmbuild/RPMS/x86_64/courier-authlib-mysql-0.63.0- 1.el6.x86_64.rpm /root/rpmbuild/RPMS/x86_64/courier-authlib-devel-0.63.0-1.el6.x86_64.rpm
次に、ダウンロードディレクトリに戻ります:
cd $ HOME / downloads
次のコマンドを実行して、必要なディレクトリを作成するか、ディレクトリのアクセス許可を変更します(そうしないと、Courier-Imapのビルドプロセスが失敗するため):
sudo mkdir -p / var / cache / ccache / tmp
sudo chmod o + rwx / var / cache / ccache /
sudo chmod 777 / var / cache / ccache / tmp
ここで、今度はsudoを使用せずにrpmbuildを再度実行します。そうしないと、rootとして実行されたため、コンパイルが失敗します。
rpmbuild -ta courier-imap-4.9.3.tar.bz2
ビルドプロセス後、rpmパッケージは$ HOME / rpm / RPMS / x86_64(i686システムを使用している場合は$ HOME / rpm / RPMS / i686)にあります:
cd $ HOME / rpm / RPMS / x86_64
コマンド
ls -l </ pre>利用可能なrpmパッケージを表示します:
[example@unixlinux.online x86_64] $ ls -l <br /> total 1116
-rw-rw-r-- 1 falko falko 331908 Dec 16 01:33 courier-imap-4.9.3-1.x86_64 .rpm
-rw-rw-r-- 1 falko falko 800864 Dec 16 01:33 courier-imap-debuginfo-4.9.3-1.x86_64.rpm
[example@unixlinux.online x86_64] $次のようにcourier-imapをインストールできます:
sudo rpm -ivh courier-imap-4.9.3-1.x86_64.rpm次に、ダウンロードディレクトリに戻ります:
cd $ HOME / downloadsそして、rpmbuildを再度実行して、今度はメールドロップパッケージをビルドします。
sudo rpmbuild -ta maildrop-2.5.5.tar.bz2ビルドプロセスの後、rpmパッケージは/ root / rpmbuild / RPMS / x86_64(i686システムを使用している場合は/ root / rpmbuild / RPMS / i686)にあります。コマンド
sudo ls -l / root / rpmbuild / RPMS / x86_64利用可能なrpmパッケージを表示します:
[example@unixlinux.online downloads] $ sudo ls -l / root / rpmbuild / RPMS / x86_64
total 1712
-rw-r--r-- 1 root root 124008 Dec 16 01:10 courier -authlib-0.63.0-1.el6.x86_64.rpm
-rw-r--r-- 1 root root 270860 Dec 1601:10courier-authlib-debuginfo-0.63.0-1.el6。 x86_64.rpm
-rw-r--r-- 1 root root 35072 Dec 16 01:10 courier-authlib-devel-0.63.0-1.el6.x86_64.rpm
-rw-r --r-- 1 root root 17368 Dec 16 01:10 courier-authlib-ldap-0.63.0-1.el6.x86_64.rpm
-rw-r--r-- 1 root root 13928 Dec 16 01:10 courier-authlib-mysql-0.63.0-1.el6.x86_64.rpm
-rw-r--r-- 1 root root 13076 Dec 1601:10courier-authlib-pgsql-0.63。 0-1.el6.x86_64.rpm
-rw-r--r-- 1 root root 8312 Dec 16 01:10 courier-authlib-pipe-0.63.0-1.el6.x86_64.rpm
-rw-r--r-- 1 root root 34064 Dec 16 01:10 courier-authlib-userdb-0.63.0-1.el6.x86_64.rpm
-rw-r--r-- 1 root root 286480 Dec 16 01:40 maildrop-2.5.5-1.x86_64.rpm
-rw-r--r-- 1 root root 751376 Dec 16 01:40 maildrop-debuginfo-2.5.5- 1.x86_64.r pm
-rw-r--r-- 1 root root 102104 Dec 16 01:40 maildrop-devel-2.5.5-1.x86_64.rpm
-rw-r--r-- 1 root root 65940 Dec 16 01:40 maildrop-man-2.5.5-1.x86_64.rpm
[example@unixlinux.online downloads] $これで、次のようにメールドロップをインストールできます:
sudo rpm -ivh /root/rpmbuild/RPMS/x86_64/maildrop-2.5.5-1.x86_64.rpm必要なすべてのパッケージをコンパイルしてインストールしたら、「
」と入力して再びrootになることができます。終了次に、Courier-IMAP/-POP3を次のように起動します。
/etc/init.d/courier-imap start
12Postfixをインストール
Postfixは次のようにインストールできます:
yum install postfix次に、Sendmailをオフにして、Postfixを開始します:
chkconfig --levels 235 sendmail off
chkconfig --levels 235 postfix on
/etc/init.d/sendmail stop
/etc/init.d/postfix restart
13Getmailをインストールする
Getmailは次のようにインストールできます:
yum install getmail
14 Amavisd-new、SpamAssassin、ClamAVをインストール
amavisd-new、spamassassin、およびclamavをインストールするには、次のコマンドを実行します。
yum install amavisd-new spamassassin clamav clamd unzip bzip2 unrar perl-DBD-mysql次に、freshclam、amavisd、およびclamd.amavisdを開始します:
sa-update
chkconfig --levels 235 amavisd on
chkconfig --del clamd
chkconfig --levels 235 clamd.amavisd on
/ usr / bin / freshclam
/etc/init.d/amavisd start
/etc/init.d/clamd.amavisd start
完璧なサーバー-CentOS6.2x86_64 with nginx[ISPConfig3]-5ページ
15 Nginx、PHP5(PHP-FPM)、およびFcgiwrapをインストールします
Nginxは、CentOS 6.2(EPELから)のパッケージとして入手でき、次のようにインストールできます。
yum install nginxApache2がすでにシステムにインストールされている場合は、今すぐ停止してください...
/etc/init.d/httpd stop...そしてApacheのシステムスタートアップリンクを削除します:
chkconfig --del httpd次に、nginxのシステム起動リンクを作成して起動します:
chkconfig --levels 235 nginx on
/etc/init.d/nginx start(Apache2とnginxの両方がインストールされている場合、ISPConfig 3インストーラーはどちらを使用するかを尋ねます。この場合はnginxと答えます。両方の両方がインストールされている場合、ISPConfigは必要な構成を自動的に行います。)
>PHP5をPHP-FPMを介してnginxで動作させることができます(PHP-FPM(FastCGI Process Manager)は、あらゆるサイズのサイト、特に忙しいサイトに役立ついくつかの追加機能を備えた代替のPHP FastCGI実装です)。次のように、phpスクリプトからMySQLを使用する場合に必要なphp-cliおよびphp-mysqlなどのいくつかのPHP5モジュールと一緒にphp-fpmをインストールできます。
yum install php-fpm php-cli php-mysql php-gd php-imap php-ldap php-odbc php-pear php-xml php-xmlrpc php-xcache php-magickwand php-magpierss php-mbstring php-mcrypt php-mssql php-shout php-snmp php-soap php-tidy次に、/ etc/php.iniを開きます...
vi /etc/php.ini...エラーレポートを変更します(通知が表示されなくなるようにします):
[...]; error_reporting =E_ALL&〜E_DEPRECATEDerror_reporting =E_ALL&〜E_NOTICE [...] |
また、cgi.fix_pathinfo =0を設定します:
vi /etc/php.ini
[...]; cgi.fix_pathinfoは、CGIの*実際の* PATH_INFO/PATH_TRANSLATEDサポートを提供します。 PHPの;以前の動作は、PATH_TRANSLATEDをSCRIPT_FILENAMEに設定し、grokしないことでした。 PATH_INFOとは何ですか。 PATH_INFOの詳細については、cgiの仕様を参照してください。設定;これを1にすると、PHPCGIはそのパスを仕様に準拠するように修正します。設定;ゼロの場合、PHPは以前と同じように動作します。デフォルトは1です。スクリプトを修正する必要があります。 PATH_TRANSLATEDではなくSCRIPT_FILENAMEを使用します。; http://www.php.net/manual/en/ini.core.php#ini.cgi.fix-pathinfocgi.fix_pathinfo=0 [...] |
(http://wiki.nginx.org/Pitfallsを読んで、これを行う必要がある理由を確認してください。)
それに加えて、
のようなエラーを回避するために[08-Aug-2011 18:07:08] PHP警告:phpinfo():システムのタイムゾーン設定に依存することは安全ではありません。 date.timezone設定またはdate_default_timezone_set()関数を使用する必要があります。これらの方法のいずれかを使用してもこの警告が表示される場合は、タイムゾーン識別子のスペルを間違えている可能性があります。 2行目の/usr/share/nginx/html/info.phpで、代わりに「CEST / 2.0/DST」に「Europe/Berlin」を選択しました
... /var/log/php-fpm/www-error.logで、ブラウザでPHPスクリプトを呼び出す場合は、/ etc/php.iniでdate.timezoneを設定する必要があります。
[...] [Date];日付関数で使用されるデフォルトのタイムゾーンを定義します。 http://www.php.net/manual/en/datetime.configuration.php#ini.date.timezonedate.timezone ="Europe / Berlin" [...] |
次のコマンドを実行すると、システムの正しいタイムゾーンを見つけることができます:
cat / etc / sysconfig / clock
[example@unixlinux.online tmp]#cat / etc / sysconfig / clock
ZONE ="Europe / Berlin"
[example@unixlinux.online tmp]#
次に、php-fpmのシステム起動リンクを作成して起動します:
chkconfig --levels 235 php-fpm on
/etc/init.d/php-fpm start
PHP-FPMは、ポート9000でFastCGIサーバーを実行するデーモンプロセス(initスクリプト/etc/init.d/php-fpmを使用)です。
nginxでCGIをサポートするには、Fcgiwrapをインストールします。
Fcgiwrapは、複雑なCGIスクリプトでも機能するCGIラッパーであり、各vhostが独自のcgi-binディレクトリを使用できるため、共有ホスティング環境で使用できます。
CentOS 6.2にはfcgiwrapパッケージがないため、自分でビルドする必要があります。まず、いくつかの前提条件をインストールします:
yum install fcgi-devel
これで、次のようにfcgiwrapを作成できます。
cd /usr/local/src/
git clone git://github.com/gnosek/fcgiwrap.git
cd fcgiwrap
autoreconf -i
./configure
make
make install
これにより、fcgiwrapが/ usr / local / sbin/fcgiwrapにインストールされます。
次に、fcgiwrapをデーモンとして実行できるようにするspawn-fcgiパッケージをインストールします。
yum install spawn-fcgi
/ etc / sysconfig / spawn-fcgi ...
を開きますvi / etc / sysconfig / spawn-fcgi
...そして次のようにファイルを変更します:
#「spawn-fcgi」サービスが機能する前に、いくつかの機能オプションを設定する必要があります。#SOCKETがファイルを指している場合、このファイルはクリーンアップされます。 initスクリプトでアップします。##可能なすべてのオプションについてはspawn-fcgi(1)を参照してください。##例:#SOCKET =/ var / run / php-fcgi.sock#OPTIONS ="-u apache -g apache -s $ SOCKET -S -M 0600 -C 32 -F 1 -P /var/run/spawn-fcgi.pid-/usr/bin/php-cgi"FCGI_SOCKET=/var/run/fcgiwrap.socketFCGI_PROGRAM=/usr/local /sbin/fcgiwrapFCGI_USER=apacheFCGI_GROUP=apacheFCGI_EXTRA_OPTIONS="-M 0770 "OPTIONS ="-u $ FCGI_USER -g $ FCGI_GROUP -s $ FCGI_SOCKET -S $ FCGI_EXTRA_OPTIONS -F 1 -P /var/run/spawn-fcgi.pid- $ FCGI_PROGRAM " |
次に、ユーザーnginxをグループapacheに追加します:
usermod -a -G apache nginx
spawn-fcgiのシステム起動リンクを作成します...
chkconfig --levels 235 spawn-fcgi on
...そして次のように開始します:
/etc/init.d/spawn-fcgi start
これで、ユーザーとグループapacheが所有するfcgiwrapソケットが/var/run/fcgiwrap.socketにあるはずです(Mailmanなどの一部のスクリプトはユーザー/グループapacheによって実行されることを期待しているため、spawnを実行しません-fcgiをユーザー/グループnginxとして使用しますが、代わりにnginxをapacheグループに追加します)。
16phpMyAdminをインストール
次に、phpMyAdminをインストールします:
yum install phpmyadmin
次に、phpMyAdminの認証をcookieからhttp:
に変更します。vi /usr/share/phpmyadmin/config.inc.php
[...]/*認証タイプ*/$ cfg ['Servers'] [$ i] ['auth_type'] ='http'; [...] |
これで、phpMyAdminは/ usr / share /phpmyadmin/ディレクトリにあります。
ISPConfig 3をインストールした後、次のようにphpMyAdminにアクセスできます。
nginxのポート8081のISPConfigアプリvhostにはphpMyAdmin構成が付属しているため、http://server1.example.com:8081/phpmyadminまたはhttp://server1.example.com:8081/phpMyAdminを使用してphpMyAdminにアクセスできます。
Webサイトから使用できる/phpmyadminまたは/phpMyAdminエイリアスを使用する場合、nginxにはグローバルエイリアス(つまり、すべてのvhostに定義できるエイリアス)がないため、これはApacheよりも少し複雑です。したがって、それぞれに対してこれらのエイリアスを定義する必要があります phpMyAdminにアクセスするvhost。
これを行うには、ISPConfigのWebサイトの[オプション]タブにある[nginxディレクティブ]フィールドに以下を貼り付けます。
location / phpmyadmin {root / usr / share /; index index.php index.html index.htm;場所〜^ / phpmyadmin /(。+ \。php)$ {try_files $ uri =404;ルート/usr/ share /; fastcgi_pass 127.0.0.1:9000; fastcgi_index index.php; fastcgi_param SCRIPT_FILENAME $ document_root $ fastcgi_script_name; / etc / nginx/fastcgi_paramsをインクルードします。 fastcgi_buffer_size 128k; fastcgi_buffers 256 4k; fastcgi_busy_buffers_size 256k; fastcgi_temp_file_write_size 256k; fastcgi_intercept_errors on; }場所〜* ^ / phpmyadmin /(。+ \。(jpg | jpeg | gif | css | png | js | ico | html | xml | txt))$ {root / usr / share /; }} location / phpMyAdmin {rewrite ^ / * / phpmyadmin last; } |
http sを使用する場合 vhostのhttpの代わりに、fastcgi_paramHTTPSという行を追加する必要があります。このようにphpMyAdmin構成に:
location / phpmyadmin {root / usr / share /; index index.php index.html index.htm;場所〜^ / phpmyadmin /(。+ \。php)$ {try_files $ uri =404;ルート/usr/ share /; fastcgi_pass 127.0.0.1:9000; fastcgi_paramHTTPSオン; #<-この行を追加fastcgi_index index.php; fastcgi_param SCRIPT_FILENAME $ document_root $ fastcgi_script_name; / etc / nginx/fastcgi_paramsをインクルードします。 fastcgi_buffer_size 128k; fastcgi_buffers 256 4k; fastcgi_busy_buffers_size 256k; fastcgi_temp_file_write_size 256k; fastcgi_intercept_errors on; }場所〜* ^ / phpmyadmin /(。+ \。(jpg | jpeg | gif | css | png | js | ico | html | xml | txt))$ {root / usr / share /; }} location / phpMyAdmin {rewrite ^ / * / phpmyadmin last; } |
vhostにhttpとhttpsの両方を使用する場合は、訪問者がhttpまたはhttpsのどちらを使用して設定するかを決定する、/ etc / nginx /nginx.confのhttp{}セクションに次のセクションを追加する必要があります(インクルード行の前)。それに応じて、$ fastcgi_https変数(phpMyAdmin構成で使用します):
vi /etc/nginx/nginx.conf
[...] http {[...]##HTTPSが使用されていることを検出するmap$schema $fastcgi_https{デフォルトオフ; https on; } [...]} [...] |
後でnginxをリロードすることを忘れないでください:
/etc/init.d/nginxリロード
次に、nginx Directivesフィールドに再度移動し、fastcgi_paramHTTPSの代わりに;行fastcgi_paramHTTPS$fastcgi_httpsを追加します。 httpリクエストとhttpsリクエストの両方にphpMyAdminを使用できるようにします。
location / phpmyadmin {root / usr / share /; index index.php index.html index.htm;場所〜^ / phpmyadmin /(。+ \。php)$ {try_files $ uri =404;ルート/usr/ share /; fastcgi_pass 127.0.0.1:9000; fastcgi_param HTTPS $ fastcgi_https; #<-この行を追加fastcgi_index index.php; fastcgi_param SCRIPT_FILENAME $ document_root $ fastcgi_script_name; / etc / nginx/fastcgi_paramsをインクルードします。 fastcgi_buffer_size 128k; fastcgi_buffers 256 4k; fastcgi_busy_buffers_size 256k; fastcgi_temp_file_write_size 256k; fastcgi_intercept_errors on; }場所〜* ^ / phpmyadmin /(。+ \。(jpg | jpeg | gif | css | png | js | ico | html | xml | txt))$ {root / usr / share /; }} location / phpMyAdmin {rewrite ^ / * / phpmyadmin last; } |
17Mailmanのインストール
バージョン3.0.4以降、ISPConfigではMailmanメーリングリストを管理(作成/変更/削除)することもできます。この機能を利用する場合は、次のようにMailmanをインストールします。
yum install mailman
Mailmanを開始する前に、mailmanという最初のメーリングリストを作成する必要があります。
/ usr / lib / mailman / bin / newlist mailman
[example@unixlinux.online tmp]# /usr/lib/mailman/bin/newlist mailman
Enter the email of the person running the list: <-- admin email address, e.g. example@unixlinux.online
Initial mailman password: <-- admin password for the mailman list
To finish creating your mailing list, you must edit your /etc/aliases (or
equivalent) file by adding the following lines, and possibly running the
`newaliases' program:
## mailman mailing list
mailman: "|/usr/lib/mailman/mail/mailman post mailman"
mailman-admin: "|/usr/lib/mailman/mail/mailman admin mailman"
mailman-bounces: "|/usr/lib/mailman/mail/mailman bounces mailman"
mailman-confirm: "|/usr/lib/mailman/mail/mailman confirm mailman"
mailman-join: "|/usr/lib/mailman/mail/mailman join mailman"
mailman-leave: "|/usr/lib/mailman/mail/mailman leave mailman"
mailman-owner: "|/usr/lib/mailman/mail/mailman owner mailman"
mailman-request: "|/usr/lib/mailman/mail/mailman request mailman"
mailman-subscribe: "|/usr/lib/mailman/mail/mailman subscribe mailman"
mailman-unsubscribe: "|/usr/lib/mailman/mail/mailman unsubscribe mailman"
Hit enter to notify mailman owner... <-- ENTER
[example@unixlinux.online tmp]#
Open /etc/aliases afterwards...
vi / etc / aliases
... and add the following lines:
[...]mailman:"|/usr/lib/mailman/mail/mailman post mailman"mailman-admin:"|/usr/lib/mailman/mail/mailman admin mailman"mailman-bounces:"|/usr/lib/mailman/mail/mailman bounces mailman"mailman-confirm:"|/usr/lib/mailman/mail/mailman confirm mailman"mailman-join:"|/usr/lib/mailman/mail/mailman join mailman"mailman-leave:"|/usr/lib/mailman/mail/mailman leave mailman"mailman-owner:"|/usr/lib/mailman/mail/mailman owner mailman"mailman-request:"|/usr/lib/mailman/mail/mailman request mailman"mailman-subscribe:"|/usr/lib/mailman/mail/mailman subscribe mailman"mailman-unsubscribe:"|/usr/lib/mailman/mail/mailman unsubscribe mailman" |
実行
newaliases
afterwards and restart Postfix:
/etc/init.d/postfix restart
Create the system startup links for Mailman and start it:
chkconfig --levels 235 mailman on
/etc/init.d/mailman start
Now we need to create this symlink to make Mailman work with ISPConfig:
cd /usr/lib/mailman/cgi-bin/
ln -s ./ mailman
If you want to use Mailman from your web sites created through ISPConfig, this is a bit more complicated than for Apache because nginx does not have global aliases (i.e., aliases that can be defined for all vhosts). Therefore you have to define these aliases for each vhost from which you want to access Mailman.
To do this, paste the following into the nginx Directives field on the Options tab of the web site in ISPConfig:
location /cgi-bin/mailman { alias /usr/lib/mailman/cgi-bin; fastcgi_split_path_info(^ / cgi-bin / mailman / [^ /] *)(。*)$; / etc / nginx/fastcgi_paramsをインクルードします。 fastcgi_param SCRIPT_FILENAME /usr/lib/mailman$fastcgi_script_name; fastcgi_param PATH_INFO $ fastcgi_path_info; fastcgi_param PATH_TRANSLATED /usr/lib/mailman$fastcgi_path_info; fastcgi_intercept_errors on; fastcgi_pass unix:/var/run/fcgiwrap.socket; } location /images/mailman { alias /usr/lib/mailman/icons; }場所/pipermail{エイリアス/var/ lib / mailman / archives / public;自動インデックスオン; } |
これにより、vhostのエイリアス/ cgi-bin / mailman /が定義されます。つまり、http://
Under http://
The Perfect Server - CentOS 6.2 x86_64 With nginx [ISPConfig 3] - Page 6
18 Install PureFTPd
PureFTPd can be installed with the following command:
yum install pure-ftpd
Then create the system startup links and start PureFTPd:
chkconfig --levels 235 pure-ftpd on
/etc/init.d/pure-ftpd start
次に、FTPおよびTLSセッションを許可するようにPureFTPdを構成します。 FTPは、すべてのパスワードとすべてのデータがクリアテキストで転送されるため、非常に安全でないプロトコルです。 TLSを使用することで、通信全体を暗号化できるため、FTPの安全性が大幅に向上します。
OpenSSL is needed by TLS; to install OpenSSL, we simply run:
yum install openssl
Open /etc/pure-ftpd/pure-ftpd.conf...
vi /etc/pure-ftpd/pure-ftpd.conf
If you want to allow FTP and TLS sessions, set TLS to 1:
[...]# This option can accept three values :# 0 :disable SSL/TLS encryption layer (default).# 1 :accept both traditional and encrypted sessions.# 2 :refuse connections that don't use SSL/TLS security mechanisms,# including anonymous sessions.# Do _not_ uncomment this blindly. Be sure that :# 1) Your server has been compiled with SSL/TLS support (--with-tls),# 2) A valid certificate is in place,# 3) Only compatible clients will log in.TLS 1[...] |
TLSを使用するには、SSL証明書を作成する必要があります。 / etc / ssl / private /に作成するので、最初にそのディレクトリを作成します:
mkdir -p / etc / ssl / private /
その後、次のようにSSL証明書を生成できます。
openssl req -x509 -nodes -days 7300 -newkey rsa:2048 -keyout /etc/ssl/private/pure-ftpd.pem -out /etc/ssl/private/pure-ftpd.pem
Country Name (2 letter code) [XX]:<-- Enter your Country Name (e.g., "DE").
State or Province Name (full name) []:<-- Enter your State or Province Name.
Locality Name (eg, city) [Default City]:<-- Enter your City.
Organization Name (eg, company) [Default Company Ltd]:<-- Enter your Organization Name (e.g., the name of your company).
Organizational Unit Name (eg, section) []:<-- Enter your Organizational Unit Name (e.g. "IT Department").
Common Name (eg, your name or your server's hostname) []:<-- Enter the Fully Qualified Domain Name of the system (e.g. "server1.example.com").
Email Address []:<-- Enter your Email Address.
Change the permissions of the SSL certificate:
chmod 600 /etc/ssl/private/pure-ftpd.pem
Finally restart PureFTPd:
/etc/init.d/pure-ftpd restart
それでおしまい。 You can now try to connect using your FTP client; however, you should configure your FTP client to use TLS.
19 Install BIND
We can install BIND as follows:
yum install bind bind-utils
Next open /etc/sysconfig/named...
vi /etc/sysconfig/named
... and make sure that the ROOTDIR=/var/named/chroot line is comment out:
# BIND named process options# ~~~~~~~~~~~~~~~~~~~~~~~~~~# Currently, you can use the following options:## ROOTDIR="/var/named/chroot" -- will run named in a chroot environment.# you must set up the chroot environment# (install the bind-chroot package) before# doing this.# NOTE:# Those directories are automatically mounted to chroot if they are# empty in the ROOTDIR directory. It will simplify maintenance of your# chroot environment.# - /var/named# - /etc/pki/dnssec-keys# - /etc/named# - /usr/lib64/bind or /usr/lib/bind (architecture dependent)## Those files are mounted as well if target file doesn't exist in# chroot.# - /etc/named.conf# - /etc/rndc.conf# - /etc/rndc.key# - /etc/named.rfc1912.zones# - /etc/named.dnssec.keys# - /etc/named.iscdlv.key## Don't forget to add "$AddUnixListenSocket /var/named/chroot/dev/log"# line to your /etc/rsyslog.conf file. Otherwise your logging becomes# broken when rsyslogd daemon is restarted (due update, for example).## OPTIONS="whatever" -- These additional options will be passed to named# at startup. Don't add -t here, use ROOTDIR instead.## KEYTAB_FILE="/dir/file" -- Specify named service keytab file (for GSS-TSIG)## DISABLE_ZONE_CHECKING -- By default, initscript calls named-checkzone# utility for every zone to ensure all zones are# valid before named starts. If you set this option# to 'yes' then initscript doesn't perform those# checks. |
Make a backup of the existing /etc/named.conf file and create a new one as follows:
cp /etc/named.conf /etc/named.conf_bak
cat /dev/null> /etc/named.conf
vi /etc/named.conf
//// named.conf//// Provided by Red Hat bind package to configure the ISC BIND named(8) DNS// server as a caching only nameserver (as a localhost DNS resolver only).//// See /usr/share/doc/bind*/sample/ for example named configuration files.//options { listen-on port 53 { any; }; listen-on-v6 port 53 { any; }; directory "/var/named"; dump-file "/var/named/data/cache_dump.db"; statistics-file "/var/named/data/named_stats.txt"; memstatistics-file "/var/named/data/named_mem_stats.txt"; allow-query { any; }; recursion no; allow-recursion { none; };};logging { channel default_debug { file "data/named.run"; severity dynamic; };};zone "." IN { type hint; file "named.ca";};include "/etc/named.conf.local"; |
Create the file /etc/named.conf.local that is included at the end of /etc/named.conf (/etc/named.conf.local will later on get populated by ISPConfig if you create DNS zones in ISPConfig):
touch /etc/named.conf.local
Then we create the startup links and start BIND:
chkconfig --levels 235 named on
/etc/init.d/named start
20 Install Vlogger, Webalizer, And AWStats
Vlogger, webalizer, and AWStats can be installed as follows:
yum install webalizer awstats perl-DateTime-Format-HTTP perl-DateTime-Format-Builder
cd /tmp
wget http://n0rp.chemlab.org/vlogger/vlogger-1.3.tar.gz
tar xvfz vlogger-1.3.tar.gz
mv vlogger-1.3/vlogger /usr/sbin/
rm -rf vlogger*
21 Install Jailkit
Jailkitは、SSHユーザーをchrootする場合にのみ必要です。次のようにインストールできます(重要:JailkitはISPConfigの前にインストールする必要があります-後でインストールすることはできません!):
cd /tmp
wget http://olivier.sessink.nl/jailkit/jailkit-2.14.tar.gz
tar xvfz jailkit-2.14.tar.gz
cd jailkit-2.14
./configure
make
make install
cd ..
rm -rf jailkit-2.14*
22 Install fail2ban
This is optional but recommended, because the ISPConfig monitor tries to show the log:
yum install fail2ban
We must configure fail2ban to log to the log file /var/log/fail2ban.log because this is the log file that is monitored by the ISPConfig Monitor module. Open /etc/fail2ban/fail2ban.conf...
vi /etc/fail2ban/fail2ban.conf
... and comment out the logtarget =SYSLOG line and add logtarget =/var/log/fail2ban.log:
[...]# Option:logtarget# Notes.:Set the log target. This could be a file, SYSLOG, STDERR or STDOUT.# Only one log target can be specified.# Values:STDOUT STDERR SYSLOG file Default:/var/log/fail2ban.log##logtarget =SYSLOGlogtarget =/var/log/fail2ban.log[...] |
Then create the system startup links for fail2ban and start it:
chkconfig --levels 235 fail2ban on
/etc/init.d/fail2ban start
23 Install rkhunter
rkhunter can be installed as follows:
yum install rkhunter
The Perfect Server - CentOS 6.2 x86_64 With nginx [ISPConfig 3] - Page 7
24 Install SquirrelMail
To install the SquirrelMail webmail client, run...
yum install squirrelmail
Then configure SquirrelMail:
/usr/share/squirrelmail/config/conf.pl
We must tell SquirrelMail that we are using Courier-IMAP/-POP3:
SquirrelMail Configuration : Read: config.php (1.4.0)
---------------------------------------------------------
Main Menu --
1. Organization Preferences
2. Server Settings
3. Folder Defaults
4. General Options
5. Themes
6. Address Books
7. Message of the Day (MOTD)
8. Plugins
9. Database
10. Languages
D. Set pre-defined settings for specific IMAP servers
C Turn color off
S Save data
Q Quit
Command >> <-- D
SquirrelMail Configuration : Read: config.php
---------------------------------------------------------
While we have been building SquirrelMail, we have discovered some
preferences that work better with some servers that don't work so
well with others. If you select your IMAP server, this option will
set some pre-defined settings for that server.
Please note that you will still need to go through and make sure
everything is correct. This does not change everything. There are
only a few settings that this will change.
Please select your IMAP server:
bincimap = Binc IMAP server
courier = Courier IMAP server
cyrus = Cyrus IMAP server
dovecot = Dovecot Secure IMAP server
exchange = Microsoft Exchange IMAP server
hmailserver = hMailServer
macosx = Mac OS X Mailserver
mercury32 = Mercury/32
uw = University of Washington's IMAP server
gmail = IMAP access to Google mail (Gmail) accounts
quit = Do not change anything
Command >> <-- courier
SquirrelMail Configuration : Read: config.php
---------------------------------------------------------
While we have been building SquirrelMail, we have discovered some
preferences that work better with some servers that don't work so
well with others. If you select your IMAP server, this option will
set some pre-defined settings for that server.
Please note that you will still need to go through and make sure
everything is correct. This does not change everything. There are
only a few settings that this will change.
Please select your IMAP server:
bincimap = Binc IMAP server
courier = Courier IMAP server
cyrus = Cyrus IMAP server
dovecot = Dovecot Secure IMAP server
exchange = Microsoft Exchange IMAP server
hmailserver = hMailServer
macosx = Mac OS X Mailserver
mercury32 = Mercury/32
uw = University of Washington's IMAP server
gmail = IMAP access to Google mail (Gmail) accounts
quit = Do not change anything
Command >> courier
imap_server_type = courier
default_folder_prefix = INBOX.
trash_folder = Trash
sent_folder = Sent
draft_folder = Drafts
show_prefix_option = false
default_sub_of_inbox = false
show_contain_subfolders_option = false
optional_delimiter = .
delete_folder = true
Press enter to continue... <-- press ENTER
SquirrelMail Configuration : Read: config.php (1.4.0)
---------------------------------------------------------
Main Menu --
1. Organization Preferences
2. Server Settings
3. Folder Defaults
4. General Options
5. Themes
6. Address Books
7. Message of the Day (MOTD)
8. Plugins
9. Database
10. Languages
D. Set pre-defined settings for specific IMAP servers
C Turn color off
S Save data
Q Quit
Command >> <--S
SquirrelMail Configuration : Read: config.php (1.4.0)
---------------------------------------------------------
Main Menu --
1. Organization Preferences
2. Server Settings
3. Folder Defaults
4. General Options
5. Themes
6. Address Books
7. Message of the Day (MOTD)
8. Plugins
9. Database
10. Languages
D. Set pre-defined settings for specific IMAP servers
C Turn color off
S Save data
Q Quit
Command >> <--Q
One last thing we need to do is modify the file /etc/squirrelmail/config_local.php and comment out the $default_folder_prefix variable - if you don't do this, you will see the following error message in SquirrelMail after you've logged in:Query:CREATE "Sent" Reason Given:Invalid mailbox name.
vi /etc/squirrelmail/config_local.php
You can now find SquirrelMail in the /usr/share/squirrelmail/ directory.
After you have installed ISPConfig 3, you can access SquirrelMail as follows:
The ISPConfig apps vhost on port 8081 for nginx comes with a SquirrelMail configuration, so you can use http://server1.example.com:8081/squirrelmail or http://server1.example.com:8081/webmail to access SquirrelMail.
If you want to use a /webmail or /squirrelmail alias that you can use from your web sites, this is a bit more complicated than for Apache because nginx does not have global aliases (i.e., aliases that can be defined for all vhosts). Therefore you have to define these aliases for each vhost from which you want to access SquirrelMail.
To do this, paste the following into the nginx Directives field on the Options tab of the web site in ISPConfig:
location /squirrelmail { root /usr/share/; index index.php index.html index.htm; location ~ ^/squirrelmail/(.+\.php)$ { try_files $uri =404;ルート/usr/ share /; fastcgi_pass 127.0.0.1:9000; fastcgi_index index.php; fastcgi_param SCRIPT_FILENAME $ document_root $ fastcgi_script_name; / etc / nginx/fastcgi_paramsをインクルードします。 fastcgi_buffer_size 128k; fastcgi_buffers 256 4k; fastcgi_busy_buffers_size 256k; fastcgi_temp_file_write_size 256k; fastcgi_intercept_errors on; } location ~* ^/squirrelmail/(.+\.(jpg|jpeg|gif|css|png|js|ico|html|xml|txt))$ { root /usr/share/; } } location /webmail { rewrite ^/* /squirrelmail last; } |
If you use https instead of http for your vhost, you should add the line fastcgi_param HTTPS on; to your SquirrelMail configuration like this:
location /squirrelmail { root /usr/share/; index index.php index.html index.htm; location ~ ^/squirrelmail/(.+\.php)$ { try_files $uri =404;ルート/usr/ share /; fastcgi_pass 127.0.0.1:9000; fastcgi_paramHTTPSオン; #<-この行を追加fastcgi_index index.php; fastcgi_param SCRIPT_FILENAME $ document_root $ fastcgi_script_name; / etc / nginx/fastcgi_paramsをインクルードします。 fastcgi_buffer_size 128k; fastcgi_buffers 256 4k; fastcgi_busy_buffers_size 256k; fastcgi_temp_file_write_size 256k; fastcgi_intercept_errors on; } location ~* ^/squirrelmail/(.+\.(jpg|jpeg|gif|css|png|js|ico|html|xml|txt))$ { root /usr/share/; } } location /webmail { rewrite ^/* /squirrelmail last; } |
If you use both http and https for your vhost, you need to add the following section to the http {} section in /etc/nginx/nginx.conf (before any include lines) which determines if the visitor uses http or https and sets the $fastcgi_https variable (which we will use in our SquirrelMail configuration) accordingly (please note that you don't need to do this if you have added this section before, for example when you configured phpMyAdmin - see chapter 16):
vi /etc/nginx/nginx.conf
[...] http {[...]##HTTPSが使用されていることを検出するmap$schema $fastcgi_https{デフォルトオフ; https on; } [...]} [...] |
Don't forget to reload nginx afterwards:
/etc/init.d/nginx reload
Then go to the nginx Directives field again, and instead of fastcgi_param HTTPS on; you add the line fastcgi_param HTTPS $fastcgi_https; so that you can use SquirrelMail for both http and https requests:
location /squirrelmail { root /usr/share/; index index.php index.html index.htm; location ~ ^/squirrelmail/(.+\.php)$ { try_files $uri =404;ルート/usr/ share /; fastcgi_pass 127.0.0.1:9000; fastcgi_param HTTPS $ fastcgi_https; #<-この行を追加fastcgi_index index.php; fastcgi_param SCRIPT_FILENAME $ document_root $ fastcgi_script_name; / etc / nginx/fastcgi_paramsをインクルードします。 fastcgi_buffer_size 128k; fastcgi_buffers 256 4k; fastcgi_busy_buffers_size 256k; fastcgi_temp_file_write_size 256k; fastcgi_intercept_errors on; } location ~* ^/squirrelmail/(.+\.(jpg|jpeg|gif|css|png|js|ico|html|xml|txt))$ { root /usr/share/; } } location /webmail { rewrite ^/* /squirrelmail last; } |
25 Install ISPConfig 3
Before you start the ISPConfig installation, make sure that Apache is stopped (if it is installed - it is possible that some of your installed packages have installed Apache as a dependency without you knowing). If Apache2 is already installed on the system, stop it now...
/etc/init.d/httpd stop
... and remove Apache's system startup links:
chkconfig --del httpd
Make sure that nginx is running:
/etc/init.d/nginx restart
(If you have both Apache and nginx installed, the installer asks you which one you want to use:Apache and nginx detected. Select server to use for ISPConfig:(apache,nginx) [apache]:
Type nginx. If only Apache or nginx are installed, this is automatically detected by the installer, and no question is asked.)
Download the current ISPConfig 3 version and install it. The ISPConfig installer will configure all services like Postfix, Courier, etc. for you. A manual setup as required for ISPConfig 2 is not necessary anymore.
You now also have the possibility to let the installer create an SSL vhost for the ISPConfig control panel, so that ISPConfig can be accessed using https:// instead of http://. To achieve this, just press ENTER when you see this question:Do you want a secure (SSL) connection to the ISPConfig web interface (y,n) [y]:.
To install ISPConfig 3 from the latest released version, do this:
cd / tmp
wget http://www.ispconfig.org/downloads/ISPConfig-3-stable.tar.gz
tar xfz ISPConfig-3-stable.tar.gz
cd ispconfig3_install / install /
The next step is to run
php -q install.php
This will start the ISPConfig 3 installer:
[example@unixlinux.online install]# php -q install.php
--------------------------------------------------------------------------------
_____ ___________ _____ __ _ ____
|_ _/ ___| ___ \ / __ \ / _(_) /__ \
| | \ `--.| |_/ / | / \/ ___ _ __ | |_ _ __ _ _/ /
| | `--. \ __/ | | / _ \| '_ \| _| |/ _` | |_ |
_| |_/\__/ / | | \__/\ (_) | | | | | | | (_| | ___\ \
\___/\____/\_| \____/\___/|_| |_|_| |_|\__, | \____/
__/ |
|___/
--------------------------------------------------------------------------------
>> Initial configuration
Operating System: Redhat or compatible, unknown version.
Following will be a few questions for primary configuration so be careful.
Default values are in [brackets] and can be accepted with
Tap in "quit" (without the quotes) to stop the installer.
Select language (en,de) [en]: <-- ENTER
Installation mode (standard,expert) [standard]: <-- ENTER
Full qualified hostname (FQDN) of the server, eg server1.domain.tld [server1.example.com]: <-- ENTER
MySQL server hostname [localhost]: <-- ENTER
MySQL root username [root]: <-- ENTER
MySQL root password []: <- - yourrootsqlpassword
MySQL database to create [dbispconfig]: <-- ENTER
MySQL charset [utf8]: <-- ENTER
Apache and nginx detected. Select server to use for ISPConfig: (apache,nginx) [apache]: <-- nginx
Generating a 2048 bit RSA private key
....+++
.................................+++
writing new private key to 'smtpd.key'
-----
You are about to be asked to enter information that will be incorporated
into your certificate request.
What you are about to enter is what is called a Distinguished Name or a DN.
There are quite a few fields but you can leave some blank
For some fields there will be a default value,
If you enter '.', the field will be left blank.
-----
Country Name (2 letter code) [XX]: <-- ENTER
State or Province Name (full name) []: <-- ENTER
Locality Name (eg, city) [Default City]: <-- ENTER
Organization Name (eg, company) [Default Company Ltd]: <-- ENTER
Organizational Unit Name (eg, section) []: <-- ENTER
Common Name (eg, your name or your server's hostname) []: <-- ENTER
Email Address []: <-- ENTER
Configuring Jailkit
Configuring SASL
Configuring PAM
Configuring Courier
Configuring Spamassassin
Configuring Amavisd
Configuring Getmail
Configuring Pureftpd
Configuring BIND
Configuring nginx
Configuring Vlogger
Configuring Apps vhost
Configuring Bastille Firewall
Configuring Fail2ban
Installing ISPConfig
ISPConfig Port [8080]: <-- ENTER
Do you want a secure (SSL) connection to the ISPConfig web interface (y,n) [y]: <-- ENTER
Generating RSA private key, 4096 bit long modulus
...............................................................................
...........................................................................................++
..............................................................
.....................................................++
e is 65537 (0x10001)
You are about to be asked to enter information that will be incorporatedinto your certificate request.
What you are about to enter is what is called a Distinguished Name or a DN.
There are quite a few fields but you can leave some blank
For some fields there will be a default value,
If you enter '.', the field will be left blank.
-----
Country Name (2 letter code) [XX]: <-- ENTER
State or Province Name (full name) []: <-- ENTER
Locality Name (eg, city) [Default City]: <-- ENTER
Organization Name (eg, company) [Default Company Ltd]: <-- ENTER
Organizational Unit Name (eg, section) []: <-- ENTER
Common Name (eg, your name or your server's hostname) []: <-- ENTER
Email Address []: <-- ENTER
Please enter the following 'extra' attributes
to be sent with your certificate request
A challenge password []: <-- ENTER
An optional company name []: <-- ENTER
writing RSA key
Configuring DBServer
Installing ISPConfig crontab
no crontab for root
no crontab fo r getmail
Restarting services ...
Stopping mysqld: [ OK ]
Starting mysqld: [ OK ]
Shutting down postfix: [ OK ]
Starting postfix: [ OK ]
Stopping saslauthd: [FAILED]
Starting saslauthd: [ OK ]
Shutting down amavisd: Daemon [1503] terminated by SIGTERM
[ OK ]
amavisd stopped
Starting amavisd: [ OK ]
Stopping clamd.amavisd: [ OK ]
Starting clamd.amavisd: [ OK ]
Stopping Courier authentication services: authdaemond
Starting Courier authentication services: authdaemond
Stopping Courier- IMAP server: imap imap-ssl pop3 pop3-ssl
Starting Courier-IMAP server: imap imap-ssl pop3 pop3-ssl
Stopping Courier-IMAP server: imap imap-ssl pop3 pop3-ssl
Starting Courier-IMAP server: imap imap-ssl pop3 pop3-ssl
Stopping Courier-IMAP server: imap imap-ssl pop3 pop3-ssl
Starting Courier-IMAP server: imap imap-ssl pop3 pop3-ssl
Stopping Courier-IMAP server: imap imap-ssl pop3 pop3-ssl
Starting Courier-IMAP server: imap imap-ssl pop3 pop3-ssl
SyntaxError: ('invalid syntax', ('/usr/lib/mailman/Mailman/mm_cfg.py', 76, 27, 'DEFAULT_SERVER_LANGUAGE = \n'))
Traceback (most recent call last):
File "/usr/lib/mailman/bin/mailmanctl", line 109, in
from Mailman import mm_cfg
File "/usr/lib/mailman/Mailman/mm_cfg.py", line 76
DEFAULT_SERVER_LANGUAGE =
^
SyntaxError: invalid syntax
Shutting down mailman: [FAILED]
SyntaxErro r: ('invalid syntax', ('/usr/lib/mailman/Mailman/mm_cfg.py', 76, 27, 'DEFAULT_SERVER_LANGUAGE = \n'))
Traceback (most recent call last):
File "/usr/lib/mailman/bin/mailmanctl", line 109, in
from Mailman import mm_cfg
File "/usr/lib/mailman/Mailman/mm_cfg.py", line 76
DEFAULT_SERVER_LANGUAGE =
^
SyntaxError: invalid syntax
Starting mailman: [FAILED]
Reloading php-fpm: [ OK ]
Reloading nginx: [ OK ]
Stopping pure-ftpd: [ OK ]
Starting pure-ftpd: [ OK ]
Installation completed.
[example@unixlinux.online install]#
To fix the Mailman errors you might get during the ISPConfig installation, open /usr/lib/mailman/Mailman/mm_cfg.py...
vi /usr/lib/mailman/Mailman/mm_cfg.py
... and set DEFAULT_SERVER_LANGUAGE ='en':
[...]#-------------------------------------------------------------# The default language for this server.DEFAULT_SERVER_LANGUAGE ='en'[...] |
Restart Mailman:
/etc/init.d/mailman restart
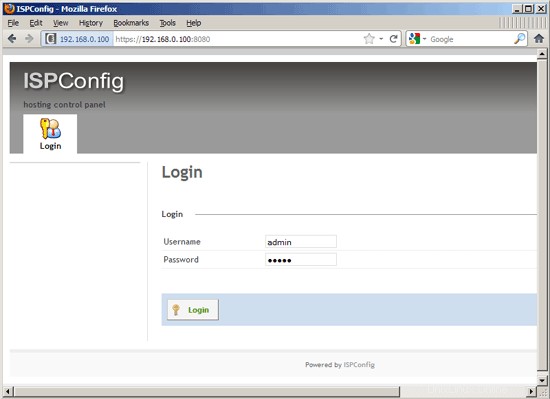
Afterwards you can access ISPConfig 3 under http(s)://server1.example.com:8080/ or http(s)://192.168.0.100:8080/ (http or https depends on what you chose during installation). Log in with the username admin and the password admin (you should change the default password after your first login):
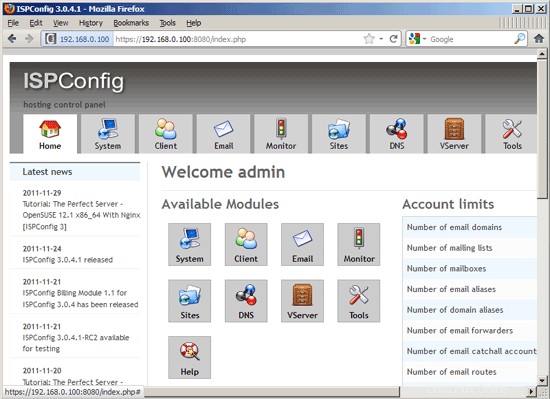
The system is now ready to be used.
25.1 ISPConfig 3 Manual
In order to learn how to use ISPConfig 3, I strongly recommend to download the ISPConfig 3 Manual.
約300ページで、ISPConfig(管理者、再販業者、クライアント)の背後にある概念をカバーし、ISPConfig 3をインストールおよび更新する方法を説明し、有効な入力の例とともにISPConfigのすべてのフォームとフォームフィールドのリファレンスを含み、 ISPConfig 3で最も一般的なタスクです。また、サーバーをより安全にする方法を示し、最後にトラブルシューティングのセクションがあります。
25.2 ISPConfig Monitor App For Android
ISPConfig Monitor Appを使用すると、サーバーのステータスを確認し、すべてのサービスが期待どおりに実行されているかどうかを確認できます。 TCPおよびUDPポートを確認し、サーバーにpingを実行できます。さらに、このアプリを使用して、ISPConfigがインストールされているサーバーに詳細を要求できます(ISPConfigモニターアプリをサポートするインストール済みのISPConfig3の最小バージョンは3.0.3.3です! ); these details include everything you know from the Monitor module in the ISPConfig Control Panel (e.g. services, mail and system logs, mail queue, CPU and memory info, disk usage, quota, OS details, RKHunter log, etc.), and of course, as ISPConfig is multiserver-capable, you can check all servers that are controlled from your ISPConfig master server.
ダウンロードと使用方法については、http://www.ispconfig.org/ispconfig-3/ispconfig-monitor-app-for-android/にアクセスしてください。
26 Links
- CentOS:http://www.centos.org/
- ISPConfig:http://www.ispconfig.org/
About The Author

Falko Timme is the owner of  Timme Hosting (ultra-fast nginx web hosting). He is the lead maintainer of HowtoForge (since 2005) and one of the core developers of ISPConfig (since 2000). He has also contributed to the O'Reilly book "Linux System Administration".