最近の記事では、Debian9にnagiosコアをインストールして一部のリモートホストのサービスを監視する方法を示しました。これを行うには、リモートホストにNagiosNRPEデーモンとプラグインをインストールする必要があります。これは、監視が必要なすべてのリモートホストにインストールされるパッケージです。
NRPE(Nagios Remote Plugin Executor)は、リモートLinuxマシンでNagiosプラグインをリモートで実行できるようにするアドオンです。これにより、リモートマシンのメトリック(ディスク使用量、CPU負荷など)を監視できます。また、NSClient ++などの一部のWindowsエージェントアドオンと通信できるため、リモートのWindowsホストでもスクリプトを実行してメトリックを確認できます。この記事では、Nagiosを使用してLinuxおよびWindowsホストサーバーを監視する方法について説明します。
NRPEはどのように機能しますか?
NRPEは、Nagiosを使用してリモートホストを監視するためによく使用される監視エージェントおよびプロトコルです。 NRPEは以下と連携します:
- Nagiosサーバーで実行されるクライアント(check_nrpeプラグイン)
- リモートサーバー上で実行され、クライアントからの要求を処理し、ステータス情報を返すデーモン。
以下のスキームでプロセスを要約できます
Nagios Server (check_nrpe)-> Remote host (NRPE deamon)-> service_to_check
Nagios Server (check_nrpe) <-Remote host (NRPE deamon) <-service_to_check
Nagiosがリモートマシンからサービスのリソースを監視する必要がある場合:
- Nagiosはcheck_nrpeを実行します プラグインを使用して、チェックする必要のあるサービスを教えてください
- check_nrpe プラグインはリモートホスト上のNRPEデーモンに接続します
- NRPEデーモンは、適切なNagiosプラグインを実行して、サービスまたはリソースをチェックします
- サービスチェックの結果は、NRPEデーモンから check_nrpeに戻されます。 プラグイン。チェック結果をNagiosプロセスに返します。
NRPEは、特定のIPアドレスからの接続のみを受け入れるように構成できます。接続を介して実行するコマンドを指示するだけです。ローカルホストが構成したコマンドのみが許可され、引数がNagiosによって送信されるかどうかを決定できます。
1)nagiosサーバーにLinuxホストを追加します
NRPEアドオンを使用するには、NagiosサーバーとNRPEデーモンがインストールされているリモートLinuxホストの両方でいくつかのタスクを実行する必要があります。私たちの場合、リモートLinuxホストはDebian9サーバーです。 CentosサーバーとUbuntuサーバーの手順の詳細を説明します。
a)リモートLinuxホストを構成します
監視するには、リモートサーバーにnagiosプラグインとNRPEプラグインをインストールする必要があります。
nagiosプラグインをインストールする
最初に前提条件をインストールする必要があります
# apt install -y autoconf gcc libc6 libmcrypt-dev make libssl-dev wget bc gawk dc build-essential snmp libnet-snmp-perl gettextCentos 7では、以下のように前提条件をインストールします
# yum install -y gcc glibc glibc-common make gettext automake autoconf wget openssl-devel net-snmp net-snmp-utils epel-release perl-Net-SNMP
次に、作業ディレクトリを/optに作成します。 プラグインをダウンロードするディレクトリ
# mkdir /opt/nagios && cd /opt/nagios# wget --no-check-certificate -O nagios-plugins.tar.gz https://github.com/nagios-plugins/nagios-plugins/archive/release-2.2.1.tar.gz# tar zxf nagios-plugins.tar.gz# cd nagios-plugins-release-2.2.1次に、プラグインをコンパイルしてインストールします
# ./tools/setup# ./configure# make# make installnrpeプラグインをインストールします
これで、nrpeの最新バージョンであるnrpeプラグイン3.2.0をダウンロードできます。 この記事を書いているとき。
# cd /opt/nagios/# wget --no-check-certificate -O nrpe.tar.gz https://github.com/NagiosEnterprises/nrpe/archive/nrpe-3.2.0.tar.gz# cd nrpe-nrpe-3.2.0# tar xzf nrpe.tar.gz && cd nrpe-nrpe-3.2.0次にコンパイルします
# ./configure --enable-command-args# make allUbuntuの場合、コンパイルコマンドは
# ./configure --enable-command-args --with-ssl-lib=/usr/lib/x86_64-linux-gnu/# make allリモートLinuxホストにもnagiosユーザーとグループを作成する必要があります
# make install-groups-users
バイナリファイル
# make install && make install-config次に、nrpeポート番号をマップします(5666) 名前付きサービスへ
# echo >> /etc/services# echo '# Nagios services' >> /etc/services# echo 'nrpe 5666/tcp' >> /etc/servicesサービスをインストールし、システムの起動時に必ずnrpeを起動します
# make install-init && systemctl enable nrpe.serviceファイアウォールを構成する
ここで重要なのは、すべてのnrpe通信を受け入れるようにファイアウォールを構成することです
# iptables -I INPUT -p tcp --destination-port 5666 -j ACCEPT
iptablesをインストールします -永続的 保存されたiptablesルールの自動ロードを引き継ぎます。これを行うには、ルールをファイル/etc/iptables/rules.v4に保存する必要があります
# apt install -y iptables-persistent必ずはいと答えてください 既存のルールを保存します。通常、 iptables-saveを使用できます iptablesの新しいルールを保存するコマンド。
Centos 7では、ファイアウォールを次のように構成します
# firewall-cmd --zone=public --add-port=5666/tcp# firewall-cmd --zone=public --add-port=5666/tcp --permanentnagiosサーバーがホストと通信することを承認します
nrpeプラグインをインストールした後、Linuxホスト上のnrpeプラグインとの通信を許可するすべてのホストを構成する必要があります。これは、到達するnagiosサーバー情報(IPアドレスなど)を指定することを意味します。ファイル/usr/local/nagios/etc/nrpe.cfg すべてのnrpe設定が含まれているものです。
ディレクティブallowed_hostsを見つけます NagiosサーバーのプライベートIPアドレスを追加します
allowed_hosts=172.16.20.128
ディレクティブdont_blame_nrpeを見つけます NRPEデーモンが、実行されるコマンドへの引数をクライアントが指定できるようにするかどうかを決定します。
dont_blame_nrpe=1nrpeサービスを開始してテストする
nrpeサービスを開始するには、以下のコマンドを使用します
# systemctl start nrpe.serviceここで、正常に動作しているかどうかを確認するために、nrpeデーモンが最初に実行されていることを確認する必要があります
# netstat -at | egrep "nrpe|5666"
tcp        0      0 0.0.0.0:nrpe            0.0.0.0:*               LISTEN
tcp6 0 0 [::]:nrpe [::]:* LISTENこれで、check_nrpeプラグインを実行して、nrpeがローカルで機能するかどうかをテストできます。 インストールされた
# /usr/local/nagios/libexec/check_nrpe -H localhost
NRPE v3.2.0
上記の出力は、nrpeプラグインがLinuxホストで完全に機能することを示しているはずです。インストールされたNRPE構成ファイルには、リモートホストの監視に使用できるいくつかのコマンド定義が含まれています。
次に、nagiosサーバーを構成する必要があります
b)リモートホストを検出するようにnagiosサーバーを構成します
この記事は、Debian 9にNagiosサーバーをすでにインストールして構成していることを前提としています。つまり、リモートLinuxホストを検出して追加するように構成します。まだ構成していない場合は、この記事に従ってください。
nagiosサーバーでは、nrpeプラグインもインストールし、Linuxホストの構成ファイルを作成する必要があります。
nrpeプラグインをインストールする
手順はLinuxホストの場合とまったく同じですが、nagiosサーバーにはすでにnagiosユーザーとグループがあるので、その手順をスキップできることを忘れないでください。 nagiosの作業ディレクトリに移動します
# cd /opt/nagios# wget --no-check-certificate -O nrpe.tar.gz https://github.com/NagiosEnterprises/nrpe/archive/nrpe-3.2.0.tar.gz# cd nrpe-nrpe-3.2.0次にコンパイルします
# tar xzf nrpe.tar.gz && cd nrpe-nrpe-3.2.0# ./configure --enable-command-args# make allバイナリと構成ファイルをインストールします
# make install && make install-confignrpeサービスも追加する必要があります
# echo >> /etc/services# echo '# Nagios services' >> /etc/services# echo 'nrpe 5666/tcp' >> /etc/servicesサービスをインストールし、システムの起動時に必ずnrpeを開始します
# make install-init && systemctl enable nrpe.serviceファイアウォールとnrpeサービスを構成する
また、すべてのホストとのnrpe通信を許可するようにファイアウォールを構成します。
# iptables -I INPUT -p tcp --destination-port 5666 -j ACCEPT# systemctl start nrpe.serviceリモートLinuxホストnrpeデーモンとの通信をテストします
check_nrpeを確認する必要があります プラグインは、リモートホスト上のNRPEデーモンと通信できます。 check_nrpeを使用します 以下に示すように、リモートホストのIPアドレスを持つプラグイン
# /usr/local/nagios/libexec/check_nrpe -H 172.16.20.129
NRPE v3.0次に、コマンド定義を使用してサービスの監視を試みます(CPUロードの確認 )リモートLinux上。
# /usr/local/nagios/libexec/check_nrpe -H 172.16.20.129 -c check_load
CRITICAL - load average: 0.01, 0.28, 0.31|load1=0.010;0.150;0.300;0; load5=0.280;0.100;0.250;0; load15=0.310;0.050;0.200;0;
監視するリモートLinuxの応答があることがわかります。これは、プラグインがリモートホストで完全に機能し、通信が良好であることを示しています。
c)nagiosサーバーで新しいLinuxホストとサービスを定義します
Nagiosには、デフォルトでいくつかのオブジェクト定義が/usr/local/nagios/etc/objectsに含まれています。 監視する必要のある各タイプのホストを表すnagiosサーバー上のディレクトリ。
# ls /usr/local/nagios/etc/objects/
commands.cfg    printer.cfg    switch.cfg    localhost.cfg   timeperiods.cfg   windows.cfg
contacts.cfg    templates.cfg
まず、Nagiosサーバーが監視する必要のあるすべてのリモートホスト構成ファイルを保存するフォルダーを作成します。
# mkdir /usr/local/nagios/etc/objects/servers Nagiosにはテンプレートファイルtemplates.cfgがあります これには、他のホストやサービスなどによって参照されるオブジェクト定義テンプレートの例がいくつか含まれています。これらの定義は、各リモートホストファイル定義を作成するときに役立ちます。
デフォルトでは、Nagiosは localhost.cfgを介してインストールされているサーバーを監視します ファイル。このファイルを使用して、Linuxホストの構成ファイルを作成します。
# cp /usr/local/nagios/etc/objects/localhost.cfg /usr/local/nagios/etc/objects/servers/linux.cfg次に、ホストを追加するためにファイルを編集します。
# cd /usr/local/nagios/etc/objects/servers/# vim linux.cfg
###############################################################################
###############################################################################
#
# HOST DEFINITION
#
###############################################################################
###############################################################################
# Define a host for the local machine
define host{
use linux-server ; Name of host template to use
; This host definition will inherit all variables that are defined
; in (or inherited by) the linux-server host template definition.
host_name debian9
alias Debian 9
address 172.16.20.129
}
###############################################################################
###############################################################################
#
# SERVICE DEFINITIONS
#
###############################################################################
###############################################################################
# Define a service to "ping" the local machine
define service{
use generic-service ; Name of service template to use
host_name debian9
service_description PING
check_command check_ping!100.0,20%!500.0,60%
}
# Define a service to check the disk space of the root partition
# on the local machine. Warning if < 20% free, critical if
# < 10% free space on partition.
define service{
use generic-service ; Name of service template to use
host_name debian9
service_description Root Partition
check_command check_local_disk!20%!10%!
}
ファイルは上記のようになります。この出力は切り捨てられています。より多くのサービス定義があります。
ディレクティブaddress 監視するリモートホストのアドレスが含まれている必要があります。
ディレクティブhost_name nagiosダッシュボードに表示される名前が含まれている必要があり、それがわかりやすい名前である必要があるため、デフォルトの localhostを削除します。 値を付けて別の名前に置き換えます( debian9 私の場合は名前です)。そのディレクティブは、ファイル内のすべての場所で置き換える必要があります。これは、ホストとすべてのサービス定義を意味します。
ファイルに存在するサービス定義は標準です。 imap、ftp、smtpのファイルの最後に追加する3つのサービス定義を以下に示します。 リモートLinuxでこれらのサービスを監視する必要がある場合。
#Checking FTP service

define service{
        use				generic-service         ; Inherit default values from a template
        host_name               	debian9
        service_description     	FTP
        check_command   		check_ftp
        }

#Checking SMTP service

define service{
        use             		generic-service         ; Inherit default values from a template
        host_name               	debian9
        service_description     	SMTP
        check_command   		check_smtp
        }

#Checking IMAP service

define service{
        use             		generic-service         ; Inherit default values from a template
        host_name               	debian9
        service_description     	IMAP
        check_command   		check_imap
        }
d)nagios構成ファイルを更新し、サービスを再起動します
リモートホスト用の新しいディレクトリを作成したので、nagiosがそれを使用するためにどこでそれを見つけることができるかを示す必要があります。したがって、デフォルトのnagios構成ファイル/usr/local/nagios/etc/nagios.cfgを編集します
 vim /usr/local/etc/nagios.cfg
# OBJECT CONFIGURATION FILE(S)
# These are the object configuration files in which you define hosts,
# host groups, contacts, contact groups, services, etc.
# You can split your object definitions across several config files
# if you wish (as shown below), or keep them all in a single config file.

# You can specify individual object config files as shown below:
cfg_file=/usr/local/nagios/etc/objects/commands.cfg
cfg_file=/usr/local/nagios/etc/objects/contacts.cfg
cfg_file=/usr/local/nagios/etc/objects/timeperiods.cfg
cfg_file=/usr/local/nagios/etc/objects/templates.cfg

# Definitions for monitoring the local (Linux) host
cfg_file=/usr/local/nagios/etc/objects/localhost.cfg
#cfg_file=/usr/local/nagios/etc/objects/linux.cfg

# Definitions for monitoring a Windows machine
#cfg_file=/usr/local/nagios/etc/objects/windows.cfg

# Definitions for monitoring a router/switch
#cfg_file=/usr/local/nagios/etc/objects/switch.cfg

# Definitions for monitoring a network printer
#cfg_file=/usr/local/nagios/etc/objects/printer.cfg


# You can also tell Nagios to process all config files (with a .cfg
# extension) in a particular directory by using the cfg_dir
# directive as shown below:

cfg_dir=/usr/local/nagios/etc/objects/servers
#cfg_dir=/usr/local/nagios/etc/servers
#cfg_dir=/usr/local/nagios/etc/printers
#cfg_dir=/usr/local/nagios/etc/switches
#cfg_dir=/usr/local/nagios/etc/routers
ディレクティブcfg_dir=/usr/local/nagios/etc/objects/serversを追加したことがわかります。 これは、考慮すべき新しいホストのディレクトリを示します。ディレクティブcfg_file nagiosが使用するさまざまなサービスとホストの構成ファイルを示します。
これは、ディレクトリを作成せず、単にファイル linux.cfgを作成した場合を意味します。 デフォルトの/usr/local/nagios/etc/objects ディレクトリの場合は、ディレクティブcfg_file=/usr/local/nagios/etc/objects/linux.cfgを追加するだけです。 nagiosがリモートホストの構成を検出するようにします。
次に、サービスを再起動する前に、nagios構成にエラーが含まれていないかどうかを確認する必要があります
# /usr/local/nagios/bin/nagios -v /usr/local/nagios/etc/nagios.cfg

Nagios Core 4.3.2
Copyright (c) 2009-present Nagios Core Development Team and Community Contributors
Copyright (c) 1999-2009 Ethan Galstad
Last Modified: 2017-05-09
License: GPL

Website: https://www.nagios.org
Reading configuration data...
   Read main config file okay...
   Read object config files okay...

Running pre-flight check on configuration data...

Checking objects...
	Checked 19 services.
	Checked 2 hosts.
	Checked 1 host groups.
	Checked 0 service groups.
	Checked 1 contacts.
	Checked 1 contact groups.
	Checked 17 commands.
	Checked 5 time periods.
	Checked 0 host escalations.
	Checked 0 service escalations.
Checking for circular paths...
	Checked 2 hosts
	Checked 0 service dependencies
	Checked 0 host dependencies
	Checked 5 timeperiods
Checking global event handlers...
Checking obsessive compulsive processor commands...
Checking misc settings...

Total Warnings: 0
Total Errors:   0

Things look okay - No serious problems were detected during the pre-flight check
エラーがないことがわかるので、nagiosサービスを再起動できます
# systemctl restart nagiose)nagiosWebインターフェースへのアクセス
これですべてが正常になりました。nagios管理ページを開始して、構成の結果を確認できます。ローカルサーバーで、 http:// localhost / nagiosからアクセスします
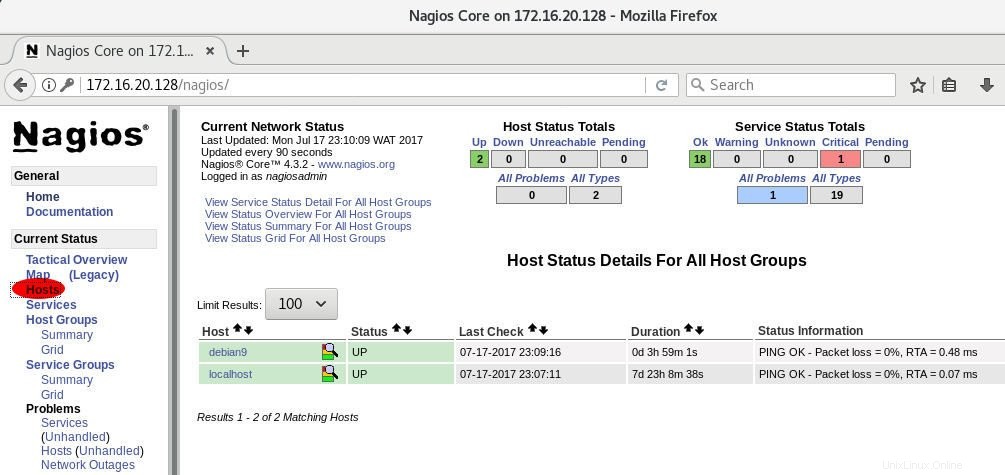
リモートLinuxでアクセスしていたので、NagiosサーバーのIPを指定したことがわかります。新しいリモートLinuxとそのサービスがあることがわかります。
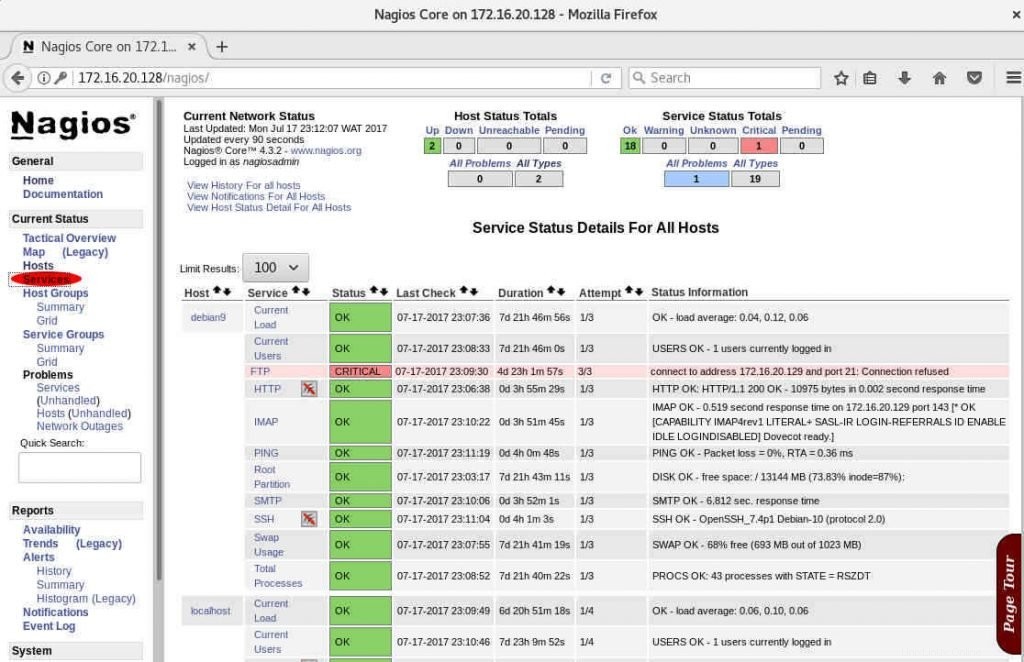
リモートホストにはまだFTPサービスをインストールしていません。これが、このサービスが重大な状態にある理由です。
2)nagiosサーバーにWindowsホストを追加します
NagiosでWindowsホストを監視するには、 NSClient ++をインストールする必要があります リモートWindowsシステム。 NSClient ++(nscp)は、監視するリモートホストにデプロイする必要があるエージェントです。 NSClient ++を使用すると、システムをチェックするさまざまな方法が可能になります。
- システムヘルス(CPU、ディスク…)を取得する
- パフォーマンスカウンターを取得する
- ログファイルを確認する
- スケジュールされたタスクなどを確認する
a)Windowsホストを構成します
リモートWindowsホストでは、nsclient++をインストールする必要があります。公式サイトからダウンロードできます。 msiファイルをダウンロードしましたNSCP-0.5.0.62-x64.msi
nsclientのインストールと構成
インストールプロセスを開始します。
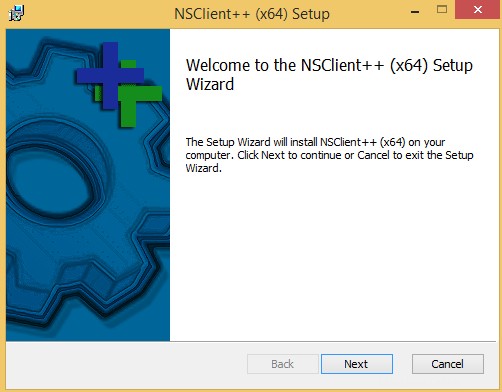
このステップで、次へを選択します
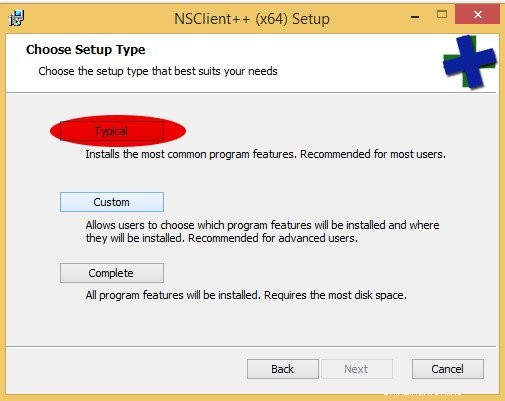
このステップでは、カスタムを使用します
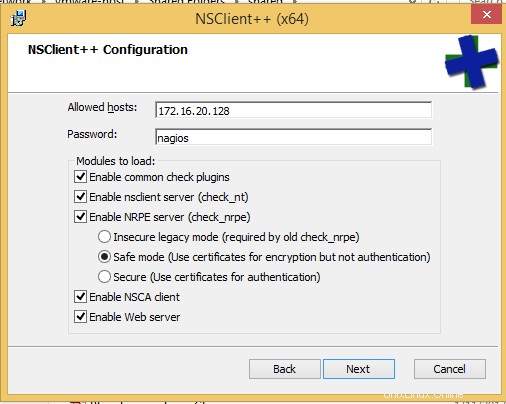
nagiosサーバーのIPとWebアクセス用のnagiosパスワードを示します。また、すべての「有効」を貼り付けます "オプション(プラグインのチェック、check_nt、check_nrpe、ウェブサーバー、 nscaクライアント )およびセーフモード。
パスワードを空白のままにしてインストールできます。示す必要はありません。
NSClientの状態を確認する
インストールされたので、 services.msc を開いて、NSClientサービスが開始されているかどうかを確認します。 。次に、nsclientについて検索し、その状態を確認します(実行中である必要があります) )。起動タイプが「自動」に設定されていることを確認します "
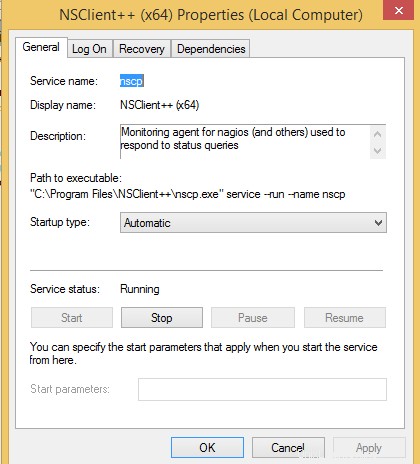
プラグインが機能していることがわかります。これで、nagiosサーバー側を構成できます。
b)nagiosサーバーを構成します
Nagiosサーバーでは、サービスで監視する新しいWindowsホストを定義する必要があります。
新しいWindowsホスト定義を追加する
/usr/local/nagios/etc/objects/windows.cfgを変更して、監視するWindowsマシンの新しいホスト定義を追加します。 ファイル。 Linuxホストについては、Windows構成ファイルをサーバーにコピーします。 以前に作成したディレクトリ。
# cp /usr/local/nagios/etc/objects/windows.cfg /usr/local/nagios/etc/objects/servers/
通常、私たちはすでに/usr/local/nagios/etc/objects/servers/に入っています サーバー上のディレクトリ。そこで、Windowsホストファイルを編集します。
# vim windows.cfg

###############################################################################
###############################################################################
#
# HOST DEFINITIONS
#
###############################################################################
###############################################################################

# Define a host for the Windows machine we'll be monitoring
# Change the host_name, alias, and address to fit your situation

define host{
	use		windows-server	; Inherit default values from a template
	host_name	winserver	; The name we're giving to this host
	alias		My Windows Server	; A longer name associated with the host
	address		172.16.20.131	; IP address of the host
	}

###############################################################################
###############################################################################
#
# SERVICE DEFINITIONS
#
###############################################################################
###############################################################################

# Create a service for monitoring the version of NSCLient++ that is installed
# Change the host_name to match the name of the host you defined above

define service{
	use			generic-service
	host_name		winserver
	service_description	NSClient++ Version
	check_command		check_nt!CLIENTVERSION
	}


# Create a service for monitoring the uptime of the server
# Change the host_name to match the name of the host you defined above

define service{
	use			generic-service
	host_name		winserver
	service_description	Uptime
	check_command		check_nt!UPTIME
	}
上記の出力として何かを持ってみてください。この出力は切り捨てられています。 IPアドレスはWindowsのIPアドレスである必要があります。別のhost_nameを使用できます 値。
デフォルトのWindowsホストファイルには、pingをチェックするためのサービス定義がないため、ファイルの最後に以下のサービスを追加できます。これはデフォルトのcheck_ping Linuxホストファイルに存在するサービス。
define service{
        use                             generic-service         ; Name of service template to use
        host_name                       winserver
        service_description             PING
	check_command			check_ping!100.0,20%!500.0,60%
        }
nagiosのパスワード保護を示したことを忘れないでください。 WindowsマシンのNSClient++構成ファイルでパスワードを指定した場合は、既存の check_ntを変更する必要があります。 Commands.cfgを変更してパスワードを含めるコマンド定義 ファイル。したがって、ファイルを開いて、以下のように適切な行を調べてください。
# vim /usr/local/nagios/etc/objects/commands.cfg

define command{
			command_name	check_nt
			command_line	$USER1$/check_nt -H $HOSTADDRESS$ -p 12489 -s PASSWORD -v $ARG1$ $ARG2$
			}
check_ntコマンドの定義を変更して、キーワード「 -s
NSClientのインストール中にパスワードを指定しない場合は、この手順をスキップできます。パスワードを設定してキャンセルしたい場合は、以下のようにコマンドプロンプトでメモ帳を使用してNSClientファイルを編集できます

そして、以下のようにパスワード行にコメントします
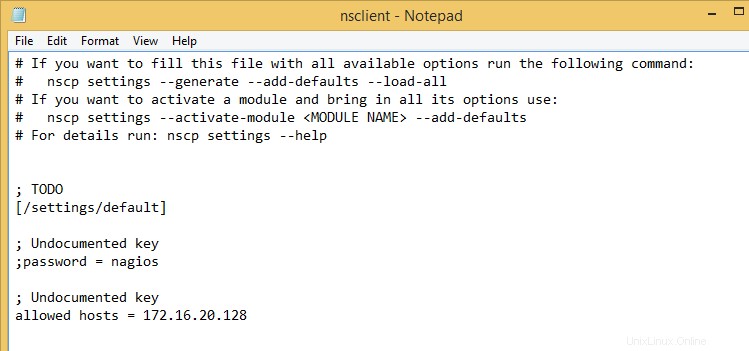
現時点では、 command.cfgにパスワードを指定する必要はありません。 ファイルの場合、この手順をスキップできます。
nagios構成ファイルを確認し、サービスを再起動します
Windowsホストの定義が完了したので、nagiosがエラーをカウントしないかどうかを確認できます。 nagiosのメイン構成ファイル/usr/local/nagios/etc/nagios.cfgにディレクティブを追加していないことに注意してください。 サーバーでWindowsファイルを編集したため 前に示したディレクトリ。そのディレクトリを作成しなかった場合は、ディレクティブcfg_file=/usr/local/nagios/etc/objects/windows.cfgのコメントを解除する必要があります。
これで、ファイルエラーを確認できます
# /usr/local/nagios/bin/nagios -v /usr/local/nagios/etc/nagios.cfg

Nagios Core 4.3.2
Copyright (c) 2009-present Nagios Core Development Team and Community Contributors
Copyright (c) 1999-2009 Ethan Galstad
Last Modified: 2017-05-09
License: GPL

Website: https://www.nagios.org
Reading configuration data...
   Read main config file okay...
   Read object config files okay...

Running pre-flight check on configuration data...

Checking objects...
	Checked 27 services.
	Checked 3 hosts.
	Checked 1 host groups.
	Checked 0 service groups.
	Checked 1 contacts.
	Checked 1 contact groups.
	Checked 25 commands.
	Checked 5 time periods.
	Checked 0 host escalations.
	Checked 0 service escalations.
Checking for circular paths...
	Checked 3 hosts
	Checked 0 service dependencies
	Checked 0 host dependencies
	Checked 5 timeperiods
Checking global event handlers...
Checking obsessive compulsive processor commands...
Checking misc settings...

Total Warnings: 0
Total Errors:   0

Things look okay - No serious problems were detected during the pre-flight check
エラーがなく、新しいホストが検出されたことがわかります。これで3つのホストができました
# systemctl restart nagiosnagiosWebインターフェースへのアクセス
これで、nagiosダッシュボードページを開いて、新しいホストとそのプロセスを確認できます。
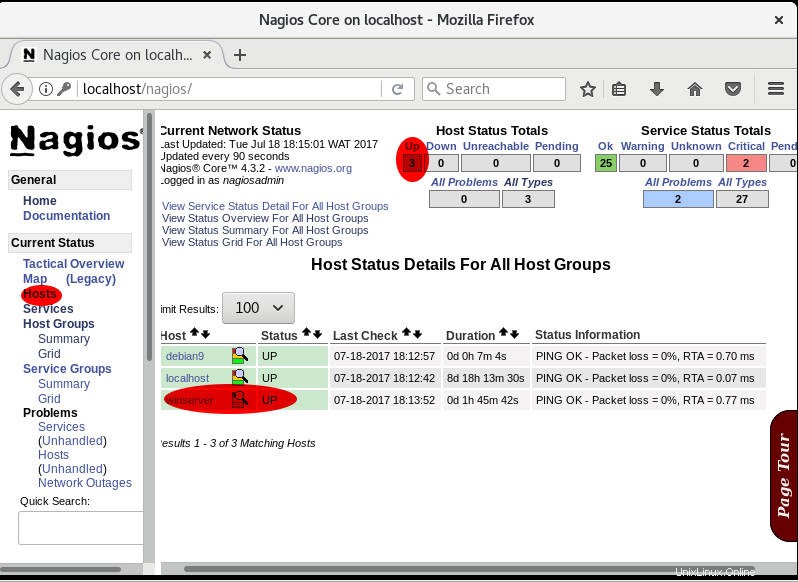
Windowsホストが追加されていることがわかります。
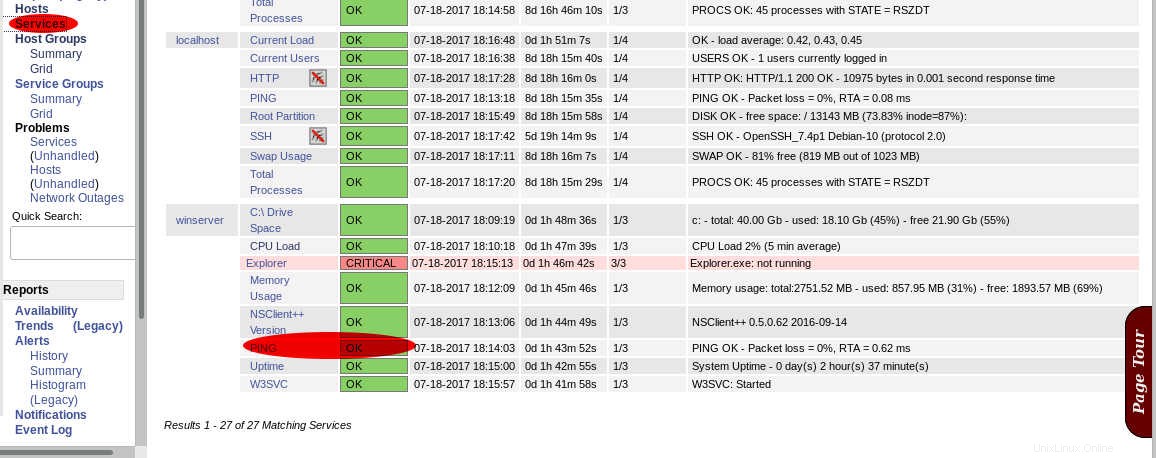
サービスを見ると、 check_pingが表示されます。 追加しました。エクスプローラーはまだリリースされていません。そのため、エクスプローラーに関する重要なメッセージを見ることができます。
これで、nagiosダッシュボードに2つの新しいサーバーが追加されました。
結論
Debian9に実装されたNagiosサーバーにLinuxおよびWindowsホストを追加する方法を見てきました。