Hugoは、Goで開発された無料のオープンソースWebサイトフレームワークです。 Hugoは、信頼性が高く最新の静的サイトジェネレーターを提供します。これにより、シンプルで高速なWebサイトを簡単に作成できます。事前に作成されたテンプレートと、SEO、コメント、分析、その他の機能を含むその他の機能が付属しています。 Hugoサイトは、PHP、Python、Rubyのような高価な実行時間なしで実行でき、データベースも必要ありません。
この投稿では、Debian11にHugoサイトジェネレータをインストールして使用する方法を紹介します。
- Debian11を実行しているサーバー。
- ルートパスワードはサーバーで構成されています。
Debian11にHugoをインストールする
デフォルトでは、HugoパッケージはDebian11のデフォルトリポジトリに含まれています。次のコマンドを使用してインストールできます:
apt-get install hugo -y
Hugoをインストールしたら、次のコマンドを使用してHugoのバージョンを確認できます。
hugo version
次の出力が得られるはずです:
Hugo Static Site Generator v0.80.0/extended linux/amd64 BuildDate: 2021-07-18T09:31:51Z (debian 0.80.0-6+b5)
Hugoを使用してWebサイトを作成する
このセクションでは、hugo.example.comという名前の新しいWebサイトを作成します。
次のコマンドを実行して、Webサイトを作成します。
hugo new site hugo.example.com
Webサイトが作成されると、次の出力が表示されます。
Congratulations! Your new Hugo site is created in /root/hugo.example.com. Just a few more steps and you're ready to go: 1. Download a theme into the same-named folder. Choose a theme from https://themes.gohugo.io/ or create your own with the "hugo new theme" command. 2. Perhaps you want to add some content. You can add single files with "hugo new / . ". 3. Start the built-in live server via "hugo server". Visit https://gohugo.io/ for quickstart guide and full documentation.
次のコマンドを使用して、Hugoによって作成されたすべてのファイルを一覧表示できます。
ls -l hugo.example.com
次の出力が得られます:
drwxr-xr-x 2 root root 4096 Nov 13 09:27 archetypes
-rw-r--r-- 1 root root   82 Nov 13 09:27 config.toml
drwxr-xr-x 2 root root 4096 Nov 13 09:27 content
drwxr-xr-x 2 root root 4096 Nov 13 09:27 data
drwxr-xr-x 2 root root 4096 Nov 13 09:27 layouts
drwxr-xr-x 2 root root 4096 Nov 13 09:27 static
drwxr-xr-x 2 root root 4096 Nov 13 09:27 themes
まず、次のコマンドを使用して、ディレクトリをWebサイトに変更します。
cd hugo.example.com
次に、次のコマンドを使用してバージョン情報ページを作成します。
hugo new about.md
次の出力が得られます:
/root/hugo.example.com/content/about.md created
次に、次のコマンドを使用してabout.mdページを編集します。
nano content/about.md
以下に示すようにファイルを変更します:
---
title: "About Us"
date: 2021-11-13T09:28:18Z
draft: false
---

This is About Us page for this website.
次に、次のコマンドを使用してサンプル投稿を作成します。
hugo new post/page.md
次の出力が得られます:
/root/hugo.example.com/content/post/page.md created
次に、次のコマンドを使用してサンプル投稿ページを編集します。
nano content/post/page.md
以下に示すようにファイルを変更します:
---
title: "Page"
date: 2021-11-13T09:29:29Z
draft: true
---

# Hugo Page

This is my first hugo website page!
終了したら、ファイルを保存して閉じます。
次に、Hugo Webサイトにアクセスするには、テーマをダウンロードして設定する必要があります。
まず、次のコマンドを使用して、ディレクトリをテーマに変更します。
cd themes
次に、次のコマンドを使用してHugoテーマをダウンロードします。
wget https://github.com/digitalcraftsman/hugo-strata-theme/archive/master.zip
次に、次のコマンドを使用して、ダウンロードしたテーマを解凍します。
unzip master.zip
次に、次のコマンドを使用して、抽出したテーマの名前を変更します。
mv hugo-strata-theme-master hugo-strata-theme
次に、config.tomlのコンテンツをサイトの設定にコピーします。
cat hugo-strata-theme/exampleSite/config.toml > ../config.toml
次に、次のコマンドを使用してconfig.tomlファイルを編集します。
nano ../config.toml
次の行を追加/変更します:
baseurl = "/"

[[menu.main]]
  name = "About"
  url  = "about"
  weight = 5
ファイルを保存して閉じてから、Webサイトのindex.htmlファイルを作成します。
cd ../
nano layouts/index.html
次の行を追加します:
{{ define "main" }}
        {{ if not .Site.Params.about.hide }}
                {{ partial "about" . }}
        {{ end }}

        {{ if not .Site.Params.portfolio.hide }}
                {{ partial "portfolio" . }}
        {{ end }}

        {{ if not .Site.Params.recentposts.hide }}
                {{ partial "recent-posts" . }}
        {{ end }}

        {{ if not .Site.Params.contact.hide }}
                {{ partial "contact" . }}
        {{ end }}
{{ end }}
ファイルを保存して閉じます。
今、あなたはそれを使用するためにあなたのウェブサイトを構築する必要があります。次のコマンドを実行してビルドできます:
hugo
次の出力が得られます:
    {{ with .OutputFormats.Get "RSS" }}{{ .RelPermalink }}{{ end }}

                   | EN
-------------------+-----
  Pages            |  8
  Paginator pages  |  0
  Non-page files   |  0
  Static files     | 26
  Processed images |  0
  Aliases          |  2
  Sitemaps         |  1
  Cleaned          |  0

Total in 48 ms
次に、Hugoサーバーを起動し、次のコマンドを使用してサーバーIPにバインドします。
hugo server --bind=0.0.0.0 --baseUrl=http://104.245.34.233 -D -F
次の出力が得られます:
    {{ with .OutputFormats.Get "RSS" }}{{ .RelPermalink }}{{ end }}

                   | EN
-------------------+-----
  Pages            | 11
  Paginator pages  |  0
  Non-page files   |  0
  Static files     | 26
  Processed images |  0
  Aliases          |  3
  Sitemaps         |  1
  Cleaned          |  0

Built in 42 ms
Watching for changes in /root/hugo.example.com/{archetypes,content,data,layouts,static,themes}
Watching for config changes in /root/hugo.example.com/config.toml
Environment: "development"
Serving pages from memory
Running in Fast Render Mode. For full rebuilds on change: hugo server --disableFastRender
Web Server is available at http://104.245.34.233:1313/ (bind address 0.0.0.0)
Press Ctrl+C to stop
この時点で、Hugoサーバーが起動し、ポート1313でリッスンします。
HugoWebサイトにアクセス
次に、Webブラウザーを開き、URL http:// your-server-ip:1313を使用してWebサイトにアクセスします。 。 Hugoのデフォルトページが表示されます:

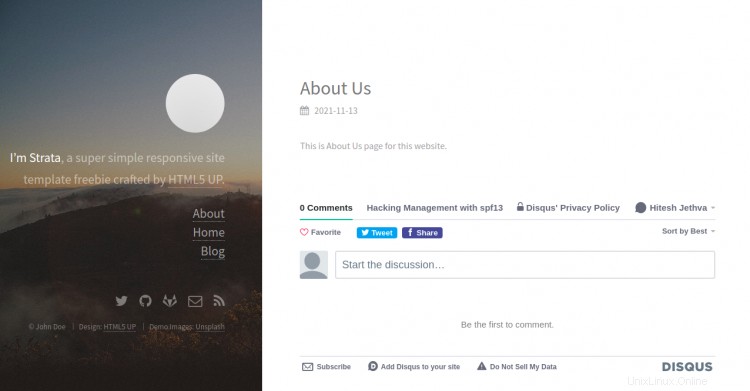
概要をクリックします 左ペインにあります。次の画面に[概要]ページが表示されます。

おめでとう!これでHugoが正常にインストールされ、Debian 11でWebサイトが作成されました。Hugoを使用して、安全で高速なWebサイトを簡単に構築できるようになりました。