Neosは、無料のオープンソースコンテンツ管理システム(CMS)であり、コーディングしなくても複雑なWebサイトを簡単に構築できます。あなたはそれを使ってブログ、ニュースウェブサイト、ポートフォリオページ、または会社のウェブサイトを作成することができます。インライン編集などの豊富な機能セットを提供し、1回のインストールで複数のWebサイトをサポートし、組み込みのSEOツール、人間が読めるURL、プラグインマネージャー、デバイスプレビューをサポートし、複数のテンプレートをサポートします。 REST API、JSON、GraphQL、oEmbedなどの最新のテクノロジーをサポートしています。
このチュートリアルでは、Rocky Linux8OSを実行しているサーバーにNeosCMSをインストールする方法を学習します。
-
RockyLinux8を実行しているサーバー。
-
ルート以外のsudoユーザー。
-
すべてが更新されていることを確認してください。
$ sudo dnf update
-
基本的なユーティリティパッケージをインストールします。それらのいくつかはすでにインストールされている可能性があります。
$ sudo dnf install wget curl nano unzip yum-utils -y
最初のステップは、ファイアウォールを構成することです。 RockyLinuxはFirewalledFirewallを使用しています。ファイアウォールのステータスを確認してください。
$ sudo firewall-cmd --state
running
ファイアウォールはさまざまなゾーンで機能し、パブリックゾーンがデフォルトで使用されます。ファイアウォールでアクティブなすべてのサービスとポートを一覧表示します。
$ sudo firewall-cmd --permanent --list-services
次の出力が表示されます。
cockpit dhcpv6-client ssh
HTTPおよびHTTPSポートを許可します。
$ sudo firewall-cmd --permanent --add-service=http
$ sudo firewall-cmd --permanent --add-service=https
ファイアウォールのステータスを再確認してください。
$ sudo firewall-cmd --permanent --list-services
同様の出力が表示されるはずです。
cockpit dhcpv6-client http https ssh
ファイアウォールをリロードして変更を有効にします。
$ sudo firewall-cmd --reload
Rocky Linuxには、古いバージョンのNginxが付属しています。最新バージョンをインストールするには、公式のNginxリポジトリをダウンロードする必要があります。
/etc/yum.repos.d/nginx.repoを作成して開きます 公式のNginxリポジトリを作成するためのファイル。
$ sudo nano /etc/yum.repos.d/nginx.repo
次のコードを貼り付けます。
[nginx-stable]
name=nginx stable repo
baseurl=http://nginx.org/packages/centos/$releasever/$basearch/
gpgcheck=1
enabled=1
gpgkey=https://nginx.org/keys/nginx_signing.key
module_hotfixes=true

[nginx-mainline]
name=nginx mainline repo
baseurl=http://nginx.org/packages/mainline/centos/$releasever/$basearch/
gpgcheck=1
enabled=0
gpgkey=https://nginx.org/keys/nginx_signing.key
module_hotfixes=true
Ctrl + Xを押してファイルを保存します Yと入力します プロンプトが表示されたら。
Nginxをインストールします。
$ sudo dnf install nginx
インストールを確認します。
$ nginx -v
nginx version: nginx/1.20.2
Nginxサービスを有効にして開始します。
$ sudo systemctl enable nginx --now
このチュートリアルでは、Remiのリポジトリを使用して最新バージョンのPHPをインストールする必要があります。最初のステップは、Epelリポジトリを取得することです。
$ sudo dnf install epel-release
次に、Remiリポジトリをインストールします。
$ sudo dnf install https://rpms.remirepo.net/enterprise/remi-release-8.rpm
利用可能なPHPストリームを確認してください。
$ dnf module list php -y
Last metadata expiration check: 0:00:12 ago on Fri 03 Dec 2021 09:39:32 AM UTC.
Rocky Linux 8 - AppStream
Name                Stream                 Profiles                                 Summary
php                 7.2 [d]                common [d], devel, minimal               PHP scripting language
php                 7.3                    common [d], devel, minimal               PHP scripting language
php                 7.4                    common [d], devel, minimal               PHP scripting language

Remi's Modular repository for Enterprise Linux 8 - x86_64
Name                Stream                 Profiles                                 Summary
php                 remi-7.2               common [d], devel, minimal               PHP scripting language
php                 remi-7.3               common [d], devel, minimal               PHP scripting language
php                 remi-7.4               common [d], devel, minimal               PHP scripting language
php                 remi-8.0               common [d], devel, minimal               PHP scripting language
php                 remi-8.1               common [d], devel, minimal               PHP scripting language

Hint: [d]efault, [e]nabled, [x]disabled, [i]nstalled
デフォルトのバージョンは7.2です。 RemiのPHP8.0リポジトリを有効にします。
$ sudo dnf module reset php
$ sudo dnf module enable php:remi-8.0
次に、ImageMagickと一緒にNeosに必要なPHPとその拡張機能をインストールします。
$ sudo dnf install php-fpm php-mbstring php-xml php-curl php-mysqlnd php-zip php-cli php-imagick ImageMagick php-intl
インストールを確認します。
$ php --version
PHP 8.0.14 (cli) (built: Dec 16 2021 03:01:07) ( NTS gcc x86_64 )
Copyright (c) The PHP Group
Zend Engine v4.0.14, Copyright (c) Zend Technologies
MySQLデータベースを使用してデータを保存します。 Rocky LinuxのAppstreamリポジトリには、最新バージョンのMySQLが付属しています。
MySQLをインストールします。
$ sudo dnf install mysql-server
MySQLサービスを有効にして開始します。
$ sudo systemctl enable mysqld --now
安全なMySQLのインストール。
$ sudo mysql_secure_installation
最初のステップとして、MySQLパスワードの強度をテストするために使用できるValidatePasswordPluginをセットアップするかどうかを尋ねられます。 Yを選択します 続行します。次のステップで、パスワード検証レベルを選択するように求められます。 2を選択します これは最強のレベルであり、パスワードは8文字以上で、大文字、小文字、数字、特殊文字が混在している必要があります。
Securing the MySQL server deployment.

Connecting to MySQL using a blank password.

VALIDATE PASSWORD COMPONENT can be used to test passwords
and improve security. It checks the strength of password
and allows the users to set only those passwords which are
secure enough. Would you like to setup VALIDATE PASSWORD component?

Press y|Y for Yes, any other key for No: Y

There are three levels of password validation policy:

LOW    Length >= 8
MEDIUM Length >= 8, numeric, mixed case, and special characters
STRONG Length >= 8, numeric, mixed case, special characters and dictionary                  file

Please enter 0 = LOW, 1 = MEDIUM and 2 = STRONG: 2
次のステップでrootパスワードを選択するように求められます。パスワード検証プラグインの要件を満たす強力なパスワードを選択してください。次のステップでは、選択したパスワードで続行するかどうかを尋ねられます。 yを押します 続行します。
Please set the password for root here.

New password:

Re-enter new password:

Estimated strength of the password: 100
Do you wish to continue with the password provided?(Press y|Y for Yes, any other key for No) : Y
Yを押します 次にENTER 次のすべてのプロンプトのキーを押して、匿名ユーザーとテストデータベースを削除し、rootログインを無効にして、新しく設定されたルールをロードします。
...
Remove anonymous users? (Press y|Y for Yes, any other key for No) : Y
Success.
...
Disallow root login remotely? (Press y|Y for Yes, any other key for No) : Y
Success.
...
Remove test database and access to it? (Press y|Y for Yes, any other key for No) : Y
 - Dropping test database...
Success.
 - Removing privileges on test database...
Success.
Reloading the privilege tables will ensure that all changes
made so far will take effect immediately.
...
Reload privilege tables now? (Press y|Y for Yes, any other key for No) : Y
Success.
All done!
MySQLシェルに入ります。ルートパスワードを入力して続行します。
$ mysql -u root -p
neosを作成する ユーザー。パスワードが前に設定した要件を満たしていることを確認してください。
mysql> CREATE USER 'neos'@'localhost' IDENTIFIED BY 'Your_password2';
neosdbを作成します データベース。
mysql> CREATE DATABASE neosdb CHARACTER SET utf8mb4 COLLATE utf8mb4_unicode_ci;
neosdbに対するユーザー権限を付与します データベース。
mysql> GRANT ALL PRIVILEGES ON neosdb.* TO 'neos'@'localhost';
シェルを終了します。
mysql> exit
ComposerはPHPの依存関係管理ツールであり、NeosCMSが機能するために必要です。
Composerインストーラスクリプトをダウンロードします。
$ curl -sS https://getcomposer.org/installer -o composer-setup.php
次のコマンドを実行して、インストーラーを確認します。
$ HASH=`curl -sS https://composer.github.io/installer.sig`
$ echo $HASH
$ php -r "if (hash_file('SHA384', 'composer-setup.php') === '$HASH') { echo 'Installer verified'; } else { echo 'Installer corrupt'; unlink('composer-setup.php'); } echo PHP_EOL;"
上記のコマンドは、インストーラーのハッシュ値を取得し、ダウンロードしたスクリプトと照合します。インストーラーが安全に実行できる場合は、次の出力が表示されます。
Installer verified
Composerをインストールします。
$ sudo php composer-setup.php --install-dir=/usr/local/bin --filename=composer
バージョンを確認して、インストールを確認します。
$ composer --version
Composer version 2.2.3 2021-12-31 12:18:53
Neosをインストールするためのルートディレクトリを作成します。
$ sudo mkdir -p /var/www/neos
ルートディレクトリの所有権を現在ログインしているユーザーに変更します。
$ sudo chown -R $USER:$USER /var/www/neos
ルートディレクトリに切り替えます。
$ cd /var/www/neos
Composerを使用してNeosとその依存関係をインストールします。
$ composer create-project --no-dev neos/neos-base-distribution .
コマンドの最後にある、Composerに現在のディレクトリにインストールするように指示するドットを忘れないでください。インストール中に次の警告が表示される場合があります。 yと入力します 続行します。そのため、インストールが妨げられることはありません。
 - Installing neos/composer-plugin (2.1.3): Extracting archive
neos/composer-plugin contains a Composer plugin which is currently not in your allow-plugins config. See https://getcomposer.org/allow-plugins
Do you trust "neos/composer-plugin" to execute code and wish to enable it now? (writes "allow-plugins" to composer.json) [y,n,d,?] y

  - Installing composer/package-versions-deprecated (1.11.99.4): Extracting archive
composer/package-versions-deprecated contains a Composer plugin which is currently not in your allow-plugins config. See https://getcomposer.org/allow-plugins
Do you trust "composer/package-versions-deprecated" to execute code and wish to enable it now? (writes "allow-plugins" to composer.json) [y,n,d,?] y
ルートディレクトリの所有権をnginxに変更します 。
$ sudo ./flow core:setfilepermissions $USER nginx nginx
現在ログインしているユーザーをnginxに追加します グループ。
$ sudo usermod -a -G nginx $USER
今のところ以上です。残りの構成は後で実行します。
SELinuxのchconを使用する /var/www/neosから提供されるWebコンテンツのファイルセキュリティコンテキストを変更するコマンド ディレクトリ。
$ sudo chcon -t httpd_sys_content_t /var/www/neos -R
$ sudo chcon -t httpd_sys_rw_content_t /var/www/neos -R
NeosCMSのネットワーク接続を許可するようにSELinuxを構成します。
$ sudo setsebool -P httpd_can_network_connect on
Let's Encryptを使用してSSL証明書をインストールするには、Certbotツールをダウンロードする必要があります。 CertbotをインストールするにはEpelリポジトリが必要ですが、チュートリアルの前半でインストールしたため、この手順をスキップできます。
Certbotをインストールします。
$ sudo dnf install certbot
Certbotツールに干渉するため、Nginxサーバーを停止します。
$ sudo systemctl stop nginx
SSL証明書を生成します。
$ sudo certbot certonly --standalone --agree-tos --no-eff-email --staple-ocsp --preferred-challenges http -m [email protected] -d neos.example.com
上記のコマンドは、証明書を/etc/letsencrypt/live/neos.example.comにダウンロードします。 サーバー上のディレクトリ。
Diffie-Hellmanグループを生成します 証明書。
$ sudo openssl dhparam -out /etc/ssl/certs/dhparam.pem 2048
Let'sEncryptの自動更新用のチャレンジWebルートディレクトリを作成します。
$ sudo mkdir -p /var/lib/letsencrypt
Cronジョブを作成してSSLを更新します。証明書を確認し、必要に応じて更新するために毎日実行されます。そのためには、まず、ファイル/etc/cron.daily/certbot-renewを作成します。 開いて編集します。
$ sudo nano /etc/cron.daily/certbot-renew
次のコードを貼り付けます。
#!/bin/sh
certbot renew --cert-name neos.example.com --webroot -w /var/lib/letsencrypt/ --post-hook "systemctl reload nginx"
Ctrl + Xを押してファイルを保存します Yと入力します プロンプトが表示されたら。
タスクファイルの権限を変更して実行可能にします。
$ sudo chmod +x /etc/cron.daily/certbot-renew
PHP-FPMを構成する
ファイル/etc/php-fpm.d/www.confを開きます 。
$ sudo nano /etc/php-fpm.d/www.conf
Unixユーザー/PHPプロセスのグループをnginxに設定する必要があります 。 user=www-dataを見つけます およびgroup=www-data ファイル内の行をnginxに変更します 。
...
; Unix user/group of processes
; Note: The user is mandatory. If the group is not set, the default user's group
;       will be used.
; RPM: apache user chosen to provide access to the same directories as httpd
user = nginx
; RPM: Keep a group allowed to write in log dir.
group = nginx
...
Ctrl + Xを押してファイルを保存します Yと入力します プロンプトが表示されたら。
PHPサービスを開始します。
$ sudo systemctl start php-fpm
Nginxを構成する
ファイル/etc/nginx/conf.d/neos.confを作成して開きます 編集用。
$ sudo nano /etc/nginx/conf.d/neos.conf
次のコードを貼り付けます。
server {
    listen       443 ssl http2;
    listen       [::]:443 ssl http2;
    server_name  neos.example.com;

    access_log  /var/log/nginx/neos.access.log;
    error_log   /var/log/nginx/neos.error.log;

    # SSL
    ssl_certificate      /etc/letsencrypt/live/neos.example.com/fullchain.pem;
    ssl_certificate_key  /etc/letsencrypt/live/neos.example.com/privkey.pem;
    ssl_trusted_certificate /etc/letsencrypt/live/neos.example.com/chain.pem;
    ssl_session_timeout  5m;
    ssl_session_cache shared:MozSSL:10m;
    ssl_session_tickets off;
    ssl_protocols TLSv1.2 TLSv1.3;
    ssl_prefer_server_ciphers on;
    ssl_ciphers ECDHE-ECDSA-AES128-GCM-SHA256:ECDHE-RSA-AES128-GCM-SHA256:ECDHE-ECDSA-AES256-GCM-SHA384:ECDHE-RSA-AES256-GCM-SHA384:ECDHE-ECDSA-CHACHA20-POLY1305:ECDHE-RSA-CHACHA20-POLY1305:DHE-RSA-AES128-GCM-SHA256:DHE-RSA-AES256-GCM-SHA384;
    ssl_ecdh_curve X25519:prime256v1:secp384r1:secp521r1;
    ssl_stapling on;
    ssl_stapling_verify on;
    ssl_dhparam /etc/ssl/certs/dhparam.pem;
    resolver 8.8.8.8;

    root /var/www/neos/Web/;
    index index.php;

    location / {
        try_files $uri $uri/ /index.php?$args;
    }

    # Pass PHP Scripts To FastCGI Server
    location ~ \.php$ {
        fastcgi_split_path_info ^(.+\.php)(.*)$;
        fastcgi_pass unix:/run/php-fpm/www.sock; # Depends On The PHP Version
        fastcgi_index index.php;
        fastcgi_param SCRIPT_FILENAME $document_root$fastcgi_script_name;
        fastcgi_param PATH_INFO $fastcgi_path_info;
        fastcgi_param FLOW_REWRITEURLS  1;
	fastcgi_param FLOW_CONTEXT  Production;
    	fastcgi_param X-Forwarded-For $proxy_add_x_forwarded_for;
	fastcgi_param X-Forwarded-Port $proxy_port;
    	fastcgi_param REMOTE_ADDR $remote_addr;
	fastcgi_param REMOTE_PORT $remote_port;
    	fastcgi_param SERVER_ADDR $server_addr;
	fastcgi_param SERVER_NAME $http_host;
        fastcgi_read_timeout 300;
	fastcgi_buffer_size  128k;
    	fastcgi_buffers  256 16k;
	fastcgi_busy_buffers_size 256k;
    	fastcgi_temp_file_write_size 256k;
        include fastcgi_params;
        try_files $uri =404;
    }

    location ~ /_Resources/ {
   	access_log off;
	log_not_found off;
	expires max;

    	if (!-f $request_filename) {
    		rewrite "/_Resources/Persistent/([a-z0-9]{40})/.+\.(.+)" /_Resources/Persistent/$1.$2 break;
     		rewrite "/_Resources/Persistent(?>/[a-z0-9]{5}){8}/([a-f0-9]{40})/.+\.(.+)" /_Resources/Persistent/$1.$2 break;
    	}
    }
}

# enforce HTTPS
server {
    listen       80;
    listen       [::]:80;
    server_name  neos.example.com;
    return 301   https://$host$request_uri;
}
Nginx構成で使用されるルートディレクトリが/var/www/neos/Web/であることに注意してください。 /var/www/neos/ではありません 。
Ctrl + Xを押してファイルを保存します Yと入力します 終了したらプロンプトが表示されたら。
ファイル/etc/nginx/nginx.confを開きます 編集用。
$ sudo nano /etc/nginx/nginx.conf
include /etc/nginx/conf.d/*.conf;の行の前に次の行を追加します 。
server_names_hash_bucket_size 64;
Ctrl + Xを押してファイルを保存します Yと入力します プロンプトが表示されたら。
Nginx構成ファイルの構文を確認します。
$ sudo nginx -t
nginx: the configuration file /etc/nginx/nginx.conf syntax is ok
nginx: configuration file /etc/nginx/nginx.conf test is successful
Nginxサービスを再起動して、新しい構成を有効にします。
$ sudo systemctl restart nginx
URL https://neos.example.comを起動します ブラウザで、次の設定画面が表示されます。
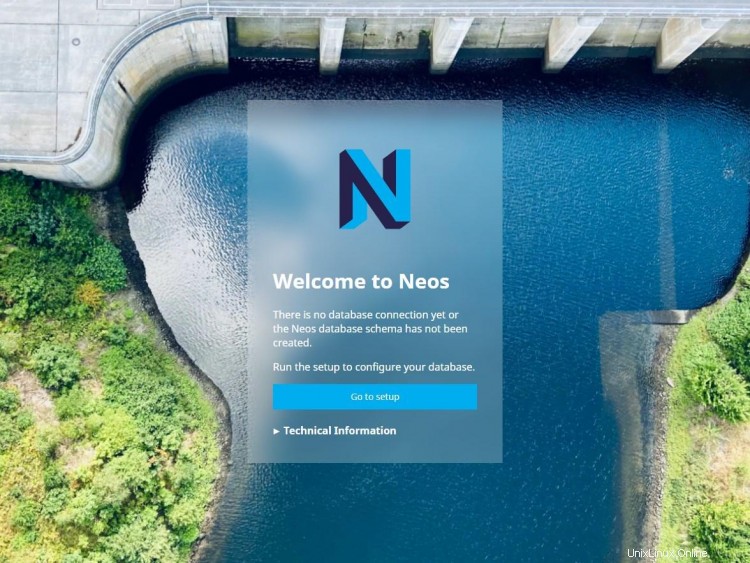
セットアップに移動をクリックします ボタンをクリックして続行します。ログイン画面にリダイレクトされます。

ターミナルで次のコマンドを実行して、パスワードを取得します。
$ cat /var/www/neos/Data/SetupPassword.txt
The setup password is:

SCPUYmmQ

After you successfully logged in, this file is automatically deleted for security reasons.
Make sure to save the setup password for later use.
>
パスワードを入力し、ログインをクリックします 続行します。 NeosはPHPイメージライブラリをチェックします。

[次へ]をクリックして続行します。 データベースのクレデンシャルを入力するように求められます。手順4で作成したクレデンシャルを入力します。クレデンシャルが確認されると、接続が確立されます 画面上のメッセージ。

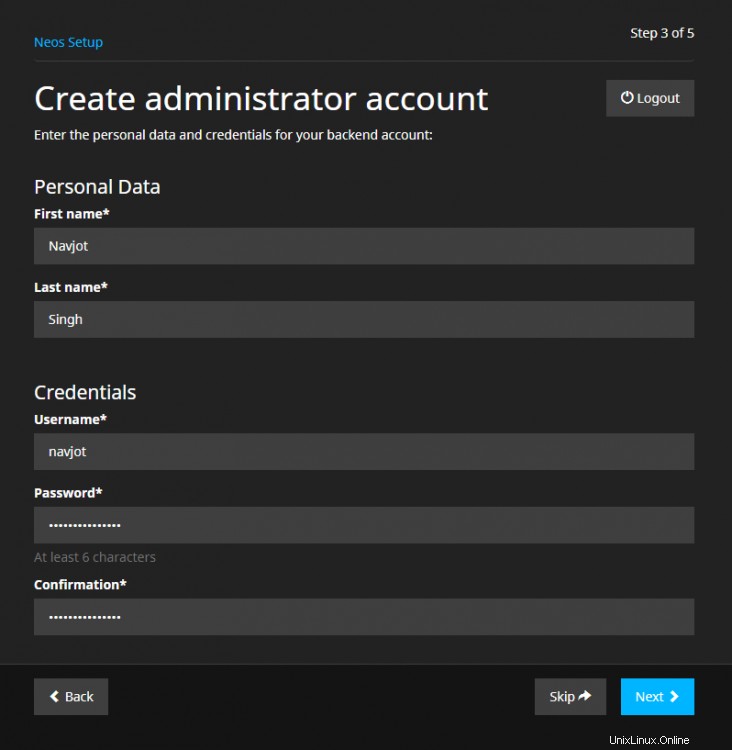
[次へ]をクリックして続行 。管理者アカウントを設定するように求められます。詳細を入力してください。
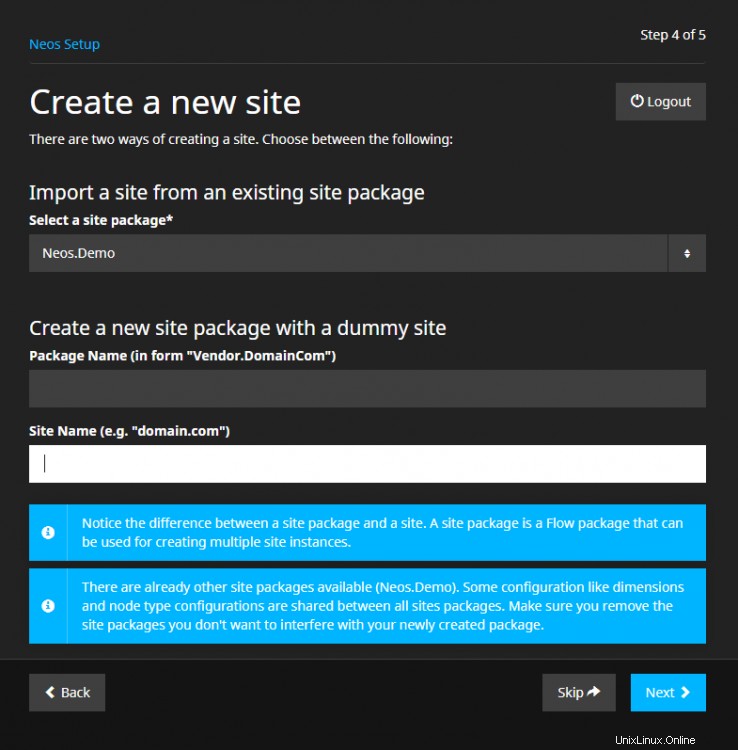
次へをクリックします 続行します。次に、デモサイトをインポートするか、最初から作成するかを選択するように求められます。新しいサイトを最初から作成する場合は、両方のボックスに入力する必要があります。たとえば、ニュースサイトを作成する場合は、表示されたとおりにボックスに入力します。ゼロから始める場合は、サイトにCSSがないため、自分で行う必要があることを忘れないでください。
Package Name: Neos.HowtoForgeNews
Site Name: HowtoForgeNews
チュートリアルでは、デモサイトに固執します。デモサイトをインポートするには、すべてのフィールドを空白のままにします。
次へをクリックします 続行します。セットアップ完了画面が表示されます。

バックエンドに移動をクリックします ボタンをクリックして、コントロールパネルのログイン画面を開きます。ユーザー名とパスワードを入力し、ログインをクリックします 管理パネルを開きます。

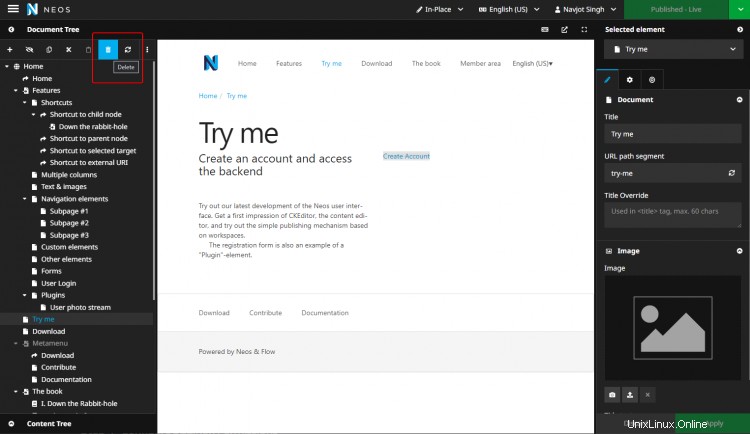
デモサイトをインポートしたので、最初のステップは試してみてくださいを削除することです ページ。誰でもウェブサイトを編集する権限を持つバックエンドアカウントを設定できます。
試してみてくださいに切り替えます 左側のサイドバーからページを表示し、削除をクリックします 下のスクリーンショットで強調表示されているボタン。
公開済み-ライブの右側にあるオレンジ色の矢印をクリックします ボタンをクリックしてドロップダウンメニューを開き、[すべて公開]をクリックします 変更を保存します。

NeosCMSインストールを使用する準備が整いました。
このチュートリアルでは、RockyLinux8ベースのサーバーにLEMPスタックを使用してNeosCMSをインストールおよび構成しました。ご不明な点がございましたら、下のコメント欄に投稿してください。