LEMPスタックはLinux、Nginx、MariaDB、およびPHPスタックの略で、ウェブサイト/ブログのホスティングに広く使用されています。
ここでは、PHPサポート(PHP-FPM経由)およびデータベース(MariaDB)サポートを使用してUbuntu18.04にLEMPスタックをインストールする方法を説明します。
LEMPスタックのインストール
Linuxのインストール
これは、Ubuntu18.04のステップバイステップインストールとUbuntu16.04およびUbuntu17.10からUbuntu18.04へのアップグレードに関するチュートリアルです。
Ubuntu 18.04へのEMP(Nginxバージョン1.17.2、PHPバージョン7.2、MariaDBバージョン10.1.40)のインストールに進みます。
Nginxをインストール
Nginxは、無料のオープンソースの高性能HTTP Webサーバーであり、その安定性、シンプルな構成、および低リソース消費で知られています。
リポジトリインデックスを更新します。
sudo apt update
以下のパッケージをインストールしてください。
sudo apt install -y wget gnupg2 ca-certificates
公式ウェブサイトからNginxリポジトリ署名キーをダウンロードします。
wget http://nginx.org/keys/nginx_signing.key
Nginx公開鍵をシステムに追加します。
sudo apt-key add nginx_signing.key
Nginxリポジトリをシステムに追加します。
echo "deb [arch=amd64] http://nginx.org/packages/mainline/ubuntu bionic nginx" | sudo tee /etc/apt/sources.list.d/nginx.list
次のコマンドを使用してNginxパッケージをインストールします。
sudo apt update

sudo apt install -y nginx
インストール後にNginxサービスを開始します。
sudo systemctl start nginx
Webブラウザーを開き、以下のURLにアクセスします。
http:// your-ip-add-ressNginxのデフォルトページが表示されます。これにより、Nginxがサーバーに正常にインストールされていることが確認されます。
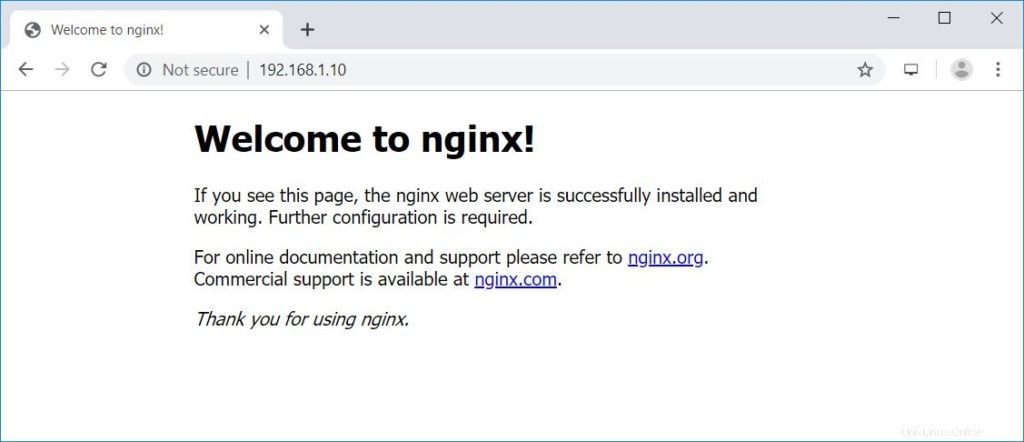
Ubuntu18.04でのNginxのデフォルトのドキュメントルートは/usr/ share / nginx / html /であり、構成ファイルは/ etc /nginx/ディレクトリにあります。
システムの起動時にNginxを自動起動します。
sudo systemctl enable nginx
MariaDBサーバーのインストール
次のコマンドを発行して、MariaDBサーバーをインストールします。
デフォルトでは、Ubuntu18.04はMariaDBv10.1を出荷します。これは、公式のMariaDBリポジトリ(v10.4)で利用可能なバージョンよりも少し古いものです。以下のURLの手順に従って、MariaDBv10.4をインストールできます。Ubuntu18.04にMariaDBをインストールする方法
sudo apt install -y mariadb-server mariadb-client
次に、mysql_secure_installationコマンドを使用してMariaDBサーバーを安全にします。
mysql_secure_installation
出力:
NOTE: RUNNING ALL PARTS OF THIS SCRIPT IS RECOMMENDED FOR ALL MariaDB
      SERVERS IN PRODUCTION USE!  PLEASE READ EACH STEP CAREFULLY!

In order to log into MariaDB to secure it, we'll need the current
password for the root user.  If you've just installed MariaDB, and
you haven't set the root password yet, the password will be blank,
so you should just press enter here.

Enter current password for root (enter for none):  << No root password. Just press Enter
OK, successfully used password, moving on...

Setting the root password ensures that nobody can log into the MariaDB
root user without the proper authorisation.

Set root password? [Y/n] Y  << Set MariaDB root password
New password:   << Enter root password
Re-enter new password:   << Re-enter root password
Password updated successfully!
Reloading privilege tables..
 ... Success!


By default, a MariaDB installation has an anonymous user, allowing anyone
to log into MariaDB without having to have a user account created for
them.  This is intended only for testing, and to make the installation
go a bit smoother.  You should remove them before moving into a
production environment.

Remove anonymous users? [Y/n] Y  << Remove anonymous users
 ... Success!

Normally, root should only be allowed to connect from 'localhost'.  This
ensures that someone cannot guess at the root password from the network.

Disallow root login remotely? [Y/n] Y  << Disallow root login remotely
 ... Success!

By default, MariaDB comes with a database named 'test' that anyone can
access.  This is also intended only for testing, and should be removed
before moving into a production environment.

Remove test database and access to it? [Y/n] Y  << Remove test database
 - Dropping test database...
 ... Success!
 - Removing privileges on test database...
 ... Success!

Reloading the privilege tables will ensure that all changes made so far
will take effect immediately.

Reload privilege tables now? [Y/n] Y  << Reload privilege
 ... Success!

Cleaning up...

All done!  If you've completed all of the above steps, your MariaDB
installation should now be secure.

Thanks for using MariaDB!
PHP-FPMのインストール
代替のPHPFastCGI実装であるPHP-FPM(PHP-FastCGI Process Manager)を介してPHPをインストールします。サイズの大きいサイトに役立つ追加機能を提供します。
デフォルトでは、Ubuntu18.04はPHP-FPMv7.2を出荷します。以下のURLの手順に従って、PHP-FPMv7.3をインストールすることもできます。Ubuntu18.04にPHP7.3をインストールする方法
次のコマンドを使用してphp-fpmをインストールします。
sudo apt install -y php-fpm php-mysql php-cli
PHP-FPMは、デフォルトでソケット/run/php/php7.2-fpm.sockをリッスンします。
PHP-FPMでTCP接続を使用するには、以下のファイルを編集します。
sudo nano /etc/php/7.2/fpm/pool.d/www.conf
次に、listenパラメーターを変更します。
FROM:
listen = /run/php/php7.2-fpm.sock
TO:
listen = 127.0.0.1:9000
PHP-FPMプロセスを再起動し、システムの起動時に自動的に開始できるようにします。
sudo systemctl restart php7.2-fpm

sudo systemctl enable php7.2-fpm
LEMPスタックのテスト
次の詳細については、Nginxサーバー上に名前ベースの仮想ホストを作成しましょう。
ドメイン名: web.itzgeek.local
ドキュメントルート: /usr/share/nginx/html/web.itzgeek.local
まず、/ etc / nginx /conf.d/ディレクトリの下にドメインの仮想ホスト構成ファイルを作成します。
sudo nano /etc/nginx/conf.d/web.itzgeek.local.conf
次のコンテンツを追加します。
server {
   server_name web.itzgeek.local;
   root /usr/share/nginx/html/web.itzgeek.local;

   location / {
       index index.html index.htm index.php;
   }

   location ~ \.php$ {
      include        /etc/nginx/fastcgi_params;
      fastcgi_pass   127.0.0.1:9000;
      fastcgi_index  index.php;
      fastcgi_param SCRIPT_FILENAME $document_root$fastcgi_script_name;
   }
}
仮想ホストのルートディレクトリを作成します。
sudo mkdir -p /usr/share/nginx/html/web.itzgeek.local
PHP-FPMサポートをテストするには、作成した仮想ホストのドキュメントルートにPHPファイルを配置します。
echo "<?php phpinfo(); ?>" | sudo tee /usr/share/nginx/html/web.itzgeek.local/index.php
ファイルの権限を更新します。
sudo chown -R www-data:www-data /usr/share/nginx/html/web.itzgeek.local/
サービスを再開します。
sudo systemctl restart nginx

sudo systemctl restart php7.2-fpm
ご使用の環境に名前解決用のDNSサーバーがない場合に備えて、/ etc / hostsファイルにドメイン(web.itzgeek.local)のホストエントリを作成します。
nano /etc/hosts
以下のようなホストエントリを追加します。
192.168.1.10 web.itzgeek.local web
Webブラウザを開き、Webアドレスにドメイン名を入力します。
http://web.itzgeek.localページは次のようになります:
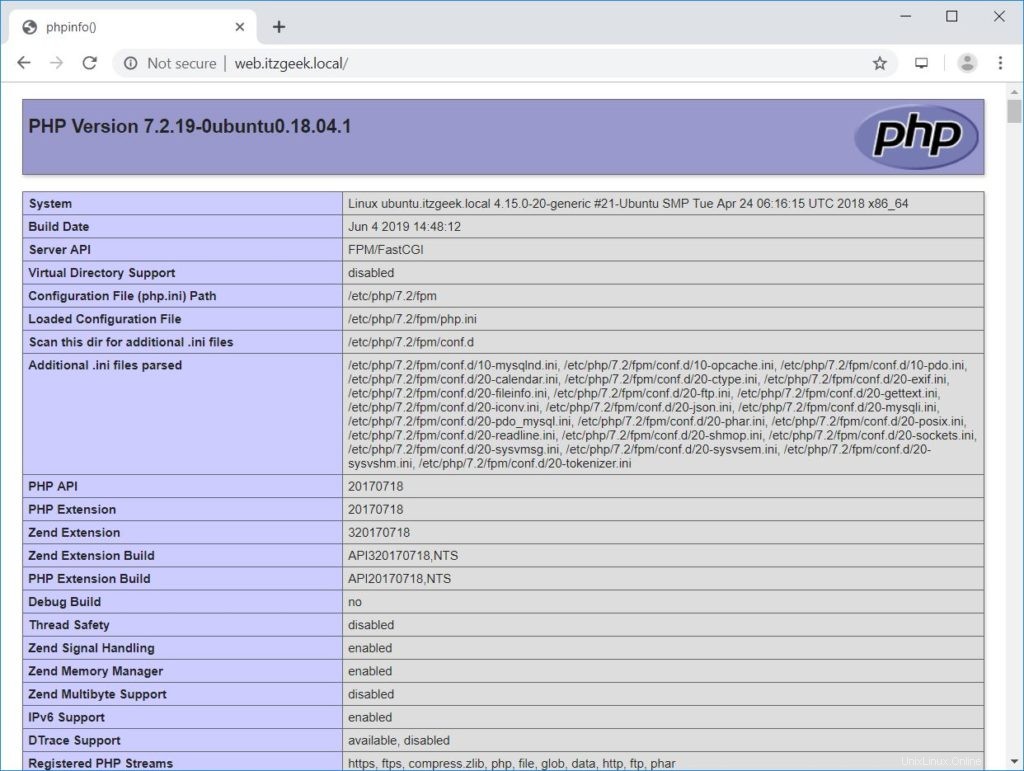
上のスクリーンショットから、PHPは FPM / FastCGIを介して動作しています 、サーバーAPI行に示されているように。
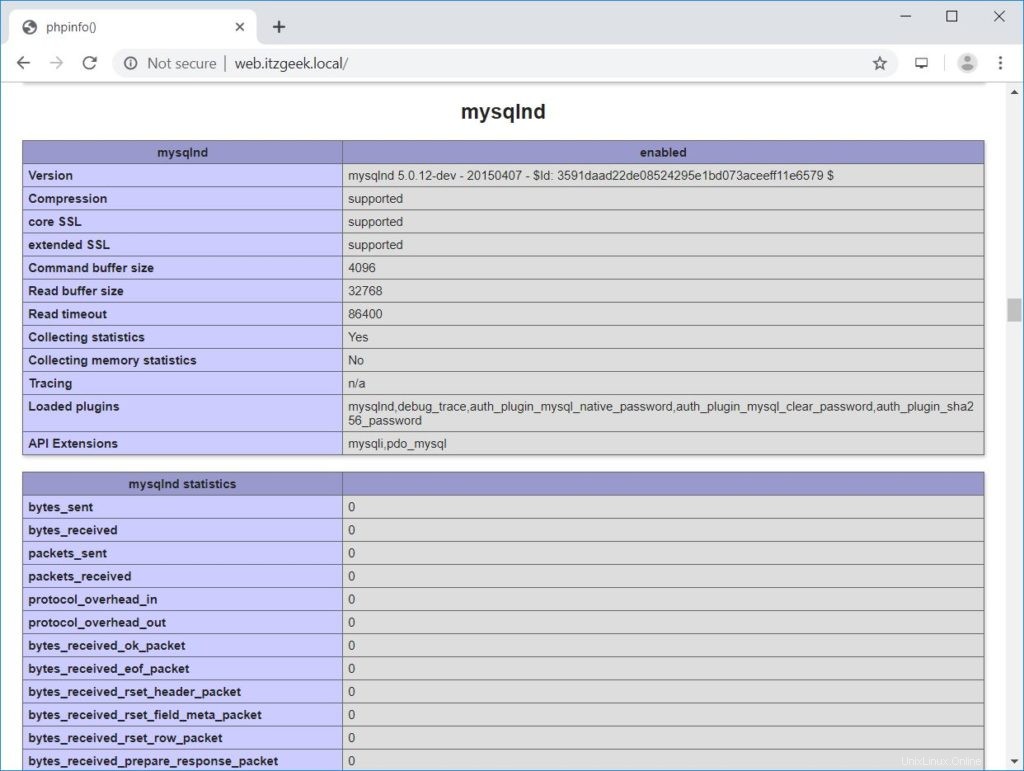
ページをさらに下にスクロールすると、MariaDBのサポートが表示されます。
結論
それで全部です。 Ubuntu18.04にLEMPスタックをインストールする方法を学んだことを願っています。セキュリティを向上させるために、サイトにLet’sEncryptSSL証明書をインストールすることを検討してください。コメントセクションでフィードバックを共有してください。