Passboltは、ルーター、ウェブサイト、Wi-Fiのパスワードなどのログイン資格情報を安全に共有および保存するのに役立つ、無料のオープンソースの自己ホスト型の拡張可能なパスワードマネージャーです。 -Fiなど。他のパスワードマネージャーとは異なります。個人ではなくチームの使用法に焦点を当てています。コミュニティ版と有料版の両方で利用できます。それはそれらのいくつかが以下にリストされている多くの機能を提供します:
- FirefoxとGoogleChromeの拡張機能を提供します。
- OpenPGPを使用してパスワードを暗号化します。
- シンプルでユーザーフレンドリーなウェブインターフェース。
- パスワードのインポートとエクスポートを許可します。
- ログイン資格情報を手動で追加できます。
このチュートリアルでは、Apacheを使用してPassbolt Password Managerをインストールし、Ubuntu20.04にLet'sEncryptを実行する方法を説明します。
- Ubuntu20.04を実行しているサーバー。
- サーバーIPで指定された有効なドメイン名。
- ルートパスワードがサーバーに設定されます。
LAMPサーバーをインストールする
まず、システムにApacheとMariaDBサーバーをインストールする必要があります。次のコマンドでインストールできます:
apt-get install apache2 mariadb-server -y
上記のパッケージをインストールした後、PHPおよびその他の必要なパッケージもシステムにインストールする必要があります。
デフォルトでは、Ubuntu20.04のデフォルトリポジトリにPHP7.4が付属しています。ただし、PassboltはPHP7.4をサポートしていません。そのため、システムにPHPリポジトリを追加する必要があります。
まず、次のコマンドを使用して必要なパッケージをインストールします。
apt-get install software-properties-common gnupg -y
次に、次のコマンドを使用してPHPリポジトリを追加します。
add-apt-repository ppa:ondrej/php --yes
次に、次のコマンドを使用して、Composerおよびその他の必要な拡張機能を備えたPHPバージョン7.3をインストールします。
apt-get install php7.3 php7.3-mysql libapache2-mod-php7.3 php7.3-intl php7.3-mbstring php7.3-gd php7.3-imagick php7.3-xml php7.3-common php7.3-curl php7.3-json php7.3-ldap php7.3-gnupg zlib1g unzip git composer curl -y
すべてのパッケージがインストールされたら、次のステップに進むことができます。
MariaDBデータベースを構成する
まず、MariaDBのインストールを保護し、MariaDBのrootパスワードを設定する必要があります。次のコマンドで実行できます:
mysql_secure_installation
このスクリプトは、以下に示すように、MariaDBルートパスワードを設定し、匿名ユーザーを削除し、rootログインをリモートで禁止し、テストデータベースとアクセスを削除します。
Enter current password for root (enter for none):
OK, successfully used password, moving on...
Set root password? [Y/n] Y
Remove anonymous users? [Y/n] Y
Disallow root login remotely? [Y/n] Y
Remove test database and access to it? [Y/n] Y
Reload privilege tables now? [Y/n] Y
MariaDBが保護されたら、次のコマンドを使用してMariaDBシェルにログインします。
mysql -u root -p
プロンプトが表示されたらrootパスワードを入力し、次のコマンドを使用してPassboltのデータベースとユーザーを作成します。
MariaDB [(none)]> CREATE DATABASE passboltdb CHARACTER SET utf8mb4 COLLATE utf8mb4_unicode_ci;>
MariaDB [(none)]> GRANT ALL on passboltdb.* to [email protected] identified by 'password';
次に、特権をフラッシュし、次のコマンドでMariaDBを終了します。
MariaDB [(none)]> FLUSH PRIVILEGES;
MariaDB [(none)]> EXIT;
終了したら、次のステップに進むことができます。
このセクションでは、passboltをダウンロードして構成する方法を学習します:
まず、次のコマンドを使用して、最新バージョンのPassboltをApacheWebルートディレクトリにダウンロードします。
mkdir /var/www/passbolt
git clone https://github.com/passbolt/passbolt_api.git /var/www/passbolt
ダウンロードしたら、次のコマンドを使用してパスボルトの所有権をwww-dataに変更します。
chown -R www-data:www-data /var/www/
次に、ディレクトリをpassboltに変更し、次のコマンドを使用して必要な依存関係をインストールします。
cd /var/www/passbolt
sudo -u www-data composer install --no-dev
次の出力が得られるはずです:
> Cake\Composer\Installer\PluginInstaller::postAutoloadDump
9 packages you are using are looking for funding.
Use the `composer fund` command to find out more!
thadafinser/package-info:  Generating class...
thadafinser/package-info: ...generating class
> App\Console\Installer::postInstall
Created `config/app.php` file
Created `/var/www/passbolt/logs` directory
Created `/var/www/passbolt/tmp/cache/models` directory
Created `/var/www/passbolt/tmp/cache/persistent` directory
Created `/var/www/passbolt/tmp/cache/views` directory
Created `/var/www/passbolt/tmp/sessions` directory
Created `/var/www/passbolt/tmp/tests` directory
Set Folder Permissions ? (Default to Y) [Y,n]? Y
Yと入力します Enterを押します フォルダのアクセス許可を設定します。
次に、送信JSONリクエストを認証して署名するためのOpenPGPキーを生成する必要があります。次のコマンドで生成できます:
cd /var/www/passbolt
gpg --full-generate-key
プロセス中に、パスフレーズの入力を求められます。Tabキーを押して、 OKを選択するだけです。 php-gnupgモジュールは現在パスフレーズの使用をサポートしていないため、設定しないことを確認してください。
gpg (GnuPG) 2.2.19; Copyright (C) 2019 Free Software Foundation, Inc.
This is free software: you are free to change and redistribute it.
There is NO WARRANTY, to the extent permitted by law.

gpg: directory '/root/.gnupg' created
gpg: keybox '/root/.gnupg/pubring.kbx' created
Please select what kind of key you want:
   (1) RSA and RSA (default)
   (2) DSA and Elgamal
   (3) DSA (sign only)
   (4) RSA (sign only)
  (14) Existing key from card
Your selection? 1
RSA keys may be between 1024 and 4096 bits long.
What keysize do you want? (3072) 4096
Requested keysize is 4096 bits
Please specify how long the key should be valid.
         0 = key does not expire
        = key expires in n days
      w = key expires in n weeks
      m = key expires in n months
      y = key expires in n years
Key is valid for? (0) 0
Key does not expire at all
Is this correct? (y/N) y

GnuPG needs to construct a user ID to identify your key.

Real name: Hitesh
Email address: [email protected]
Comment: Hi
You selected this USER-ID:
    "Hitesh (Hi) <[email protected]>"

Change (N)ame, (C)omment, (E)mail or (O)kay/(Q)uit? O
We need to generate a lot of random bytes. It is a good idea to perform
some other action (type on the keyboard, move the mouse, utilize the
disks) during the prime generation; this gives the random number
generator a better chance to gain enough entropy.
We need to generate a lot of random bytes. It is a good idea to perform
some other action (type on the keyboard, move the mouse, utilize the
disks) during the prime generation; this gives the random number
generator a better chance to gain enough entropy.
gpg: /root/.gnupg/trustdb.gpg: trustdb created
gpg: key 2DA8E7FB8E23B2FD marked as ultimately trusted
gpg: directory '/root/.gnupg/openpgp-revocs.d' created
gpg: revocation certificate stored as '/root/.gnupg/openpgp-revocs.d/9622291A72D99A4EC78ABCB92DA8E7FB8E23B2FD.rev'
public and secret key created and signed.

pub   rsa4096 2020-07-25 [SC]
      D2394A45B7CBBAB7F00CC79B23D4750486780854
uid                      Hitesh (Hi) <[email protected]>
sub   rsa4096 2020-07-25 [E]
上記の公開鍵指紋は、セットアップの後半で必要になるため、覚えておいてください。
次に、次のコマンドを使用して、公開鍵と秘密鍵を「/ var / www/passbolt」ディレクトリにエクスポートします。
gpg --armor --export-secret-keys [email protected] > /var/www/passbolt/config/gpg/serverkey_private.asc
gpg --armor --export [email protected] > /var/www/passbolt/config/gpg/serverkey.asc
次に、Apacheユーザーのgpgキーのキーリングを初期化する必要があります。次のコマンドで実行できます:
sudo su -s /bin/bash -c "gpg --list-keys" www-data
次の出力が得られるはずです:
gpg: directory '/var/www/.gnupg' created
gpg: keybox '/var/www/.gnupg/pubring.kbx' created
gpg: /var/www/.gnupg/trustdb.gpg: trustdb created
>
Passboltを構成する
まず、次のコマンドを使用して、サンプルのPassbolt構成ファイルをコピーします。
cp /var/www/passbolt/config/passbolt{.default,}.php 次に、次のコマンドを使用してPassbolt構成ファイルを編集します::
nano /var/www/passbolt/config/passbolt.php
以下に示すように、fullbaseurl、データベース、および公開鍵の指紋を定義します。
        'fullBaseUrl' => 'https://passbolt.linuxbuz.com',
    // Database configuration.

    'Datasources' => [
        'default' => [
            'host' => 'localhost',
            //'port' => 'non_standard_port_number',
            'username' => 'passbolt',
            'password' => 'password',
            'database' => 'passboltdb',
            'serverKey' => [
            // Server private key fingerprint.
            'fingerprint' => 'D2394A45B7CBBAB7F00CC79B23D4750486780854',
            'public' => CONFIG . 'gpg' . DS . 'serverkey.asc',
            'private' => CONFIG . 'gpg' . DS . 'serverkey_private.asc',
終了したら、ファイルを保存して閉じます。
公開鍵の指紋を覚えていない場合は、次のコマンドで取得できます。
gpg --list-keys --fingerprint | grep -i -B 2 [email protected]
次の出力が得られるはずです:
gpg: checking the trustdb
gpg: marginals needed: 3  completes needed: 1  trust model: pgp
gpg: depth: 0  valid:   1  signed:   0  trust: 0-, 0q, 0n, 0m, 0f, 1u
pub   rsa4096 2020-07-25 [SC]
      D239 4A45 B7CB BAB7 F00C  C79B 23D4 7504 8678 0854
uid           [ultimate] Hitesh (Hi) <[email protected]>
Passbolt用にApacheを構成する
次に、Passbolt用のApache仮想ホスト構成ファイルを作成する必要があります。次のコマンドで作成できます:
nano /etc/apache2/sites-available/passbolt.conf
次の行を追加します:
<VirtualHost *:80>

        ServerName passbolt.linuxbuz.com
        DocumentRoot /var/www/passbolt

        ErrorLog ${APACHE_LOG_DIR}/passbolt_error.log
        CustomLog ${APACHE_LOG_DIR}/passbolt_access.log combined


      <Directory /var/www/passbolt/>
                Options FollowSymLinks MultiViews
                AllowOverride All
                Require all granted
        </Directory>

</VirtualHost>
ファイルを保存して閉じてから、仮想ホストファイルをアクティブ化し、次のコマンドを使用してApacheサービスを再起動します。
a2ensite passbolt
systemctl restart apache2
終了したら、次のステップに進むことができます。
Let'sEncryptを使用したセキュアパスボルト
Let's Encrypt SSLを使用してWebサイトを保護するには、システムにCertbotクライアントユーティリティをインストールしてSSL証明書を管理する必要があります。
次のコマンドでインストールできます:
apt-get install python3-certbot-apache -y
インストールしたら、次のコマンドを実行して、Let'sEncryptSSLでWebサイトを保護します。
certbot --apache -d passbolt.linuxbuz.com
以下に示すように、メールアドレスを提供し、利用規約に同意するよう求められます。
Saving debug log to /var/log/letsencrypt/letsencrypt.log
Plugins selected: Authenticator standalone, Installer None
Enter email address (used for urgent renewal and security notices) (Enter 'c' to
cancel): [email protected]

- - - - - - - - - - - - - - - - - - - - - - - - - - - - - - - - - - - - - - - -
Please read the Terms of Service at
https://letsencrypt.org/documents/LE-SA-v1.2-November-15-2017.pdf. You must
agree in order to register with the ACME server at
https://acme-v02.api.letsencrypt.org/directory
- - - - - - - - - - - - - - - - - - - - - - - - - - - - - - - - - - - - - - - -
(A)gree/(C)ancel: A

- - - - - - - - - - - - - - - - - - - - - - - - - - - - - - - - - - - - - - - -
Would you be willing to share your email address with the Electronic Frontier
Foundation, a founding partner of the Let's Encrypt project and the non-profit
organization that develops Certbot? We'd like to send you email about our work
encrypting the web, EFF news, campaigns, and ways to support digital freedom.
- - - - - - - - - - - - - - - - - - - - - - - - - - - - - - - - - - - - - - - -
(Y)es/(N)o: Y
Plugins selected: Authenticator apache, Installer apache
Obtaining a new certificate
Performing the following challenges:
http-01 challenge for passbolt.linuxbuz.com
Enabled Apache rewrite module
Waiting for verification...
Cleaning up challenges
Created an SSL vhost at /etc/apache2/sites-available/passbolt-le-ssl.conf
Enabled Apache socache_shmcb module
Enabled Apache ssl module
Deploying Certificate to VirtualHost /etc/apache2/sites-available/passbolt-le-ssl.conf
Enabling available site: /etc/apache2/sites-available/passbolt-le-ssl.conf
次に、以下に示すように、HTTPトラフィックをHTTPSにリダイレクトするかどうかを選択します。
Please choose whether or not to redirect HTTP traffic to HTTPS, removing HTTP access.
- - - - - - - - - - - - - - - - - - - - - - - - - - - - - - - - - - - - - - - -
1: No redirect - Make no further changes to the webserver configuration.
2: Redirect - Make all requests redirect to secure HTTPS access. Choose this for
new sites, or if you're confident your site works on HTTPS. You can undo this
change by editing your web server's configuration.
- - - - - - - - - - - - - - - - - - - - - - - - - - - - - - - - - - - - - - - -
Select the appropriate number [1-2] then [enter] (press 'c' to cancel): 2
2と入力します Enterを押します ウェブサイトにLet'sEncryptSSLをインストールするには:
Enabled Apache rewrite module
Redirecting vhost in /etc/apache2/sites-enabled/passbolt.conf to ssl vhost in /etc/apache2/sites-available/passbolt-le-ssl.conf

- - - - - - - - - - - - - - - - - - - - - - - - - - - - - - - - - - - - - - - -
Congratulations! You have successfully enabled https://passbolt.linuxbuz.com

You should test your configuration at:
https://www.ssllabs.com/ssltest/analyze.html?d=passbolt.linuxbuz.com
- - - - - - - - - - - - - - - - - - - - - - - - - - - - - - - - - - - - - - - -

IMPORTANT NOTES:
 - Congratulations! Your certificate and chain have been saved at:
   /etc/letsencrypt/live/passbolt.linuxbuz.com/fullchain.pem
   Your key file has been saved at:
   /etc/letsencrypt/live/passbolt.linuxbuz.com/privkey.pem
   Your cert will expire on 2020-10-23. To obtain a new or tweaked
   version of this certificate in the future, simply run certbot again
   with the "certonly" option. To non-interactively renew *all* of
   your certificates, run "certbot renew"
 - If you like Certbot, please consider supporting our work by:

   Donating to ISRG / Let's Encrypt:   https://letsencrypt.org/donate
   Donating to EFF:                    https://eff.org/donate-le
この時点で、WebサイトはLet'sEncryptSSLで保護されています。
次に、Passboltインストールスクリプトを実行してPassboltをインストールできます。
まず、ディレクトリを/ var / www / passboltに変更します:
cd /var/www/passbolt
次に、次のコマンドを使用してPassboltインストールスクリプトを実行します。
sudo su -s /bin/bash -c "./bin/cake passbolt install --no-admin" www-data
インストールが正常に完了すると、次の出力が表示されます。
All Done. Took 1.6533s

Import the server private key in the keyring
---------------------------------------------------------------
Importing /var/www/passbolt/config/gpg/serverkey_private.asc
Keyring init OK

Passbolt installation success! Enjoy! ?
次に、ブラウザからPassboltの設定を完了する必要があります。 Webブラウザーを開き、URLhttps://passbolt.linuxbuz.comにアクセスします。次の画面が表示されます。
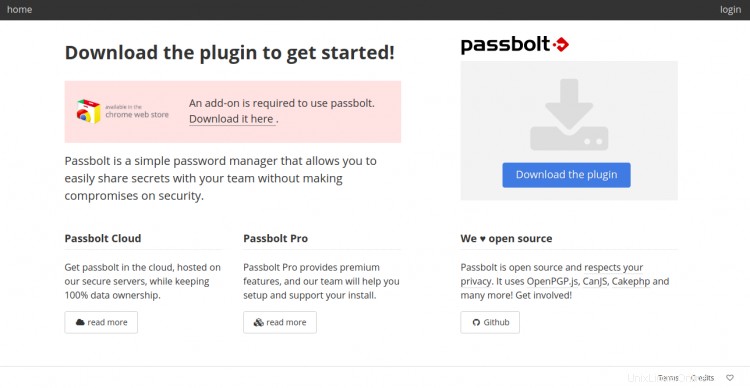
ここでは、ブラウザ用のプラグインをダウンロードしてインストールする必要があります。 プラグインのダウンロードをクリックします Passboltプラグインをダウンロードしてインストールします。インストールしたら、次のステップに進むことができます。
AccessPassboltWebインターフェイス
開始する前に、管理者ユーザーを作成し、Passboltのパスワードを設定する必要があります。次のコマンドで実行できます:
cd /var/www/passbolt
sudo su -s /bin/bash -c "./bin/cake passbolt register_user -u [email protected] -f howtoforge -l Demo -r admin" www-data
次の出力が得られるはずです:
     ____                  __          ____
    / __ \____  _____ ____/ /_  ____  / / /_
   / /_/ / __ `/ ___/ ___/ __ \/ __ \/ / __/
  / ____/ /_/ (__  |__  ) /_/ / /_/ / / /
 /_/    \__,_/____/____/_.___/\____/_/\__/

 Open source password manager for teams
---------------------------------------------------------------
User saved successfully.
To start registration follow the link provided in your mailbox or here:
https://passbolt.linuxbuz.com/setup/install/5bcfb186-3d9f-448f-8388-f705abd855c8/a2ba80dc-5ef2-433a-9138-11282747b377
次に、上記の出力からリンクをコピーし、それを使用してブラウザーでのPassboltのセットアップを完了します。次の画面が表示されます。
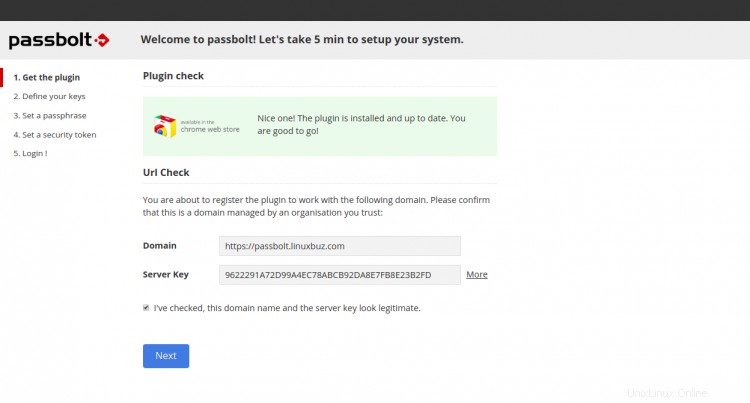
URLとGPGキーの指紋に問題がないことを確認し、次へをクリックします ボタン。次の画面が表示されます。
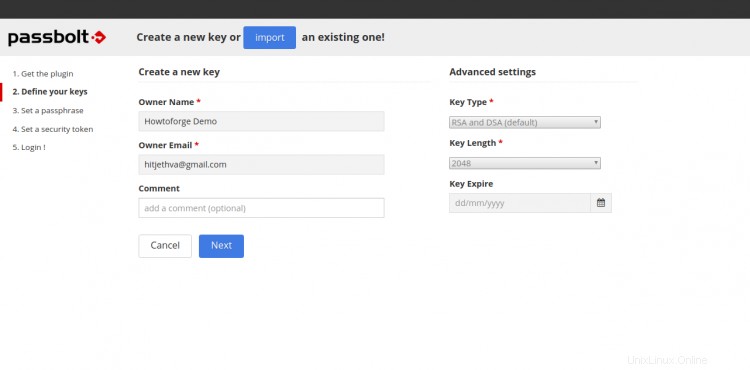
所有者の名前とメールアドレスを入力し、次へをクリックします ボタン。次の画面が表示されます。
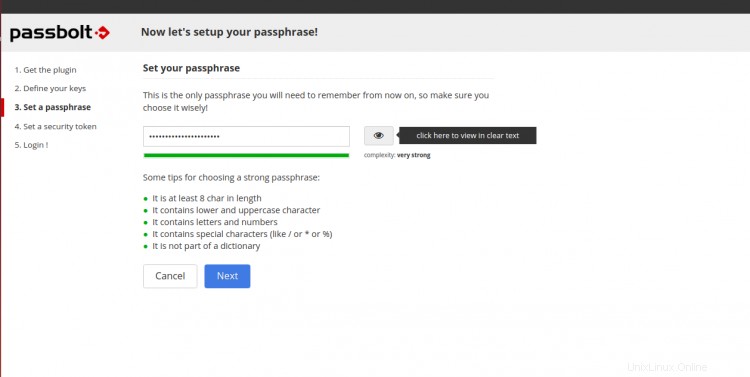
パスワードを設定し、次へをクリックします ボタン。次の画面が表示されます。
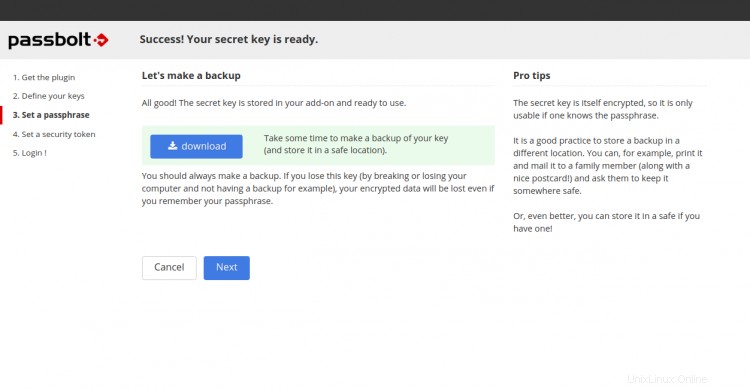
秘密鍵をダウンロードして、次へをクリックします ボタン。次の画面が表示されます。
セキュリティトークンを設定し、次へをクリックします ボタン。次の画面が表示されます。
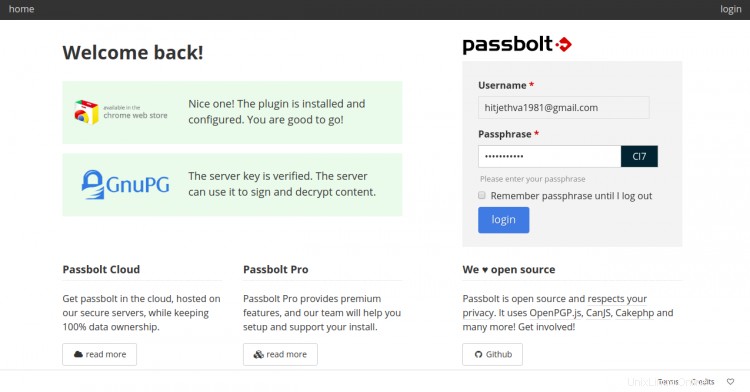
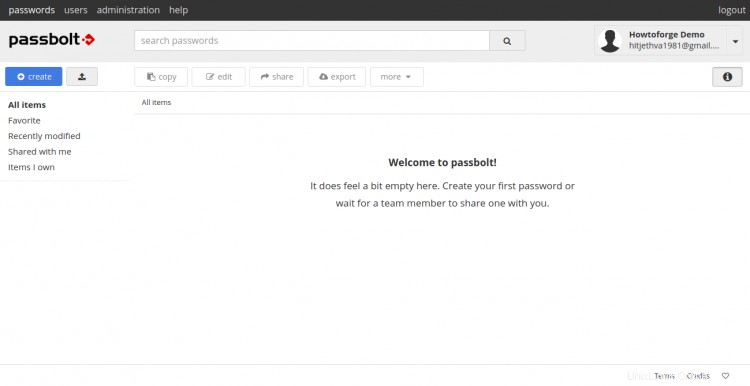
ユーザー名とパスワードを入力し、ログインをクリックします ボタン。次の画面にPassboltダッシュボードが表示されます。
おめでとうございます!これで、Ubuntu20.04サーバーにLet'sEncryptSSLを使用してPassboltパスワードマネージャーが正常にインストールされました。これで、パスワードを保存して、チームや個々のユーザーと共有できます。ご不明な点がございましたら、お気軽にお問い合わせください。