Osclassは、無料のオープンソースでユーザーフレンドリーなアプリケーションであり、独自のサーバー上に独自の求人サイトを作成するために使用できます。機能豊富なエディター、ユーザーフレンドリーな管理ポータル、柔軟でテンプレートシステムが付属しており、技術的な知識がなくても独自のリストサイトを作成できます。多言語、キャプチャ、ダッシュボード、SEOフレンドリー、統合検索エンジン、無料サイト作成者などの機能のログがあります。
このチュートリアルでは、Ubuntu20.04サーバーにNginxとLet'sEncryptSSLを使用してOsclass分類されたWebサイトcmsをインストールする方法を説明します。
- Ubuntu20.04を実行しているサーバー。
- サーバーIPで指定された有効なドメイン名。
- ルートパスワードがサーバーに設定されます。
LEMPスタックをインストール
まず、Nginx Webサーバー、MariaDBサーバー、PHP、およびその他の必要なパッケージをサーバーにインストールする必要があります。次のコマンドですべてをインストールできます:
apt-get install nginx mariadb-server php7.4 php7.4-cli php7.4-fpm php7.4-common php7.4-mysql php7.4-gd php7.4-xml curl gnupg2 unzip -y
すべてのパッケージをインストールしたら、次のステップに進むことができます。
Osclassのデータベースを作成する
次に、Osclassのデータベースとユーザーを作成する必要があります。まず、次のコマンドを使用してMariaDBにログインします。
mysql
ログインしたら、次のコマンドを使用してOsclassのデータベースとユーザーを作成します。
MariaDB [(none)]> CREATE DATABASE osclass;
MariaDB [(none)]> GRANT ALL PRIVILEGES ON osclass.* TO 'osclass'@'localhost' IDENTIFIED BY 'password';
次に、特権をフラッシュし、次のコマンドを使用してMariaDBシェルを終了します。
MariaDB [(none)]> FLUSH PRIVILEGES;
MariaDB [(none)]> EXIT;
終了したら、次のステップに進むことができます。
Osclassをダウンロード
まず、Gitリポジトリから最新バージョンのOsclassをダウンロードする必要があります。次のコマンドでダウンロードできます:
wget https://github.com/Dis555/Osclass/releases/download/4.2.0/Osclass-Evolution4.2.0.zip
ダウンロードが完了したら、次のコマンドを使用して、ダウンロードしたファイルをNginxルートディレクトリに解凍します。
unzip Osclass-Evolution4.2.0.zip -d /var/www/html/osclass
次に、osclassディレクトリの所有権をwww-dataに変更し、次のコマンドで適切な権限を付与します。
chown -R www-data:www-data /var/www/html/osclass
chmod -R 755 /var/www/html/osclass
終了したら、次のステップに進むことができます。
Osclass用にNginxを構成する
次に、Osclassにサービスを提供するためのNginx仮想ホスト構成ファイルを作成する必要があります。次のコマンドで作成できます:
nano /etc/nginx/sites-available/osclass.conf
次の行を追加します:
server {
    listen 80;
    listen [::]:80;

    server_name osclass.linuxbuz.com;
    root /var/www/html/osclass;

    index index.php index.html;

    location / {
      try_files $uri $uri/ /index.php?$args;
    }

    location ~ \.php$ {
        include snippets/fastcgi-php.conf;
        fastcgi_pass unix:/var/run/php/php7.4-fpm.sock; # Check this
    }
}
ファイルを保存して閉じてから、次のコマンドでNginx仮想ホストを有効にします。
ln -s /etc/nginx/sites-available/osclass.conf /etc/nginx/sites-enabled/
次に、次のコマンドを使用して、構成エラーがないかNginxを確認します。
nginx -t
次の出力が得られるはずです:
nginx: the configuration file /etc/nginx/nginx.conf syntax is ok
nginx: configuration file /etc/nginx/nginx.conf test is successful
最後に、Nginxサービスを再起動して、変更を適用します。
systemctl restart nginx
次に、次のコマンドを使用してNginxサービスのステータスを確認します。
systemctl status nginx
次の出力が表示されます。
? nginx.service - A high performance web server and a reverse proxy server
     Loaded: loaded (/lib/systemd/system/nginx.service; enabled; vendor preset: enabled)
     Active: active (running) since Thu 2020-08-13 06:21:23 UTC; 4s ago
       Docs: man:nginx(8)
    Process: 13399 ExecStartPre=/usr/sbin/nginx -t -q -g daemon on; master_process on; (code=exited, status=0/SUCCESS)
    Process: 13412 ExecStart=/usr/sbin/nginx -g daemon on; master_process on; (code=exited, status=0/SUCCESS)
   Main PID: 13415 (nginx)
      Tasks: 3 (limit: 2353)
     Memory: 3.5M
     CGroup: /system.slice/nginx.service
             ??13415 nginx: master process /usr/sbin/nginx -g daemon on; master_process on;
             ??13416 nginx: worker process
             ??13417 nginx: worker process

Aug 13 06:21:23 ubuntu2004 systemd[1]: Starting A high performance web server and a reverse proxy server...
Aug 13 06:21:23 ubuntu2004 systemd[1]: Started A high performance web server and a reverse proxy server.
終了したら、次のステップに進むことができます。
Let'sEncryptを使用したSecureOsclass
Let'sEncryptSSLを使用してOsclassWebサイトを保護することは常に良い考えです。まず、サーバーにCertbotクライアントをインストールする必要があります。 Certbotは、ドメインのSSL証明書を管理するために使用されるLet'sEncryptクライアントです。次のコマンドを使用して、Certbotクライアントをインストールできます。
apt-get install python3-certbot-nginx -y
Certbotクライアントをインストールした後、次のコマンドを実行して、WebサイトにLet'sEncryptSSLをインストールします。
certbot --nginx -d osclass.linuxbuz.com
以下に示すように、メールアドレスを入力し、利用規約に同意するよう求められます。
Saving debug log to /var/log/letsencrypt/letsencrypt.log
Plugins selected: Authenticator nginx, Installer nginx
Enter email address (used for urgent renewal and security notices) (Enter 'c' to
cancel): [email protected]

- - - - - - - - - - - - - - - - - - - - - - - - - - - - - - - - - - - - - - - -
Please read the Terms of Service at
https://letsencrypt.org/documents/LE-SA-v1.2-November-15-2017.pdf. You must
agree in order to register with the ACME server at
https://acme-v02.api.letsencrypt.org/directory
- - - - - - - - - - - - - - - - - - - - - - - - - - - - - - - - - - - - - - - -
(A)gree/(C)ancel: A

- - - - - - - - - - - - - - - - - - - - - - - - - - - - - - - - - - - - - - - -
Would you be willing to share your email address with the Electronic Frontier
Foundation, a founding partner of the Let's Encrypt project and the non-profit
organization that develops Certbot? We'd like to send you email about our work
encrypting the web, EFF news, campaigns, and ways to support digital freedom.
- - - - - - - - - - - - - - - - - - - - - - - - - - - - - - - - - - - - - - - -
(Y)es/(N)o: Y
Obtaining a new certificate
Performing the following challenges:
http-01 challenge for osclass.linuxbuz.com
Waiting for verification...
Cleaning up challenges
Deploying Certificate to VirtualHost /etc/nginx/sites-enabled/osclass.conf
次に、以下に示すように、HTTPトラフィックをHTTPSにリダイレクトするかどうかも選択する必要があります。
Please choose whether or not to redirect HTTP traffic to HTTPS, removing HTTP access.
- - - - - - - - - - - - - - - - - - - - - - - - - - - - - - - - - - - - - - - -
1: No redirect - Make no further changes to the webserver configuration.
2: Redirect - Make all requests redirect to secure HTTPS access. Choose this for
new sites, or if you're confident your site works on HTTPS. You can undo this
change by editing your web server's configuration.
- - - - - - - - - - - - - - - - - - - - - - - - - - - - - - - - - - - - - - - -
Select the appropriate number [1-2] then [enter] (press 'c' to cancel): 2
2と入力し、Enterキーを押して続行します。証明書がインストールされると、次の出力が表示されます。
Redirecting all traffic on port 80 to ssl in /etc/nginx/sites-enabled/osclass.conf

- - - - - - - - - - - - - - - - - - - - - - - - - - - - - - - - - - - - - - - -
Congratulations! You have successfully enabled https://osclass.linuxbuz.com

You should test your configuration at:
https://www.ssllabs.com/ssltest/analyze.html?d=osclass.linuxbuz.com
- - - - - - - - - - - - - - - - - - - - - - - - - - - - - - - - - - - - - - - -

IMPORTANT NOTES:
 - Congratulations! Your certificate and chain have been saved at:
   /etc/letsencrypt/live/osclass.linuxbuz.com/fullchain.pem
   Your key file has been saved at:
   /etc/letsencrypt/live/osclass.linuxbuz.com/privkey.pem
   Your cert will expire on 2020-11-11. To obtain a new or tweaked
   version of this certificate in the future, simply run certbot again
   with the "certonly" option. To non-interactively renew *all* of
   your certificates, run "certbot renew"
 - Your account credentials have been saved in your Certbot
   configuration directory at /etc/letsencrypt. You should make a
   secure backup of this folder now. This configuration directory will
   also contain certificates and private keys obtained by Certbot so
   making regular backups of this folder is ideal.
 - If you like Certbot, please consider supporting our work by:

   Donating to ISRG / Let's Encrypt:   https://letsencrypt.org/donate
   Donating to EFF:                    https://eff.org/donate-le

 - We were unable to subscribe you the EFF mailing list because your
   e-mail address appears to be invalid. You can try again later by
   visiting https://act.eff.org.
この時点で、OsclassWebサイトはLet'sEncryptSSLで保護されています。
次に、Webブラウザーを開き、URLhttps://osclass.linuxbuz.comを入力します。次の画面にリダイレクトされます:
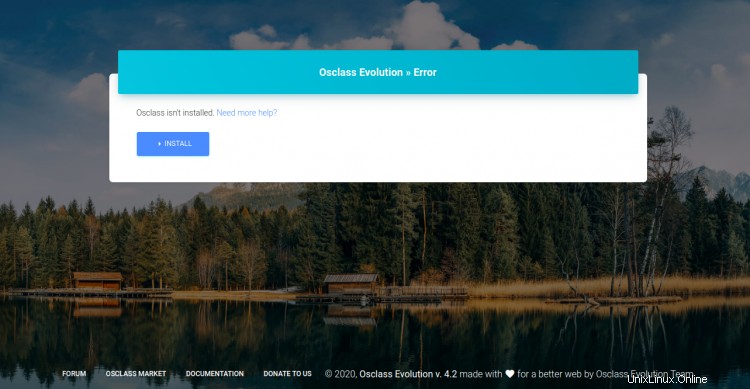
インストールをクリックします ボタンをクリックしてインストールを開始します。次の画面が表示されます。
すべての要件が満たされていることを確認してから、インストールを実行をクリックします ボタン。次の画面が表示されます。
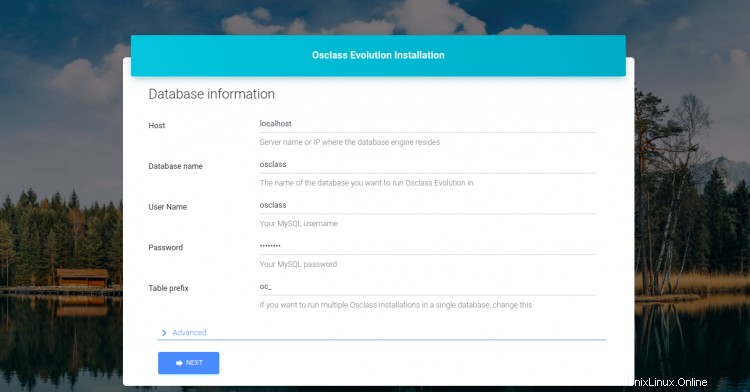
データベース名、データベースユーザー名、パスワードを入力し、次へをクリックします。 ボタン。次の画面が表示されます。
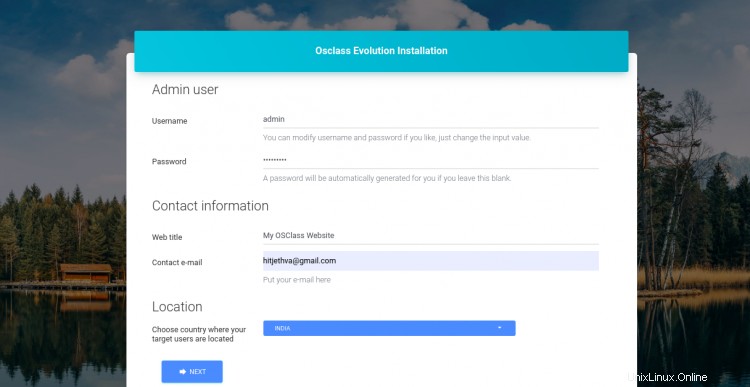
管理者のユーザー名、パスワード、メールアドレスを入力し、次へをクリックします ボタン。インストールが完了すると、次の画面が表示されます。
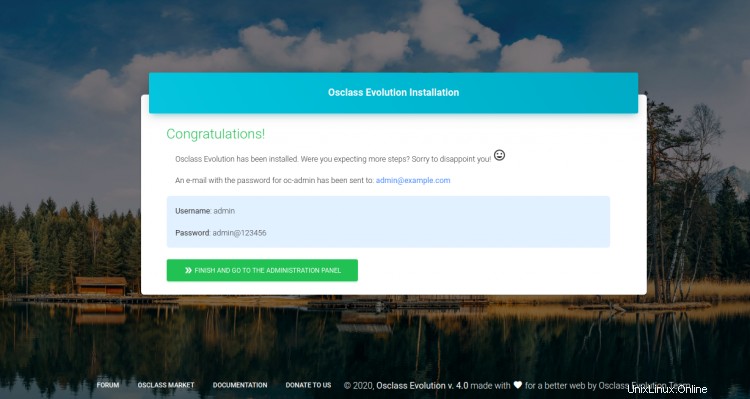
終了して管理パネルに移動をクリックします ボタン。以下に示すように、Osclassログイン画面にリダイレクトされます。
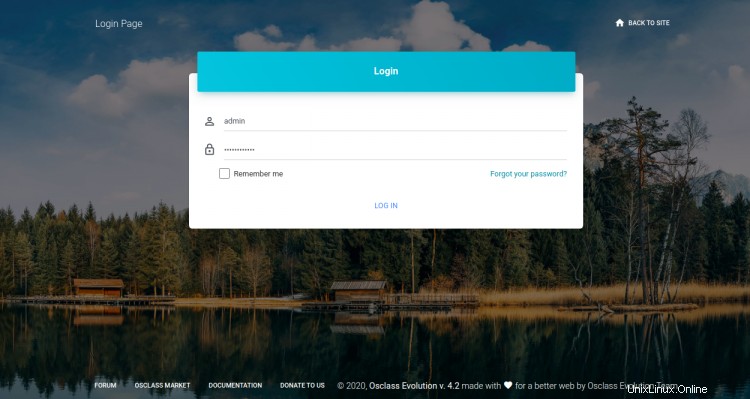
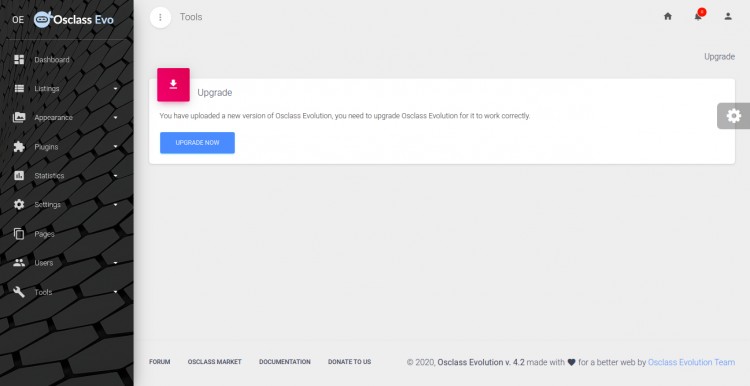
管理者のユーザー名とパスワードを入力し、ログをクリックします IN ボタン。次の画面にOsclassダッシュボードが表示されます。
このガイドでは、Ubuntu20.04サーバーにNginxを使用してOsclasscmsをインストールする方法を学習しました。また、Let'sEncryptSSLを使用してOsclassを保護する方法も学びました。 Osclassを使用して独自の求人サイトを簡単に作成できるようになったことを願っています。