Attendizeは、Laravelフレームワーク上にPHPで記述された無料のオープンソースチケット販売およびイベント管理です。 Attendizeは、追加料金を支払うことなく、一般的な入場イベントを管理するためのシンプルなソリューションを提供します。 Attendizeを使用すると、複数の主催者/イベントとリアルタイムのイベント統計を簡単に管理できます。 Attendizeは、Stripe、PayPalなどの複数の支払いゲートウェイをサポートしています。 Attendizeを使用すると、チケット販売ウィジェットを既存のWordPressブログに埋め込むことができます。
このチュートリアルでは、Ubuntu18.04LTSサーバーにAttendizeをインストールする方法を説明します。
- Ubuntu18.04を実行しているサーバー。
- OpenSSL、PDO、Mbstring、Fileinfo、GD、およびTokenizer拡張機能を備えたPHPバージョン7.1.3以降。
- ルートパスワードはサーバーで構成されています。
Nginx、MariaDB、PHPをインストール
Attendizeは、PHPで記述されたWebサーバー上で実行され、MariaDBを使用してデータを保存します。そのため、サーバーにNginx、MariaDB、PHP、および必要なPHP拡張機能をインストールする必要があります。次のコマンドを実行して、それらすべてをインストールできます。
apt-get install apache2 mariadb-server php7.2 php7.2-cli php7.2-fpm php7.2-common php7.2-mysql php7.2-curl php7.2-json php7.2-zip php7.2-gd php7.2-xml php7.2-mbstring php7.2-opcache php7.2-pgsql curl git unzip -y
必要なすべてのパッケージがインストールされたら、NginxおよびMariaDBサービスを開始し、次のコマンドを使用してシステムの再起動時にそれらを開始できるようにします。
systemctl start nginx
 systemctl enable nginx
 systemctl start mariadb
 systemctl enable mariadb
完了したら、次のステップに進むことができます。
デフォルトでは、MariaDBは保護されていません。したがって、最初にそれを取得する必要があります。次のスクリプトを使用してMariaDBを保護できます:
mysql_secure_installation
以下に示すように、すべての質問に答えてください。
In order to log into MariaDB to secure it, we'll need the current
password for the root user.  If you've just installed MariaDB, and
you haven't set the root password yet, the password will be blank,
so you should just press enter here.

Enter current password for root (enter for none):
OK, successfully used password, moving on...

Setting the root password ensures that nobody can log into the MariaDB
root user without the proper authorisation.

You already have a root password set, so you can safely answer 'n'.

Change the root password? [Y/n] n
 ... skipping.

By default, a MariaDB installation has an anonymous user, allowing anyone
to log into MariaDB without having to have a user account created for
them.  This is intended only for testing, and to make the installation
go a bit smoother.  You should remove them before moving into a
production environment.

Remove anonymous users? [Y/n] Y
 ... Success!

Normally, root should only be allowed to connect from 'localhost'.  This
ensures that someone cannot guess at the root password from the network.

Disallow root login remotely? [Y/n] Y
 ... Success!

By default, MariaDB comes with a database named 'test' that anyone can
access.  This is also intended only for testing, and should be removed
before moving into a production environment.

Remove test database and access to it? [Y/n] Y
 - Dropping test database...
 ... Success!
 - Removing privileges on test database...
 ... Success!

Reloading the privilege tables will ensure that all changes made so far
will take effect immediately.

Reload privilege tables now? [Y/n] Y
 ... Success!

Cleaning up...

All done!  If you've completed all of the above steps, your MariaDB
installation should now be secure.

Thanks for using MariaDB!
MariaDBが保護されたら、次のコマンドを使用してMariaDBシェルにログインします。
mysql -u root -p
プロンプトが表示されたら、rootパスワードを入力します。次に、次のコマンドを使用して、Attendizeのデータベースとユーザーを作成します。
MariaDB [(none)]> CREATE DATABASE attendizedb;
 MariaDB [(none)]> GRANT ALL PRIVILEGES ON attendizedb.* TO 'attendize'@'localhost' IDENTIFIED BY "password";
次に、特権をフラッシュし、次のコマンドを使用してMariaDBシェルを終了します。
MariaDB [(none)]> FLUSH PRIVILEGES;
 MariaDB [(none)]> EXIT;
データベースが作成されたら、次のステップに進むことができます。
Attendizeをダウンロードする前に、Composerをシステムにインストールする必要があります。次のコマンドを実行するだけでComposerをインストールできます。
curl -sS https://getcomposer.org/installer -o composer-setup.php
 php composer-setup.php --install-dir=/usr/local/bin --filename=composer
Composerをインストールした後、次のコマンドでComposerのバージョンを確認できます。
composer --version
出力は次のようになります。
Composer version 1.8.6 2019-06-11 15:03:05
次に、次のコマンドを使用して、最新バージョンのAttendizeをGitリポジトリからNginxWebルートディレクトリにダウンロードします。
cd /var/www/html/
 git clone https://github.com/Attendize/Attendize attendize
次に、出席するディレクトリを変更し、.env.exampleファイルの名前を変更します。
cd attendize
 mv .env.example .env
次に、お気に入りのテキストエディタで.envファイルを開きます:
nano .env
以下に示すようにデータベース設定を定義します。
DB_TYPE=mysql
DB_HOST=db
DB_PORT=3306
DB_DATABASE=attendizedb
DB_USERNAME=attendize
DB_PASSWORD=password
終了したら、ファイルを保存して閉じます。次に、次のコマンドを使用して、attendizeディレクトリに適切な権限を付与します。
chown -R www-data:www-data /var/www/html/attendize
 chmod -R 755 /var/www/html/attendize
終了したら、次のステップに進むことができます。
Nginxを参加用に構成する
次に、Attendize用のNginx仮想ホストファイルを作成します。
nano /etc/nginx/sites-available/attendize.conf
次の行を追加します:
server {
    listen 80;
    listen [::]:80;

    server_name example.com;
    root /var/www/html/attendize/public;

    index index.php;

    location / {
        try_files $uri $uri/ /index.php$is_args$args;
    }

    location ~ \.php$ {
        try_files $uri =404;
        fastcgi_pass unix:/var/run/php/php7.2-fpm.sock; # Check this
        fastcgi_param SCRIPT_FILENAME $document_root$fastcgi_script_name;
        include fastcgi_params;
    }
}
ファイルを保存して閉じます。次に、次のコマンドを使用して仮想ホストファイルを有効にします。
ln -s /etc/nginx/sites-available/attendize.conf /etc/nginx/sites-enabled/
次に、次のコマンドを使用して、構文エラーがないかNginxを確認します。
nginx -t
出力は次のようになります。
nginx: the configuration file /etc/nginx/nginx.conf syntax is ok
nginx: configuration file /etc/nginx/nginx.conf test is successful
最後に、NginxとPHP-FPMサービスをリロードして、すべての構成変更を適用します。
systemctl reload nginx
 systemctl restart php7.2-fpm
次のコマンドを使用して、Nginxのステータスを確認できます。
systemctl status nginx
次の出力が表示されます。
? nginx.service - A high performance web server and a reverse proxy server
   Loaded: loaded (/lib/systemd/system/nginx.service; enabled; vendor preset: enabled)
   Active: active (running) since Mon 2019-07-22 05:07:19 UTC; 3s ago
     Docs: man:nginx(8)
  Process: 17781 ExecStop=/sbin/start-stop-daemon --quiet --stop --retry QUIT/5 --pidfile /run/nginx.pid (code=exited, status=0/SUCCESS)
  Process: 17793 ExecStart=/usr/sbin/nginx -g daemon on; master_process on; (code=exited, status=0/SUCCESS)
  Process: 17783 ExecStartPre=/usr/sbin/nginx -t -q -g daemon on; master_process on; (code=exited, status=0/SUCCESS)
 Main PID: 17794 (nginx)
    Tasks: 2 (limit: 1114)
   CGroup: /system.slice/nginx.service
           ??17794 nginx: master process /usr/sbin/nginx -g daemon on; master_process on;
           ??17796 nginx: worker process

Jul 22 05:07:19 ubuntu1804 systemd[1]: Stopped A high performance web server and a reverse proxy server.
Jul 22 05:07:19 ubuntu1804 systemd[1]: Starting A high performance web server and a reverse proxy server...
Jul 22 05:07:19 ubuntu1804 systemd[1]: nginx.service: Failed to parse PID from file /run/nginx.pid: Invalid argument
Jul 22 05:07:19 ubuntu1804 systemd[1]: Started A high performance web server and a reverse proxy server.
完了したら、次のステップに進むことができます。
次に、Webブラウザーを開き、URLhttp://example.comを入力します。次のページにリダイレクトされます:
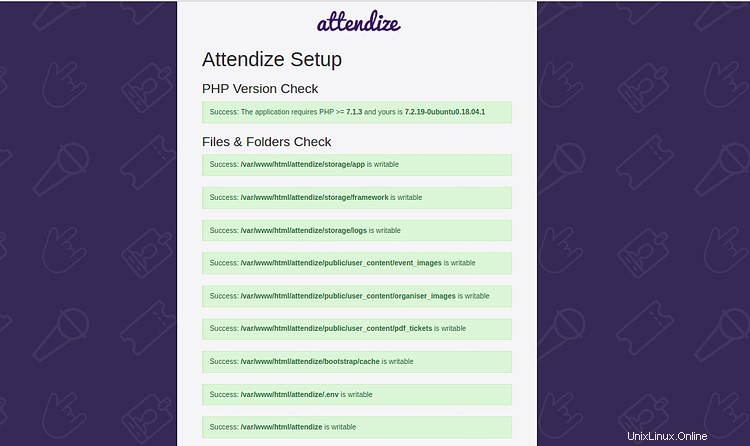
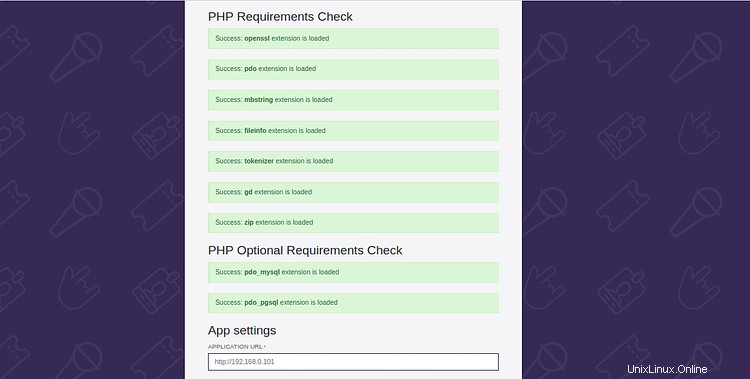
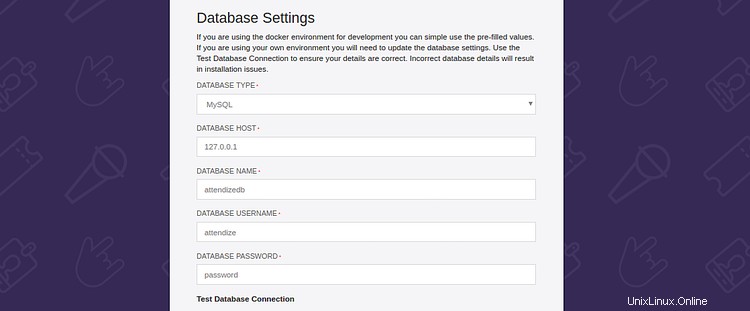
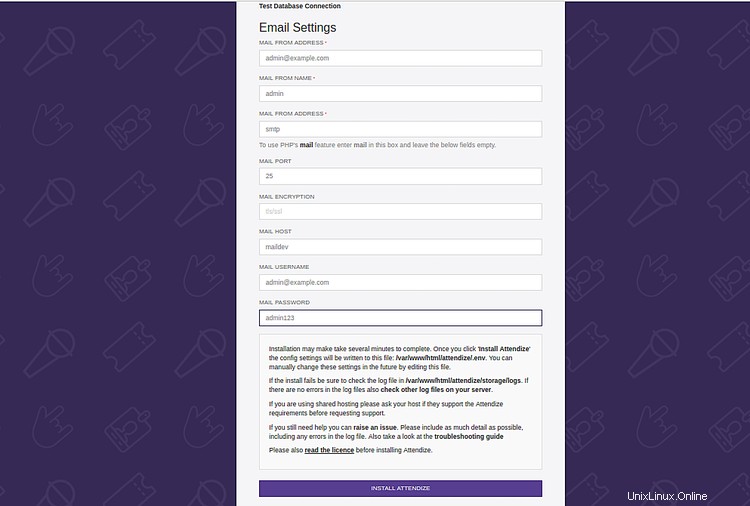
必要な拡張機能がすべてインストールされていることを確認してください。次に、データベース情報と電子メール情報を入力し、 INSTALL ATTENDIZEをクリックします。 ボタン。次のページが表示されます:

名前、メールアドレス、パスワードを入力してください。次に、サインアップをクリックします ボタン。次のページが表示されます:
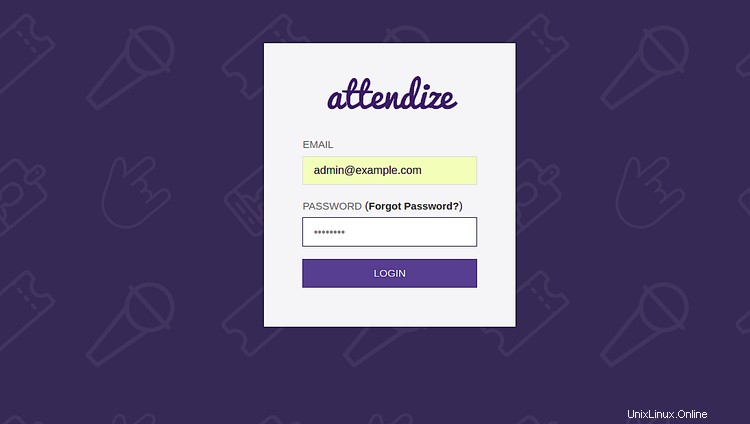
次に、ログインの詳細を入力して、ログインをクリックします。 ボタン。次のページが表示されます:
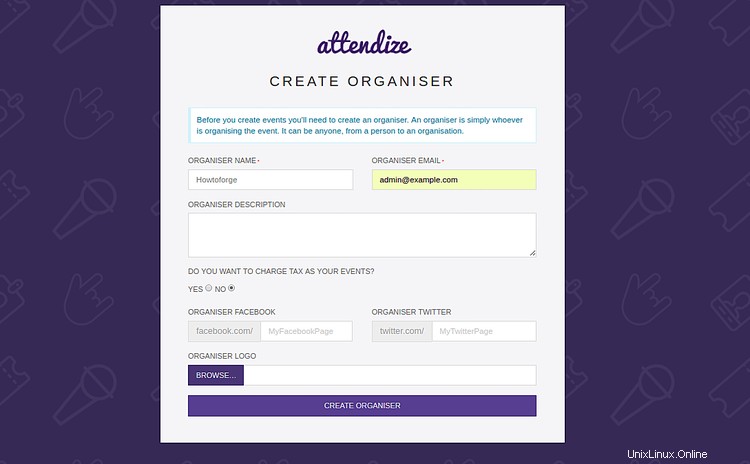
次に、主催者の名前、メールアドレス、説明を入力して、 CREATE ORGANISERをクリックします。 ボタン。次のページが表示されます:
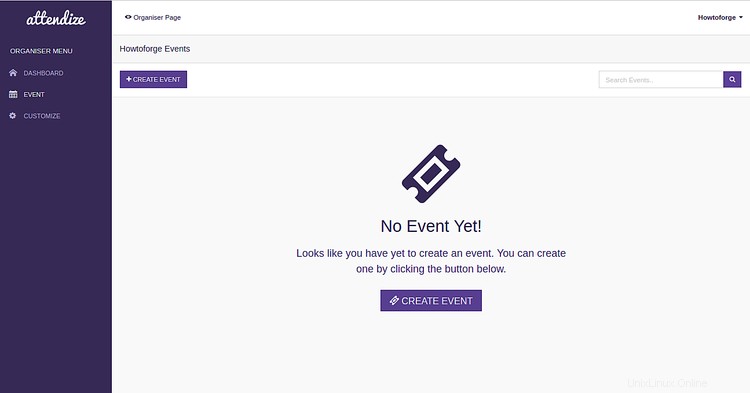
おめでとう!これで、Ubuntu18.04サーバーにAttendizeチケット販売およびイベント管理アプリケーションが正常にインストールされました。 Attendizeを使用すると、追加費用なしで無制限の数のイベントを整理および管理できるようになりました。詳細については、AttendizeDocのAttendize公式ドキュメントをご覧ください