WordPressは無料のオープンソースであり、完全にPHPで構築された世界で最も人気のあるCMSです。これは、ブログ、ビジネスWebサイト、およびeコマースストアを運営するために世界中の何千人もの人々によって使用されています。シンプルで使いやすい管理パネル、数千のプラグイン、巨大なコミュニティ、詳細なテーマ設定、カスタマイズなど、いくつかの優れた機能があります。
このガイドでは、Apacheを使用してWordPressをインストールし、AlmaLinux8にSSLを暗号化する方法を説明します。
- AlmaLinux8を実行しているサーバー。
- サーバーIPで指定された有効なドメイン名。
- ルートパスワードはサーバーで構成されています。
LAMPサーバーをインストールする
WordPressでは、LAMPサーバーがサーバーにインストールされている必要があります。次のコマンドを使用してインストールできます:
dnf install httpd mariadb-server php php-mysqlnd php-dom php-simplexml php-xml php-xmlreader php-curl php-exif php-ftp php-gd php-iconv php-json php-mbstring php-posix php-sockets php-tokenizer unzip -y
LAMPサーバーをインストールした後、ApacheおよびMariaDBサービスを開始し、システムの再起動時に開始できるようにします。
systemctl start mariadb
systemctl start httpd
systemctl enable mariadb
systemctl enable httpd
完了したら、次のステップに進むことができます。
MariaDBデータベースを構成する
まず、MariaDBルートパスワードを設定し、MariaDBインストールを保護する必要があります。次のコマンドを使用して実行できます:
mysql_secure_installation
以下に示すように、すべての質問に答えてください。
Enter current password for root (enter for none):
Set root password? [Y/n] Y
New password:
Re-enter new password:
Remove anonymous users? [Y/n] Y
Disallow root login remotely? [Y/n] Y
Remove test database and access to it? [Y/n] Y
Reload privilege tables now? [Y/n] Y
完了したら、次のコマンドを使用してMariaDBにログインします。
mysql -u root -p
ログインしたら、WordPressのデータベースとユーザーを作成します。
MariaDB [(none)]> CREATE DATABASE wordpress;
MariaDB [(none)]> CREATE USER `wordpress`@`localhost` IDENTIFIED BY 'password';
次に、以下のコマンドを使用して、WordPressデータベースにすべての権限を付与します。
MariaDB [(none)]> GRANT ALL ON wordpress.* TO `wordpress`@`localhost`;
次に、特権をフラッシュし、次のコマンドを使用してMariaDBシェルを終了します。
MariaDB [(none)]> FLUSH PRIVILEGES;
MariaDB [(none)]> EXIT;
完了したら、次のステップに進むことができます。
次に、ディレクトリをApache Webルートに変更し、次のコマンドを使用して最新バージョンのWordPressをダウンロードします。
cd /var/www/html
wget https://wordpress.org/latest.tar.gz
ダウンロードが完了したら、次のコマンドを使用してダウンロードしたファイルを抽出します。
tar -xvzf latest.tar.gz
次に、ディレクトリをワードプレスに変更し、サンプル構成ファイルの名前を変更します。
cd wordpress
mv wp-config-sample.php wp-config.php
次に、次のコマンドを使用して構成ファイルを編集します。
nano wp-config.php
以下に示すようにデータベース構成を定義します。
/** The name of the database for WordPress */
define( 'DB_NAME', 'wordpress' );

/** MySQL database username */
define( 'DB_USER', 'wordpress' );

/** MySQL database password */
define( 'DB_PASSWORD', 'password' );

/** MySQL hostname */
define( 'DB_HOST', 'localhost' );
終了したらファイルを保存して閉じ、WordPressディレクトリに適切な権限を設定します。
chown -R apache:apache /var/www/html/wordpress
終了したら、次のステップに進むことができます。
次に、WordPress用のApache仮想ホスト構成ファイルを作成する必要があります。次のコマンドで作成できます:
nano /etc/httpd/conf.d/wordpress.conf
次の行を追加します:
<VirtualHost *:80>
   ServerAdmin [email protected]
   DocumentRoot "/var/www/html/wordpress"
   ServerName wordpress.example.com
   ErrorLog "/var/log/httpd/example.com-error_log"
   CustomLog "/var/log/httpd/example.com-access_log" combined

<Directory "/var/www/html/wordpress">
   DirectoryIndex index.html index.php
   Options FollowSymLinks
   AllowOverride All
   Require all granted
</Directory>
</VirtualHost>
>
ファイルを保存して閉じてから、Apacheサービスを再起動して変更を適用します。
systemctl restart httpd
次のコマンドを使用して、Apacheのステータスを確認できます。
systemctl status httpd
次の出力が得られるはずです:
? httpd.service - The Apache HTTP Server
   Loaded: loaded (/usr/lib/systemd/system/httpd.service; disabled; vendor preset: disabled)
   Active: active (running) since Fri 2021-07-09 03:30:47 EDT; 3s ago
     Docs: man:httpd.service(8)
 Main PID: 4153 (httpd)
   Status: "Started, listening on: port 80"
    Tasks: 213 (limit: 12524)
   Memory: 24.5M
   CGroup: /system.slice/httpd.service
           ??4153 /usr/sbin/httpd -DFOREGROUND
           ??4155 /usr/sbin/httpd -DFOREGROUND
           ??4156 /usr/sbin/httpd -DFOREGROUND
           ??4157 /usr/sbin/httpd -DFOREGROUND
           ??4158 /usr/sbin/httpd -DFOREGROUND

Jul 09 03:30:47 AlmaLinux systemd[1]: Stopped The Apache HTTP Server.
Jul 09 03:30:47 AlmaLinux systemd[1]: Starting The Apache HTTP Server...
終了したら、次のステップに進むことができます。
次に、Certbotクライアントをインストールして、Let's Encrypt SSLforWordPressをインストールする必要があります。次のコマンドでインストールできます:
dnf install epel-release -y
dnf install certbot python3-certbot-apache
次に、次のコマンドを使用して、letsドメインのSSL証明書を取得してインストールします。
certbot --apache -d wordpress.example.com
メールアドレスを入力し、利用規約に同意するよう求められます:
Saving debug log to /var/log/letsencrypt/letsencrypt.log
Plugins selected: Authenticator apache, Installer apache
Enter email address (used for urgent renewal and security notices)
 (Enter 'c' to cancel): [email protected]

- - - - - - - - - - - - - - - - - - - - - - - - - - - - - - - - - - - - - - - -
Please read the Terms of Service at
https://letsencrypt.org/documents/LE-SA-v1.2-November-15-2017.pdf. You must
agree in order to register with the ACME server. Do you agree?
- - - - - - - - - - - - - - - - - - - - - - - - - - - - - - - - - - - - - - - -
(Y)es/(N)o: Y

- - - - - - - - - - - - - - - - - - - - - - - - - - - - - - - - - - - - - - - -
Would you be willing, once your first certificate is successfully issued, to
share your email address with the Electronic Frontier Foundation, a founding
partner of the Let's Encrypt project and the non-profit organization that
develops Certbot? We'd like to send you email about our work encrypting the web,
EFF news, campaigns, and ways to support digital freedom.
- - - - - - - - - - - - - - - - - - - - - - - - - - - - - - - - - - - - - - - -
(Y)es/(N)o: Y
Account registered.
Requesting a certificate for wordpress.example.com
Performing the following challenges:
http-01 challenge for wordpress.example.com
Waiting for verification...
Cleaning up challenges
Deploying Certificate to VirtualHost /etc/httpd/conf.d/wordpress.conf
Redirecting all traffic on port 80 to ssl in /etc/httpd/conf.d/wordpress.conf

- - - - - - - - - - - - - - - - - - - - - - - - - - - - - - - - - - - - - - - -
Congratulations! You have successfully enabled https://wordpress.example.com
- - - - - - - - - - - - - - - - - - - - - - - - - - - - - - - - - - - - - - - -
Subscribe to the EFF mailing list (email: [email protected]).


IMPORTANT NOTES:
 - Congratulations! Your certificate and chain have been saved at:
   /etc/letsencrypt/live/wordpress.example.com/fullchain.pem
   Your key file has been saved at:
   /etc/letsencrypt/live/wordpress.example.com/privkey.pem
   Your certificate will expire on 2022-02-09. To obtain a new or
   tweaked version of this certificate in the future, simply run
   certbot again with the "certonly" option. To non-interactively
   renew *all* of your certificates, run "certbot renew"
 - If you like Certbot, please consider supporting our work by:

   Donating to ISRG / Let's Encrypt:   https://letsencrypt.org/donate
   Donating to EFF:                    https://eff.org/donate-le
次に、ポート80と443がfirewalldを通過できるようにする必要があります。次のコマンドで許可できます:
firewall-cmd --permanent --zone=public --add-service=http
firewall-cmd --permanent --zone=public --add-service=https
次に、firewalldをリロードして変更を適用します:
firewall-cmd --reload
終了したら、次のステップに進むことができます。
次に、Webブラウザーを開き、URL https://wordpress.example.comを使用してWordPress管理パネルにアクセスします。 。次のページにリダイレクトされます:
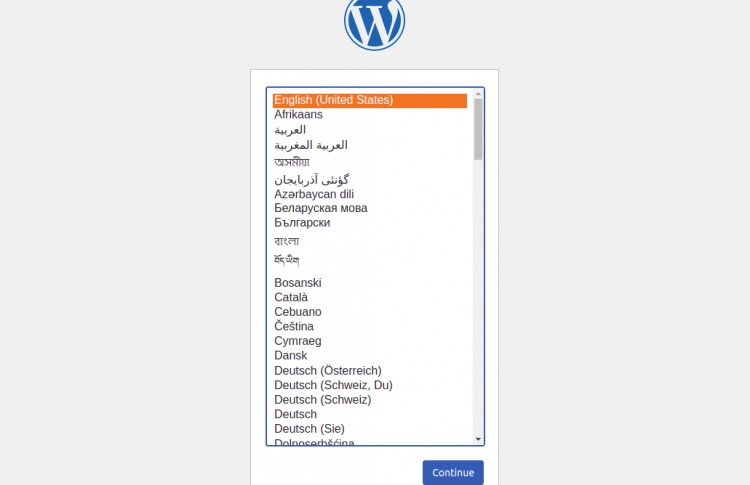
言語を選択して、続行をクリックします 。 WordPressサイトの設定ページが表示されます:
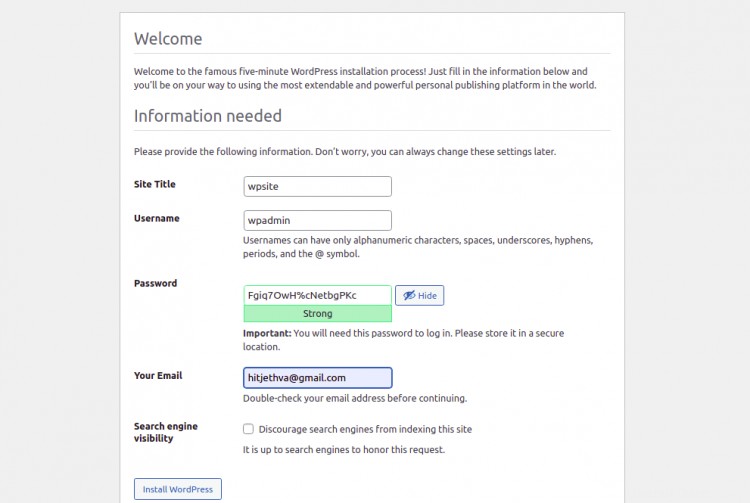
サイト情報を入力し、WordPressのインストールをクリックします ボタン。インストールが完了すると、次のページが表示されます。

ログインをクリックします ボタン。 WordPressのログインページにリダイレクトされます:

管理者のユーザー名とパスワードを入力し、ログインをクリックします ボタン。次のページにWordPressダッシュボードが表示されます:
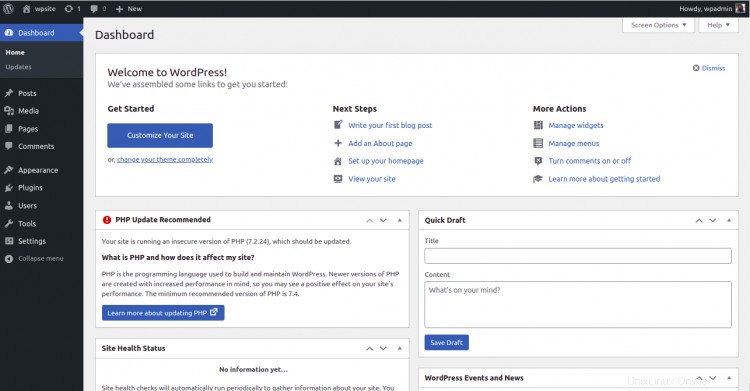
おめでとう!これで、Apacheを使用してWordPressを正常にインストールし、AlmaLinux8にSSLを暗号化しましょう。WordPressを使用して独自のWebサイトを簡単に作成できるようになりました。ご不明な点がございましたら、お気軽にお問い合わせください。