Privoxyは、無料の非キャッシュWebプロキシサーバーです。 Webブラウザは、インターネットに直接接続する前にこのプロキシサーバーを使用します。 Privoxyは主にセキュリティのために使用され、高度なキャッシュ機能を通じて効率を向上させます。 Privoxyには、広告のブロック、Webコンテンツのフィルタリング、WebページデータとHTTPアクセスの変更、アクセスの制御と不要なサイトのブロックなどの高度なフィルタリング機能があります。
シンプルで、構成が簡単で、高度にカスタマイズ可能です。
この投稿では、CentOS8VPSにPrivoxyサーバーをインストールして構成する方法を紹介します。
前提条件
- Atlantic.Netクラウドプラットフォーム上の新しいCentOS8サーバー
- サーバーで構成されているrootパスワード
ステップ1-Atlantic.Netクラウドサーバーを作成する
まず、Atlantic.Netクラウドサーバーにログインします。 2GB以上のRAMを搭載したオペレーティングシステムとしてCentOS8を選択して、新しいサーバーを作成します。 SSH経由でクラウドサーバーに接続し、ページの上部で強調表示されているクレデンシャルを使用してログインします。
CentOS 8サーバーにログインしたら、次のコマンドを実行して、ベースシステムを最新の利用可能なパッケージで更新します。
dnf update -y
ステップ2–Privoxyをインストールする
dnf install epel-release -y
EPELをインストールしたら、次のコマンドを使用してPrivoxyサーバーをインストールできます。
dnf install privoxy -y
Privoxyサーバーは、すべての構成ファイルを/ etc /privoxy/に保存します。次のコマンドで確認できます:
ls -l /etc/privoxy/
次の出力が表示されます。
-rw-r--r-- 1 root root  84868 Mar  1 12:22 config
-rw-r--r-- 1 root root 109864 Mar  1 12:22 default.action
-rw-r--r-- 1 root root  43970 Feb 25 12:54 default.filter
-rw-r--r-- 1 root root    600 Feb 25 12:54 match-all.action
-rw-r--r-- 1 root root  42259 Feb 25 12:54 regression-tests.action
drwxr-xr-x 2 root root   4096 May 26 02:29 templates
-rw-r--r-- 1 root root   3565 Feb 25 12:54 trust
-rw-r--r-- 1 root root   9012 Feb 25 12:54 user.action
-rw-r--r-- 1 root root      0 Mar  1 12:22 user.filter
ステップ3–Privoxyを構成する
nano /etc/privoxy/config
次の行を見つけます:
listen-address 127.0.0.1:8118
次の行で変更します:
listen-address your-server-ip:8118
次に、次の行のコメントを解除します。
logdir /var/log/privoxy
logfile logfile

       debug     1 # Log the destination for each request. See also debug 1024.
        debug     2 # show each connection status
        debug     4 # show tagging-related messages
        debug     8 # show header parsing
        debug    16 # log all data written to the network
        debug    32 # debug force feature
        debug    64 # debug regular expression filters#
        debug   128 # debug redirects
        debug   256 # debug GIF de-animation
        debug   512 # Common Log Format
        debug  1024 # Log the destination for requests Privoxy didn't let through, and the reason why.
        debug  2048 # CGI user interface#
        debug  4096 # Startup banner and warnings.
        debug  8192 # Non-fatal errors
        debug 32768 # log all data read from the network
        debug 65536 # Log the applying actions
ファイルを保存して閉じ、次のコマンドを使用してPrivoxyサービスを開始します。
systemctl start privoxy
次のコマンドを使用して、Privoxyのステータスを確認できます。
systemctl status privoxy
次の出力が得られるはずです:
● privoxy.service - Privoxy Web Proxy With Advanced Filtering Capabilities
   Loaded: loaded (/usr/lib/systemd/system/privoxy.service; disabled; vendor preset: disabled)
   Active: active (running) since Wed 2021-05-26 02:34:04 EDT; 5s ago
  Process: 41499 ExecStart=/usr/sbin/privoxy --pidfile /run/privoxy.pid --user privoxy /etc/privoxy/config (code=exited, status=0/SUCCESS)
 Main PID: 41500 (privoxy)
    Tasks: 1 (limit: 12524)
   Memory: 1.4M
   CGroup: /system.slice/privoxy.service
           └─41500 /usr/sbin/privoxy --pidfile /run/privoxy.pid --user privoxy /etc/privoxy/config

May 26 02:34:03 centos8 systemd[1]: Starting Privoxy Web Proxy With Advanced Filtering Capabilities...
May 26 02:34:04 centos8 systemd[1]: Started Privoxy Web Proxy With Advanced Filtering Capabilities.
この時点で、Privoxyサーバーが起動し、ポート8118でリッスンしています。次のコマンドで確認できます。
ss -antpl | grep 8118
次の出力が表示されます。
LISTEN 0 128 104.245.32.188:8118 0.0.0.0:* users:(("privoxy",pid=41500,fd=7))
ステップ4–Privoxyプロキシを使用するようにWebブラウザを設定する
次に、WebブラウザをプロキシサーバーとしてPrivoxyサーバーに設定する必要があります。
まず、クライアントシステムに移動し、FirefoxWebブラウザを開きます。 =>そして編集をクリックします =>設定 。次のページが表示されます:

次に、ネットワーク設定をクリックします。 =>設定 。次のページが表示されます:
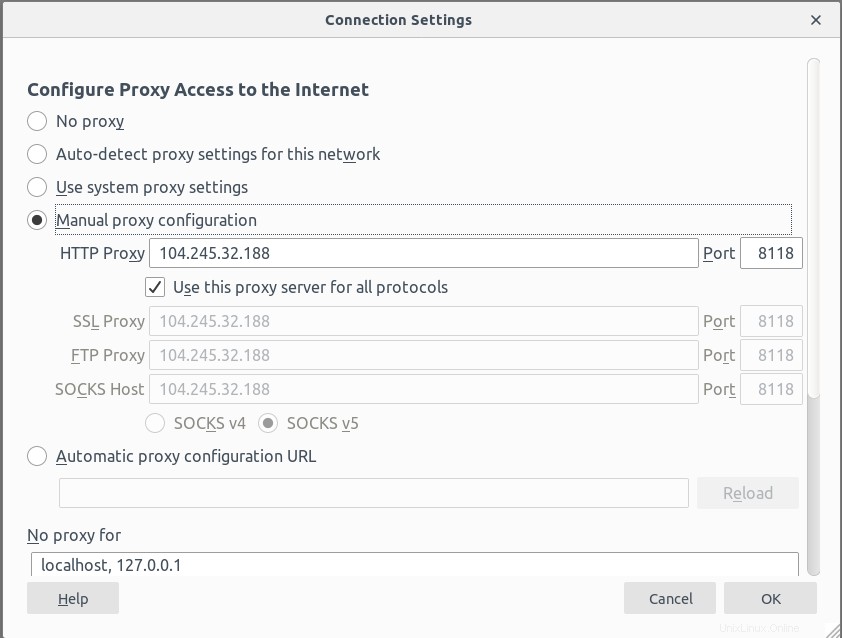
ここで、PrivoxyサーバーのIPとポートを指定し、 OK ボタンをクリックして変更を保存します。
この時点で、インターネットに接続する前にPrivoxyサーバーを使用するようにWebブラウザーが構成されています。
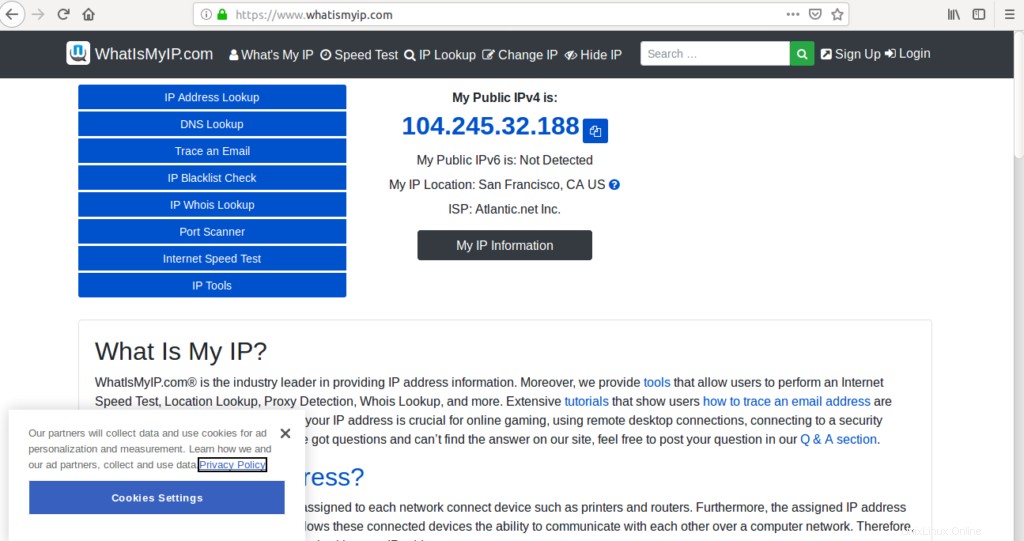
次に、Webブラウザーを開き、URL https://www.whatismyip.comにアクセスします。 パブリックIPアドレスを確認します。すべて問題がなければ、次のページにPrivoxyサーバーのIPが表示されます。
結論
おめでとう!これで、CentOS8仮想プライベートサーバーにPrivoxyサーバーが正常にインストールおよび構成されました。これで、Privoxyサーバーで高度なフィルターを使用して、目的のコンテンツをブロックできます。