PXE(Preboot eXecution Environment)サーバーでは、ネットワークを介した無人または自動のOSインストールが可能です。pxeの主な利点は、OS(オペレーティングシステム)を起動するために起動可能なドライブが不要であり、ISOファイルを書き込む必要がないことです。 DVDまたはusbデバイスに。
PXEサーバーを構成すると、ネットワーク経由で数百のシステムを同時にインストールできます。クライアントサーバーアーキテクチャで動作するため、クライアントにOSをインストールするには、PXEオプションを使用してクライアントを起動します。
この記事では、CentOS 7.xでPXEサーバーをセットアップしてから、pxeブートを使用してクライアントにOSをインストールしようとします。
以下は私のセットアップの詳細です:
- サーバーIP=172.168.1.11
- ホスト名=pxe.example.com
- OS =CentOS 7.x
- SELinux=有効
- ファイアウォール=有効
ステップ:1PXEセットアップに必要なパッケージをインストールする
centos 7.xにpxeサーバーをインストールして構成するには、次のパッケージ「dhcp、tftp-server、ftp server(vsftpd)、xinted」が必要です。コマンドの下でターミナル実行を開きます:
[[email protected] ~]# yum install dhcp tftp tftp-server syslinux vsftpd xinetd
ステップ:2PXE用にDHCPサーバーを構成する
dhcpパッケージをインストールすると、dhcpサーバーのサンプル構成ファイルが「/usr/share/doc/dhcp*/dhcpd.conf.example 「ただし、dhcpの構成ファイルは「/etc/dhcp/dhcpd.conf」にあります。 ’。
次の行をファイル「/etc/dhcp/dhcpd.conf」にコピーし、環境に応じてIPサブネットとその他の詳細を置き換えます。
[[email protected] ~]# vi /etc/dhcp/dhcpd.conf

# DHCP Server Configuration file.

ddns-update-style interim;
ignore client-updates;
authoritative;
allow booting;
allow bootp;
allow unknown-clients;

# internal subnet for my DHCP Server
subnet 172.168.1.0 netmask 255.255.255.0 {
range 172.168.1.21 172.168.1.151;
option domain-name-servers 172.168.1.11;
option domain-name "pxe.example.com";
option routers 172.168.1.11;
option broadcast-address 172.168.1.255;
default-lease-time 600;
max-lease-time 7200;

# IP of PXE Server
next-server 172.168.1.11;
filename "pxelinux.0";
}
ステップ:3 tftpサーバー(/etc/xinetd.d/tftp)を編集および構成します
TFTP(Trivial File Transfer Protocol)は、認証なしでデータサーバーからクライアントにファイルを転送するために使用されます。 PXEサーバーのセットアップの場合、ブートストラップのロードにはtftpが使用されます。 tftpサーバーを構成するには、その構成ファイル‘ /etc/xinetd.d/tftpを編集します 」、パラメータ「disable=yes」を「disable=no」に変更し、他のパラメータはそのままにします。
[[email protected] ~]# vi /etc/xinetd.d/tftp
service tftp
{
 socket_type = dgram
 protocol    = udp
 wait        = yes
 user        = root
 server      = /usr/sbin/in.tftpd
 server_args = -s /var/lib/tftpboot
 disable     = no
 per_source  = 11
 cps         = 100 2
 flags       = IPv4
}
ネットワークブートに関連するすべてのファイルは、tftpルートディレクトリ「/ var / lib / tftpboot」に配置されます。 」
次のコマンドを実行して、「/ var / lib /tftpboot/」に必要なネットワークブートファイルをコピーします
[[email protected] ~]# cp -v /usr/share/syslinux/pxelinux.0 /var/lib/tftpboot
[[email protected] ~]# cp -v /usr/share/syslinux/menu.c32 /var/lib/tftpboot
[[email protected] ~]# cp -v /usr/share/syslinux/memdisk /var/lib/tftpboot
[[email protected] ~]# cp -v /usr/share/syslinux/mboot.c32 /var/lib/tftpboot
[[email protected] ~]# cp -v /usr/share/syslinux/chain.c32 /var/lib/tftpboot
[[email protected] ~]#
[[email protected] ~]# mkdir /var/lib/tftpboot/pxelinux.cfg
[[email protected] ~]# mkdir /var/lib/tftpboot/networkboot
[email protected] ~]#
ステップ:4CentOS 7.x ISOファイルをマウントし、その内容をローカルftpサーバーにコピーします
私の場合、PXEサーバーにCentOS7.xisoファイルを既にダウンロードしています。以下のコマンドを実行してisoファイルをマウントし、その内容をftpサーバーのディレクトリ「 / var / ftp / pub」にコピーします。 ’
[[email protected] ~]# mount -o loop CentOS-7-x86_64-DVD-1511.iso /mnt/
mount: /dev/loop0 is write-protected, mounting read-only
[[email protected] ~]# cd /mnt/
[[email protected] mnt]# cp -av * /var/ftp/pub/
カーネルファイル(vmlimz)とinitrdファイルをマウントされたisoファイルから「 / var / lib / tftpboot / networkboot /」にコピーします ’
[[email protected] ~]# cp /mnt/images/pxeboot/vmlinuz /var/lib/tftpboot/networkboot/
[[email protected] ~]# cp /mnt/images/pxeboot/initrd.img /var/lib/tftpboot/networkboot/
[[email protected] ~]#
これで、「umount」コマンドを使用してisoファイルをアンマウントできます
[[email protected] ~]# umount /mnt/
[[email protected] ~]#
ステップ:5kickStart&PXEメニューファイルを作成します。
キックスタートファイルを作成する前に、まず暗号化された文字列でルートパスワードを作成しましょう。これは、その暗号化されたパスワード文字列をキックスタートファイルで使用するためです。
[[email protected] ~]# openssl passwd -1 [email protected]#
$1$e2wrcGGX$tZPQKPsXVhNmbiGg53MN41
[[email protected] ~]#
システムのデフォルトのキックスタートファイルは、「 anaconda-ks.cfg」という名前の/rootの下に配置されます ’。 / var / ftp/pubフォルダの下に「centos7.cfg」という名前の新しいキックスタートを作成します。 ’
次のコンテンツを新しいキックスタートファイルにコピーします。必要に応じてキックスタートファイルを変更してください。
[[email protected] ~]# vi /var/ftp/pub/centos7.cfg

#platform=x86, AMD64, or Intel EM64T
#version=DEVEL
# Firewall configuration
firewall --disabled
# Install OS instead of upgrade
install
# Use FTP installation media
url --url="ftp://172.168.1.11/pub/"
# Root password
rootpw --iscrypted $1$e2wrcGGX$tZPQKPsXVhNmbiGg53MN41
# System authorization information
auth useshadow passalgo=sha512
# Use graphical install
graphical
firstboot disable
# System keyboard
keyboard us
# System language
lang en_US
# SELinux configuration
selinux disabled
# Installation logging level
logging level=info
# System timezone
timezone Europe/Amsterdam
# System bootloader configuration
bootloader location=mbr
clearpart --all --initlabel
part swap --asprimary --fstype="swap" --size=1024
part /boot --fstype xfs --size=300
part pv.01 --size=1 --grow
volgroup root_vg01 pv.01
logvol / --fstype xfs --name=lv_01 --vgname=root_vg01 --size=1 --grow
%packages
@^minimal
@core
%end
%addon com_redhat_kdump --disable --reserve-mb='auto'
%end
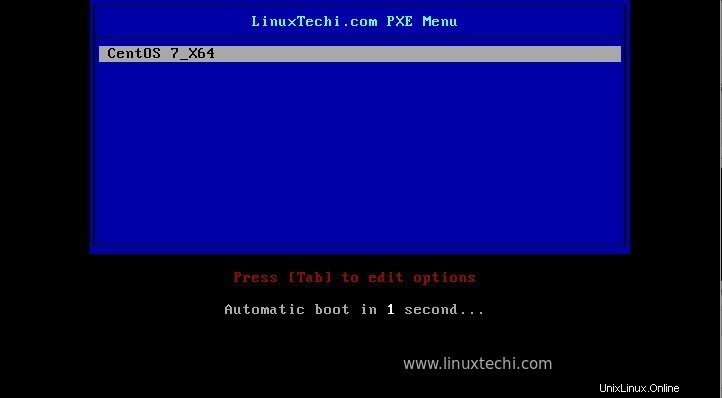
PXEメニューファイルを作成します( /var/lib/tftpboot/pxelinux.cfg/default )、次の内容をpxeメニューファイルにコピーします。
[[email protected] ~]# vi /var/lib/tftpboot/pxelinux.cfg/default

default menu.c32
prompt 0
timeout 30
MENU TITLE LinuxTechi.com PXE Menu
LABEL centos7_x64
MENU LABEL CentOS 7_X64
KERNEL /networkboot/vmlinuz
APPEND initrd=/networkboot/initrd.img inst.repo=ftp://172.168.1.11/pub ks=ftp://172.168.1.11/pub/centos7.cfg
ステップ:6xinetd、dhcp、vsftpdサービスを開始して有効にします。
以下のコマンドを使用して、xinetd、dhcp、およびvsftpdを起動して有効にします。
[[email protected] ~]# systemctl start xinetd
[[email protected] ~]# systemctl enable xinetd
[[email protected] ~]# systemctl start dhcpd.service
[[email protected] ~]# systemctl enable dhcpd.service
Created symlink from /etc/systemd/system/multi-user.target.wants/dhcpd.service to /usr/lib/systemd/system/dhcpd.service.
[[email protected] ~]#
[[email protected] ~]# systemctl start vsftpd
[[email protected] ~]# systemctl enable vsftpd
Created symlink from /etc/systemd/system/multi-user.target.wants/vsftpd.service to /usr/lib/systemd/system/vsftpd.service.
[[email protected] ~]#
SELinuxが有効になっている場合は、ftpサーバーに次のselinuxルールを設定します。
[[email protected] ~]# setsebool -P allow_ftpd_full_access 1
[[email protected] ~]#
次のfirewall-cmdコマンドを使用してOSファイアウォールのポートを開きます
[[email protected] ~]# firewall-cmd --add-service=ftp --permanent
success
[[email protected] ~]# firewall-cmd --add-service=dhcp --permanent
success
[[email protected] ~]# firewall-cmd --add-port=69/tcp --permanent
success
[[email protected] ~]# firewall-cmd --add-port=69/udp --permanent
success
[[email protected] ~]# firewall-cmd --add-port=4011/udp --permanent
success
[[email protected] ~]# firewall-cmd --reload
success
[[email protected] ~]#
これで、PXEサーバーのインストールと構成は完了です。
ステップ:7pxeブートオプションを使用してクライアントをブートします。
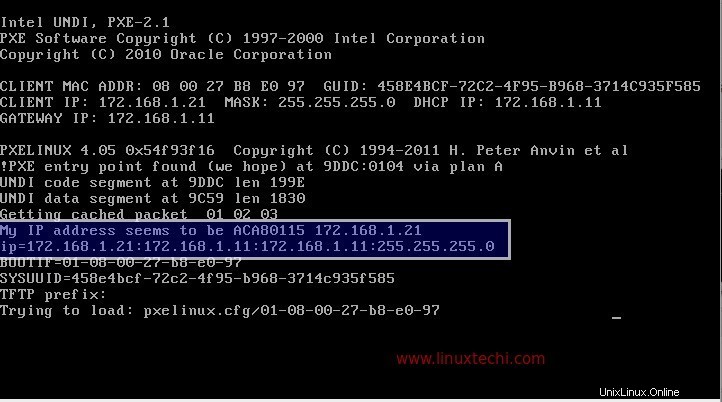
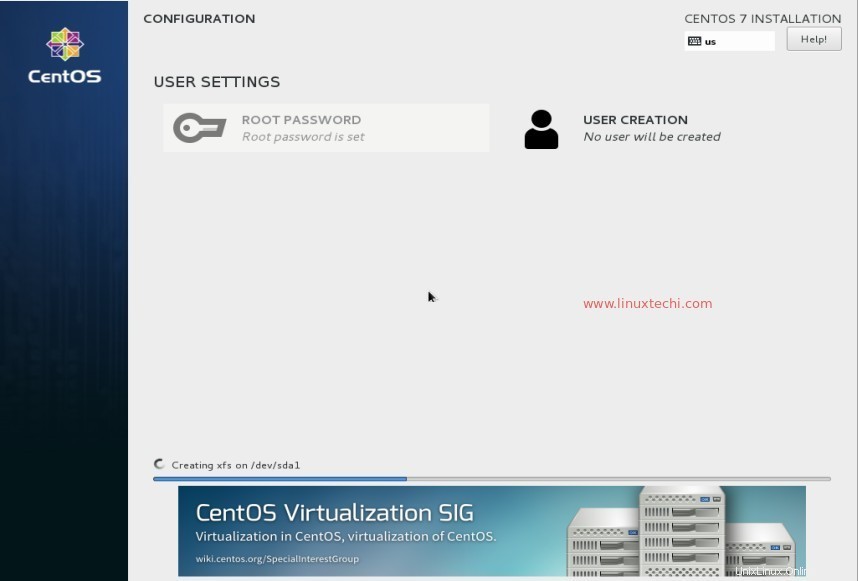
上で見ることができるように、インストールは人間の相互作用で開始されました。 PXEサーバーのインストールと構成を楽しんでいただければ幸いです。フィードバックやコメントを共有してください。