このガイドでは、Nimプログラミング言語のインストール方法について説明します。 Linuxの場合。不思議に思う人のために、Nimはオープンソースで、命令型のマルチパラダイムでコンパイルされたプログラミング言語であり、読みやすい高性能コードの記述に使用できます。これは比較的新しいプログラミング言語であり、 Pythonのような成熟した言語からの成功した概念を組み合わせています 、エイダ およびモジュラ 。 Nimは、Linux、BSD、macOS、MicrosoftWindowsを含むすべての主要なオペレーティングシステムをサポートしています。
LinuxにNimプログラミング言語をインストールする
Nimをインストールする前に、次の前提条件を満たしていることを確認してください。
Nimコンパイラは、コードをコンパイルするためにCコンパイラを必要とします。したがって、 clangをインストールする必要があります またはgcc Linuxシステムのコンパイラ。 Linuxにgccコンパイラおよびその他の開発ツールをインストールするには、次のリンクを参照してください。
- Linuxに開発ツールをインストールする方法
Nimは複数の方法でインストールできます。 LinuxにNimをインストールする3つの異なる方法があります。
1。 Choosenimを使用してNimをインストールします(公式に推奨)
Nimをインストールするための公式に推奨される方法は、 Choosenimを使用することです。 。 ラストアップに似ています およびpyenv 、choosenimはツールチェーンマルチプレクサです。これは、ユーザーが必要なすべてのツールとともに複数のバージョンのNimコンパイラーをインストールするのに役立ちます。その後、さまざまなNimバージョンを簡単に切り替えて、オンデマンドで任意のNimバージョンを選択できます。
gccコンパイラをインストールした後、次のコマンドを実行して、choosenimツールチェーンインストーラを使用して最新の安定したNimバージョンをインストールします。
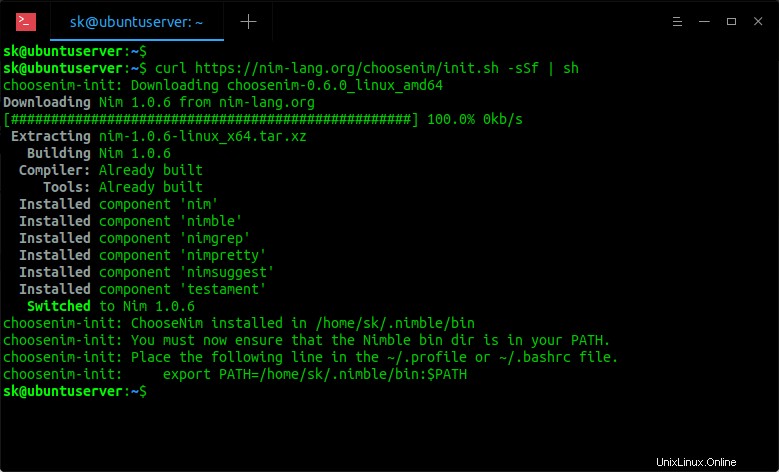
$ curl https://nim-lang.org/choosenim/init.sh -sSf | sh
画面の指示に従います。まず、Choosenimが匿名のテレメトリデータを記録および送信できるようにするかどうかを尋ねられます。データの送信に同意する場合は、「y」を押してEnterキーを押します。不要な場合は、「n」を押します。
choosenim-init: Downloading choosenim-0.6.0_linux_amd64
Prompt: Can choosenim record and send anonymised telemetry data? [y/n]
... Anonymous aggregate user analytics allow us to prioritise
... fixes and features based on how, where and when people use Nim.
... For more details see: https://goo.gl/NzUEPf.
インストールが正常に完了すると、次のメッセージが表示されます。
Downloading Nim 1.0.6 from nim-lang.org
[##################################################] 100.0% 0kb/s
 Extracting nim-1.0.6-linux_x64.tar.xz
   Building Nim 1.0.6
  Compiler: Already built
     Tools: Already built
  Installed component 'nim'
  Installed component 'nimble'
  Installed component 'nimgrep'
  Installed component 'nimpretty'
  Installed component 'nimsuggest'
  Installed component 'testament'
   Switched to Nim 1.0.6
choosenim-init: ChooseNim installed in /home/sk/.nimble/bin
choosenim-init: You must now ensure that the Nimble bin dir is in your PATH.
choosenim-init: Place the following line in the ~/.profile or ~/.bashrc file.
choosenim-init:     export PATH=/home/sk/.nimble/bin:$PATH
ご覧のとおり、nimおよびその他の必要なコンポーネントは〜/ .nimble / binにインストールされています。 ディレクトリ。 Nimblebinディレクトリが$PATHに追加されていることを確認する必要があります。これを行うには、〜/ .bashrcを編集します または〜/ .profile ファイル:
$ nano ~/.bashrc
または、
$ nano ~/.profile
その中に次の行を追加します:
export PATH=/home/sk/.nimble/bin:$PATH
「/home/ sk/...」パスを独自のパスに置き換えます。
最後に、コマンドを使用して変更を更新します:
$ source ~/.bashrc
〜/ .profileにその行を追加した場合は、次のようにします。
$ source ~/.profile
インストールされているNimのバージョンを確認するには、次のコマンドを実行します。
$ nim -v
このガイドを書いている時点で、最新の安定したNimバージョンは1.0.6でした。
Nim Compiler Version 1.0.6 [Linux: amd64]
Compiled at 2020-01-23
Copyright (c) 2006-2019 by Andreas Rumpf

active boot switches: -d:release
Nim開発バージョンに切り替えます
デフォルトでは、choosenimはダウンロードをインストールし、最新の安定したNimバージョンをインストールします。開発バージョンをインストールする場合は、次を実行します:
$ choosenim devel
出力例:
Downloading Nim devel from GitHub
[##################################################] 100.0% 0kb/s
Extracting nim-1.1.1-linux_x64.tar.xz
Setting up git repository
Building Nim #devel
Compiler: Already built
Tools: Already built
Switched to Nim #devel
Nimのバージョンを確認します:
$ nim -v
Nim Compiler Version 1.1.1 [Linux: amd64]
Compiled at 2020-04-02
Copyright (c) 2006-2020 by Andreas Rumpf

active boot switches: -d:release
安定バージョンに戻すには、次のコマンドを実行します:
$ choosenim stable
Switched to Nim 1.0.6
利用可能なNimバージョンのリスト
利用可能なすべてのNimバージョンのリストを表示するには、次を実行します。
$ choosenim versions
出力例:
   Channel: stable

 Installed:
          * 1.0.6 (latest)
            #devel

 Available:
            1.0.4
            1.0.2
            1.0.0
            0.20.2
            0.20.0
            0.19.6
            0.19.4
            0.19.2
            0.19.0
            0.18.0
            0.17.2
            0.17.0
            0.16.0
上記のコマンドは、インストールされているNimバージョンと使用可能なNimバージョンのリストを示しています。
特定のNimバージョンをインストールする
プロジェクトに特定のNimバージョンが必要な場合は、以下のようにインストールできます。
$ choosenim 1.0.4
このコマンドは、Nimのバージョン1.0.4をインストールして選択します。
Nimを更新
Nimは以下のように更新できます。
安定したニム:
$ choosenim update stable
Nim開発バージョン:
$ choosenim update devel
特定のNimバージョンを更新します:
$ choosenim update 1.0.6
Choosenim自体を更新するには、次のコマンドを実行します:
$ choosenim update self
ヘルプが必要な場合
$ choosenim -h
出力例:
choosenim: The Nim toolchain installer.

Choose a job. Choose a mortgage. Choose life. Choose Nim.

Usage:
  choosenim <version/path/channel>

Example:
  choosenim 0.16.0
    Installs (if necessary) and selects version 0.16.0 of Nim.
  choosenim stable
    Installs (if necessary) Nim from the stable channel (latest stable release)
    and then selects it.
  choosenim devel [--latest]
    Installs (if necessary) and selects the most recent nightly build of Nim.
    The '--latest' flag selects and builds the latest commit in the devel branch
  choosenim ~/projects/nim
    Selects the specified Nim installation.
  choosenim update stable
    Updates the version installed on the stable release channel.
  choosenim update devel [--latest]
    Updates to the most recent nightly build of Nim.
    The '--latest' flag updates and builds the latest commit in the devel branch
  choosenim versions [--installed]
    Lists the available versions of Nim that choosenim has access to.

Channels:
  stable
    Describes the latest stable release of Nim.
  devel
    Describes the latest development (or nightly) release of Nim taken from
    the devel branch.

Commands:
  update    <version/channel>    Installs the latest release of the specified
                                 version or channel.
  show                           Displays the selected version and channel.
  update    self                 Updates choosenim itself.
  versions  [--installed]        Lists available versions of Nim, passing
                                 `--installed` only displays versions that
                                 are installed locally (no network requests).

Options:
  -h --help             Show this output.
  -y --yes              Agree to every question.
  --version             Show version.
  --verbose             Show low (and higher) priority output.
  --debug               Show debug (and higher) priority output.
  --noColor             Don't colorise output.

  --choosenimDir:<dir>  Specify the directory where toolchains should be
                        installed. Default: ~/.choosenim.
  --nimbleDir:<dir>     Specify the Nimble directory where binaries will be
                        placed. Default: ~/.nimble.
  --firstInstall        Used by install script.
2。ディストリビューションのパッケージマネージャーを使用してNimをインストールします
Nimは、多くの一般的なLinuxディストリビューション用にパッケージ化されており、公式リポジトリで入手できます。
ArchLinuxおよびManjaroLinuxなどのその亜種では、次のコマンドを実行してNimをインストールします。
$ sudo pacman -S nim
Debian、Ubuntu、および派生物の場合:
$ sudo apt install nim
Fedoraの場合:
$ sudo dnf install nim
openSUSEの場合:
$ sudo zypper install nim
Void Linuxの場合:
$ xbps-install -S nim
Nimはスナップパッケージとしても入手可能です。 Linuxディストリビューションにスナップがある場合 、以下のようにNimをインストールします。
最新の安定版リリース:
$ snap install nim-lang --classic
最新のLTS1.0.xリリース:
$ snap install nim-lang-lts-1 --classic
最新のナイトリービルド:
$ snap install nim-lang-nightly --classic
公式リポジトリのNimバージョンは少し古い可能性があることに注意してください。最新バージョンが必要な場合は、前の方法で説明したように、choosenimインストーラーを使用してください。
3。 Dockerを使用してインストール
コミュニティで管理されているNimDockerイメージは、 Docker Hubで入手できます。 。これらのイメージを実行するには、LinuxシステムにDockerをインストールします。
- Ubuntu18.04LTSサーバーにDockerをインストールする方法
- CentOSにDockerをインストールする方法
Dockerをインストールした後、次のコマンドを使用して最新の安定したNimDockerイメージを取得します。
$ docker pull nimlang/nim
最新の開発バージョンを入手する:
$ docker pull nimlang/nim:devel
Nimプログラミング言語のテスト
Nimのインストールが正常にインストールされているかどうかを確認するために、Nimを使用して簡単なプログラムを実行してみましょう。
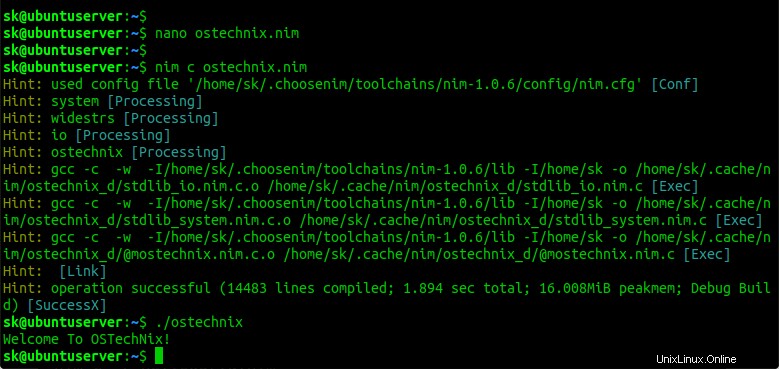
ostechnix.nimなどのテキストファイルを作成します:
$ nano ostechnix.nim
その中に次の行を追加します:
echo "Welcome To OSTechNix!"
ファイルを保存して閉じます。
コマンドを使用してファイルをコンパイルします:
$ nim c ostechnix.nim
出力例:
Hint: used config file '/home/sk/.choosenim/toolchains/nim-1.0.6/config/nim.cfg' [Conf]
Hint: system [Processing]
Hint: widestrs [Processing]
Hint: io [Processing]
Hint: ostechnix [Processing]
Hint: gcc -c  -w  -I/home/sk/.choosenim/toolchains/nim-1.0.6/lib -I/home/sk -o /home/sk/.cache/nim/ostechnix_d/stdlib_io.nim.c.o /home/sk/.cache/nim/ostechnix_d/stdlib_io.nim.c [Exec]
Hint: gcc -c  -w  -I/home/sk/.choosenim/toolchains/nim-1.0.6/lib -I/home/sk -o /home/sk/.cache/nim/ostechnix_d/stdlib_system.nim.c.o /home/sk/.cache/nim/ostechnix_d/stdlib_system.nim.c [Exec]
Hint: gcc -c  -w  -I/home/sk/.choosenim/toolchains/nim-1.0.6/lib -I/home/sk -o /home/sk/.cache/nim/ostechnix_d/@mostechnix.nim.c.o /home/sk/.cache/nim/ostechnix_d/@mostechnix.nim.c [Exec]
Hint:  [Link]
Hint: operation successful (14483 lines compiled; 1.894 sec total; 16.008MiB peakmem; Debug Build) [SuccessX]
最後に、コマンドを使用してプログラムを実行します:
$ ./ostechnix
出力例:
Welcome To OSTechNix!
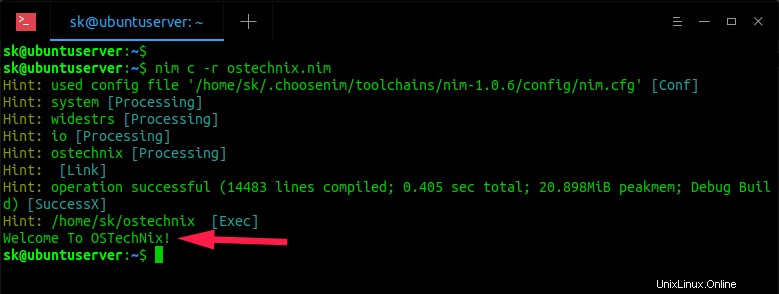
または、以下のようにコンパイルして実行します。
$ nim c -r ostechnix.nim
出力例:
Hint: used config file '/home/sk/.choosenim/toolchains/nim-1.0.6/config/nim.cfg' [Conf]
Hint: system [Processing]
Hint: widestrs [Processing]
Hint: io [Processing]
Hint: ostechnix [Processing]
Hint: [Link]
Hint: operation successful (14483 lines compiled; 0.405 sec total; 20.898MiB peakmem; Debug Build) [SuccessX]
Hint: /home/sk/ostechnix [Exec]
Welcome To OSTechNix!
Nimの使用法の詳細については、公式のNimの基本を参照してください。 最後にドキュメント。
Nimのアンインストール
Choosenimを使用してNimをインストールした場合は、Nimインストールディレクトリを削除するだけです。
$ rm -r ~/.nimble/ ~/.choosenim/
ディストリビューションのパッケージマネージャーを使用してインストールした場合は、アンインストールコマンドを実行するだけです。たとえば、Debian、Ubuntuでは、次のコマンドを使用してNimを削除できます。
$ sudo apt-get purge --auto-remove nim
これがお役に立てば幸いです。