さび またはrust-lang は、C / C ++を置き換えるように設計された、最新の高速なクロスプラットフォームのオープンソースシステムプログラミング言語ですが、C#およびJavaからのユーザーを満足させるために高レベルの抽象化を備えています。ゼロコストの抽象化、移動セマンティクス、メモリの安全性の保証、データ競合のないスレッド、特性ベースのジェネリック、パターンマッチング、型推論、最小限のランタイム、効率的なCバインディングなどの多くの機能が付属しています。Rustは本番環境で積極的に使用されていますCanonical、Chef、Coursera、CoreOS、Dropbox、Mozilla、NPMなどの人気のある組織によるものです。今日は、LinuxにRustプログラミング言語をインストールする方法を学びます。
LinuxにRustプログラミング言語をインストールする
Rust言語は、いくつかの異なる方法でインストールできます。 Rustをインストールするための公式に推奨される方法は、 Rustupを使用することです。 、Rustツールチェーンインストーラー。 rustupを使用してrustをインストールするのは非常に簡単です。ターミナルを開いて次のコマンドを実行するだけです。
$ curl --proto '=https' --tlsv1.2 -sSf https://sh.rustup.rs | sh
または、
$ curl https://sh.rustup.rs -sSf | sh
1と入力します (ナンバーワン)デフォルト値でインストールを続行します。または、 2と入力します インストールをカスタマイズします。デフォルト値を使用するので、 1と入力しました 。
出力例:
info: downloading installer

Welcome to Rust!

This will download and install the official compiler for the Rust
programming language, and its package manager, Cargo.

It will add the cargo, rustc, rustup and other commands to
Cargo's bin directory, located at:

  /home/ostechnix/.cargo/bin

This can be modified with the CARGO_HOME environment variable.

Rustup metadata and toolchains will be installed into the Rustup
home directory, located at:

  /home/ostechnix/.rustup

This can be modified with the RUSTUP_HOME environment variable.

This path will then be added to your PATH environment variable by
modifying the profile file located at:

  /home/ostechnix/.profile

You can uninstall at any time with rustup self uninstall and
these changes will be reverted.

Current installation options:

   default host triple: x86_64-unknown-linux-gnu
     default toolchain: stable
               profile: default
  modify PATH variable: yes

1) Proceed with installation (default)
2) Customize installation
3) Cancel installation
>1

info: profile set to 'default'
info: default host triple is x86_64-unknown-linux-gnu
info: syncing channel updates for 'stable-x86_64-unknown-linux-gnu'
info: latest update on 2020-06-18, rust version 1.44.1 (c7087fe00 2020-06-17)
info: downloading component 'cargo'
  5.0 MiB /   5.0 MiB (100 %)   3.3 MiB/s in  1s ETA:  0s
info: downloading component 'clippy'
info: downloading component 'rust-docs'
 12.2 MiB /  12.2 MiB (100 %)   2.6 MiB/s in  5s ETA:  0s
info: downloading component 'rust-std'
 17.7 MiB /  17.7 MiB (100 %)   2.4 MiB/s in  8s ETA:  0s
info: downloading component 'rustc'
 60.3 MiB /  60.3 MiB (100 %)   2.2 MiB/s in 26s ETA:  0s
info: downloading component 'rustfmt'
  3.4 MiB /   3.4 MiB (100 %)   2.6 MiB/s in  1s ETA:  0s
info: installing component 'cargo'
info: installing component 'clippy'
info: installing component 'rust-docs'
 12.2 MiB /  12.2 MiB (100 %)   2.5 MiB/s in  4s ETA:  0s
info: installing component 'rust-std'
 17.7 MiB /  17.7 MiB (100 %)   8.6 MiB/s in  4s ETA:  0s
info: installing component 'rustc'
 60.3 MiB /  60.3 MiB (100 %)   7.2 MiB/s in  9s ETA:  0s
info: installing component 'rustfmt'
info: default toolchain set to 'stable'

  stable installed - rustc 1.44.1 (c7087fe00 2020-06-17)

Rust is installed now. Great!

To get started you need Cargo's bin directory ($HOME/.cargo/bin) in your PATH
environment variable. Next time you log in this will be done automatically.

To configure your current shell run source $HOME/.cargo/env 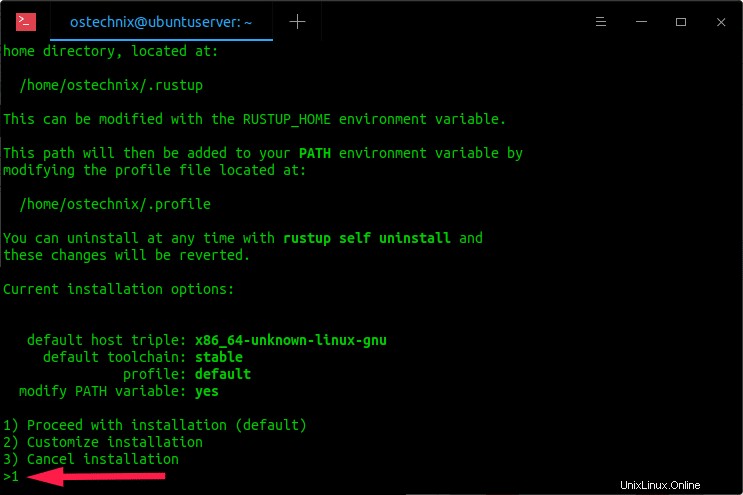
上記の出力にあるように、rustupインストーラースクリプトは、Rustプログラミング言語の公式コンパイラーと Cargoという名前のパッケージマネージャーをダウンロードしてインストールします。 、そしてそれは貨物を追加します 、 rustc 、ラストアップ および~/.cargo/binにあるCargoのbinディレクトリへのその他のコマンド 。次に、プロファイルを変更して、CargoのbinディレクトリをPATH環境変数に追加します。 ~/.profileにあるファイル 。
最後に、次のコマンドを実行して現在のシェルを構成します。
$ source $HOME/.cargo/env
インストールされているバージョンを確認するには、次のコマンドを実行します:
$ rustc --version
rustc 1.44.1 (c7087fe00 2020-06-17)
大丈夫!最新のRustバージョンをインストールしました。さびプログラムのサンプルを作成して、それが機能するかどうかを確認しましょう。
Rustプログラミング言語のテスト
すべてのRustコードを配置するメインプロジェクトディレクトリを作成します。このディレクトリは、すべてのRustプログラムの親ディレクトリとして機能します。
たとえば、 "my_rust_projectsという名前のメインプロジェクトディレクトリを作成します。 " 私の$HOMEで ディレクトリ。
$ mkdir ~/my_rust_projects そのディレクトリに移動します:
$ cd ~/my_rust_projects 次に、バイナリを作成します'hello_world' 以下に示すようにCargoを使用したパッケージ。
$ cargo new hello_world
上記のコマンドは、必要なすべてのファイルを含む「hello_world」という名前の新しいディレクトリを作成します。
そのディレクトリへのCD:
$ cd hello_world
最後に、コマンドを使用してhello_worldプログラムを実行します:
$ cargo run
出力例:
Compiling hello_world v0.1.0 (/home/sk/my_rust_projects/hello_world)
    Finished dev [unoptimized + debuginfo] target(s) in 0.44s
     Running `target/debug/hello_world`
Hello, world! 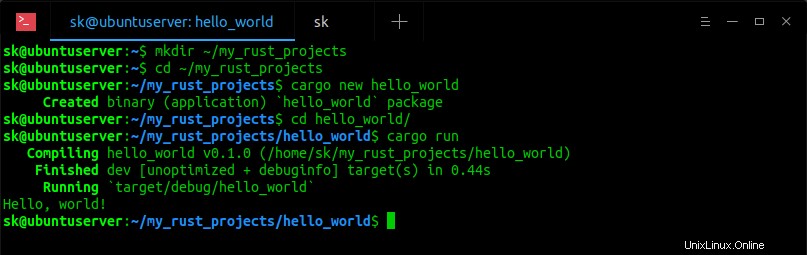
これは、Cargoを使用するための推奨される方法です。
または、プロジェクトのディレクトリを手動で作成し、テキストファイルにコードを記述して、最後に以下のようにコンパイルして実行することもできます。
プロジェクトディレクトリを作成しましょう:
$ mkdir hello_world
そのディレクトリへのCD:
$ cd hello_world
次に、テキストまたはGUIエディターを使用して最初のRustプログラムを作成します。 rustファイルは常に拡張子.rsで終わります 。
サンプルのrustプログラムを作成するには、たとえば ostechnix.rs 、実行:
$ vi ostechnix.rs
次のコードをコピーして貼り付けます。
fn main() {
    println!("Hello, Welcome To OSTechNix blog!");
}
ESCを押します キーを押して:wqと入力します ファイルを保存して終了します。
次に、次のコマンドを実行して、rustコードをコンパイルします。
$ rustc ostechnix.rs
上記のコマンドは、 ostechnixという名前の実行可能なrustプログラムを作成します。 現在のディレクトリにあります。
$ ls
ostechnix ostechnix.rs
最後に、コマンドを使用してRustプログラムを実行します:
$ ./ostechnix
Hello, Welcome To OSTechNix blog!
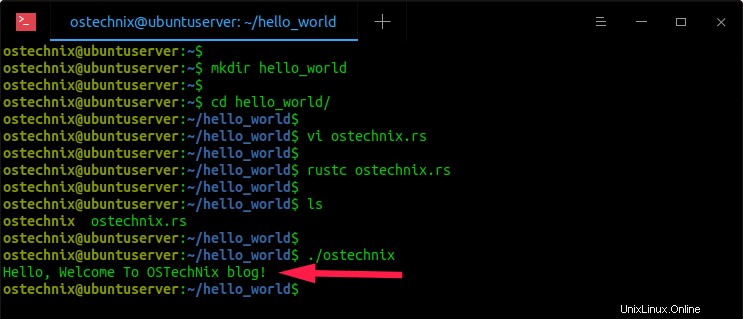
動作しています!!
トラブルシューティング
"エラー:リンカーccが発生する場合があります 見つかりません」 Cargoでプログラムをコンパイルするときのメッセージ。これを修正するには、次のリンクで説明されているように、GCCなどのCコンパイラをインストールします。
- LinuxでRustエラー「リンカー'cc'が見つかりません」を修正する方法
タブ補完を有効にする
Rustupは、 Bashなどの一般的なシェルのタブ補完をサポートしています 、魚 、 Zsh およびPowerShell 。
Bashのタブ補完を有効にするには 、実行:
$ mkdir -p ~/.local/share/bash-completion/completions
$ rustup completions bash >> ~/.local/share/bash-completion/completions/rustup
魚 :
$ mkdir -p ~/.config/fish/completions
$ rustup completions fish > ~/.config/fish/completions/rustup.fish
Zsh :
$ mkdir ~/.zfunc
次に、「compinit」の直前の「.zshrc」ファイルに次の行を追加します。
fpath+=~/.zfunc
これで、次のコマンドを使用して完了スクリプトをインストールできます。
$ rustup completions zsh > ~/.zfunc/_rustup
タブ補完を有効にした後、変更を有効にするには、シェルセッションからログアウトして再度ログインする必要があります。
錆の更新
新しいバージョンがリリースされたときに錆を更新するには、次のコマンドを実行します:
$ rustup update
info: syncing channel updates for 'stable-x86_64-unknown-linux-gnu'
info: latest update on 2018-03-29, rust version 1.25.0 (84203cac6 2018-03-25)
info: downloading component 'rustc'
info: downloading component 'rust-std'
info: downloading component 'cargo'
info: downloading component 'rust-docs'
info: removing component 'rustc'
info: removing component 'rust-std'
info: removing component 'cargo'
info: removing component 'rust-docs'
info: installing component 'rustc'
info: installing component 'rust-std'
info: installing component 'cargo'
info: installing component 'rust-docs'
info: checking for self-updates

stable-x86_64-unknown-linux-gnu updated - rustc 1.25.0 (84203cac6 2018-03-25)
このコマンドは、 rustupの更新もチェックします 最新バージョンを自動的にインストールします。
更新を手動で確認し、最新バージョンの rustupをインストールする場合 インストールされているツールチェーンを更新せずに、次のように入力します:
$ rustup self update
Rustのアンインストール
コマンドを使用して、いつでもrust言語をアンインストールできます:
$ rustup self uninstall
このコマンドはシステムから錆を削除し、上記の変更はすべて元に戻されます。
Thanks for hacking in Rust!

This will uninstall all Rust toolchains and data, and remove $HOME/.cargo/bin
from your PATH environment variable.

Continue? (y/N) y

info: removing rustup home
info: removing cargo home
info: removing rustup binaries
info: rustup is uninstalled
最後に、rustプロジェクトの親ディレクトリを削除します。
$ rm -fr ~/my_rust_projects
そして、今のところこれですべてです。これで、rustupを使用してRustをインストールする方法、更新する方法、サンプルのrustプログラムを作成して実行する方法、そして最後にシステムからrustを削除する方法を理解しました。これがお役に立てば幸いです。