はじめに
Apache Solrは、Javaで記述されたオープンソースの検索プラットフォームです。Solrは、全文検索、スペルの提案、カスタムドキュメントの順序付けとランキング、スニペットの生成、および強調表示を提供します。 Solrは、JSON、XML、多くのOfficeドキュメント、CSVなど、さまざまなデータ型をすぐに処理します。
Solrは、スケーラビリティーとフォールトトレランスのために設計されています。エンタープライズ検索と分析のユースケースにも使用され、活発な開発コミュニティと定期的なリリースがあります。
また、Solrは、ApacheLucene上に構築された人気のある超高速のオープンソースエンタープライズ検索プラットフォームです。
Linuxソフトウェアパッケージの更新
Linuxオペレーティングシステムのソフトウェアパッケージを更新します。
# dnf update -yOpenJDKをインストールする
Apache SolrはJavaで記述されており、Java開発キットが必要です。 (JDK)
OpenJDK 標準のyumリポジトリで利用可能であり、簡単にインストールできます。
そのため、次のコマンドを使用してLinuxサーバーにOpenJDK11をインストールしています。
# dnf install -y java-11-openjdkこれで、OpenJDKがLinuxサーバーにインストールされました。
ApacheSolrをインストールする
Apache Solrは、Githubまたは公式Webサイトからダウンロードして、最新バージョンを入手できます。
現在、最新バージョンはsolr-8.9.0
です。[root@unixcop ~]# wget https://downloads.apache.org/lucene/solr/8.9.0/solr-8.9.0.tgz
--2021-08-25 10:06:52-- https://downloads.apache.org/lucene/solr/8.9.0/solr-8.9.0.tgz
Resolving downloads.apache.org (downloads.apache.org)... 135.181.209.10, 135.181.214.104, 88.99.95.219, ...
Connecting to downloads.apache.org (downloads.apache.org)|135.181.209.10|:443... connected.
HTTP request sent, awaiting response... 200 OK
Length: 202942547 (194M) [application/x-gzip]
Saving to: 'solr-8.9.0.tgz'
solr-8.9.0.tgz 100%[=======================================================================>] 193.54M 401KB/s in 8m 41s
2021-08-25 10:15:34 (380 KB/s) - 'solr-8.9.0.tgz' saved [202942547/202942547]ダウンロードしたtarballからインストールスクリプトを抽出します 以下に示すように。
[root@unixcop ~]# tar xzf solr-8.9.0.tgz solr-8.9.0/bin/install_solr_service.sh --strip-components=2
[root@unixcop ~]# ls
anaconda-ks.cfg  install_solr_service.sh  solr-8.9.0.tgz
[root@unixcop ~]#
インストールスクリプトを実行して、Apache SolrSearchServerをインストールします。
[root@unixcop ~]# ./install_solr_service.sh solr-8.9.0.tgz
We recommend installing the 'lsof' command for more stable start/stop of Solr
id: 'solr': no such user
Creating new user: solr

Extracting solr-8.9.0.tgz to /opt


Installing symlink /opt/solr -> /opt/solr-8.9.0 ...


Installing /etc/init.d/solr script ...


Installing /etc/default/solr.in.sh ...

Service solr installed.
Customize Solr startup configuration in /etc/default/solr.in.sh
*** [WARN] *** Your open file limit is currently 1024.
 It should be set to 65000 to avoid operational disruption.
 If you no longer wish to see this warning, set SOLR_ULIMIT_CHECKS to false in your profile or solr.in.sh
*** [WARN] ***  Your Max Processes Limit is currently 3901.
 It should be set to 65000 to avoid operational disruption.
 If you no longer wish to see this warning, set SOLR_ULIMIT_CHECKS to false in your profile or solr.in.sh
NOTE: Please install lsof as this script needs it to determine if Solr is listening on port 8983.

Started Solr server on port 8983 (pid=15862). Happy searching!


Found 1 Solr nodes:

Solr process 15862 running on port 8983
{
  "solr_home":"/var/solr/data",
  "version":"8.9.0 05c8a6f0163fe4c330e93775e8e91f3ab66a3f80 - mayyasharipova - 2021-06-10 17:54:40",
  "startTime":"2021-08-25T14:20:43.324Z",
  "uptime":"0 days, 0 hours, 0 minutes, 19 seconds",
  "memory":"79.9 MB (%15.6) of 512 MB"}

[root@unixcop ~]#
これにより、システムにsolrという名前のアカウントが作成され、インストールプロセスが完了します。
また、上記の警告についても心配する必要はありません。解決します。
lsofをインストールします ApacheSolrの要求に応じて。
# dnf install -y lsofコマンドを使用してSolrサービスを有効にします:
[root@unixcop ~]# systemctl enable solr
solr.service is not a native service, redirecting to systemd-sysv-install.
Executing: /usr/lib/systemd/systemd-sysv-install enable solr
[root@unixcop ~]#
Solr検索サービスがデフォルトのポート8983で実行されていることを確認します。
[root@unixcop ~]# ss -tulpn | grep 8983
tcp   LISTEN 0      50                      *:8983            *:*    users:(("java",pid=15862,fd=153))
[root@unixcop ~]#
Apache Solr EnterpriseSearchServerの要件に応じてセキュリティ制限を定義する必要があります。
したがって、 Limits.confを編集します vimエディターのファイル。
# vi /etc/security/limits.confそして、このファイルに以下を追加します。
solr   soft   nofile   65536
solr   hard   nofile   65536
solr   soft   nproc    65536
solr   hard   nproc    65536
次に、Solrサービスを再起動します
[root@unixcop ~]# service solr restart
Sending stop command to Solr running on port 8983 ... waiting up to 180 seconds to allow Jetty process 15862 to stop gracefully.
Waiting up to 180 seconds to see Solr running on port 8983 [\]
Started Solr server on port 8983 (pid=16988). Happy searching!

[root@unixcop ~]#
また、ファイアウォールで8983ポート(solrが使用)を許可する必要があります。
[root@unixcop ~]# firewall-cmd --permanent --add-port=8983/tcp
success
[root@unixcop ~]# firewall-cmd --reload
success
[root@unixcop ~]#
新しいSolrコレクションを作成する
コレクションは、一緒になって単一の論理インデックスを形成するコアのグループです。コレクションには、他のコレクションとは異なる構成ファイルとスキーマ定義のセットがあります。次のコマンドを実行して、コレクションを作成できます。
[root@unixcop ~]# su - solr -c "/opt/solr/bin/solr create -c Unixcop_col1 -n data_driven_schema_configs"

Created new core 'Unixcop_col1'
[root@unixcop ~]#
Solr管理パネルにアクセス
デフォルトでは、Solrサーバーはポート8983で実行されます。サーバーのIPアドレスまたはホスト名と8983ポートを使用して、WebブラウザーでSolrダッシュボードにアクセスします。
http:// ip_address:8983 /
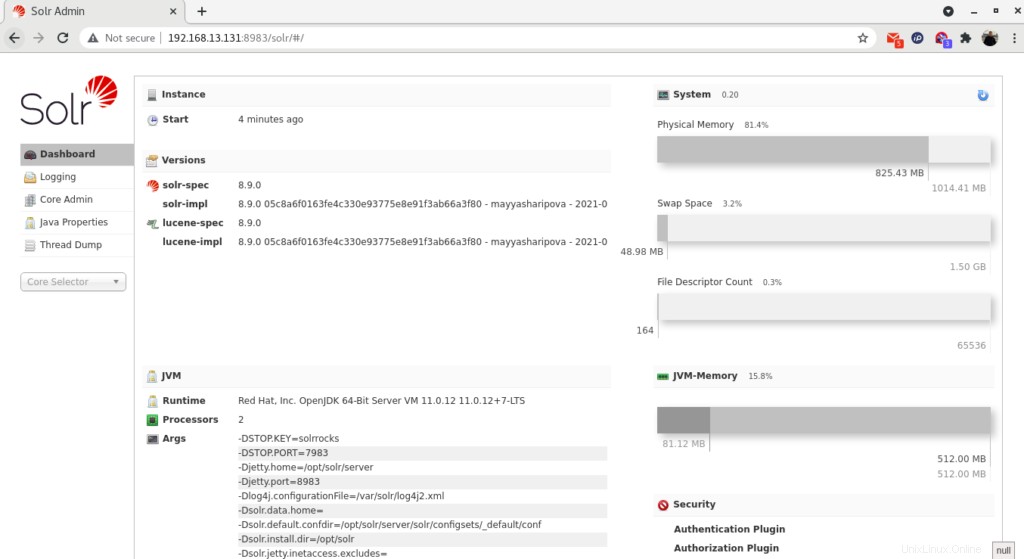
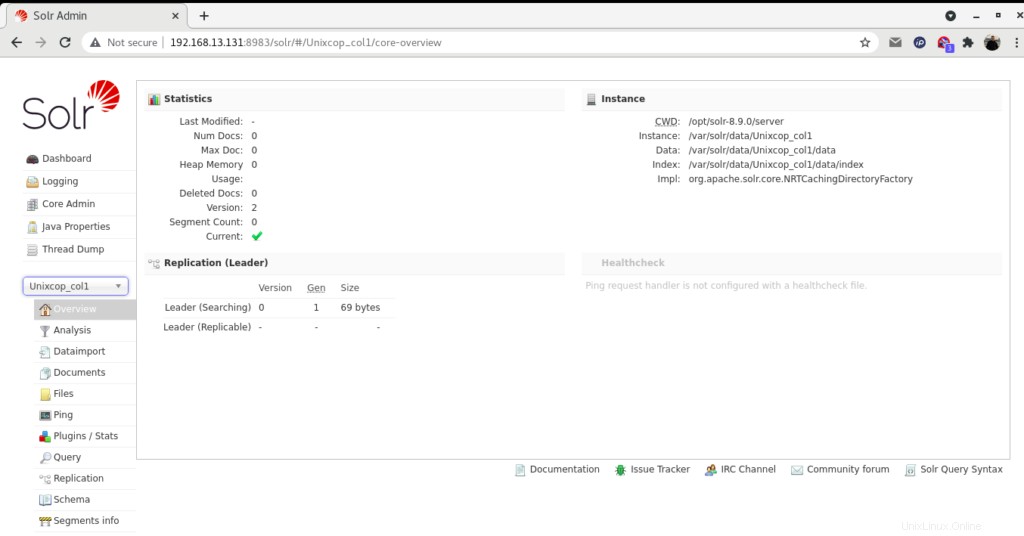
「Unixcop_col1」という名前の作成されたコレクションの統計を表示できます。 「コアセレクター」をクリックして、作成したコレクションを選択します。
結論
このインストールガイドでは、 Apache Solr EnterpriseServerをインストールする方法を学習しました。 CentOS /RHEL8で。