アスタリスクは、オープンソースライセンスでリリースされた強力なデジタルPBXおよびVoIPサーバーであるため、無料で使用できます。 VoIPは、複数のエンドポイント間の通話を確立および制御するために使用されるテクノロジーです。これは、VoIPゲートウェイ、会議サーバー、コールセンター、通信事業者、および世界中の政府機関で使用されています。 Linux、BSD、OS Xで動作し、ローカルシステムまたはサーバーを通信サーバーに変えることができます。
この投稿では、CentOS8サーバーにAsteriskをインストールする方法について説明します。
- CentOS8を実行しているサーバー。
- ルートパスワードはサーバーで構成されています。
デフォルトでは、SELinuxはCentOS 8で有効になっているため、最初に無効にする必要があります。無効にするには、SELinux構成ファイルを編集します:
nano /etc/selinux/config
次の行を変更します:
SELINUX=disabled
ファイルを保存して閉じ、システムを再起動して変更を適用します。
アスタリスクには、サーバーにインストールする必要のあるいくつかのパッケージが必要です。まず、次のコマンドを使用してEPELリポジトリをインストールします。
dnf install https://dl.fedoraproject.org/pub/epel/epel-release-latest-8.noarch.rpm
次に、次のコマンドを使用してPowerToolsリポジトリを有効にします。
dnf config-manager --set-enabled PowerTools
次に、次のコマンドを使用して他のパッケージと開発ツールをインストールします。
dnf install wget gcc gcc-c++ svn make bzip2 patch libedit-devel uuid-devel libuuid-devel libxml2-devel sqlite sqlite-devel nano openssl openssl-devel -y>
dnf groupinstall "Development Tools"
必要なパッケージがすべてインストールされたら、次のステップに進むことができます。
JanssonとPJSIPをインストールします
次に、Janssonをシステムにインストールする必要があります。メディアデータのエンコードとデコードに使用されます。
まず、次のコマンドを使用してGitリポジトリからダウンロードします。
git clone https://github.com/akheron/jansson.git
次に、ディレクトリをダウンロードしたディレクトリに変更し、次のコマンドを使用してコンパイルします。
cd jansson
autoreconf -i
./configure --prefix=/usr/
make
make install
次に、PJSIPをシステムにインストールする必要があります。これは、SIP、SDP、RTP、STUN、TURN、およびICEプロトコルを実装するために使用されるライブラリです。
まず、次のコマンドを使用してダウンロードします。
cd
git clone https://github.com/pjsip/pjproject.git
次に、ディレクトリをダウンロードしたディレクトリに変更し、次のコマンドを使用してコンパイルします。
cd pjproject
./configure CFLAGS="-DNDEBUG -DPJ_HAS_IPV6=1" --prefix=/usr --libdir=/usr/lib64 --enable-shared --disable-video --disable-sound --disable-opencore-amr
make dep
make
make install
ldconfig
完了したら、アスタリスクのインストールに進むことができます。
まず、ホームディレクトリに移動し、次のコマンドを使用して最新バージョンのAsteriskをダウンロードします。
cd
wget https://downloads.asterisk.org/pub/telephony/asterisk/asterisk-18-current.tar.gz
ダウンロードが完了したら、次のコマンドを使用してダウンロードしたファイルを抽出します。
tar -xvzf asterisk-18-current.tar.gz
次に、次のコマンドを使用して、ディレクトリを抽出したディレクトリに変更します。
cd asterisk-18.4.0/
次に、次のコマンドを使用してアスタリスクを構成します。
./configure --libdir=/usr/lib64
次の出力が表示されます。
configure: Menuselect build configuration successfully completed

               .$$$$$$$$$$$$$$$=..
            .$7$7..          .7$$7:.
          .$$:.                 ,$7.7
        .$7.     7$$$$           .$$77
     ..$$.       $$$$$            .$$$7
    ..7$   .?.   $$$$$   .?.       7$$$.
   $.$.   .$$$7. $$$$7 .7$$$.      .$$$.
 .777.   .$$$$$$77$$$77$$$$$7.      $$$,
 $$$~      .7$$$$$$$$$$$$$7.       .$$$.
.$$7          .7$$$$$$$7:          ?$$$.
$$$          ?7$$$$$$$$$$I        .$$$7
$$$       .7$$$$$$$$$$$$$$$$      :$$$.
$$$       $$$$$$7$$$$$$$$$$$$    .$$$.
$$$        $$$   7$$$7  .$$$    .$$$.
$$$$             $$$$7         .$$$.
7$$$7            7$$$$        7$$$
 $$$$$                        $$$
  $$$$7.                       $$  (TM)
   $$$$$$$.           .7$$$$$$  $$
     $$$$$$$$$$$$7$$$$$$$$$.$$$$$$
       $$$$$$$$$$$$$$$$.

configure: Package configured for:
configure: OS type  : linux-gnu
configure: Host CPU : x86_64
configure: build-cpu:vendor:os: x86_64 : pc : linux-gnu :
configure: host-cpu:vendor:os: x86_64 : pc : linux-gnu :
次に、次のコマンドを実行して、Asteriskでインストールする追加のアドオンをインストールします。
make menuselect
次のページが表示されます:

アドオンを選択します Enterを押します 。次のページが表示されます:
必要なアドオンを選択し、 Enterを押します 選択するには、 ESCを押します。 メインメニューに戻るには:
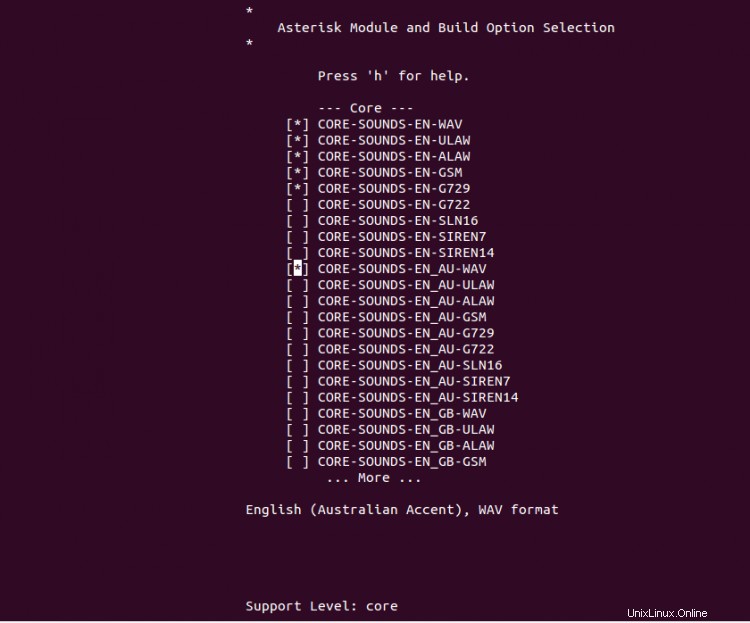
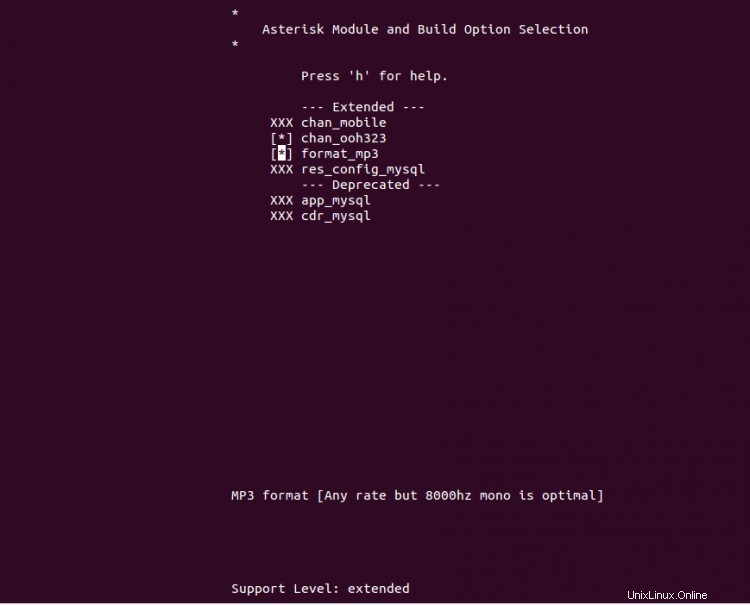
必要なコアを選択します 音 パッケージ化してEnterを押します それを選択します。次に、 ESCを押します 戻るには、以下に示すようにMOHパッケージを選択します。
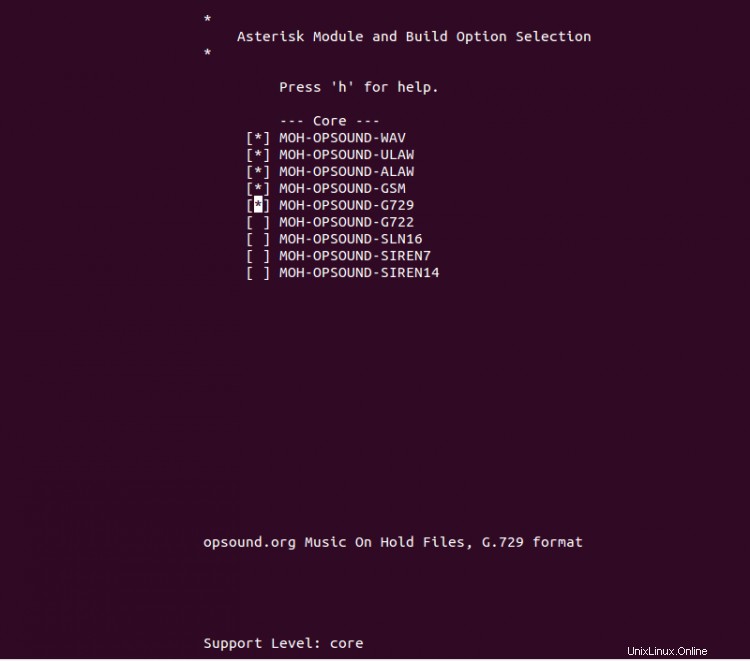
必要なパッケージを選択し、 Enterをクリックします それらを選択します。次に、 ESCを押します 戻るには、以下に示すように追加パッケージを選択します:
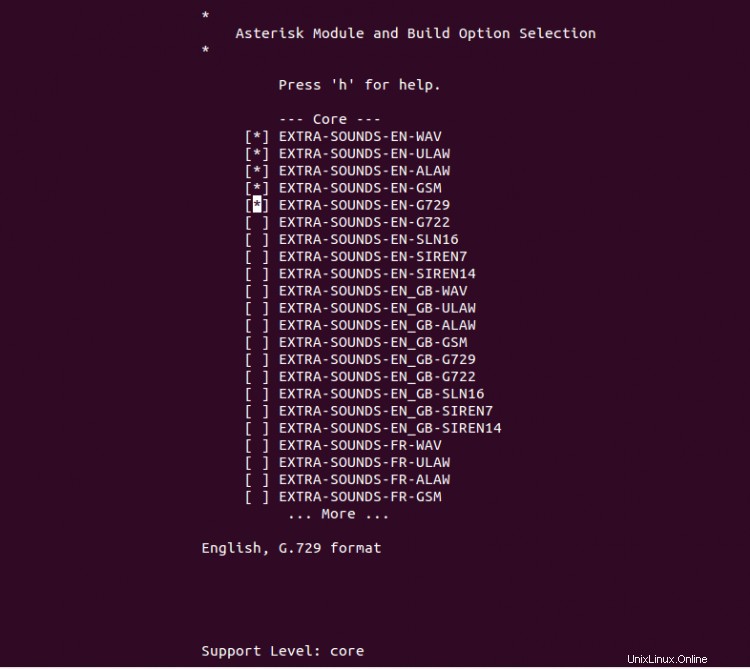
必要なパッケージを選択し、Enterキーを押して選択します。次に、 ESCを押します ボタン。次のページが表示されます:

Sを押します 変更を保存して終了します。
次に、次のコマンドを実行して、必要なすべての依存関係をインストールします。
contrib/scripts/get_mp3_source.sh
次に、次のコマンドを使用してアスタリスクを作成します。
make
次の出力が表示されます。
 +--------- Asterisk Build Complete ---------+
 + Asterisk has successfully been built, and +
 + can be installed by running:              +
 +                                           +
 +                make install               +
 +-------------------------------------------+

make install
 +---- Asterisk Installation Complete -------+
 +                                           +
 +    YOU MUST READ THE SECURITY DOCUMENT    +
 +                                           +
 + Asterisk has successfully been installed. +
 + If you would like to install the sample   +
 + configuration files (overwriting any      +
 + existing config files), run:              +
 +                                           +
 + For generic reference documentation:      +
 +    make samples                           +
 +                                           +
 + For a sample basic PBX:                   +
 +    make basic-pbx                         +
 +                                           +
 +                                           +
 +-----------------  or ---------------------+
 +                                           +
 + You can go ahead and install the asterisk +
 + program documentation now or later run:   +
 +                                           +
 +               make progdocs               +
 +                                           +
 + **Note** This requires that you have      +
 + doxygen installed on your local system    +
 +-------------------------------------------+
次に、次のコマンドを使用してアスタリスクをインストールします。
make samples
make config
ldconfig
次に、Asteriskを実行するための専用ユーザーを作成する必要があります。次のコマンドを使用して、ユーザーとグループを作成できます。
groupadd asterisk
useradd -r -d /var/lib/asterisk -g asterisk asterisk
次に、次のコマンドを使用して、オーディオおよびダイヤルアウトユーザーをAsteriskグループに追加します。
usermod -aG audio,dialout asterisk
次に、次のコマンドを使用して、アスタリスクディレクトリの所有権をアスタリスクユーザーに設定します。
chown -R asterisk.asterisk /etc/asterisk /var/{lib,log,spool}/asterisk /usr/lib64/asterisk 次に、/ etc / sysconfig/asteriskファイルを編集します。
nano /etc/sysconfig/asterisk
次の行のコメントを解除します:
AST_USER="asterisk"
AST_GROUP="asterisk"
ファイルを保存して閉じてから、/ etc / asterisk/asterisk.confファイルを編集します。
nano /etc/asterisk/asterisk.conf
次の行のコメントを解除します:
runuser = asterisk ; The user to run as.
rungroup = asterisk ; The group to run as.
終了したら、ファイルを保存して閉じます。次に、Asteriskサービスを再起動して変更を適用します。
systemctl restart asterisk
次に、システムの再起動時にAsteriskサービスを開始できるようにします。
systemctl enable asterisk
Asteriskサービスのステータスを確認するには、次のコマンドを実行します。
systemctl status asterisk
次の出力が得られるはずです:
? asterisk.service - LSB: Asterisk PBX
   Loaded: loaded (/etc/rc.d/init.d/asterisk; generated)
   Active: active (running) since Sat 2021-05-22 08:19:08 EDT; 15s ago
     Docs: man:systemd-sysv-generator(8)
  Process: 70883 ExecStart=/etc/rc.d/init.d/asterisk start (code=exited, status=0/SUCCESS)
 Main PID: 70914 (asterisk)
    Tasks: 81 (limit: 25014)
   Memory: 36.8M
   CGroup: /system.slice/asterisk.service
           ??70912 /bin/sh /usr/sbin/safe_asterisk
           ??70914 /usr/sbin/asterisk -f -vvvg -c

May 22 08:19:08 centos8 systemd[1]: Starting LSB: Asterisk PBX...
May 22 08:19:08 centos8 asterisk[70883]: Starting asterisk:
この時点で、Asteriskがインストールおよび構成されています。これで、次のコマンドを使用してアスタリスクを確認できます。
asterisk -rvv
すべてが正常であれば、次の出力が得られるはずです:
Asterisk 18.4.0, Copyright (C) 1999 - 2021, Sangoma Technologies Corporation and others.
Created by Mark Spencer <[email protected]>
Asterisk comes with ABSOLUTELY NO WARRANTY; type 'core show warranty' for details.
This is free software, with components licensed under the GNU General Public
License version 2 and other licenses; you are welcome to redistribute it under
certain conditions. Type 'core show license' for details.
=========================================================================
Running as user 'asterisk'
Running under group 'asterisk'
Connected to Asterisk 18.4.0 currently running on centos8 (pid = 70914)
centos8*CLI>
次に、次のコマンドを実行してコアチャネルを表示します。
centos8*CLI> core show channels
次の出力が表示されます。
Channel              Location             State   Application(Data)
0 active channels
0 active calls
0 calls processed
アスタリスクの稼働時間を表示するには、次のコマンドを実行します。
centos8*CLI> core show uptime
次の出力が表示されます。
System uptime: 1 minute, 33 seconds
Last reload: 1 minute, 33 seconds
Asterisk CLIを終了するには、次のコマンドを実行します。
centos8*CLI> quit
上記のガイドでは、CentOS8サーバーにAsteriskバージョン18をダウンロードしてコンパイルする方法を学びました。これで、Asteriskを他のプラットフォームと統合し、VoIPベースのアプリケーションを構築できます。