LibModSecurityは、さまざまな種類のサイバー攻撃からNginxサーバーを保護するために使用できる無料のオープンソースWebアプリケーションファイアウォールです。 SQLインジェクション、クロスサイトスクリプティング、トロイの木馬などを含むコアルールセットが付属しています。 HTTPトラフィックをリアルタイムで監視し、OWASPModSecurityコアルールセットを使用して脆弱性と戦うことで機能します。 Apache、Nginx、IISで使用でき、Debian、Ubuntu、CentOSとも互換性があります。
このチュートリアルでは、CentOS8でNginxをサポートするLibModSecurityをダウンロードしてコンパイルする方法を示します。
- CentOS8を実行しているサーバー。
- ルートパスワードはサーバーで構成されています。
開始する前に、次のコマンドを使用してサーバーを最新バージョンに更新します。
dnf update
サーバーが最新の状態になったら、サーバーを再起動して変更を適用します。
まず、EPELおよびREMIリポジトリをシステムにインストールします。次のコマンドでインストールできます:
dnf install https://dl.fedoraproject.org/pub/epel/epel-release-latest-8.noarch.rpm
 dnf install https://rpms.remirepo.net/enterprise/remi-release-8.rpm
次に、次のコマンドを使用して、必要なすべての依存関係をインストールします。
dnf install gcc-c++ flex bison yajl curl-devel zlib-devel pcre-devel autoconf automake git curl make libxml2-devel pkgconfig libtool httpd-devel redhat-rpm-config wget openssl openssl-devel nano
すべてのパッケージがインストールされたら、PowerToolリポジトリを使用して他の依存関係をインストールできます。
dnf --enablerepo=PowerTools install doxygen yajl-devel
次に、次のコマンドを実行して、REMIリポジトリを使用してGeoIPをインストールします。
dnf --enablerepo=remi install GeoIP-devel
すべてのパッケージがインストールされたら、次のステップに進むことができます。
LibModsecurityをダウンロードしてコンパイルします
まず、LibModsecurityソースをダウンロードして、システムでコンパイルする必要があります。これを行うには、ディレクトリを/ optに変更し、Gitリポジトリから最新バージョンのLibModsecurityをダウンロードします。
cd /opt/
 git clone --depth 1 -b v3/master --single-branch https://github.com/SpiderLabs/ModSecurity
次に、ディレクトリをModSecurityに変更し、次のコマンドを使用してlibInjectionコードをダウンロードします。
cd ModSecurity
 git submodule init
 git submodule update
次に、次のコマンドを使用してLibModsecurityを構成します。
./build.sh
 ./configure
最後に、次のコマンドを使用してLibModSecurityをコンパイルしてインストールします。
make
 make install
この時点で、LibModsecurityがシステムにインストールされています。これで、LibModsecurityをサポートするNginxのインストールに進むことができます。
LibModsecurityサポートを使用してNginxをダウンロードしてコンパイルする
まず、Nginxのシステムユーザーとグループを作成する必要があります。次のコマンドで作成できます:
useradd -r -M -s /sbin/nologin -d /usr/local/nginx nginx
次に、Nginxをダウンロードし、LibModsecurityサポートを使用してコンパイルする必要があります。
これを行うには、最初に次のコマンドを使用してGitリポジトリからModSecurity-nginxコネクタをダウンロードします。
cd /opt
 git clone https://github.com/SpiderLabs/ModSecurity-nginx.git
次に、次のコマンドを使用してNginxの最新の安定バージョンをダウンロードします。
wget http://nginx.org/download/nginx-1.17.6.tar.gz
ダウンロードしたら、次のコマンドを使用してダウンロードしたファイルを抽出します。
tar -xvzf nginx-1.17.6.tar.gz
次に、Nginxディレクトリを変更し、次のコマンドで構成します。
cd nginx-1.17.6
 ./configure --user=nginx --group=nginx --with-pcre-jit --with-debug --with-http_ssl_module --with-http_realip_module --add-module=/opt/ModSecurity-nginx
次に、次のコマンドを使用してNginxをインストールします。
make
 make install
この時点で、NginxはLibModsecurityをサポートしてインストールされています。これで、Nginxの構成に進むことができます。
ModSecurityでNginxを構成する
まず、サンプルのModSecurity構成ファイルをNginxソースディレクトリからNginx構成ディレクトリにコピーする必要があります。
次のコマンドでそれらをコピーできます:
cp /opt/ModSecurity/modsecurity.conf-recommended /usr/local/nginx/conf/modsecurity.conf
 cp /opt/ModSecurity/unicode.mapping /usr/local/nginx/conf/
次に、次のコマンドを使用して、Nginxバイナリから/ usr /sbin/パスへのシンボリックリンクを作成します。
ln -s /usr/local/nginx/sbin/nginx /usr/sbin/
次に、次のコマンドを使用してNginxログディレクトリを作成します。
mkdir /var/log/nginx
次に、次のコマンドを使用してNginx構成ファイルを開きます。
nano /usr/local/nginx/conf/nginx.conf
次の変更を行います:
user  nginx;
worker_processes  1;
pid  /run/nginx.pid;
events {
    worker_connections  1024;
}


http {
    include	  mime.types;
    default_type  application/octet-stream;
    sendfile        on;
    keepalive_timeout  65;
    server {
	listen       80;
        server_name  your-server-ip;
        modsecurity  on;
        modsecurity_rules_file  /usr/local/nginx/conf/modsecurity.conf;
        access_log  /var/log/nginx/access.log;
        error_log  /var/log/nginx/error.log;
        location / {
            root   html;
            index  index.html index.htm;
        }
        error_page   500 502 503 504  /50x.html;
        location = /50x.html {
            root   html;
        }
    }
}
終了したら、ファイルを保存して閉じます。次に、次のコマンドを使用して、構文エラーがないかNginxを確認します。
nginx -t
次の出力が表示されます。
nginx: the configuration file /usr/local/nginx/conf/nginx.conf syntax is ok
nginx: configuration file /usr/local/nginx/conf/nginx.conf test is successful
この時点で、Nginxが構成されています。 Nginxのsystemdサービスファイルの作成に進むことができます。
NginxのSystemdサービスファイルを作成する
次に、Nginxサービスを管理するためのsystemdファイルを作成する必要があります。次のコマンドで作成できます:
nano /etc/systemd/system/nginx.service
次の行を追加します:
[Unit]
Description=The nginx server
After=network.target remote-fs.target nss-lookup.target

[Service]
Type=forking
PIDFile=/run/nginx.pid
ExecStartPre=/usr/bin/rm -f /run/nginx.pid
ExecStartPre=/usr/sbin/nginx -t
ExecStart=/usr/sbin/nginx
ExecReload=/bin/kill -s HUP $MAINPID
KillSignal=SIGQUIT
TimeoutStopSec=5
KillMode=mixed
PrivateTmp=true

[Install]
WantedBy=multi-user.target
>
終了したら、ファイルを保存して閉じます。次に、次のコマンドを使用してsystemdデーモンをリロードします。
systemctl daemon-reload
次に、次のコマンドを使用して、Nginxサービスを開始し、システムの再起動後に開始できるようにします。
systemctl start nginx
 systemctl enable --now nginx
次の出力が表示されます。
Created symlink /etc/systemd/system/multi-user.target.wants/nginx.service → /etc/systemd/system/nginx.service.
次に、次のコマンドを使用してNginxサービスを確認します。
systemctl status nginx
次の出力が表示されます。
? nginx.service - The nginx HTTP and reverse proxy server
   Loaded: loaded (/etc/systemd/system/nginx.service; enabled; vendor preset: disabled)
   Active: active (running) since Mon 2019-12-30 10:20:01 EST; 41s ago
  Process: 17730 ExecStart=/usr/sbin/nginx (code=exited, status=0/SUCCESS)
  Process: 17728 ExecStartPre=/usr/sbin/nginx -t (code=exited, status=0/SUCCESS)
  Process: 17727 ExecStartPre=/usr/bin/rm -f /run/nginx.pid (code=exited, status=0/SUCCESS)
 Main PID: 17732 (nginx)
    Tasks: 2 (limit: 6102)
   Memory: 5.0M
   CGroup: /system.slice/nginx.service
           ??17732 nginx: master process /usr/sbin/nginx
           ??17733 nginx: worker process

Dec 30 10:20:00 nginx systemd[1]: Starting The nginx HTTP and reverse proxy server...
Dec 30 10:20:00 nginx nginx[17728]: nginx: the configuration file /usr/local/nginx/conf/nginx.conf syntax is ok
Dec 30 10:20:00 nginx nginx[17728]: nginx: configuration file /usr/local/nginx/conf/nginx.conf test is successful
Dec 30 10:20:01 nginx systemd[1]: nginx.service: Failed to parse PID from file /run/nginx.pid: Invalid argument
Dec 30 10:20:01 nginx systemd[1]: Started The nginx HTTP and reverse proxy server.
この時点で、Nginxが起動して実行されています。これで、ModSecurityの構成に進むことができます。
デフォルトでは、ModSecurityは検出専用モードに設定されています。したがって、ModSecurityルールエンジンをオンにする必要があります。 modsecurity.confファイルを編集することでそれを行うことができます:
nano /usr/local/nginx/conf/modsecurity.conf
次の行を見つけます:
SecRuleEngine DetectionOnly
そして、それを次の行に置き換えます:
SecRuleEngine On
次の行も見つけてください:
/var/log/modsec_audit.log
そして、それを次の行に置き換えます:
/var/log/nginx/modsec_audit.log
終了したら、ファイルを保存して閉じます。
次に、次のコマンドを使用して、Gitリポジトリから最新バージョンのModSecurityコアルールセットをダウンロードします。
git clone https://github.com/SpiderLabs/owasp-modsecurity-crs.git /usr/local/nginx/conf/owasp-crs
ダウンロードしたら、次のコマンドを使用してCRSサンプル構成ファイルの名前を変更します。
mv /usr/local/nginx/conf/owasp-crs/crs-setup.conf.example /usr/local/nginx/conf/owasp-crs/crs-setup.conf
次に、ファイル/usr/local/nginx/conf/modsecurity.confを編集して、これらのルールを使用するようにModeSecurityを構成します。
nano /usr/local/nginx/conf/modsecurity.conf
ファイルの最後に次の行を追加します。
Include owasp-crs/crs-setup.conf
Include owasp-crs/rules/*.conf
終了したら、ファイルを保存して閉じます。次に、Nginxサービスを再起動して、変更を実装します。
systemctl restart nginx
これで、ModSecurityがインストールおよび構成されました。それが機能しているかどうかをテストする時が来ました。
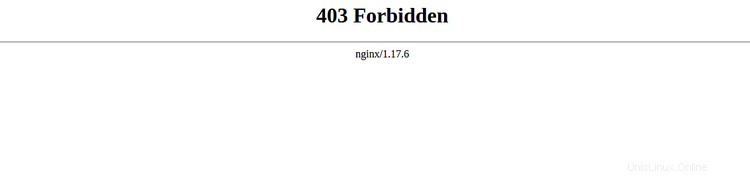
コマンドインジェクションに対してModSecurityをテストするには、Webブラウザーを開き、URL http://localhost/index.html?exec =/ bin/bashを入力します。次のページに403Forbiddenエラーが表示されるはずです:
CSS攻撃に対してModSecurityをテストするには、ターミナルを開いて次のコマンドを実行します。
curl http://localhost/?q="><script>alert(1)</script>"
次の出力が得られるはずです:
<html>
<head><title>403 Forbidden</title></head>
<body>
<center><h1>403 Forbidden</h1></center>
<hr><center>nginx/1.17.6</center>
</body>
</html>
おめでとう! Nginxを使用してLibModSecurityを正常にダウンロードしてコンパイルしました。これで、サーバーはさまざまな攻撃から保護されます。詳細については、ModSecurityDocのModSecurityドキュメントにアクセスしてください。