前回のチュートリアルでは、RedHatが提供するパッケージがActive Directoryをサポートしていないため、ソースからSambaをコンパイルしてCentos7でSambaを構成する方法を示しました。 samba4rpmにADサポートを提供するWingというリポジトリがあることに気づきました。このチュートリアルでは、このリポジトリをSambaのインストールに使用します。また、Samba共有を作成する方法も示します。
このチュートリアルでは、SELinuxを有効にしたベースとして、最小限のインストールでCentOS7サーバーを使用します。
CentOS7サーバーを準備します
SELinuxのステータスを確認してください。
[[email protected] ~]# sestatus
SELinux status:                 enabled
SELinuxfs mount:                /sys/fs/selinux
SELinux root directory:         /etc/selinux
Loaded policy name:             targeted
Current mode:                   enforcing
Mode from config file:          enforcing
Policy MLS status:              enabled
Policy deny_unknown status:     allowed
Max kernel policy version:      28
[[email protected] ~]#
ホストファイルに、サーバーのIPアドレス、完全な(fqdn)ホスト名、ホスト名のローカル部分の順にエントリを作成します。
[[email protected] ~]# cat /etc/hosts
127.0.0.1   localhost localhost.localdomain localhost4 localhost4.localdomain4
::1         localhost localhost.localdomain localhost6 localhost6.localdomain6
192.168.1.190   samba4.sunil.cc samba4
[[email protected] ~]#
EpelCentOSリポジトリをインストールします。
[[email protected] ~]# yum install epel-release -y
基本パッケージをインストールします。
[[email protected] ~]# yum install vim wget authconfig krb5-workstation -y
次に、ウィングリポジトリをインストールします。
[[email protected] ~]# cd /etc/yum.repos.d/
[[email protected] yum.repos.d]# wget http://wing-net.ddo.jp/wing/7/EL7.wing.repo
[[email protected] yum.repos.d]# sed -i '[email protected][email protected][email protected]' /etc/yum.repos.d/EL7.wing.repo
[[email protected] yum.repos.d]# yum clean all
Loaded plugins: fastestmirror
Cleaning repos: base extras updates wing wing-source
Cleaning up everything
Cleaning up list of fastest mirrors
[[email protected] yum.repos.d]#
CentOS7にSamba4をインストールする
yumを使用してwingリポジトリからSamba4パッケージをインストールします。
[[email protected] yum.repos.d]# yum install -y samba45 samba45-winbind-clients samba45-winbind samba45-client\
samba45-dc samba45-pidl samba45-python samba45-winbind-krb5-locator perl-Parse-Yapp\
perl-Test-Base python2-crypto samba45-common-tools
これらのファイルを削除してください。
[[email protected] ~]# rm -rf /etc/krb5.conf
[[email protected] ~]# rm -rf /etc/samba/smb.conf
Samba4の構成
次に、ドメインプロビジョニングを行います。
[[email protected] ~]# samba-tool domain provision --use-rfc2307 --interactive
 Realm [SUNIL.CC]:
 Domain [SUNIL]:
 Server Role (dc, member, standalone) [dc]:
 DNS backend (SAMBA_INTERNAL, BIND9_FLATFILE, BIND9_DLZ, NONE) [SAMBA_INTERNAL]:
 DNS forwarder IP address (write 'none' to disable forwarding) [4.2.2.1]:
Administrator password:
Retype password:
Looking up IPv4 addresses
Looking up IPv6 addresses
No IPv6 address will be assigned
Setting up secrets.ldb
Setting up the registry
Setting up the privileges database
Setting up idmap db
Setting up SAM db
Setting up sam.ldb partitions and settings
Setting up sam.ldb rootDSE
Pre-loading the Samba 4 and AD schema
Adding DomainDN: DC=sunil,DC=cc
Adding configuration container
Setting up sam.ldb schema
Setting up sam.ldb configuration data
Setting up display specifiers
Modifying display specifiers
Adding users container
Modifying users container
Adding computers container
Modifying computers container
Setting up sam.ldb data
Setting up well known security principals
Setting up sam.ldb users and groups
Setting up self join
Adding DNS accounts
Creating CN=MicrosoftDNS,CN=System,DC=sunil,DC=cc
Creating DomainDnsZones and ForestDnsZones partitions
Populating DomainDnsZones and ForestDnsZones partitions
Setting up sam.ldb rootDSE marking as synchronized
Fixing provision GUIDs
A Kerberos configuration suitable for Samba 4 has been generated at /var/lib/samba/private/krb5.conf
Setting up fake yp server settings
Once the above files are installed, your Samba4 server will be ready to use
Server Role:           active directory domain controller
Hostname:              samba4
NetBIOS Domain:        SUNIL
DNS Domain:            sunil.cc
DOMAIN SID:            S-1-5-21-1578983437-3114190590-2362936743
[[email protected] etc]#
ポートがファイアウォールで開かれていることを確認してください。
[[email protected] etc]#firewall-cmd --add-port=53/tcp --permanent;firewall-cmd --add-port=53/udp --permanent;firewall-cmd --add-port=88/tcp --permanent;firewall-cmd --add-port=88/udp --permanent; \
firewall-cmd --add-port=135/tcp --permanent;firewall-cmd --add-port=137-138/udp --permanent;firewall-cmd --add-port=139/tcp --permanent; \
firewall-cmd --add-port=389/tcp --permanent;firewall-cmd --add-port=389/udp --permanent;firewall-cmd --add-port=445/tcp --permanent; \
firewall-cmd --add-port=464/tcp --permanent;firewall-cmd --add-port=464/udp --permanent;firewall-cmd --add-port=636/tcp --permanent; \
firewall-cmd --add-port=1024-3500/tcp --permanent;firewall-cmd --add-port=3268-3269/tcp --permanent
[[email protected] ~]# firewall-cmd --reload
パッケージにはinitスクリプトが含まれていません。ここで追加します。
[[email protected] ~]# cat  /etc/systemd/system/samba.service
[Unit]
Description= Samba 4 Active Directory
After=syslog.target
After=network.target

[Service]
Type=forking
PIDFile=/var/run/samba.pid
ExecStart=/usr/sbin/samba

[Install]
WantedBy=multi-user.target
[[email protected] ~]#
[[email protected] ~]# systemctl enable samba
Created symlink from /etc/systemd/system/multi-user.target.wants/samba.service to /etc/systemd/system/samba.service.
[[email protected] ~]# systemctl restart samba
他のすべての手順は、以前の記事と同様です
WindowsおよびLinuxホストを構成するには、それを参照してください
ソースからのSamba4ドメインコントローラーのインストール
WindowsACLサポートを使用したSamba共有の作成
samba4の拡張ACLを設定する必要があります。グローバルの下のsmb.confファイルに以下を追加します。
[[email protected] ~]# cat /etc/samba/smb.conf
# Global parameters
[global]
        ------------
		-------------
        vfs objects = acl_xattr
        map acl inherit = yes
        store dos attributes = yes
		------------
		-------------

[[email protected] ~]#
次に、Sambaサービスを再起動します。
[[email protected] ~]# systemctl restart samba
共有権限を構成できるのは、SeDiskOperatorPrivilege権限が付与されているユーザーとグループのみです。
[[email protected] ~]# net rpc rights grant "SUNIL\Domain Admins" SeDiskOperatorPrivilege -U "USER\administrator"
Enter USER\administrator's password:
Successfully granted rights.
[[email protected] ~]#
>
共有を作成する前に、samba4サーバーがそれ自体で認証されていることを確認する必要があります。
wingの既存のパッケージがRedHatによって提供されるパッケージと競合するため、通常の方法を実行できません。ここではsssdを使用できません。これを機能させるためにwinbindを使用します。
以下の方法を使用してください。これは、特定の権限を持つSamba共有を作成するために必要です
以下のパッケージをインストールしてください。
[[email protected] ~]#yum -y install authconfig-gtk*
コマンドを実行します。
[[email protected] yum.repos.d]# authconfig-tui
winbindを選択し、次の手順に従ってください。
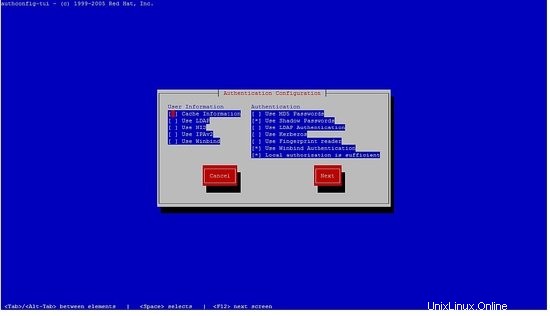
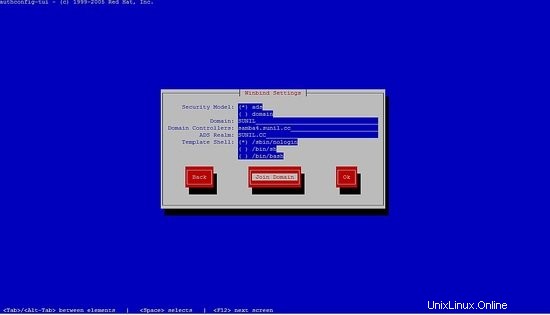
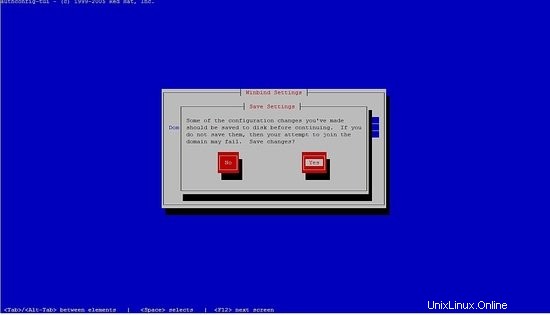
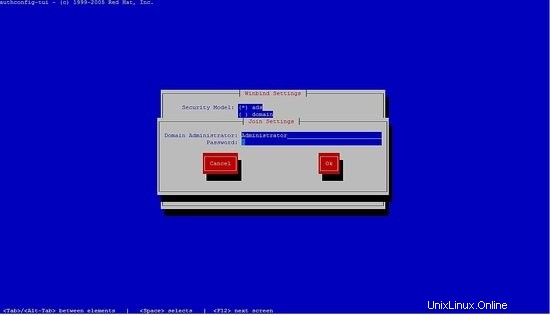
パスワードを入力することはできません。[OK]を押すだけです。
次に、/ etc / samba / smb.confの行をコメントアウトし、sambaサービスを再起動します。
構成は次のようになります。
[[email protected] ~]# cat /etc/samba/smb.conf
# Global parameters
[global]
#--authconfig--start-line--

# Generated by authconfig on 2017/05/26 17:23:04
# DO NOT EDIT THIS SECTION (delimited by --start-line--/--end-line--)
# Any modification may be deleted or altered by authconfig in future

#   workgroup = SUNIL
#   password server = samba4.sunil.cc
#   realm = SUNIL.CC
#   security = ads
#   idmap config * : range = 16777216-33554431
#   template shell = /sbin/nologin
#  kerberos method = secrets only
#   winbind use default domain = false
#   winbind offline logon = false

#--authconfig--end-line--
        netbios name = SAMBA4
        realm = SUNIL.CC
        workgroup = SUNIL
        dns forwarder = 4.2.2.1
        server role = active directory domain controller
        idmap_ldb:use rfc2307 = yes
        vfs objects = acl_xattr
        map acl inherit = yes
        store dos attributes = yes

[netlogon]
        path = /var/lib/samba/sysvol/sunil.cc/scripts
        read only = No

[sysvol]
        path = /var/lib/samba/sysvol
        read only = No
[[email protected] ~]#
[[email protected] ~]# systemctl restart samba
ユーザーとグループにデータを入力できるかどうかを確認します:
[[email protected] ~]# wbinfo -u
SUNIL\administrator
SUNIL\sambauser
SUNIL\testuser
SUNIL\krbtgt
SUNIL\guest
[[email protected] ~]# wbinfo -g
SUNIL\cert publishers
SUNIL\ras and ias servers
SUNIL\allowed rodc password replication group
SUNIL\denied rodc password replication group
SUNIL\dnsadmins
SUNIL\enterprise read-only domain controllers
SUNIL\domain admins
SUNIL\domain users
SUNIL\domain guests
SUNIL\domain computers
SUNIL\domain controllers
SUNIL\schema admins
SUNIL\enterprise admins
SUNIL\group policy creator owners
SUNIL\read-only domain controllers
SUNIL\dnsupdateproxy
[[email protected] ~]#
nsswitch.confの行を変更します:
[[email protected] ~]# cat /etc/nsswitch.conf
----------
---------
passwd:     files winbind
shadow:     files winbind
group:      files winbind
hosts:      files dns wins
services:   files winbind
netgroup:   files winbind

---------
----------
次に、idコマンドを使用してユーザー名を取得できるかどうかを確認します。
[[email protected] ~]# id testuser
uid=3000019(SUNIL\testuser) gid=100(users) groups=100(users),3000019(SUNIL\testuser),3000009(BUILTIN\users)
[[email protected] ~]#
Samba共有の作成
2つの共有を作成します。1つはテストユーザーのみがアクセスでき、もう1つはドメインユーザーグループのすべてのユーザーがアクセスできます。
testuserがアクセスできる共有はtestshareと呼ばれます。
すべてのユーザーがアクセスできる共有は、commonshareと呼ばれます。
[[email protected] ~]# mkdir /testshare
[[email protected] ~]# mkdir /commonshare
[[email protected] ~]# chmod 770 /testshare
[[email protected] ~]# chmod 770 /commonshare
[[email protected] ~]# chown -R root:testuser /testshare
[[email protected] ~]# chown -R root:"Domain Users" /commonshare
次に、smb.confにエントリを追加します
[[email protected] ~]# cat /etc/samba/smb.conf
# Global parameters
[global]
        netbios name = SAMBA4
        realm = SUNIL.CC
        workgroup = SUNIL
        dns forwarder = 4.2.2.1
        server role = active directory domain controller
        idmap_ldb:use rfc2307 = yes
        vfs objects = acl_xattr
        map acl inherit = yes
        store dos attributes = yes

[netlogon]
        path = /var/lib/samba/sysvol/sunil.cc/scripts
        read only = No

[sysvol]
        path = /var/lib/samba/sysvol
        read only = No
[TestShare]
        comment = Test share accessible by testuser
        path = /testshare
        valid users = SUNIL\testuser
        writable = yes
        read only = no
        force create mode = 0660
        create mask = 0770
        directory mask = 0770
        force directory mode = 0770
        access based share enum = yes
        hide unreadable = yes
[CommonShare]
         comment = Accessible by all the users
          path = /commonshare
          valid users = "@SUNIL\Domain Users"
          writable = yes
        read only = no
        force create mode = 0660
        create mask = 0777
        directory mask = 0777
        force directory mode = 0770
        access based share enum = yes
        hide unreadable = yes
[[email protected] ~]#
sambaサービスを再起動します。
[[email protected] ~]# systemctl restart samba
テストユーザーとしてSamba共有にアクセスします。
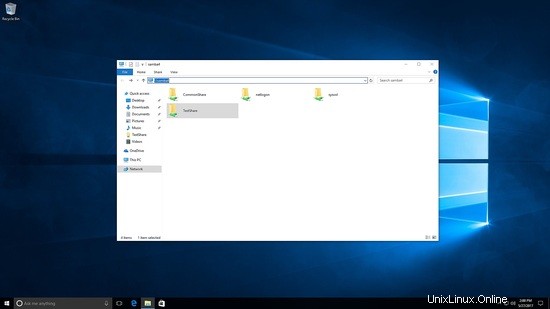
ここでは、testshareとcommonshareの両方が表示されます。
testshareの下でファイルとフォルダを作成することをテストしました。
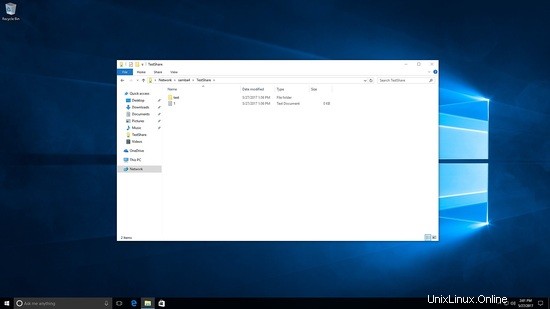
[[email protected] /]# cd /testshare/
[[email protected] testshare]# ls -l
total 8
-rwxrwx---+ 1 SUNIL\testuser users 0 May 27 22:56 1.txt
drwxrwx---+ 2 SUNIL\testuser users 6 May 27 22:56 test
[[email protected] testshare]#
現在、別のユーザーとしてログインしています。commonshareのみが表示されます:
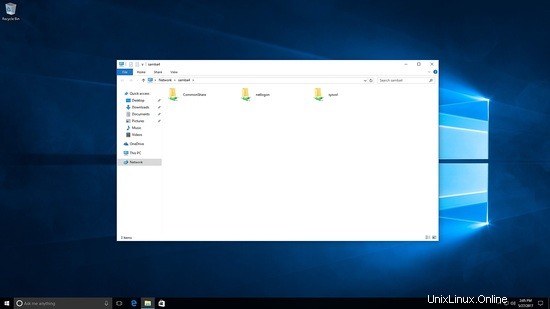
commonshareでファイルを作成しています。
[[email protected] commonshare]# ls -l
total 8
drwxrwxrwx+ 2 SUNIL\testuser  users 6 May 27 23:02 test
drwxrwxrwx+ 2 SUNIL\sambauser users 6 May 27 23:07 test2
[[email protected] commonshare]#
>
これが、Samba4で共有を作成する方法です。