HAProxyまたは高可用性プロキシは、オープンソースのTCPおよびHTTPロードバランサーおよびプロキシサーバーソフトウェアです。 HAProxyはCでWillyTarreauによって作成されており、SSL、圧縮、キープアライブ、カスタムログ形式、およびヘッダーの書き換えをサポートしています。 HAProxyは、メモリフットプリントが小さく、CPU使用率が低い、高速で軽量のプロキシサーバーおよびロードバランサーです。 Github、StackOverflow、Reddit、Tumblr、Twitterなどの大規模なサイトで使用されています。過去数年間で最も人気のあるソフトウェアロードバランサーおよびプロキシサーバーになりました。
このチュートリアルでは、RHEL 8 / CentOS 8でのHAProxyのインストールと構成について説明します。単一のサーバーにHAProxyをインストールしてから、他のサーバーにNginxWebサーバーをインストールします。 HAProxyは、NginxWebサーバーのロードバランサーとして機能します。
このチュートリアルでは、次のことを学びます。
- HAProxyのアーキテクチャと概念
- 名前解決のためにhostsファイルを構成する
- HAProxyのインストールと構成
- Nginxのインストールと構成
- 負荷分散機能のテスト
- HAProxyStatsURLにアクセスします
<中央>
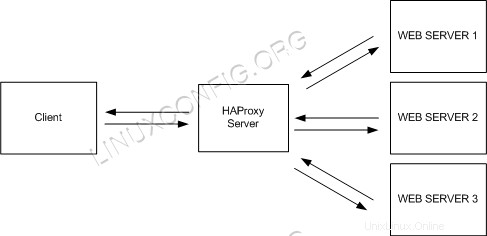 HAProxyアーキテクチャ。
使用されるソフトウェア要件と規則
| カテゴリ | 使用する要件、規則、またはソフトウェアバージョン |
|---|---|
| RHEL 8 / CentOS 8 | |
| HAProxy、Nginx | |
rootまたはsudoを介したLinuxシステムへの特権アクセス コマンド。 | |
# –指定されたLinuxコマンドは、rootユーザーとして直接、またはsudoを使用して、root権限で実行する必要があります。 コマンド$ –特定のLinuxコマンドを通常の非特権ユーザーとして実行する必要があります |
HAProxyのアーキテクチャと概念
HAProxyは、TCPモードのレイヤー4とHTTPモードのレイヤー7の2つのモードで実行できます。レイヤー4 TCPモードでは、HAProxyはRAWTCPパケットをクライアントからアプリケーションサーバーに転送します。レイヤー7HTTPモードでは、HAProxyはHTTPヘッダーを解析してからアプリケーションサーバーに転送します。このチュートリアルでは、レイヤー7HTTPモードをサポートするWebサーバーとしてNginxを使用します。
<中央>
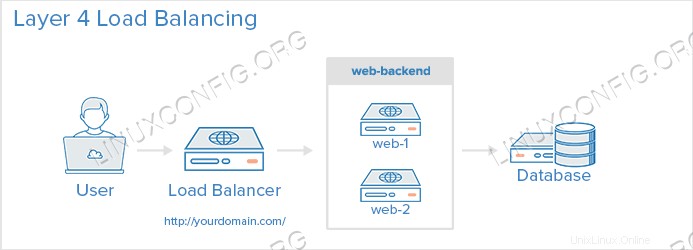 レイヤー4の負荷分散。
 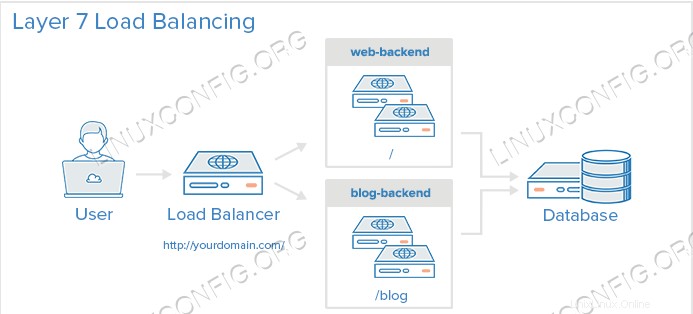 レイヤー7の負荷分散。
バランスアルゴリズムは、負荷分散を行うときにサーバーを選択するためにHAProxyによって使用されるアルゴリズムです。次のモードを使用できます。
ラウンドロビン
これは最も単純なバランスアルゴリズムです。新しい接続ごとに、次のバックエンドサーバーによって処理されます。リストの最後のバックエンドサーバーに到達すると、バックエンドリストの先頭から再起動します。
Leastconn
新しい接続は、接続数が最も少ないバックエンドサーバーによって処理されます。これは、リクエストの時間と負荷が大きく異なる場合に役立ちます。
出典
これはスティッキーセッション用です。クライアントIPはハッシュされ、このIPから最後のリクエストを受信したバックエンドサーバーを判別します。したがって、IP Aは常にバックエンド1によって処理され、IPBは常にbanckend2によって処理されてセッションを中断しません。
名前解決のためにhostsファイルを構成する
ロードバランサーサーバーにログインし、/etc/hostsを編集します ファイルとHAProxyロードバランサー、nginx1、nginx2ホスト名。同じファイルを他の2つのnginxノードにコピーし、pingコマンドを介してネットワーク接続を確認します。
# vim /etc/hosts
192.168.1.108 loadbalancer.example.com
192.168.1.104 nginx1.example.com
192.168.1.105 nginx2.example.com
HAProxyのインストールと設定
HAProxyはRHEL8/ CentOS 8リポジトリで利用できるため、ロードバランサーサーバーにログインし、このyumコマンドを使用してパッケージHAProxyをインストールします。
# yum install haproxy
正常にインストールされたら、以下のコマンドを使用してインストールを確認できます。
# yum info haproxy
# yum info haproxy
Updating Subscription Management repositories.
Updating Subscription Management repositories.
Last metadata expiration check: 0:06:03 ago on Sat 16 Mar 2019 11:40:24 PM +04.
Installed Packages
Name         : haproxy
Version      : 1.8.14
Release      : 1.el8
Arch         : x86_64
Size         : 4.1 M
Source       : haproxy-1.8.14-1.el8.src.rpm
Repo         : @System
From repo    : rhel-8-for-x86_64-appstream-beta-rpms
Summary      : HAProxy reverse proxy for high availability environments
URL          : http://www.haproxy.org/
License      : GPLv2+
Description  : HAProxy is a TCP/HTTP reverse proxy which is particularly suited for high
             : availability environments. Indeed, it can:
             :  - route HTTP requests depending on statically assigned cookies
             :  - spread load among several servers while assuring server persistence
             :    through the use of HTTP cookies
             :  - switch to backup servers in the event a main one fails
             :  - accept connections to special ports dedicated to service monitoring
             :  - stop accepting connections without breaking existing ones
             :  - add, modify, and delete HTTP headers in both directions
             :  - block requests matching particular patterns
             :  - report detailed status to authenticated users from a URI
             :    intercepted from the application
インストールが完了したら、/etc/haproxy/に移動します ディレクトリを作成し、元の構成ファイルをバックアップします。
# cd /etc/haproxy/
# cp haproxy.cfg haproxy.cfg.orig
次に、HAProxy構成ファイルhaproxy.cfgで以下の変更を行います。 いずれかのエディターで。
#---------------------------------------------------------------------
# Example configuration for a possible web application.  See the
# full configuration options online.
#
#   https://www.haproxy.org/download/1.8/doc/configuration.txt
#
#---------------------------------------------------------------------

#---------------------------------------------------------------------
# Global settings
#---------------------------------------------------------------------
global
    # to have these messages end up in /var/log/haproxy.log you will
    # need to:
    #
    # 1) configure syslog to accept network log events.  This is done
    #    by adding the '-r' option to the SYSLOGD_OPTIONS in
    #    /etc/sysconfig/syslog
    #
    # 2) configure local2 events to go to the /var/log/haproxy.log
    #   file. A line like the following can be added to
    #   /etc/sysconfig/syslog
    #
    #    local2.*                       /var/log/haproxy.log
    #
    log         127.0.0.1 local2

    chroot      /var/lib/haproxy
    pidfile     /var/run/haproxy.pid
    maxconn     4000
    user        haproxy
    group       haproxy
    daemon

    # turn on stats unix socket
    stats socket /var/lib/haproxy/stats

    # utilize system-wide crypto-policies
    ssl-default-bind-ciphers PROFILE=SYSTEM
    ssl-default-server-ciphers PROFILE=SYSTEM

#---------------------------------------------------------------------
# common defaults that all the 'listen' and 'backend' sections will
# use if not designated in their block
#---------------------------------------------------------------------
defaults
    mode                    http
    log                     global
    option                  httplog
    option                  dontlognull
    option http-server-close
    option forwardfor       except 127.0.0.0/8
    option                  redispatch
    retries                 3
    timeout http-request    10s
    timeout queue           1m
    timeout connect         10s
    timeout client          1m
    timeout server          1m
    timeout http-keep-alive 10s
    timeout check           10s
    maxconn                 3000
#---------------------------------------------------------------------
# HAProxy Monitoring Config
#---------------------------------------------------------------------
listen stats
    bind loadbalancer.example.com:8080            # HAProxy Monitoring run on port 8080
    mode http
    option forwardfor
    option httpclose
    stats enable
    stats show-legends
    stats refresh 5s
    stats uri /stats                         # URL for HAProxy monitoring
    stats realm Haproxy\ Statistics
    stats auth admin:admin                   # User and Password for login to the monitoring dashboard
    #stats admin if TRUE
    default_backend loadbalancer                 # This is optionally for monitoring backend
#---------------------------------------------------------------------
# main frontend which proxys to the backends
#---------------------------------------------------------------------
frontend loadbalancer
    bind loadbalancer.example.com:80
    #acl url_static       path_beg       -i /static /images /javascript /stylesheets
    #acl url_static       path_end       -i .jpg .gif .png .css .js

    #use_backend static          if url_static
    option http-server-close
    option forwardfor
    default_backend       loadbalancer

#---------------------------------------------------------------------
# static backend for serving up images, stylesheets and such
#---------------------------------------------------------------------
#backend static
#    balance     roundrobin
#    server      static 127.0.0.1:4331 check

#---------------------------------------------------------------------
# round robin balancing between the various backends
#---------------------------------------------------------------------
backend loadbalancer
    balance     roundrobin                                    # Balance algorithm
    option httpchk HEAD / HTTP/1.1\r\nHost:\ localhost        # Check the server application is up and healty - 200 status code
    server  nginx1.example.com 192.168.1.104:80 check         # NGINX Server1
    server  nginx2.example.com 192.168.1.105:80 check         # NGNIX Server2
この構成ファイルを保存して終了します。
次に、HAProxy統計をログに記録するようにrsyslogデーモンを構成します。 rsyslog.confを編集します UDPポート514をrsyslogで使用できるようにするファイル。 rsyslog構成ファイルを開き、行のコメントを解除してUDP接続を有効にします。
# vim /etc/rsyslog.conf
module(load="imudp") # needs to be done just once
input(type="imudp" port="514")
上記の変更を加えてファイルを保存し、終了します。次に、rsyslog用の新しいHAProxy構成ファイルを作成し、そのファイルに以下のエントリを追加します。
# cd /etc/rsyslog.d/
# vi haproxy.conf
local2.=info     /var/log/haproxy-access.log    # For Access Log
local2.notice    /var/log/haproxy-info.log      # For Service Info - Backend, loadbalancer
次に、rsyslogを再起動してから、HAProxyサービスを開始し、起動時に開始するHAProxyを追加します。
# systemctl restart rsyslog
# systemctl start haproxy
# systemctl enable haproxy
Nginxのインストールと構成
Nginxはすでに既存のRHEL8/ CentOS 8リポジトリの一部であり、次のコマンドでインストールできます。
# yum install nginx
インストールしたら、このコマンドを使用してインストールを確認できます。
# yum info nginx
# yum info nginx
Updating Subscription Management repositories.
Updating Subscription Management repositories.
Last metadata expiration check: 0:06:14 ago on Sat 16 Mar 2019 11:40:24 PM +04.
Installed Packages
Name         : nginx
Epoch        : 1
Version      : 1.14.0
Release      : 3.el8+1631+ba902cf0
Arch         : x86_64
Size         : 568 k
Source       : nginx-1.14.0-3.el8+1631+ba902cf0.src.rpm
Repo         : rhel-8-for-x86_64-appstream-beta-rpms
Summary      : A high performance web server and reverse proxy server
URL          : http://nginx.org/
License      : BSD
Description  : Nginx is a web server and a reverse proxy server for HTTP, SMTP, POP3 and
             : IMAP protocols, with a strong focus on high concurrency, performance and low
             : memory usage.
Nginxがインストールされたら、Webディレクトリに移動し、index.htmlを変更します。 それに応じてファイルします。 nginx1およびnginx2サーバーで以下の手順を実行していることを確認してください。
# cd /usr/share/nginx/html
# ls -lrth
total 20K
-rw-r--r--. 1 root root 2.8K Oct 31  2016 poweredby.png
-rw-r--r--. 1 root root  368 Oct 31  2016 nginx-logo.png
-rw-r--r--. 1 root root 3.7K Mar 16 20:39 50x.html
-rw-r--r--. 1 root root 3.6K Mar 16 20:39 404.html
-rw-r--r--. 1 root root 3.7K Mar 16 20:42 index.html
次に、起動時に起動するNginxを追加してから、以下のコマンドでデーモンを起動します。
# systemctl enable nginx
# systemctl start nginx
負荷分散機能のテスト
テストは、ロードバランサーIP 192.168.1.108(私の場合)を参照してアクセスすることで実行できます。1回目はNginx Node1に移動し、2回目はラウンドロビン方式でNginxNode2に移動します。
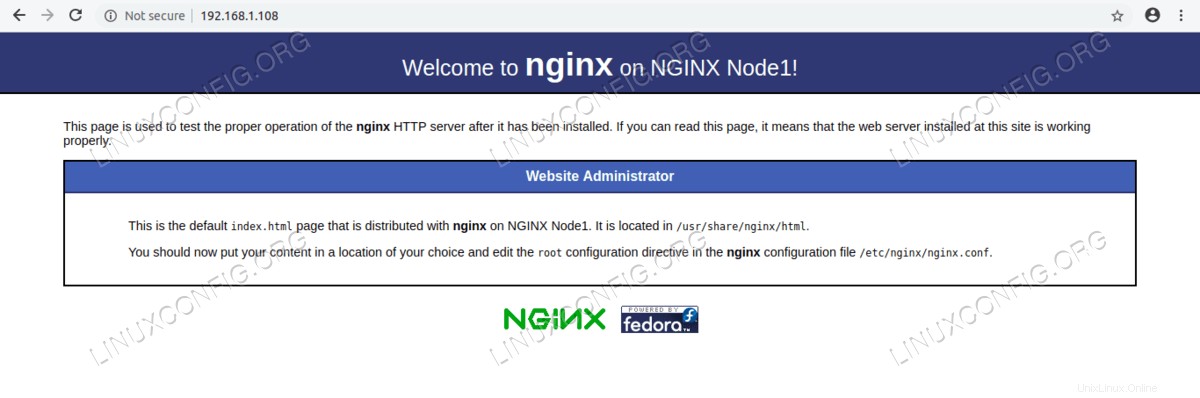 NGINXNode1のWebページ。
 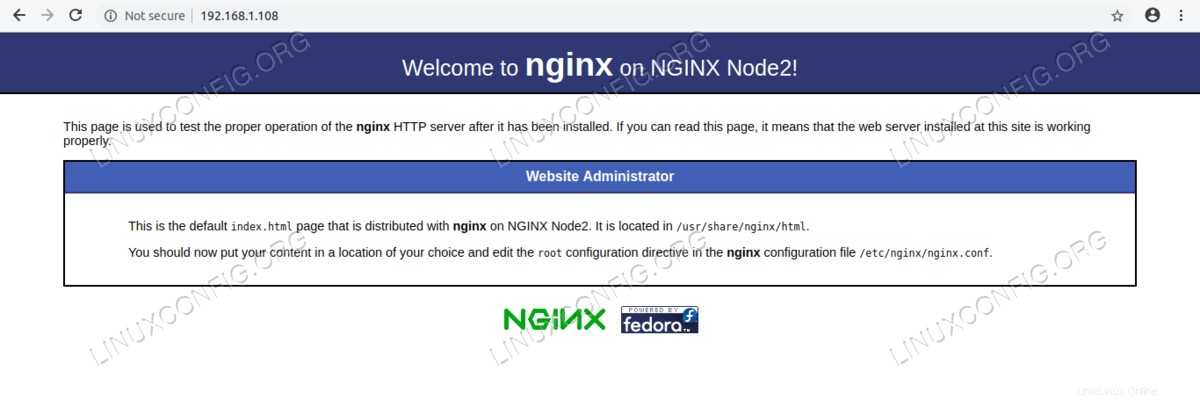 NGINXNode2のWebページ。
/var/log/haproxy-access.logを確認することもできます 負荷分散に関する詳細情報を取得します。
HAProxyStatsURLにアクセスする
haproxy.cfgで定義されたユーザー名とパスワードを使用して、ポート8080で実行されているHAProxy統計レポートのダッシュボードにアクセスします。 ファイル。
http://192.168.1.108:8080/stats
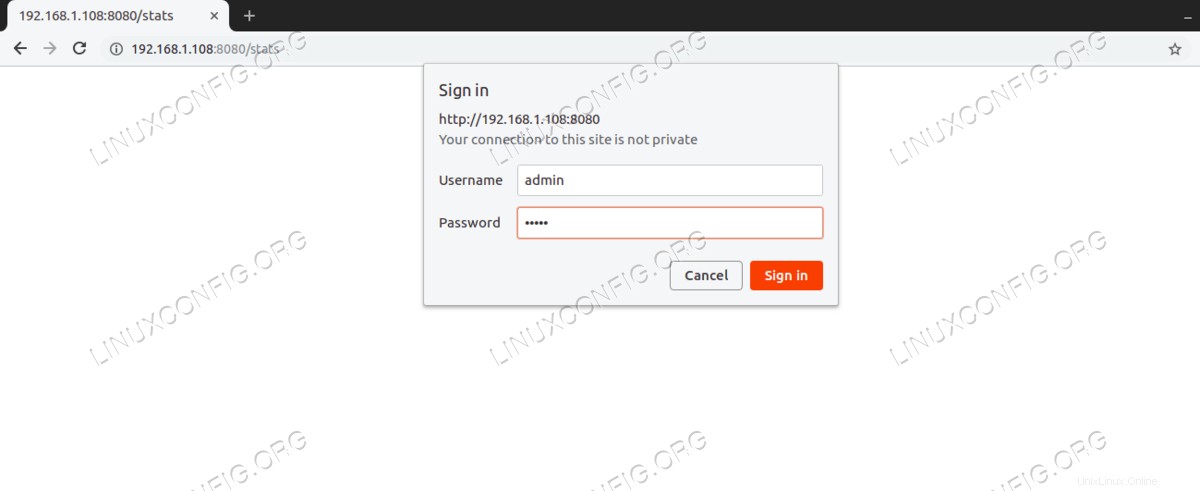 HAProxy統計URLにアクセスします。
 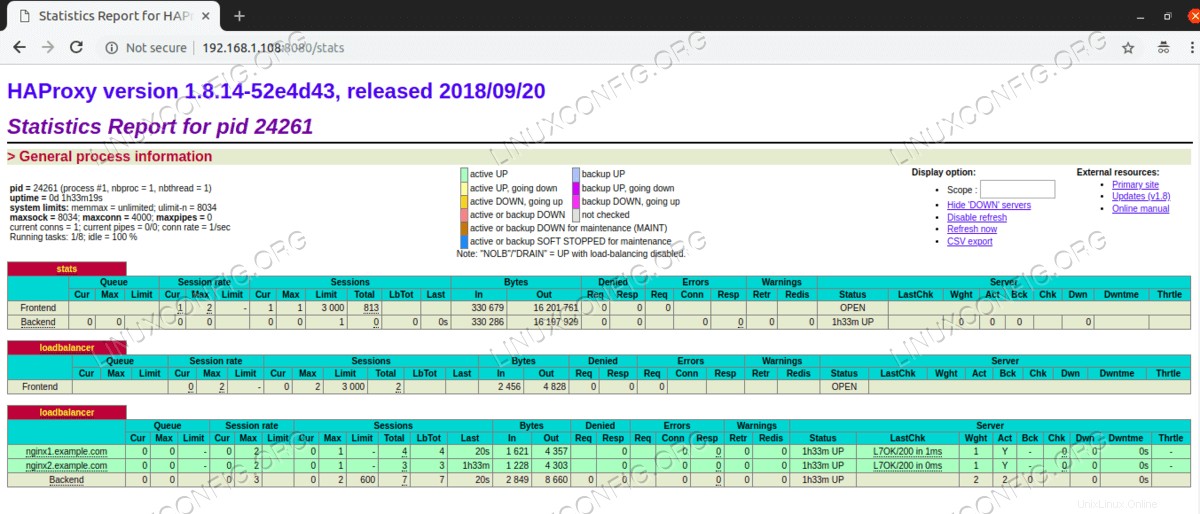 HAProxy統計ダッシュボード。
 HAProxyは正常に機能しており、2つのNginxWebサーバーのロードバランサーとして機能します。
結論
HAProxyまたは高可用性プロキシは、TCPベースのサービスに高可用性を提供するオープンソースソフトウェアであり、HTTPロードバランサーおよびプロキシサーバーとして動作します。このソフトウェアはCで記述されており、SSL、キープアライブ、および圧縮をサポートしています。 HAProxyは、メモリフットプリントが小さく、CPU使用率が低く、高速で軽量なロードバランサーとプロキシサーバーを必要とするすべての人に最適です。 Haproxyは、レイヤー4TCPモードとレイヤー7HTTPモードで実行できます。 Nginxは、HAProxyを使用したレイヤー7HTTPモードのみをサポートします。レイヤー4TCPモードを使用する場合は、Apacheなどの他のWebサーバーを使用できます。 RHEL 8 / CentOS 8 Linuxでは、HAProxyはデフォルトのリポジトリで利用できます。インストールと構成は簡単です。