このページでは、電子メールの基本的な概要を説明し、続いてSendmailメールサーバーについて説明します。 そしてそれを設定するためのWebminモジュール。
Sendmail構成モジュール
Sendmailは、今日インターネットで使用されている最も人気のあるMTAであり、最初に開発されて以来使用されています。これは、Unixオペレーティングシステムのほぼすべてのバリアントに標準で含まれており、それらすべてで同じように機能します。エイリアス、ドメインルーティング、ユーザーが作成可能な転送ファイルなど、電子メールのルーティングと処理に役立つ多くの機能があります。
Sendmailには、Unixユーザーとメールボックスの間の1対1のマッピングがあります。各ユーザーは、通常/ var/mailまたは/var/ spool/mailディレクトリに独自のメールファイルを持っています。メッセージがユーザーに配信されるたびに、そのディレクトリ内のユーザーと同じ名前(/ var / mail / jcameronなど)でファイルに追加されます。 Sendmailには「メールユーザー」の概念はありません。新しいメールボックスを作成する場合は、ユーザーとグループで説明されているように、新しいUnixユーザーを追加する必要があります。
Sendmailは、SMTP接続から、または適切なパラメーターを指定してsendmailコマンドを呼び出し、入力として電子メールをフィードする別のプログラムのいずれかによって、2つの異なる方法で電子メールを受け入れることができます。いずれの場合も、メッセージはローカルユーザーのメールボックスに配信されるか、別のシステムに送信されます。ご想像のとおり、Sendmailサーバープロセスが実行されていない場合、SMTP経由でシステムに電子メールを送信することはできません。また、キューに入れられた電子メールは配信されません。
Sendmailのプライマリ設定ファイルは適切にsendmail.cfという名前で、/etcまたは/etc/mailディレクトリにあります。さらに、ローカルドメイン、メール転送エイリアス、アドレスマッピング、およびこの章で後述するその他の機能用に、個別のテキストファイルとDBM形式のファイルがあります。これらの追加ファイルのほとんどすべては、実際にはUnix DBMデータベース形式ですが、システム管理者(およびWebmin)が編集できる対応するテキストファイルから構築されています。ただし、SendmailはDBMファイルのみを読み取り、受信したすべてのメッセージについてそれらを再チェックして、データベースファイルの1つへの変更がすぐにアクティブになるようにします。
Webminを使用してSendmailをセットアップするには、サーバーカテゴリの下にあるSendmail構成モジュールにアクセスする必要があります。サーバーがインストールされているとすると、モジュールのメインページは次の例のようになります。
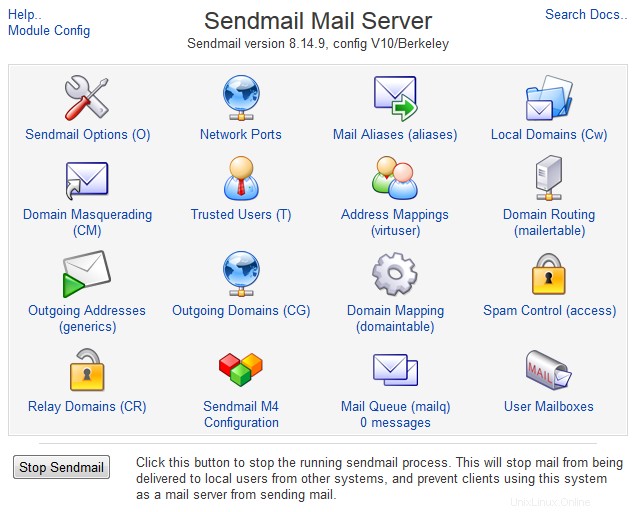 SendmailMailServerのメイン画面
 モジュールがシステム上でSendmailサーバープログラムまたはプライマリ構成ファイルを見つけることができない場合、その旨のエラーメッセージが代わりに表示されます。 LinuxディストリビューションCDまたはWebサイトでsendmailパッケージを確認し、ソフトウェアパッケージモジュールを使用してインストールします。名前がsendmail-で始まる他のパッケージ(sendmail-cfやsendmail-docsなど)が利用できる場合は、それらもインストールします。
このエラーは、Sendmailまたはその構成ファイルをモジュールが予期する場所とは異なる場所にインストールしたという万が一の場合にも発生する可能性があります。デフォルトでは、オペレーティングシステムに付属のパッケージを使用することを前提としていますが、これらは多くの場合、古くなっています。このため、最新バージョンをコンパイルして別のディレクトリにインストールした可能性があります。その場合は、Sendmail構成モジュールの構成を参照してください。 プログラムと構成ファイルのパスを変更する方法については、以下のセクションを参照してください。
Sendmailは何年にもわたってさまざまなリリースを経ており、その間にプライマリ構成ファイル(通常は/etc/sendmail.cfにあります)が変更されました。非常に古いバージョンを実行している場合、または古い構成ファイルを使用している場合、モジュールのメインページに、ファイル形式がサポートされていないことを示すエラーメッセージが表示されます。バージョン7より古い構成はこのエラーを引き起こしますが、幸いなことに、最近のUnixシステムではめったに見つかりません。
メインページにエラーメッセージが表示されない場合は、上の画像に示されているアイコンの表が表示されます。それぞれをクリックして、メールエイリアシング、ドメインルーティング、メールキューなどのSendmailの機能の1つにアクセスできます。この章の残りの部分では、各アイコンの下にあるページとフォームの使用方法について説明します。各アイコンの名前の横(アドレスマッピングなど) )は、virtuserなど、制御する括弧内のSendmail構成機能の内部名です。これらの名前は、モジュール内のアイコンが実際の構成ファイルおよびディレクティブにどのように関連しているかを知りたい経験豊富な管理者にとって主に役立ちます。
一部のアイコンをクリックすると、* Sendmail構成でアドレスマッピング(virtuser)機能が有効になっていない*などのメッセージが表示される場合があります。多くのオペレーティングシステムでは、プライマリSendmail構成ファイルには、デフォルトでアクティブ化されているすべての使用可能な機能が含まれていません。選択したアイコンのページを利用できるようにするには、この章で後述する「M4でのSendmail機能の追加」セクションの手順に従ってください。
Sendmailサーバープロセスが実行されている場合は、 Stop Sendmailというラベルの付いたボタン メインページの下部に表示されます。その名前が示すように、このボタンをクリックするとサーバーがシャットダウンされ、システムはSMTP接続を受け入れなくなり、メールキューをスキャンしなくなります。逆に、Sendmailが StartSendmailを実行していない場合 代わりにボタンが表示され、サーバープロセスを開始するために使用できます。
Sendmailを常に実行する場合は、Bootup and Shutdownモジュールを使用して、起動時にサーバープロセスを開始します。ほとんどのパッケージには、有効にできるアクションスクリプトが含まれており、デフォルトで有効になっている場合もあります。それ以外の場合は、起動時にコマンド/ usr / sbin / sendmail-bd-q30mを実行するアクションを作成する必要があります。
ローカルドメインの編集とドメインのマスカレード
SendmailがSMTP接続を介して電子メールメッセージを受信する場合、それをローカルに配信するか、別のサーバーに転送するかを判断する必要があります。これは、メッセージの宛先アドレス、具体的には@の後のドメイン部分を調べることによって行われます。ドメインはローカルドメインのリストと比較され、一致するものが見つかった場合、電子メールは宛先アドレスの@の左側にある名前のユーザーのメールボックスに配信されます。または、そのようなユーザーが存在しない場合は、バウンスメッセージが生成され、元の送信者に返送されます。
ドメインがローカルでない場合、Sendmailはドメインのメールサーバーを検索し、メッセージを転送するためにドメインへの接続を試みます。これは、同じネットワーク上のクライアントが電子メールを送信するために接続するときに通常発生することです。ただし、Sendmailがそれ自体に接続しようとすると問題が発生します。これは、DNSがローカルドメインリストにないドメインのメールサーバーであると言った場合に発生する可能性があります。これが発生した場合、メールループのようなテキストを含むバウンスメッセージが送信者に返送されます。
デフォルトでは、このローカルドメインリストには、 server.example.comなどのシステムの完全なホスト名のみが含まれます。 。一部のドメイン( example.com など)のインターネットから電子メールを受信するようにサーバーを設定している場合 )、リストに追加する必要があります。これを行う手順は次のとおりです。
- モジュールのメインページで、ローカルドメインをクリックします アイコン。現在のすべてのローカルドメインが一覧表示されているテキストボックスを含むページが表示されます。
- 1行に1つずつ、必要な数のドメインまたはホスト名をリストに追加します。サーバーが複数のドメインのメールを受け入れる可能性は十分にあります。特に、仮想ホスティングに使用される場合はそうです。はじめに説明したように、メールは、ドメインごとに適切なMX DNSレコードが存在する場合にのみ、最初にシステムに送信されます。
- 保存をクリックします ページの下部にあるボタンをクリックして、それらをアクティブにします。
Sendmailは、宛先アドレスにドメインが含まれておらず、ユーザー名のみが含まれているローカル配信の電子メールメッセージを常に受け入れます。これらは、Cronデーモンやメールコマンドなど、システム自体で実行されているプログラムによって送信されることがよくあります。
ローカルドメインリストの裏側は、ドメインマスカレードです。このSendmail機能を使用すると、mailコマンドなどで何も指定されていない場合に、システムから送信される電子メールに追加されるドメインを設定できます。メールクライアントから送信されるメッセージなど、SMTP経由で受信するメッセージの差出人アドレスドメインをSendmailに変更させることもできます。
ドメインマスカレードを設定するには、次の手順に従います。
- モジュールのメインページで、ドメインマスカレードをクリックします。 アイコン。
- ドメインとしてのマスカレードに入力します example.com など、ドメイン名がない発信元アドレスに追加する必要があるドメイン名のフィールド 。このフィールドを空白のままにすると、Sendmailによるドメインの変更は行われません。
- Sendmailに他のドメインからのメッセージの差出人アドレスを書き換えさせるには、マスカレードするドメインに入力します 分野。これは、サーバーを介してメッセージを送信する一部のメールクライアントが間違ったドメインの使用を主張する場合に役立ちます。
- 保存をクリックします マスカレードをアクティブにするボタン。
ほとんどのメールサーバーでは、すべてのメールがSMTPを使用してクライアントプログラムによって送信されるため、マスカレードを設定する必要はありません。すべてのメールクライアントでは、ユーザーが完全な差出人アドレスを指定できます。これには、正しいドメインが含まれている必要があります。
メールエイリアスの管理
メールエイリアスは、サーバーが特定のメールボックスに対して受信した電子メールを、代わりに別の宛先に転送する必要があることを指定します。その宛先は、別の電子メールアドレス、アドレスのファイル、ローカルファイル、またはプログラムへの入力である可能性があります。これらは、 sales@example.comなどの実際の人に実際に電子メールを送信する疑似メールボックスを設定するのに役立ちます。 またはwebmaster@example.com 。エイリアスはUnixユーザーと同じ名前を持つことができます。その場合、エイリアスはそのユーザーへのすべてのメールを傍受し、代わりに別の宛先に転送します。
ほとんどのオペレーティングシステムでは、Sendmailには、bin、nobody、uucpなどのシステムユーザー用にデフォルトで定義されたいくつかのエイリアスがあり、これらはすべてメールをrootに転送します。また、すべてのメールサーバーに必要なポストマスターエイリアスがあり、メールサーバーの責任者にメッセージを転送する必要があります。通常、これはrootユーザーにもなります。
Webminを使用して独自のメールエイリアスを作成するには、次の手順に従います。
- モジュールのメインページで、メールエイリアスをクリックします アイコン。既存のすべてのエイリアスとその宛先を一覧表示するページが表示され、上部に新しいエイリアスを追加するためのフォームが表示されます。以下のスクリーンショットは例を示しています。
- 住所 エイリアスの作成のフィールド フォームに、このエイリアスのユーザー名またはメールボックス名(@の左側のアドレスの部分)を入力します。サーバーが複数のドメインをホストしている場合、エイリアスはそれらのドメインのいずれかで入力された名前に送信された電子メールを転送します。たとえば、サーバーが foo.comのメールを受け入れる場合 およびbar.com 、次に salesというエイリアス メールを両方のsales@foo.comに転送します およびsales@bar.com 。複数のドメインで同じメールボックス名を異なる方法で転送できるようにする場合は、以下の「仮想アドレスマッピングの管理」というタイトルのセクションを参照してください。
- このエイリアスをSendmailで実際に使用したい場合は、有効のままにしますか? フィールドをはいに設定 。 いいえに変更します エイリアスは無視されます。このフィールドは、エイリアスを完全に削除するのではなく、一時的に無効にするためにエイリアスを編集するときに使用できます。
- エイリアス フィールドは、このエイリアスへの電子メールの送信先を決定します。メニューから次のオプションを使用できます。
- <なし>
- 受信したメールには何もしません。新しいエイリアスを作成するときにこのオプションを選択しても意味がありません。
- メールアドレス
- 電子メールは、隣接するフィールドに入力されたユーザーまたはアドレスに転送されます。エイリアスのアドレスに再度メールを送信して転送ループを設定しないように注意してください。 Unixユーザーと同じ名前のエイリアスを作成していて、メールをそのメールボックスやその他の宛先に配信したい場合は、ユーザー名の前に円記号を付けて入力します( \ jcameron > )このフィールドに。バックスラッシュは、Sendmailにエイリアスチェックをバイパスするように指示します。
- ファイル内のアドレス
- エイリアスへの電子メールは、隣接するテキストフィールドにファイルパスが入力されているテキストファイル内のすべてのアドレスに送信されます。各アドレスは別々の行にある必要があります。このオプションは、単純なメーリングリストを作成する場合に役立ちます。このタイプのエイリアスは、Majordomoリストマネージャー(MajordomoListManagerでカバーされています)によって使用されます。
- ファイルに書き込む
- エイリアスが受信した電子メールのすべてのヘッダーを含む全文が、パスがテキストボックスに入力されたファイルに追加されます。
- プログラムへのフィード
- パスとパラメータがテキストボックスに入力されたプログラムが実行され、エイリアスが受信した電子メールのすべてのヘッダーを含む全文が入力としてプログラムに送られます。この種のエイリアスは、独自のカスタム処理または電子メールメッセージのフィルタリングを実行したいプログラマーにとって最も便利です。プログラムは通常、rootまたはエイリアスと同じ名前のユーザーではなく、Unixユーザーデーモンとして実行されます。
- ファイルからの自動返信
- エイリアスにメールが送信されると、隣接するテキストボックスで指定されたファイルの内容が元の送信者に返送されます。このタイプのエイリアスの使用の詳細については、以下の「自動返信エイリアスの作成」セクションを参照してください。
- フィルターファイルを適用する
- エイリアスに送信された電子メールは、テキストボックスに入力されたフィルターファイルのルールに従って処理され、メッセージの内容に応じてさまざまな宛先に転送できます。詳細については、この章で後述する「フィルターエイリアスの作成」セクションを参照してください。エイリアスが複数の宛先を持つ可能性があります。複数追加するには、保存後にこのエイリアスを再編集し、行に
を入力する必要があります。 エイリアスの下部で選択 テーブル。
- 保存をクリックします エイリアスをリストに追加し、すぐにアクティブにします。

メールエイリアスリスト
Webminで通常行われているように、[メールエイリアス]ページのリストで名前をクリックすると、既存のエイリアスを編集できます。これにより、作成フォームと同じフィールドがすべて含まれているが、保存がある編集フォームが表示されます。 および削除 代わりに下部のボタン。これらの最初のものは、行った変更でエイリアスを更新し、2番目のものは完全に削除します。
Unixユーザーのホームディレクトリに.forwardという名前のファイルがある場合、通常はそのメールファイルに配信される電子メールは、代わりに.forwardファイルにリストされているアドレスに送信されます。多くの点で、これらのファイルは、システム管理者ではなく個々のユーザーが作成できるエイリアスと同等です。 .forwardファイルに、Sendmailに別のファイルのアドレスのリストに電子メールを送信したり、入力としてプログラムにフィードしたり、ファイルに追加したりするように指示するエントリを含めることもできます。
ただし、このモジュールは.forwardファイルの編集をサポートしていません。ただし、Usermainを使用すると、通常のユーザーは、このセクションで説明されているものとほぼ同じWebベースのインターフェイスを使用して自分の転送ファイルを編集できます。
リレーの構成
インターネットの初期には、メールサーバーはメールをローカルドメインに安全に配信し、他のすべてのメールをその送信元に関係なく別のMTAに転送することができました。現在、サーバーが受信した電子メールを転送できるようにすることは、スパマーがシステムをリレーとして使用するように誘うものです。適切に構成されたサーバーは、会社のネットワークやホームLAN上のホストなど、信頼できるクライアントホストからの非ローカルドメインの電子メールのみを受け入れる必要があります。ローカルドメインに送信される電子メールは安全であり、どこからでも受け入れることができます。
システム上のSendmailがオープンリレー(どこからでもローカル以外の電子メールを受け入れるリレー)である場合、何百万ものスパム電子メールメッセージを送信する人々はそれを使用して自分のトラックをカバーできます。スパマーが知らないと思う小さな会社のために小さなメールサーバーを実行している場合でも、システムをリレーに開放したままにしておくことは非常に悪い考えです。
このため、最新のLinuxディストリビューションに付属するSendmailパッケージは、サーバーが同じシステム以外の場所からの非ローカル電子メールを受け入れないようにデフォルトで構成されています。会社または自宅のLAN用にメールサーバーを設定する場合は、他のホストにもメールの中継を許可する必要があります。
- モジュールのメインページで、リレードメインをクリックします リレーネットワークとドメインを入力するためのフォームを表示するアイコン。
- 中継先のドメイン [許可]フィールドに、クライアントにリレーを許可するネットワークのアドレスを追加します。 192.168.1 のように、末尾にゼロを付けずに入力する必要があります。 。特定のIPアドレスと同様に、複数のネットワークに入ることができます。 foo.comのようなドメイン名を入力することもできます そのSendmailはへの中継を許可します。指定されたドメイン宛てに受信された電子メールメッセージ(送信元に関係なく)は、適切なサーバーに配信されます。これは、*ドメインルーティングの構成*セクションで説明されているように、システムがインターネットの他の部分から直接アクセスできない他のドメインのメールゲートウェイである場合に役立ちます。
- 保存をクリックします ボタンをクリックして、新しいリレードメインリストをアクティブにします。
Sendmailの中継制限の1つの副作用は、信頼できないネットワークから接続しているときに、システムを送信メールのサーバーとして使用する方法がないことです。実際、それが要点です。たとえば、多くの異なるISPにダイヤルインし、それぞれに異なる送信メールサーバーを使用するようにメールクライアントを再構成したくない場合など、煩わしい場合があります。理想的な世界では、どこから接続していても、送信メールに独自のメールサーバーを使用することは可能ですが、これは通常、リレー制限を完全にオフにしないと不可能です。
この問題の最善の解決策はSMTP認証です。この認証では、クライアントは電子メールを中継する前にSendmailにログインします。残念ながら、Webminにはまだこれを設定する簡単な方法がありません。もう1つの解決策は、SMTPの前にPOP3接続を確立するクライアントを信頼することです。これはほとんどのメールクライアントプログラムが行います。ただし、これには、通常は無関係のプログラムであるPOP3サーバーとSendmailの間の連携が必要です。執筆時点では、Webminはその構成もサポートしていません。
仮想アドレスマッピングの管理
アドレスマッピングはエイリアスに似ていますが、エイリアスのように任意のドメインのユーザーに適用されるのではなく、特定のユーザーとドメインに送信される電子メールにのみ適用される点が異なります。もう1つの違いは、アドレスマッピングは、プログラム、ファイル、またはアドレスのリストではなく、単一のアドレスにのみ電子メールを転送できることです。ただし、この制限は、マッピングとエイリアスの両方を組み合わせることで克服できます。
アドレスマッピングを使用して、 sales@foo.comにメールを送信できます。 およびsales@bar.com 両方のドメインがサーバーによってホストされている場合でも、異なる最終宛先に送信されます。これは、さまざまな顧客の多数の電子メールドメインを管理している場合に特に役立ちます。顧客の多くは、同様のアドレス( sales など)を持ちたいと考えています。 )ドメイン内。
アドレスマッピングを使用して、特定のドメインへのすべての電子メールを別のドメインの同じユーザーにリダイレクトすることもできます。たとえば、 bob@foo.comにメールを送信できます。 およびfred@foo.com bob@bar.comに送信されます およびfred@bar.com それぞれ。さらに良いことに、ドメイン内の任意のアドレス宛てのすべての電子メールを他の1つのアドレスに送信できます。これは、POP3メールクライアントのFetchmail Mail Retrievalに役立ちます。新しいアドレスマッピングを作成するには、次の手順に従います。
- モジュールのメインページで、アドレスマッピングをクリックします アイコン。既存のすべてのマッピングを一覧表示するページが表示され、上部にマッピングの作成というラベルの付いたフォームが表示されます。 新しいものを追加するため。
- 単一のアドレスへの電子メールのマッピングを作成する場合は、アドレスを選択します メール フィールドに入力し、隣接するテキストボックスにアドレスを入力します。エイリアスとは異なり、 fred@example.comのように完全に入力する必要があります 。ドメインへのすべてのメールのマッピングを作成する場合は、ドメインを選択します オプションを選択し、 example.comなどの横にあるテキストフィールドに完全なドメインまたはホスト名を入力します 。いずれの場合も、アドレス内のドメインまたは入力したドメインは、ローカルドメインの編集で説明されているSendmailのローカルドメインのリストに表示される必要があります この章の前半のセクション。
- マッピングの宛先が単一のアドレスの場合、送信先で フィールド選択アドレス 横にあるテキストボックスに完全なアドレス( jcameron@foo.com など)を入力します )またはメールボックス名( jcameron など) )。 ドメインの場合 Mail forに選ばれました フィールドで、ドメインを選択できます このフィールドのオプションもあります。その場合は、ドメイン名を入力する必要があります( foo.com など)。 )元のドメインに送信されるすべての電子メールが転送される隣接するテキストボックスに。最後のリターンエラー 送信先のオプション 代わりに特定のエラーメッセージを送信者に返す場合は、フィールドを選択できます。選択した場合は、その横のメニューからエラータイプを選択し、より詳細なエラーメッセージをテキストボックスに入力する必要があります。このオプションは、特定のアドレスまたはドメイン全体に到達できなくなった理由を説明するバウンスメッセージを送り返す場合に役立ちます。
- 作成をクリックします ボタンをクリックして、フォームの下に表示されているリストにアドレスマッピングを追加します。すぐにアクティブになります。
エイリアスと同様に、リスト内のアドレスをクリックして、既存のマッピングを編集または削除できます。これにより、マッピングの作成に使用したものと同じフォームが表示されますが、保存が使用されます。 および削除 下部にあるボタン。
ドメインとそのドメイン内のアドレスの両方にマッピングが存在する場合、Sendmailは2番目をその特定のアドレスへの電子メールに使用し、1番目をドメイン内の他のメールボックスへの電子メールに使用します。実際には、より具体的なアドレスマッピングが、より一般的なアドレスマッピングよりも優先されます。 [アドレスマッピング]ページのリストでの順序はまったく関係ありません。
電子メールをプログラム、ファイル、またはアドレスのリストに転送するマッピングを作成する場合は、エイリアスも作成する必要があります。アドレスマッピングはエイリアスに電子メールを送信し、エイリアスはそれを実際の宛先に転送します。通常、エイリアスには、 jcameron-example-com など、アドレスマッピングに関連する名前を付ける必要があります。 仮想アドレスjcameron@webmin.comのマッピング用 。
多くのドメインとユーザーがいるシステムでは、2人が bob@foo.comなどの異なるドメインで同じメールボックス名を使用したいと思う可能性が非常に高くなります。 およびbob@bar.com 。 Sendmailは最終的にはUnixユーザーのメールファイルにのみ電子メールを配信し、2人のUnixユーザーが同じ名前を持つことはできないため、これは問題になる可能性があります。通常の解決策は、 bob-fooのような名前のユーザーを作成することです。 およびボブバー 、および電子メールを転送するための適切なアドレスマッピングを設定します。唯一の欠点は、ユーザーがPOP3サーバーに bob-fooとしてログインする必要があることです。 またはボブバー bobだけでなく 。
ドメインルーティングの構成
Sendmailのドメインルーティング機能を使用して、特定のドメインのすべての電子メールを別のサーバーに転送できます。 DNSが、あるドメインの電子メールをシステムに送信するように設定されている場合に最も役立ちます。その後、DNSは、インターネットの他の部分から到達できない別のMTAに転送されます。ルーティングを使用して、Sendmailが電子メールの送信先のホストを特定する通常の方法をオーバーライドすることもできます。これは、接続が不完全なネットワークや一部のDNS情報がすべてのホストで利用できないネットワークで便利です。
新しいドメインルーティングルールを追加するには、次の手順に従います。
- モジュールのメインページで、ドメインルーティングをクリックします。 アイコン。既存のルーティング(存在する場合)を一覧表示するページが表示されます。その上に、新しいルーティングを追加するためのフォームがあります。
- 特定のドメインまたはホストのみにメールを送信するには、ホストを選択します Mail forのオプション フィールドに入力し、隣接するフィールドにドメインまたはホスト名を入力します。または、ドメイン内のすべてのホストのメールをルーティングする場合は、ドメインを選択します 代わりに、そのフィールドにドメイン名を入力してください。ドメインexample.comに対するこの種のルーティング ドメイン内のアドレス( jcameron@example.com など)への電子メール送信には影響しません )、ただしドメイン内のホスト( jcameron@foo.example.com など)のアドレスにのみメールを送信します )。通常、これはあなたが望むものではありません。入力するドメインまたはホスト名は、リレーの設定で説明されているように、Sendmailがリレーを許可するリストに含まれている必要があります この章の前半のセクション。
- 配信から メニューで、 SMTPを選択します 。このフィールドは、ドメインの電子メールをルーティングするときに使用するプロトコルをSendmailに指示します。他のオプションのほとんどは、もうほとんど使用されていないUUCPに関連しているため、役に立ちません。
- 送信先 フィールドに、メールの転送先となるシステムのホスト名を入力します。 SMTP配信用のMXを無視する Sendmailが正しい宛先を決定するために別のDNSルックアップを試みるのではなく、常にこのホストに直接配信するように、ボックスもチェックする必要があります。
- 作成を押します ボタンをクリックして、新しいドメインルーティングを追加してアクティブにします。小さな間違い(ドメインの選択など)として、実際に機能していることを確認するためにテストする必要があります ホストの代わりに )ルートが機能しない可能性があります。
モジュール内の他の同様のページと同様に、既存のルーティングルールは、[ドメインルーティング]ページのリストにあるドメイン名をクリックすることで編集または削除できます。ただし、エイリアスの場合のように、ルールを一時的に無効にする方法はありません。
Sendmailは、特定のドメインに電子メールを送信するだけでなく、すべての非ローカル電子メールを特定のサーバーに転送するように構成することもできます。これは、システムを実際の宛先サーバーに接続するのではなく、会社またはISPに電子メールを渡す中央メールサーバーがある場合に役立ちます。次のセクションでは、これを設定する方法について説明します。
グローバルSendmailオプションの編集
グローバルオプションは、最大メッセージサイズ、電子メールを再試行する日数、負荷平均制限、送信メールサーバーなどを制御します。以下の手順は、最も便利なもののいくつかを編集する方法を説明しています。
- モジュールのメインページで、Sendmailオプションをクリックします アイコン。グローバルオプションを編集するためのフォーム(以下に表示)が表示されます。
- ホスト経由で送信メールを送信する場合 フィールドが*直接配信*に設定されている場合、Sendmailは正しいメールサーバーで非ローカルメッセージを検索し、それに接続してメールを配信します。ただし、2番目のオプションを選択し、テキストボックスにホスト名を入力すると、ローカルユーザー宛てのメッセージを除くすべてのメッセージが代わりにそのホストに送信されます。通常、これはISPまたは会社のネットワーク上の中央メールサーバーになります。アドレスにドメインルーティングルールが存在する場合、このフィールドで使用されているサーバーセットよりも優先されます。
- 配信モード フィールドは、Sendmailが着信メッセージを処理する方法を制御します。利用可能なオプションは次のとおりです。背景 または*デフォルト*このモードでは、電子メールはクライアントからすぐに受け入れられ、別のバックグラウンドプロセスによって宛先に配信されます。これは通常あなたが望むものです。 *キューのみ*または*延期*これらのモードのいずれかを選択すると、Sendmailは受信メッセージをメールキューに追加するだけです。キューが明示的にフラッシュされた場合にのみ、キューは宛先に送信されます。これは、システムが常にインターネットに接続されているとは限らない場合、またはサーバーがメッセージを送信するタイミングを明示的に制御する場合に役立ちます。これらのモードのいずれかでメッセージを受信すると、Sendmailは送信元アドレスまたは宛先アドレスの検証を実行しません。そうしないと、システムがネットワークから切断された場合に問題が発生します。 *インタラクティブ*このモードはバックグラウンドに似ていますが、電子メールがクライアントからそれを受け入れるのと同じプロセスによって配信される点が異なります。これは、Sendmailがメッセージを次のサーバーまたは宛先サーバーに転送するまでクライアントが待機する必要があることを意味します。これには時間がかかる場合があります。ただし、Sendmailが開始する必要のあるプロセスの数は削減されます。
- SMTPポートオプション フィールドを使用して、SendmailがSMTP接続をリッスンするTCPポートを設定できます。入力できる実際の値は非常に複雑になる可能性がありますが、システムが標準のSMTPポートのどこからでも接続を受け入れるようにする場合は、Name=MTAと入力する必要があります。一部のオペレーティングシステムでは、これはデフォルトではなく、Sendmailはローカルホストからの接続のみを受け入れます。
- 送信の最大負荷平均 フィールドを使用して、Sendmailがメッセージを送信しない負荷平均を設定できます。負荷平均は、第11章で説明されているように、現時点でシステムで実行されているプロセス数の概算です。このオプションと次のオプションは、Sendmailがシステムで使用できるCPU時間を制限するのに役立ちます。 、後者の方が便利ですが。 デフォルトの場合 を選択すると、負荷平均がいくらであっても、サーバーは引き続きメールキューを処理し、メッセージを送信します。
- Sendmailが新しいメッセージを受け入れなくなる負荷平均を設定するには、受信の最大負荷平均の値を入力します 分野。このレベルに達すると、サーバーは、負荷が再び下に下がるまでSMTPポートを閉じます。通常、入力するものはすべて、送信の最大負荷平均に設定された制限よりも低くする必要があります フィールド。これにより、負荷が高い場合でもメールキューが処理されます。 デフォルトの場合 が選択されている場合、Sendmailは平均負荷に関係なく新しい接続を受け入れます。
- あきらめるまでの時間 フィールドは、Sendmailがバウンスメッセージを送信者に返す前に、接続できないリモートサーバーに電子メールを送信しようとする時間を指定します。入力する値は、数値の後にdが続く日数、またはhが時間数である必要があります。システムがデフォルトの5日より長くインターネットから切断される可能性があり、キュー内のメッセージが返送されないようにする場合にのみ、変更する必要があります。
- 同様の警告を送信するまでの時間 フィールドは、Sendmailが元の送信者に警告を送信する前にメッセージをキューに保持する時間を指定します。システムが特定のドメインのセカンダリメールサーバーである場合、またはネットワークから切断されることが多い場合は、前のフィールドと同じ時間に増やす必要があります。
- Sendmailが致命的またはダブルバウンスメッセージを送信するアドレスを変更するには、[*エラーメッセージの送信先*]フィールドに新しいアドレスを入力します。 ポストマスターの場合 を選択すると、代わりにPostmasterメールボックスに送信されます。これは通常rootのエイリアスです。
- To limit the amount of disk space that Sendmail will use up for queued messages, fill in the Min free disk space 分野。 If the number of free blocks drops below this level, new incoming messages will no longer be accepted. The exact size of a block depends on the type of filesystem in use, but they are typically
- kB or 512 bytes in size.
- To stop large messages being sent via your mail server, fill in the Max message size 分野。 Any email larger than the number of bytes entered will be rejected when it is received. If you have a slow network connection and un-trusted client users, this option can be useful to save on bandwidth.
- Finally, click Save and Apply to save the new global options. Webmin will automatically re-start Sendmail for you to activate them.

The Sendmail options page
Viewing the mail queue
When Sendmail receives a message, it is placed into the mail queue. If it can be send to its destination immediately, then it will be removed from the queue almost at once - however, if some temporary error occurs when ending then it will remain queued for later processing. The Sendmail server process makes periodic checks of messages in the queue, re-trying each one at longer and longer intervals. Finally after a message has been in the queue for too long (usually 5 days), it will be removed and a bounce email sent back to the original sender.
Most messages that are in the queue for a long time are there because the destination mail server is down or unreachable. Another common cause is a temporary error reported by the remote MTA, such as a lack of disk space. Webmin allows you to view messages in the queue and even delete them by following these steps :
- On the module's main page, click on the Mail Queue icon to go to a page listing the details of queued messages. The number of emails in the queue is displayed below the icon, so that you can see how long it is at a glance.
- On the mail queue page the ID, sender, destination, subject and size of all queued messages are displayed in a table. In the final column is the current status, which indicates what Sendmail is trying to do with the message at the moment. Sending will appear when Sendmail is trying to connect to the remote server, and Deferred will be shown along with a reason when a connection has been tried and failed. If the queue contains more than 20 messages, only the first 20 will be displayed. To page through the rest, use the left and right arrow buttons that appear above the list.
- To view the actual contents of an email, click on its ID in the queue listing. All headers, the text body and any attachments will be displayed. To view an attachment, just click on its icon. To remove just this message from the queue, hit the Delete ページ下部のボタン。 If the email is locked because it is currently being sent, Webmin will display an error message along with a button labelled Force deletion anyway that you can click to override the lock. This may cause the message to be only partially sent though, and so is not recommended.
- To remove multiple messages from the queue, first select them using checkboxes next to their IDs and the Select all and Invert selection links on the queue list page. Then click the Delete selected messages button to get rid of those that you have chosen. To override any locks on the selected emails, check the Even if locked box first. After you hit the Delete button, a page listing the ID and deletion result of each chosen message will be displayed. Deletion can fail if the message is no longer in the queue, or if it is currently locked.
Even though Sendmail will re-try messages in the queue automatically, you can force it to attempt delivery of all queued messages immediately using Webmin. This can be useful if you have a dial-up Internet connection and have queued up several emails while disconnected. The steps to flush the queue are:
- On the module's main page, click on the Mail Queue icon to bring a list of queued messages.
- As long as the queue is not empty, a button labelled *Flush Mail Queue* will be visible at the bottom of the page. Click it begin immediate processing of all waiting messages.
- A page showing the output from Sendmail as it attempts to deliver queued email will be displayed. If you have a large queue containing messages for down remote servers, it may take a long time to completely appear.
ユーザーのメールを読む
As the introduction explains, Sendmail stores messages received by users in files in the /var/mail or /var/spool/mail directory. These are read and emptied by the POP3 server, command-line mail clients like pine or elm, or web-based mail clients like Usermin. However, this Webmin module can also act as a simple mail client, allowing you the system administrator to read any user's email.
This feature is useful for deleting large messages is user mailboxes that would otherwise take a long time to download over a dialup POP3 connection. It also allows you to read email for system users such as root without needing to telnet in or run a separate mail client. More controversially, on a multi-user system you can even invade people's privacy by reading their personal email - assuming they have not downloaded and deleted it via POP3 yet.
The steps to check the contents of a user's mailbox are:
- On the module's main page, click on the User Mailboxes icon. A page listing all of the users on your system and the sizes of their mailboxes will be displayed, unless you have more than 200 users. In that case, a small form for entering a username will appear instead.
- Click on the name of a user to bring up a list of messages in his mailbox, an example of which is shown in Figure 37-4. By default, the most recent messages are shown first, even though they are actually at the end of the actual mail file. If the mailbox contains more than 20 emails, only the first 20 will be displayed. To page though the rest, use the left and right arrow buttons above the list.
- To view an actual message, click on the sender's name in the From 桁。 A page showing the important headers, body text and attachments will appear. Click on an attachment icon to view it, assuming that the data type is supported by your browser or some external program. To remove just this email from the user's mailbox, click the Delete ページ下部のボタン。 This can take quite some time if the mailbox is extremely large (over 10 MB) or contains lots of messages, as Webmin needs to re-write the entire mail file.
- To delete multiple messages, first select them using the checkboxes and Select all and Invert selection links on the mail list page. Then click the Delete button above or below the list - once again, this can take a while for large mailboxes.
- To search the user's mailbox for messages matching some criteria, use the Find messages where form below the list. The following types of search can be selected from the menu :From:matches , Subject:matches , To:matches or Cc:matches Finds messages in which the From, Subject, To or Cc field contains the text entered into the adjacent text box. The comparison is case-insensitive, but regular expression characters cannot be used. Date:matches Finds messages in which the sending date header contains the entered text. This header will not be converted to local format, so whatever you enter must match the date format used by the sender. Body matches Finds messages whose body contains the entered text. The body includes all attachments in their un-encoded form, not just the text that is shown when you read an email. *Size is greater than* Finds messages whose total size is greater than the number of bytes entered into the adjacent field. For each of the above search types, an inverse type is also available, such as From:doesn't match or *Size is less than*. After choosing your search type and entering text to match, hit the Search ボタン。 A page listing all matching messages will be displayed, from which you can view the contents of emails or select some or all to delete, just like in the normal mail list.

The contents of a user's mailbox
The mail reading section of the module actually allows you to compose new messages and reply to or forward existing ones. In fact, it can be used as a full-featured email client, although it is not the best program for the job. The default From address for sent messages is determined from the mailbox user's name and the system hostname, but this can be changed on the module access control page on a per-Webmin user basis. It is even possible to create Webmin users who can use this module to read only their own mailbox and send email from only their address. However, you should really use a program like Usermin if you want to give the same mail-reading web interface to a large number of users on your system.
By default, the module assumes that that mail for each user will be stored in a file with the user's name in the /var/mail or /var/spool/mail directory. It is possible to configure Sendmail to use a different file path instead though, such as the mbox file in each user's home directory. If this is the case on your system, you will need to re-configure the module, as explained in the section Sendmail Configuration モジュール。 Otherwise all the mailbox will show up empty, because Webmin is looking in the wrong place for them.
Adding Sendmail features with M4
The primary Sendmail configuration file sendmail.cf is extremely complex, and almost impossible to edit manually. Fortunately, it is usually built from a series of M4 macro files that are much simpler and can be modified using this module or by manual editing. M4, for those who have not heard of it before, is a program that parses text files and expands macros in them. These macros can include other text files, define variables and functions or exclude text based on certain conditions. M4 is very similar to the pre-processor used by the C programming language which handles #include and #define statements. Fortunately, this module hides most of the complex details from you.
Often, the default Sendmail configuration that comes with your operating system will not have some features enabled, such as address mapping or domain routing. Webmin can detect this, and will display an error message if you try to use a module page for a Sendmail feature that is not enabled in the primary configuration file. To turn on a missing feature, an entry must be added to the primary M4 configuration file, from which sendmail.cf is re-built. Then Sendmail will be able to use it, and this module will be able to configure it.
Before you can manage your Sendmail M4 configuration, this module must know where to find the M4 files. To check if it has the correct paths and to set them if not, follow these steps:
- On the module's main page, click on the Sendmail M4 Configuration icon.
- If an error message like *The Sendmail M4 configuration file /etc/sendmail.mc was not found* or The locations of the Sendmail M4 base directory and M4 config* files have not been set* is displayed, then module cannot find the M4 files. However, if a table of entries from the file is displayed instead then everything is configured OK and you can skip the rest of these steps.
- If you are running Linux, check your distribution CD or website to make sure that all the packages whose names start with sendmail are installed. Sometimes the M4 files are in a separate package named something like sendmail-cf. If you do find and install such as package, go back to step 1 and check again to see if the module has found the configuration files.
- If you are using the Sendmail package that came with your version of Unix and cannot find any M4 files on your system, then this feature of the module cannot be used. This is unfortunately the case on some operating systems.
Once the Sendmail M4 Configuration page displays the contents of your primary M4 file, you can use it to add new features such as address mapping or domain routing. The page can in fact be used to modify any of the M4 macros in the file, but unless you are any experienced Sendmail administrator it is best to stick to these instructions for adding features:
- From the menu next to the Add new entry of type button at the bottom of the page, select Feature and then hit the button to go to the feature creation form.
- Select the one that you want to add from the Feature メニュー。 The most commonly used features have names next to them in brackets that correspond to their icons on the module's main page.
- In the Parameters field, enter hash -o followed by the path that should be used for the feature's text and DBM files. For example, if adding a virtusertable feature you should enter hash -o /etc/mail/virtusertable (assuming your system has an /etc/mail directory).
- Login to your system as root via SSH, telnet or at the console and create the empty text file with a command like touch /etc/mail/virtusertable. Naturally, this is not necessary if it already exists.
- 作成をクリックします button to update the M4 file and be returned to the previous page.
- At the very bottom of the M4 file contents list, click the *Rebuild Sendmail Configuration* button. A confirmation page showing the exact changes that will be made to your sendmail.cf file will be displayed - typically they will be limited to directives for the new feature. If the confirmation form indicates that a huge number of lines are going to be changed, it is likely that the M4 file being edited was not originally used to built your current sendmail.cf file, and so should not be used in future.
- To go ahead and use the newly rebuilt Sendmail configuration, click the Yes, replace it now ボタン。 Your sendmail.cf file will be updated and the server process re-started to immediately activate it.
- Go back to the module's main page, and click on the icon for the feature that you have just enabled. You will not be able to add and edit address mappings or whatever it was that you added support for.
As you can see from looking at the existing M4 file entries, editing or adding to it can still be quite complex. For this reason, the book does not cover all of the possible features or other macro types that you can add. However, for most people the defaults will work just fine - at most, all you should need to do is add a feature or two as explained above. If you want to learn more about editing the M4 configuration, you should buy a book dedicated to Sendmail administration.
One problem with using the M4 page to re-build your Sendmail configuration is that any changes that have been made directly to sendmail.cf will be overwritten. The module's Sendmail Options page unfortunately does precisely this, so if you follow the instructions above to add a new feature any changes made on that page will be lost! The only real solution is to edit the entries in the M4 file that correspond to those on the Sendmail Options page - for example, the Send outgoing mail via host field is set by the SMART_HOST define.
Creating autoreply aliases
The Sendmail Configuration module lets you easily create an alias that triggers an automatic reply to anyone who sends email to it. When you do this, Webmin creates a simple script that is run from the alias and receives the contents of email sent to it as input, just like a command specified using the Feed to program alias type.
To set up an autoreply alias, follow these steps:
- On the module's main page, click on the Mail Aliases icon.
- In the Create Alias form, enter a name for the alias and select Autoreply from file from the type menu. The name can be that of an existing Unix user if you want to set up an automatic reply to any message send to him, for example if he is on holidays.
- In the field next to the type menu, enter the path to a file that will contain the autoreply message, such as /home/someuser/autoreply.txt 。 The file does not have to exist yet.
- 作成をクリックします button to add the alias, and then click on its name in the list to edit again.
- Follow the Edit link next to the autoreply filename field. This will bring up a page containing a large text box for entering the contents of the reply message.
- After entering the text that you want sent back to any sender, click Save at the bottom of the page. The autoreply alias is now fully active.
The reply text can contain several special macros that start with $, such as $SUBJECT, $TO, $FROM, $DATE and $BODY. When the reply is sent, these will be replaced with the original message's subject, destination address, sender address, sending date or body respectively. Be careful using the $BODY macro though, as it will be replaced with the entire un-encoded contents of the email being replied to.
You can also add to or override the headers used in the reply message by starting the autoreply text with one or more lines in standard SMTP header format, followed by a blank line. For example, to set the subject of the automatic reply you could enter _Subject:This is an automatic reply_ at the top of the text box, with an empty line after it.
One problem with Webmin's autoreply script is its inability to reliably determine the From address to use when sending the reply. Normally this is just taken from the To address of the original message, but this is not possible when replying to a message that was sent to multiple people. Even though the code attempts to find the right address automatically, it can sometimes get the wrong one and send an automatic reply that appears to be from the wrong person. For this reason, you should include a header line like From:Jamie Cameron
If you are setting up an automatic reply alias for a Unix user, it is usually a good idea to have a copy of all email sent to the user stored in his mailbox as well. To do this, re-edit the alias and select Email address from the second type menu. Then enter the user's name preceded by a backslash into the text field next to it (like \jcameron ) and hit Save 。
Creating filter aliases
Sendmail aliases normally forward email messages to their destinations regardless of their content. However, it is possible to use this Webmin module to create an alias that forwards to different addresses or files depending on the headers or body of a message send to it. When you create an alias like this, the module internally creates a script that is passed the contents of email to the alias as input, just like a command specified using the Feed to program alias type.
A filter consists of a series of rules, each of which has a condition and action. The condition specifies a header to check and text to check if the header contains, while the action specifies an address to forward to or a file to append the message to. When a message is received by the filter, it is checked against the rules in order until one that matches is found and its action performed. At the end of the list is a default action, which determines where to forward email that does not match any of the conditions.
Compared to other mail filtering or classification programs like Procmail Mail Filter and SpamAssassin Mail Filter, Webmin's filters are limited in their functionality and flexibility. However, they are easy to create and require no additional software. To create one, the steps to follow are:
- On the module's main page, click on the Mail Aliases icon.
- In the Create Alias form, enter a name for the alias and select Apply filter file from the type menu. The alias name can be that of an existing Unix user if you want to filter his email before delivery.
- In the field next to the type menu, enter the path to a file that will contain the filter rules, such as /home/someuser/filter.rules 。 Because the file format is fairly complex, you should not enter the name of any existing file unless it was created by following these same steps.
- 作成をクリックします button to add the alias, and then click on its name in the list to edit again.
- Follow the Edit link next to the filter rules file field. This will take you to the form shown in Figure 37-5, which contains a table of empty rows for entering new rules and a text field for the default action address.
- In the first row, select the header that you want to filter on from the menu next to If the 。 Or to check the entire un-decoded email body, select body from the list instead. To have the action performed if some text is found in the header or body, select matches from the second menu. Alternately, to perform the action only when some text is not found, choose *doesn't match* instead. In the field next to this menu, enter the text that the filter should check the header or body for. The comparison will always be case-insensitive, and Perl regular expression characters like [, ., + and * can be used. In the *then forward to* field, enter the email address or mailbox name to which messages matching the condition that you specified will be sent. It is also possible to enter an absolute file path like /home/someuser/mail/somefolder to which email will be appended instead. This could be another user's mail file, or a mail folder - however, it must be writable by the Unix user daemon that Sendmail runs as.
- To enter another rule, fill in the second blank row by repeating the instructions in the previous step again. Only five empty rows are displayed, but you can create more than five rules by saving and re-editing the filter file.
- In the Otherwise forward to field at the bottom of the table, enter an address or filename to which messages that do no match any of the rules will be sent or appended. If this is left blank, unmatched email will be thrown away!
- Finally, click the Save button to activate the new filter rules. To make sure they are really working, you should send a few text messages to the alias and check that they are delivered correctly.

The filter creation form
To have email forwarded to multiple addresses by a single rule or the default action, just enter them separated by commas into one of the forward to 田畑。 Or enter the name of another alias as the destination, which can then send messages to multiple files, addresses and/or programs.
When creating a filter alias with the same name as a Unix user, it is often useful to specify that messages matching some rule be delivered to the user's normal mailbox. However, just entering the user's name as the destination would be a big mistake, as this would trigger an endless loop through the filter! Instead, you should prepend a backslash to the username, like \jcameron 。 As with aliases, this tells Sendmail to ignore any aliases for this mailbox.
Because it can often be difficult to work out what a filter alias is doing and why it is doing it, the filter script creates a log file in the same directory as the rules file. The log has the same name as the filter file, but with .log appended. Every message received by the alias and delivered to some destination by the filter causes a line to be added to the log, containing the date, time, sender, destination and rule matched. The log file will only be created if the directory or log itself is writable by the daemon user though.
モジュールアクセス制御
The Sendmail Configuration module probably has the most powerful access control features of any module in Webmin. You can use them to limit the aliases and virtual addresses a Webmin user can edit, or restrict him to reading only the mailboxes of certain Unix users. These features are most useful in a virtual hosting environment, where customers own email domains and the user accounts. On this kind of system, you can create one Webmin user per customer who can only manage the address mappings, aliases and mailboxes for his own domains, while not being able to use other features of the module or touch other customers' information.
Once you have created a Webmin user who has access to the module (as explained in WebminUsers), follow these steps to restrict what he can do:
- In the Webmin Users module, click on Sendmail Configuration next to the name of the user that you want to restrict.
- モジュール構成を編集できますか?を変更します いいえへのフィールド , so that he cannot modify paths to Sendmail programs and files.
- Set all of the Yes/No fields in the second section to No , which will prevent the user from seeing most of the module's icons.
- Select No from the Can manage mail queue? menu, or *View only* if you just want the module user to be able to see the contents of the queue. Selecting Yes would be a bad idea, as it would allow him to delete queued email belonging to other domains.
- For the Address mappings this user can edit field, select the Matching option and enter a Perl regular expression for allowable mapping sources into the text field next to it. For example, to let him create and edit mappings in the domains foo.com and example.com , you should enter (@foo.com|@bar.com)$.
- It is safe to select all of the checkboxes in the *Address mapping types this user can edit* field.
- To limit the number of mappings that the user can create, select the second radio button in the *Maximum number of address mappings* field and enter a number into the box next to it. This can be useful for preventing a single customer from more address mappings than he has paid for.
- In the Aliases this user can edit field, select Matching and enter a regular expression that only lets him modify or create aliases starting with the customer's domain names. For example, if the user owns the domains foo.com and example.com you should enter ^(foo|example)- to limit him to aliases like foo-jcameron or example-fred 。 This naming convention ensures that users cannot step on each others' aliases.
- In the Alias types this user can edit field, de-select the checkboxes for types of aliases that the Webmin user should not be allowed to create. Good candidates to deny access to are Write to file , Feed to program , Autoreply and *Filter file*, as they use the permissions of the Sendmail daemon user and thus may be a security risk.
- To limit the number of aliases that the customer can create, select the second radio button in the Maximum number of aliases field and enter the maximum into the box next to it.
- To stop the Webmin user creating aliases that run programs, append to files or use address files outside a certain directory, enter it into the Limit files and program to directory 分野。 Unfortunately, this can be subverted by the clever use of symbolic links and so is not a very strong security measure.
- In the Outgoing addresses this user can edit field, select Matching and enter the same regular expression as in the Address mappings this user can edit 分野。 This will limit the user to re-writing addresses for only his own domains. Or to prevent the editing of outgoing addresses at all, select None - in most cases, there is no need for a Sendmail administrator to edit them anyway.
- In the Users whose mail can be read field, select one of the last five options to limit the customer to only those Unix users who belong to him. If he has been given limited access to the Users and Groups module as well, then you should allow him to read the email of the same users that he can create an edit in that module.
- Leave the rest of the fields on the form set to their defaults - they are only really useful if you are setting up the module as a web- based mail reading interface. Although this is possible, there are much better alternatives such as Usermin.
- 保存をクリックします button to make the restrictions for the user active.
Even though it is possible to configure this module to limit a user to certain domains, the module's interface is not particularly friendly compared to products like Plesk or Cpanel. These are web-based virtual server management interfaces that have been designed from the ground up for that purpose, unlike Webmin which was design to allow the management of everything on a system.
Configuring the Sendmail Configuration module
The Module Config link on the main page takes you to a form seen in many other modules for editing settings that apply to the operation of the module itself. Those listed under Configurable options relate to its user interface, while those under System configuration define the paths to the Sendmail programs and files.
Settings in the latter group do not usually need to be changed, as by default they are set to match the Sendmail package supplied with your operating system. However, if you have compiled and installed the MTA yourself from the source code, then it is quite possible that they will be incorrect.
コンテンツ
関連項目
- Introduction to Internet Mail