SambaWindowsファイル共有 このページでは、SMBプロトコル( CIFS と呼ばれることが多い)について説明しています。 -Windowsシステムがファイルを共有するための一般的なインターネットファイルシステム)、および Sambaの設定方法を説明します Unixサーバー上のファイルをWindowsクライアントで利用できるようにするプログラム。
Sambaの紹介があります。
SambaWindowsファイル共有モジュール
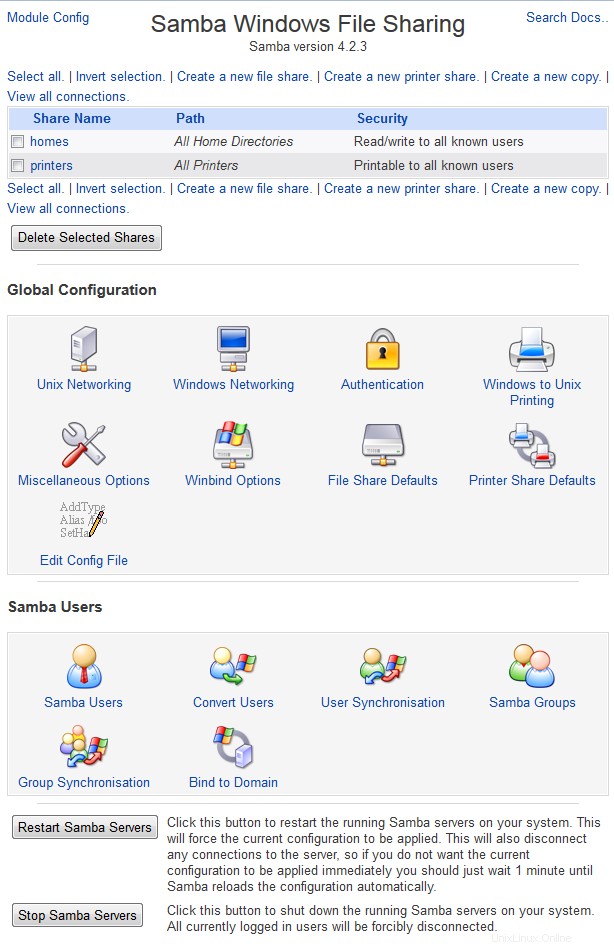
SambaWindowsファイル共有 モジュールを使用すると、SMBプロトコル(サーバーメッセージブロック)を使用してWindowsクライアントと共有するディレクトリとプリンターを指定できます。サーバーカテゴリにあり、リンクをクリックすると、下のスクリーンショットに示すようなメインページが表示されます。既存のすべての共有が、それらのパスと使用可能なユーザーとともに一覧表示されます。その下には、すべての共有に適用されるさまざまなグローバルオプションを設定するためのアイコン、Sambaユーザーを管理するためのリンク、およびサーバープロセスを開始または再起動するためのボタンがあります。
何年にもわたって、Sambaは構成可能なオプションの膨大な配列を獲得してきました。ただし、このモジュールでは、これらすべてを構成することはできません。単純なネットワーク上の小さなサーバーに役立つものだけを構成できます。たとえば、ログインスクリプト、NTドメイン、SSLに関連する設定は編集できません。ただし、それらをsmb.confファイルに手動で追加した場合、モジュールはそれらを変更しません。
一部のサーバーを構成する他のすべてのモジュールと同様に、このモジュールは、Sambaサーバーが実際にインストールされている場合にのみ使用できます。モジュールが見つからない場合は、Sambaサーバーの実行可能ファイル/usr / sbin/smbdが見つかりませんでしたのようなエラーメッセージが表示されます。 代わりにメインページに表示されます。 Sambaがインストールされているが、モジュールが期待する場所とは異なる場所にある場合は、SambaWindowsファイル共有の構成を参照してください。 正しいパスを使用するように再構成する方法については、この章の後半のモジュールセクションを参照してください。それ以外の場合は、インストールする必要があります。
ほとんどのLinuxディストリビューションおよびその他のいくつかのオペレーティングシステムには、ソフトウェアパッケージモジュール(第12章で説明)を使用して簡単にインストールできるSambaパッケージが含まれています。そうでない場合は、www.samba.orgからソースコードをダウンロードしてから、手動でコンパイルしてインストールする必要があります。モジュールは、パッケージが利用可能な場合はパッケージを使用するか、そうでない場合はソースコードを使用することを想定しているため、使用しなくてもメインページにエラーメッセージが表示される場合は、正しいパスを使用するようにモジュールの構成を調整する必要があります。
Sambaのインストール方法に関係なく、デフォルトの構成ファイルには、少なくとも2つの共有(特別なホームとプリンター)と、いくつかのグローバル設定が含まれます。これは、これまでこのモジュールを使用したことがないか、Sambaを手動で構成したことがない場合でも、メインページのリストが空にならないことを意味します。もちろん、構成ファイルを直接編集して共有を追加している場合は、それらも表示されます。
WebminがSambaがすでに実行されていることを検出した場合、Sambaサーバーの再起動というラベルの付いたボタン ページ下部に表示されます。予想通り、それをクリックすると、実行中のすべてのサーバープロセスが強制終了されて再起動され、現在の構成が強制的に再ロードされます。ただし、Sambaは構成ファイルが変更されたことを検出するとすぐに再読み取りするため、これは通常は不要です。
モジュールが両方のSambaサーバープロセスが実行されていないことを検出すると、サーバーの起動が表示されます。 代わりにボタンをクリックすると、smbdとnmbdの両方が起動します。実行されているかどうかを判断するためにPIDファイルはチェックされません。代わりに、モジュールはそれらの名前で実行中のプロセスを検索します。
 SambaWindowsファイル共有
 Sambaユーザーの管理
はじめに述べたように、SMBプロトコルは、標準のUnix形式と互換性のないパスワード暗号化形式を使用します。古いバージョンのWindows(95以前)は暗号化されていないSMBサーバーにパスワードを送信したため、かつてはこれは問題ではありませんでした。これにより、Sambaは、FTPサーバーやTelnetサーバーと同じように、それらを暗号化してUnixパスワードリストと照合することができました。残念ながら、最近のWindowsリリースでは、特定のあいまいなレジストリキーが変更されない限り、新しいNTLM暗号化形式でのみパスワードが送信されます。つまり、Sambaは、最新のクライアントを検証するために、パスワードの個別のリストを維持する必要があります。
サーバーに古いWindowsホストまたはLinuxシステムからのみアクセスする場合を除いて、この個別の暗号化されたパスワードリストを有効にする必要があります。これを行う手順は次のとおりです。
- モジュールのメインページで、認証をクリックします アイコン。
- 表示されるフォームで、暗号化されたパスワードを使用しますか?を変更します はいへのフィールド 。
- [保存]をクリックします フォームの下部に戻って新しい設定をアクティブにし、モジュールのメインページに戻ります。以前に表示されなかった場合は、暗号化されたパスワード これで、3つのリンクを含むセクションが表示されます。
Sambaの個別のパスワードリストが有効になったので、既存のUnixユーザーの一部をそれに追加する必要があります。これは、以下の手順に従ってWebminを使用して簡単に実行できます。
- Sambaモジュールのメインページで、暗号化されたパスワードの*UnixユーザーをSambaユーザーに変換*リンクをクリックします。 変換フォームを表示するセクション。
- これらのユーザーを変換または削除しないでください フィールドには、変換から除外されるユーザーが一覧表示され、デフォルトではすべてのシステムアカウントが含まれます。他の人を追加することもできますが、使用されないアカウントを変換しても害はありません。
- 以前にこのフォームを使用したことがある場合は、[既存のSambaユーザーをUnixの詳細から更新する]オプションをオンにして、既存のSambaユーザーを対応するUnixユーザーと一致するように更新できます。
- 同様に、* Unixに存在しないSambaユーザーの削除*をチェックして、対応するUnixユーザーが存在しないSambaユーザーを削除することができます。
- 新しく作成されたユーザーの場合、パスワードを次のように設定します ユーザーの既存のパスワードを変換する方法がないため、フィールドは割り当てられるパスワードを決定します。最良の選択は*アカウントロック*です。これにより、後でパスワードが設定されるまで、変換されたユーザーが使用されなくなります。 パスワードなしを選択することもできます 新しいアカウントをパスワードなしで残す(セキュリティ的には悪い考えです)、またはこのパスワードを使用する 変換されたすべてのユーザーのパスワードを指定します。
- ユーザーの変換をクリックします ボタンをクリックしてプロセスを開始します。変換、スキップ、または更新された各ユーザーを一覧表示するページが表示されます。
変換後、おそらく新しいSambaユーザーのパスワードを設定する必要があります。これは、ユーザーごとに次の手順に従って、1つずつ実行する必要があります。
- モジュールのメインページで、[* Sambaユーザーとパスワードの編集*]リンクをクリックして、既存のユーザーのリストを表示します。
- パスワードを設定するユーザーの名前をクリックします。
- パスワード フィールドで、新しいパスワードを選択します オプションを選択し、その横にあるテキストボックスに入力します。 アクセスなしを選択することもできます このユーザーによるすべてのSambaログインをブロックするには、パスワードなし パスワードまたは現在のパスワードなしでログインできるようにする パスワードを変更しないでください。
- フォームの他のフィールドは変更しないでください。保存をクリックするだけです。 ボタンをクリックしてユーザーリストに戻ります。
- これで、選択したパスワードを使用してこのユーザーとしてSambaサーバーにログインし、共有内のファイルにアクセスできるようになります。特別な家を想定 共有が存在する場合、すべてのユーザーは自分のユーザー名と同じ名前で共有にアクセスできます。
新しいユーザーごとにパスワードを変換して設定するのは面倒な労力の無駄なので、Webminで作成されたUnixユーザーごとにSambaユーザーを自動的に作成するようにモジュールを構成できます。ユーザーとグループモジュールで対応するUnixユーザーアカウントが変更されたときに、Sambaユーザーの名前を変更したり、削除したり、パスワードを変更したりすることもできます。この同期を設定するための手順は次のとおりです。
- Sambaモジュールのメインページで、[暗号化されたパスワード]セクションの[UnixとSambaの自動ユーザー同期の構成]リンクをクリックします。
- 同期フォームで、* Unixユーザーが追加されたときにSambaユーザーを追加する*をチェックして、新しいUnixユーザーごとに正しいUIDとパスワードでSambaユーザーを作成します。
- Unixユーザーが変更されたときに対応するSambaユーザーの名前を変更したり、パスワードを変更したりするには、[*Unixユーザーが変更されたときにSambaユーザーを変更する*]チェックボックスをオンにします。
- Unixユーザーが削除されたときにWebminで一致するSambaユーザーを削除するには、*[Unixユーザーが削除されたらSambaユーザーを削除する*]をオンにします。
- 適用をクリックします ボタンをクリックして設定を保存します。ユーザーとグループモジュールで実行されるアクション(*他のモジュールで*オプションが使用されている場合)は、Sambaユーザーリストも変更します。
| 注: | 残念ながら、この同期は、Webminのユーザーとグループ、パスワードの変更、およびユーザーとグループのクラスターモジュールにのみ適用されます。 adduserでユーザーを追加する場合 シェルコマンドを実行するか、 passwdを使用してパスワードを変更します シェルコマンド、Sambaユーザーは追加または更新されません |
新しいファイル共有の追加
通常のデフォルト構成では、SambaはすべてのUnixユーザーがホームディレクトリ内のファイルにログインしてアクセスできるようにします。特別な家 shareはこの機能を提供します。多くの場合、ユーザーがサーバーに自分のファイルを保存するために必要なのはこれだけです。ただし、組織全体が関心のあるドキュメントを利用できるように、全員がアクセスできるディレクトリを共有すると便利なことがよくあります。このような共有は、ゲストアクセスを許可する(つまり、アクセスするためにログインは必要ありません)か、サーバーへの有効なログインを要求するように設定できます。
ファイル共有を作成するには、次の手順に従います。
- まず、共有するディレクトリを決定し、まだ存在しない場合は作成します。ユーザーが読み取りや書き込みを行えるように、適切なUnix権限を付与する必要があります。
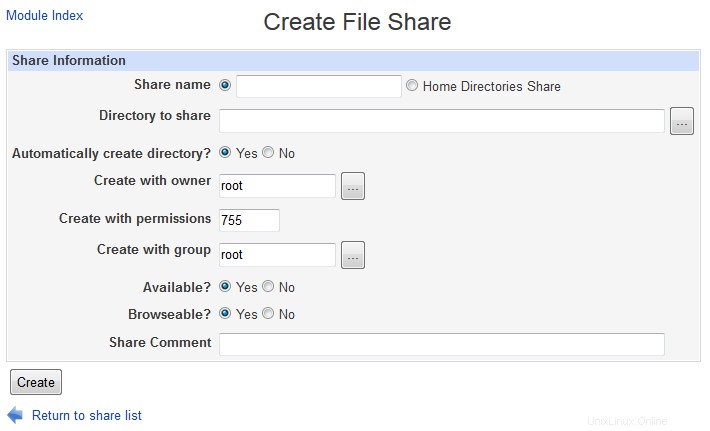
- モジュールのメインページで、新しいファイル共有の作成をクリックします。 表の上または下のリンク。これにより、下のスクリーンショットに示されている共有作成フォームが表示されます。
- 共有名 [フィールド]で、最初のボタンが選択されていることを確認し、ドキュメントのように、共有の一意の英数字の名前をテキストボックスに入力します 。 Unixユーザーの名前を入力すると、そのユーザーの自動ホームディレクトリ共有が上書きされます。
- 共有するディレクトリ フィールドに入力するか、小さなボタンで手順1で選択したディレクトリへのフルパスを選択します
- この共有を無効にして使用できないようにするには、使用可能ですか?を変更します いいえへのフィールド 。これは、すべてのオプションが適切に設定されるまでオフラインにする場合に役立ちます。
- サーバーが参照されたときに表示される共有のリストからこの共有を非表示にするには、参照可能ですか?を変更します いいえへのフィールド 。ただし、\\ servername\sharenameパスを使用して直接アクセスできます。
- コメントの共有 フィールドに、企業ドキュメントのように、このファイル共有の簡単な説明を入力します 。
- 作成をクリックします ボタンをクリックして、Samba構成に追加します。ブラウザがモジュールのメインページに戻り、新しい共有が一覧表示されます。
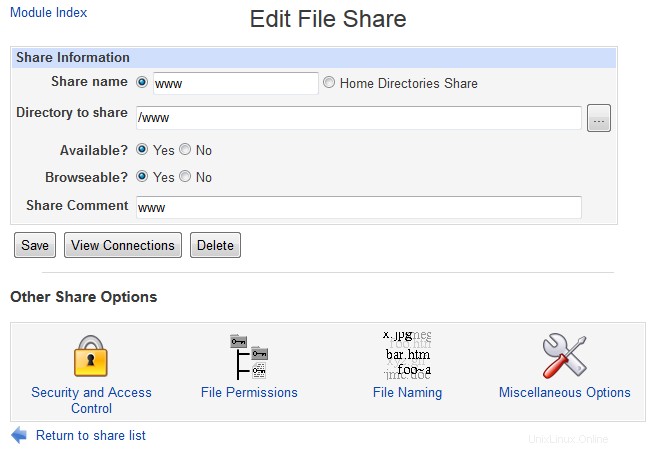
- 新しい共有名をクリックして、編集ページを表示します。
- セキュリティとアクセス制御をクリックします 共有のセキュリティフォームを表示するアイコン。
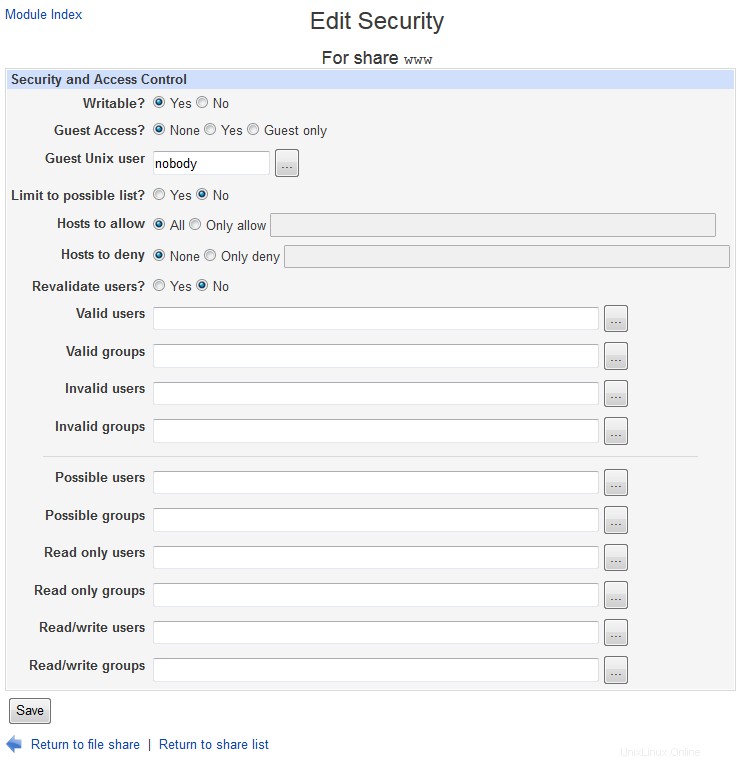
- この共有内のファイルを読み取り専用にする必要がある場合は、書き込み可能?を設定します いいえへのフィールド -それ以外の場合は、はいを確認してください が選択されています。
- ゲストアクセス? フィールドは、クライアントがサーバーにログインせずにこの共有にアクセスできるかどうかを決定します。利用可能なオプションは次のとおりです。なし 認証されたユーザーのみがアクセスを許可されます。 はい 誰でも共有にアクセスできますが、認証されていないクライアントはゲストとして扱われます。ログインしたクライアントには、通常のファイルアクセス権があります。 ゲストのみ 認証されているかどうかに関係なく、すべてのクライアントがゲストとして扱われます。
- ゲストがファイルの読み取りと書き込みを行うUnixユーザーを設定するには、ゲストunixユーザーを変更します。 分野。これは通常、読み取り専用アクセス権を持つアカウントである必要があります。
- 保存をクリックします フォームの下部にあるボタン。これで、クライアントが共有を使用できるようになり、サーバーが参照されたときに表示されるはずです。
-
 ファイル共有の作成
共有は、モジュールのメインページのリストで名前をクリックして編集フォームを表示し、パスや説明などの詳細を変更して保存をクリックすることで、作成後に編集できます。 ボタン。または、削除をクリックして完全に削除することもできます 同じ形で。編集ページの下部にあるアイコンをクリックして、追加のパラメーターを編集することもできます。この章の後半のセクションでは、パラメーターの機能について詳しく説明します。
ホーム共有も編集できますが、通常はパスがありません(パスがある場合は、接続しているユーザーのホームディレクトリに置き換えられる特別な%Uコードが含まれます)。
 ファイル共有の編集
 新しいプリンタ共有の追加
デフォルトのSamba構成には通常、特別なプリンターが含まれています 共有。これは、システム上のすべてのプリンターがSMBクライアントで使用可能であることを示します。ただし、代わりに特定のプリンターを明示的に共有することもできます。これは、プリンタごとに異なるオプションを設定したり、一部を完全に共有から除外したりできるため、すべてを自動的に共有するよりも優れている場合があります。
Sambaでの印刷とプリンターの参照が正しく機能する前に、Unixボックスに適切な印刷システムを使用するように構成する必要があります。 プリンタの設定を参照してください これを設定する方法の詳細については、この章の後半のセクションを参照してください。正しく設定されていない場合、サーバーはプリンターの一覧表示とジョブの送信に間違ったコマンドを使用します。これにより、自動的に生成されたプリンターのリストが空になったり、印刷要求が失敗したりする可能性があります。
SMBクライアントがプリンタを利用できるようにするには、次の手順に従います。
- モジュールのメインページで、表の上または下にある[*新しいプリンタ共有を作成する*]リンクをクリックします。これにより、以下に示す印刷共有作成フォームが表示されます。
- 共有名 フィールドで、最初のボタンが選択されていることを確認し、 hplaser のように、共有の一意の英数字の名前をテキストボックスに入力します 。これは、混乱を避けるために、次の手順で選択するUnixプリンタの名前と同じである必要があります。同じ名前で自動的に作成されたプリンタ共有がすでに存在する場合、この新しい共有はそれを上書きします。
- Unixプリンターから メニューで、SMBクライアントが利用できるようにするプリンターを選択します。このリストは、プリンター管理モジュール(第22章で説明)から取得されます。 デフォルトの場合 を選択すると、印刷システムのデフォルトのプリンタが使用されます。
- このプリンタを無効にして使用できないようにするには、使用可能ですか?を変更します いいえへのフィールド 。
- サーバーの参照時に表示されるリストからこのプリンターを非表示にするには、参照可能ですか?を変更します いいえへのフィールド 。ただし、\\ servername\printernameパスを使用して直接アクセスできます。
- スプールディレクトリ フィールドには、印刷用の一時ファイルが保存されているディレクトリの名前を入力できます。 Sambaのデフォルトを使用するには、空のままにします。これは通常は正常に機能します。
- コメントの共有 フィールドに、 Office HP Laserjet 5などのこのプリンタの簡単な説明を入力します 。
- 作成をクリックします ボタンをクリックして、Samba構成に共有を追加します。ブラウザがモジュールのメインページに戻り、新しいプリンタがテーブルに表示されます。
- 新しい共有名をクリックして、編集ページを表示します。
- セキュリティとアクセス制御をクリックします 共有のセキュリティフォームを表示するアイコン。
- ゲストアクセス? フィールドは、クライアントがサーバーにログインせずにこのプリンターへの印刷を許可するかどうかを決定します。利用可能なオプションは次のとおりです。なし 認証されたユーザーのみがアクセスを許可されます。 はい 誰でも共有にアクセスできますが、認証されていないクライアントはゲストとして扱われます。ログインしたクライアントは、ログイン名で印刷ジョブを送信します。 ゲストのみ 認証されているかどうかに関係なく、すべてのクライアントがゲストとして扱われます。
- ゲストが印刷ジョブを送信するUnixユーザーを設定するには、ゲストunixユーザーを変更します。 分野。プリンタシステムが特定のユーザーをブロックするように構成されていない限り、これはそれほど重要ではありません。
- 保存をクリックします フォームの下部にあるボタンをクリックして、プリンタの編集ページに戻ります。
- プリンタオプションをクリックします アイコン。
- このプリンターをWindowsクライアントで使用する予定で、Unixドライバーがインストールされていない場合は、その完全なメーカーとモデルをプリンタードライバーに入力します。 分野。これは、クライアントがインストールするドライバーを認識できるように、Windowsがプリンターを参照する名前と正確に一致する必要があります。 なしの場合 が選択されている場合、このプリンタをWindowsシステムに追加するユーザーは、代わりにリストからプリンタモデルを選択するように求められます。手順3で選択したUnixプリンターが既にドライバーでセットアップされている場合、クライアントは、プリンターが使用するネイティブデータ形式ではなくPostscript形式でジョブを送信する必要があります(ドライバーが変換を行うため)。この場合、 Apple LaserJet II など、Postscriptをネイティブに使用するプリンタの名前を入力できます。 。
- 最後に、[保存]をクリックします このフォームのボタン。これで、Windowsクライアントでプリンター共有を使用できるようになりました。
ファイル共有の作成 ファイル共有の場合と同様に、モジュールのメインページの表にある名前をクリックすることで、プリンターを編集および削除できます。特別なプリンター 共有も変更できますが、 Unixプリンターなど、多くのオプションを設定しても意味がありません。 またはプリンタドライバ 。
クライアントの表示と切断
システム上のファイルまたはプリンター共有にアクセスしているすべてのクライアントにはSambaサーバーへの接続があり、これらの接続はこのモジュールを使用して表示できます。クライアントは、編集のために開いているファイルをロックして、他の人がそれらを開くことができないようにすることもできます。サーバーのタスクの1つは、これらのロックの保守です。これらのロックは、セッションに関連付けられており、表示することもできます。クライアントが適切に切断せずにクラッシュした場合、クライアントが保持しているロックは、TCP接続がタイムアウトするまで残ります。これにはしばらく時間がかかる場合があります。このため、このモジュールを使用すると、クライアントセッションを強制終了して、ロックを解除できます。
クライアントセッションを表示および削除するには、次の手順に従います。
- モジュールのメインページで、すべての接続を表示をクリックします 共有テーブルの上または下にリンクして、サーバーへのすべての接続のリストを表示します。または、プリンタまたはファイル共有をクリックしてから、接続の表示をクリックすることもできます。 編集ページのボタンをクリックして、その特定の共有への接続のみのリストを表示します。
- いずれの場合も、表示されるページには現在使用中の共有が一覧表示され、それぞれに接続ユーザーの名前、接続元のホスト、接続時刻、ロックされたファイルが表示されます。左端の列は、この接続を処理しているSambaサーバーサブプロセスのIDです。通常、同じクライアントシステムから異なる共有への複数の接続は、1つのプロセスで処理されます。
- プロセスを強制終了して、処理しているすべての接続を切断するには、最初の列のプロセスIDをクリックします。クライアントが保持しているロックはすべて解放され、他のユーザーが使用できるようにファイルが解放されます。実際にクラッシュしたクライアントの接続のみを強制終了する必要があります。アクティブなクライアントのセッションを強制終了すると、開いているファイルが破損する可能性があります。ただし、ファイルが開いていないWindowsクライアントへの接続は、共有上のファイルが次に開かれたときにクライアントによって即座に透過的に再確立されるため、通常は安全です。
共有セキュリティオプションの編集
プリンタまたはファイル共有が作成されると、それにアクセスできるユーザーと接続できるホストを制御するさまざまなセキュリティ関連のオプションを編集できます。これは、一部の共有に特定のユーザーのみがアクセスできるファイルが含まれている場合、またはSambaサーバーが内部ネットワーク上のクライアントのみが使用する場合に役立ちます。
共有セキュリティオプションを編集するには、次の手順に従います。
- モジュールのメインページで、テーブル内の共有の名前をクリックして編集フォームを表示し、[セキュリティとアクセス制御]アイコンをクリックします。
- 新しいファイル共有の追加で説明されているように セクション、書き込み可能? およびゲストアクセス? フィールドは、共有に書き込むことができるかどうか、および認証が必要かどうかを決定します。 ゲストUnixユーザー フィールドは、ファイルがゲストクライアントによって読み書きされることをユーザーに設定します。必要に応じて、ここで再度変更してください。
- 特定のホストのみにこの共有へのアクセスを許可するには、許可するホストの2番目のラジオボタンを選択します フィールドに入力し、ホスト名とIPアドレスのリストを隣接するテキストボックスに入力します。 192.168.1。のような部分的なIP または、192.168.1.0 / 255.255.255.0などのネットワークアドレスを使用して、ネットワーク全体を許可できます。システムがNISクライアントの場合は、 @_(_ @ servers など)を前に付けたネットグループ名を入力できます。 )グループのすべてのメンバーを許可します。 すべての場合 を選択すると、次のフィールドに入力しない限り、すべてのホストにアクセスが許可されます。入力内容に関係なく、ローカルホスト(127.0.0.1)からの接続は、[拒否するホスト]フィールドに具体的にリストされていない限り、常に許可されます。
- 特定のホストがこの共有にアクセスするのをブロックするには、拒否するホストに入力します ホスト名、IPアドレス、ネットワーク、またはネットグループの同様のリストを含むフィールド。両方のフィールドに入力されている場合、許可するホスト 優先されます。 なしの場合 を選択すると、すべてのホストが許可されます。
- 特定のユーザーのみがこの共有にアクセスできるようにするには、有効なユーザーに入力します スペースで区切られたユーザー名のリストを含むフィールド。 有効なグループに入力することもできます プライマリメンバーとセカンダリメンバーにアクセスが許可されるグループのリストを含むフィールド。両方のリストが空の場合にのみ、すべてのユーザーが許可されます。
- または、特定のユーザーとグループのメンバーを拒否するには、無効なユーザーに入力します および無効なグループ 田畑。ユーザーが有効リストと無効リストの両方に表示されると、アクセスが拒否されます。
- 一部のユーザーをこの共有の読み取り専用アクセスに制限するには、ユーザー名のリストを読み取り専用ユーザーに入力します 分野。 読み取り専用グループにUnixグループのリストを入力することもできます プライマリメンバーを制限します。共有が実際に書き込み可能であり、読み取り/書き込みであると仮定すると、他のすべてのユーザーは完全な読み取り/書き込みアクセス権を持ちます。 フィールドは入力されていません。
- 特定のユーザーのみに共有への書き込み権限を付与し、他のすべてのユーザーに読み取り専用アクセスを制限するには、ユーザー名のリストを読み取り/書き込みユーザーに入力します。 分野。いつものように、読み取り/書き込みグループ フィールドを使用して、プライマリメンバーにも書き込みが許可されるグループのリストを入力できます。当然のことながら、ファイルやディレクトリへの書き込みを妨げる可能性のある通常のUnixファイルのアクセス許可は、引き続きすべてのユーザーに適用されます。ユーザーが両方の読み取り専用に表示される場合 および読み取り/書き込み リスト、彼は書くことが許可されます。この手順と前の手順のフィールドは、プリンターの共有には影響しません。代わりに、許可されたすべてのユーザーが印刷できるようになります。
- ファイルセキュリティオプションの編集が完了したら、[保存]をクリックします ページの下部にあるボタンをクリックして、新しい設定をアクティブにします。
単一の共有にセキュリティオプションを設定するだけでなく、個々の共有で上書きされない限り適用されるすべての共有にデフォルトを設定できます。これを行うには、ファイル共有のデフォルトをクリックします 共有の名前の代わりにモジュールのメインページにあるアイコン、次にセキュリティとアクセス制御 。サーバー全体へのアクセスを信頼できるネットワークのみに制限したい場合があるため、許可または拒否するホストのリストなどの一部の設定は、実際にはグローバルに設定する必要があります。 共有のデフォルトの編集を参照してください デフォルトの仕組みの詳細については、この章の後半のセクションを参照してください。
 セキュリティ共有の編集
 ファイル権限設定の編集
ファイル共有には、Unixのアクセス許可とファイルの所有権に関連するいくつかの設定があり、グローバルに、または共有ごとに設定できます。 WindowsクライアントとSMBプロトコルにはアクセス許可の概念がないため、共有ごとに新しいファイルとディレクトリのデフォルトを設定する方法があると便利です。これを行う手順は次のとおりです。
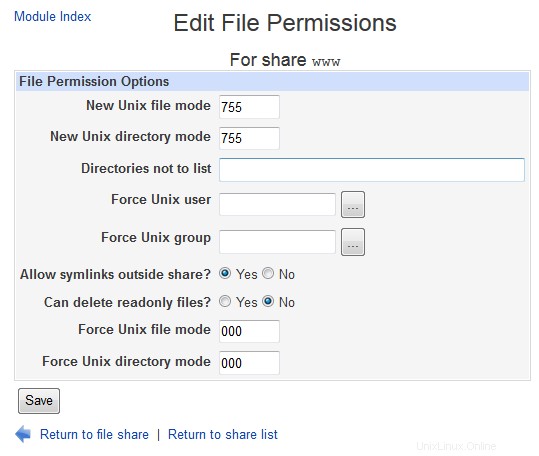
- モジュールのメインページで、アクセス許可を設定する共有の名前をクリックしてから、ファイルのアクセス許可をクリックします。 編集ページのアイコン。
- 新しいUnixファイルモードの場合 フィールドに、新しく作成されたファイルに割り当てる必要がある8進数の権限(chmodコマンドで使用される)を入力します。たとえば、モード 600 所有者による読み取りと書き込みは許可されますが、他のユーザーへのアクセスは完全に拒否されます。
- 新しいUnixディレクトリモード フィールドに、新しく作成されたディレクトリの8進数のアクセス許可を入力します。たとえば、 755 誰でもリストして読むことができますが、所有者だけがディレクトリにファイルを作成できます。
- 一部のディレクトリをSMBクライアントに常に空で表示するには、フルパスのコンマ区切りリストを[*リストしないディレクトリ*]フィールドに入力します。たとえば、 / proc、/ devと入力します。 これらの2つのディレクトリの内容を非表示にします。これらは、通常、Windowsクライアントには役に立ちません。
- すべてのクライアントが(ログインしたユーザーではなく)特定のUnixユーザーとしてファイルにアクセスするように強制するには、[*Unixユーザーを強制する*]フィールドに入力します。これは、ファイルが実際に作成者によって所有されている場合に発生する可能性のあるUnix権限の問題を回避するため、さまざまな人が互いのドキュメントを編集する共有に非常に役立ちます。デフォルトでは、ファイルがアクセスされるグループは、指定されたユーザーのプライマリグループになります。これを変更するには、ForceUnixグループに入力します フィールドも。
- Windows SMBクライアントはUnixシンボリックリンクをサポートしていないため、クライアントがリンクの読み取りまたは書き込みを行おうとすると、Sambaは常にリンク先ファイルの読み取りまたは書き込みを行います。残念ながら、これは潜在的なセキュリティリスクをもたらします。これは、共有ディレクトリの外部にある通常はアクセスできないファイルを指すシンボリックリンクが作成される可能性があるためです。これを防ぐには、[共有外のシンボリックリンクを許可しますか?]フィールドをいいえに変更します。 。
- Unixファイルシステムでは、ディレクトリが書き込み可能であれば、ユーザーが読み取り専用のファイルを削除することもできます。ただし、これは通常のWindowsファイルシステムには当てはまりません。そのため、Sambaはこれを防ぎます。これを変更してUnixファイルシステムのセマンティクスを適用するには、[*読み取り専用ファイルを削除できますか?*]フィールドをはいに変更します。 。
- 保存をクリックします ページの下部にあるボタンをクリックして、新しいファイルセキュリティオプションをアクティブにします。
共有のデフォルトの編集として セクションでは詳細を説明しています。ファイル共有のデフォルトをクリックすると、すべての共有のファイル権限設定を編集できます。 メインページのアイコンに続いてファイルのアクセス許可 。上記の手順で共有を上書きしない限り、これらは適用されます。
 ファイルのアクセス許可を編集する
 ファイル命名オプションの編集
Sambaには、Unixファイル名をWindowsシステムに適した名前に変換する方法を制御するいくつかのオプションがあります。最近では、Windowsバージョン95以降で長いファイル名を適切にサポートできるようになったため、それらのほとんどは不要になりました。 Windows 3.1とDOSだけが古い8.3ファイル名形式に固執し、それらはもうほとんど使用されていません。
最新のクライアントに関連する共有の名前付けオプションを編集するには、次の手順に従います。
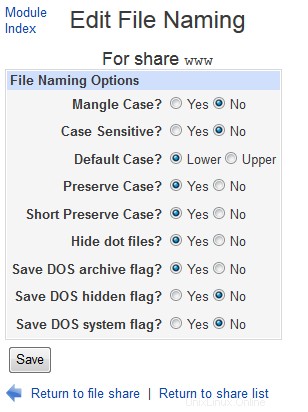
- モジュールのメインページで共有の名前をクリックしてから、ファイルの名前付けをクリックします。 アイコン。
- 大文字と小文字を区別しますか? フィールドがいいえに設定されている 、サーバーは、クライアントから要求されたファイルを開くときに大文字と小文字を区別しません。これはWindowsファイルシステムの動作方法であるため、Sambaのデフォルトの動作でもあります。ただし、すべてのUnixファイルシステムでは大文字と小文字が区別されるため、ディレクトリをスキャンする必要があるため、CPU時間とIO帯域幅が多く消費されます。このため、はいを選択することをお勧めします 代わりに、すべてのクライアントが通常のUnixケースルールの適用を期待するLinuxシステムである場合。
- 通常、Sambaは、クライアントによって指定された正確な大文字と小文字を使用してファイルを作成します。これを変更して、代わりに大文字または小文字を強制的に使用するには、大文字と小文字を保持しますか?を変更します いいえへのフィールド デフォルトの場合のオプションの1つを選択します 分野。これは、Windowsクライアントが通常のUnixの小文字の標準に従うことを好むときに、多くの大文字のファイルを作成している場合に役立ちます。
- Windowsファイルシステムでは、各ファイルには、プログラムに通常表示されるかどうかを決定する非表示の属性があります。 Unixシステムにはそのような属性は存在しません。代わりに、名前がドットで始まるファイルは、lsやその他のコマンドによって非表示になります。このため、Sambaは、ドットファイルを非表示にしますか?のときに、ドットファイルに非表示属性を設定します。 フィールドがはいに設定されている 、デフォルトのままです。別の方法は、Unixファイルパーミッションのワールド実行ビットを非表示フラグとして使用することです。これは、実行パーミッションがSambaによって使用されないためです。この動作を有効にするには、 DOS非表示フラグを保存しますか?を変更します はいへのフィールド 。これにより、共有内のファイルにアクセスするUnixプログラムのアクセス許可が台無しになるため、共有ディレクトリがSMBクライアントによってのみアクセスされている場合にのみ使用する必要があります。
- Windowsファイルには、さらに2つの属性があります。ファイルがバックアップされたことを示すアーカイブフラグと、通常はアクセスできないシステムファイルをマークするシステムフラグです。 DOSアーカイブフラグを保存しますか?の場合、Sambaは、これらの属性をファイルのユーザー実行ビットとグループ実行ビットに格納するように構成できます。 およびDOSシステムフラグを保存しますか? フィールドははいに設定されます それぞれ。 Windowsクライアントがこの情報を必要としない場合、またはUnix実行可能ファイルとスクリプトのアクセス許可が混乱していることに気付いた場合は、両方をいいえに設定します。 代わりは。
- 新しいファイルの名前設定を有効にするには、保存をクリックします ページ下部のボタン。
繰り返しますが、これらのオプションは、ファイル共有のデフォルトをクリックすることで、すべての共有に設定できます。 メインページのアイコンの後に*ファイルの名前付け*が続きます。
 ファイルの名前付けを編集
 他のファイル共有オプションの編集
このモジュールを使用して設定できるコマンドのロックと自動実行に関連するファイル共有オプションがさらにいくつかあります。ロックに使用されるものは、Windowsクライアントがファイルをロックして排他的アクセスを取得しようとしたときのSambaの動作を制御します。これにより、読み取りまたは書き込みのたびにサーバーに接続しなくても、ファイルにデータをキャッシュできます。デフォルトでは、ロックは完全に有効になっており、Windowsサーバーの場合とまったく同じ方法で実装されるため、通常、これらの設定を変更する必要はありません。
Samba can also be configured to run shell commands when a client connects or disconnects, either as root or as the connecting Unix user. This can be useful if you want to move newly added files to some other directory or perform some kind of processing on them.
To edit the module's other file sharing options, follow these steps :
- Click on the name of the share to edit on the main page, and then on the Miscellaneous Options icon on the share editing page that appears.
- If this share is exclusively for read-only use (for example if you are sharing some kind of read-only media like a CD), then the Fake oplocks? field can be safely changed to Yes to boost performance. This tells Samba to simply grant all lock requests by clients and not to bother actually keeping track of who has locked what, which can boost performance. None of the other locking fields should be touched unless you really know what you are doing, as the defaults will work fine and any other settings may lead to data corruption if multiple clients try to access the same files.
- To limit the number of clients that can be connected to this share at any one time, select the second radio button in the Max connections field and enter a number into the adjacent text box. This can be useful if you want to limit the load on your system. If Unlimited is selected, no maximum will be placed on the number of concurrent connections.
- The fields Command to run on connect and *Command to run on disconnect* allow you to enter shell commands that will be run by Samba as the authenticated user at connection and disconnection time. They will always be run in the share directory, and special % codes like %U for the connecting user or %S for the server name can be used in the command.
- Similarly, the Command to run on connect as root and *Command to run on disconnect as root* fields can be used to enter shell commands that will always be run as the Unix root user. However, they will be run in root's home directory instead.
- 保存を押します button to activate the new locking and command settings.
One thing to remember about locking and Samba is that locks taken out by SMB clients will not generally effect or be detectable by Unix programs or NFS clients. This means that data corruption can still happen if Unix and Windows programs open the same file, or if the same NFS exported directory is shared by two different Samba servers.
-
 Samba - Miscelleanous File Defaults
Editing printer share options
Once a printer share has been created, there are several options that you can set for it. Most of them relate to the commands that Samba will run to print a new job, list the queue or cancel a job. By default, appropriate commands for the print system in use (explained in the Configuring printers section) will be used - however, there are times that you will want to specify additional parameters or even use a completely different command.
To edit printer options for a share, follow these instructions :
- On the module's main page, click on the name in the table of the printer share that you want to edit. On the form that appears, hit the Printer Options icon at the bottom of the page.
- To prevent clients using up all the disk space in the printer's spool directory with large jobs, change the *Minimum free space* field. You must enter a number of kilobytes that will always be left free on the filesystem.
- To change the command that Samba will run to print a submitted file, edit the Print command 分野。 The special codes %f (for the temporary file to print) and %p (for the printer name) can and should be used in the command, so that you can enter for example something like lpr -P%p %f ; rm %f 。 Your command must always delete the temporary file (as the example does), as the server will not do this for you. All the usual shell meta-characters like ;, &and> can be used, which allows you to enter quite complex series of commands. Whatever command you enter will always be run as the Unix user connected to the printer share.
- To edit the command that Samba uses to list jobs waiting to be printed on some printer, select the second radio button in the Display queue command field and fill in its text box. Whatever you enter must produce output in the format generated by the standard BSD lpr command so that Samba can parse. If the special code %p appears in the command, it will be replaced with the name of the printer.
- Similarly, you can change the commands that Samba runs to delete, pause and un-pause a print job by editing the *Delete job command*, Pause job command and Unresume job command fields respectively. All can and should use the codes %p for the printer name, and %j for the job ID. For most print systems, there are no defaults for the pause and un-pause commands as those features are not supported. Generally you will not need to change these fields.
- As the Adding a new printer share section explains, the Printer driver field can be used to enter the model of the attached printer (as recognized by Windows) so that clients can automatically select the right driver.
- When you are done with this page, hit the Save button to update the Samba configuration file and thus activate the new settings.
You can also edit these settings for all shares by clicking on the Printer Share Defaults icon on the module's main page and then on Printer Options 。 In fact, all of the command options make much more sense to edit globally as the same commands are likely to be needed for all printers.
Editing share defaults
As the previous few sections in this chapter have mentioned, the Samba configuration allows you to define defaults that apply to all shares unless specifically overridden. This can be done by clicking on either the File Share Defaults or Printer Share Defaults icon on the main page, editing the contents of the form that appears and hitting Save 。 However, most of the options in this form are not particularly useful to set globally, except maybe Available? and Browseable? 。
More usefully, you can click on one of the icons on the defaults page and change settings that will apply to all file or printer shares. In the case of the Security and Access Control icon (which appears on both pages), and global defaults that you set will apply to both file and printer shares, as Samba does not differentiate between them.
Any option that is set globally will appear as the default on per-share forms. For example, if you fill in the Delete job command field under Printer Options on the Printer Share Defaults page and then went to the same page for a specific printer, the same value would appear. Even though the command does not actually appear in the configuration file for the printer, Webmin still displays it because as the default it will be used. Of course, if you enter a different command for the share, it will override the global setting and thus be used and display instead. This behavior may be a little confusing, as it is not the way that other Webmin modules usually work.
Configuring networking
This module can be used to set various Samba options that control how the entire server appears to and behaves for Windows clients. You can change the workgroup (under which the system is listed in the network neighborhood display), the server's name and any aliases, and the description that appears next to the name. Options related to the file sharing protocol and authentication method used can also be edited, in order to support old clients.
-
 Windows Networking options
It is even possible to set up your system as a WINS server or client, a protocol that some Windows clients use to find IP addresses for SMB server names if DNS is not available. The biggest difference between WINS and DNS is that clients can register their own names and IP addresses with a WINS server, rather than having it done by an administrator. It is most useful on small file-sharing networks that do not have a DNS server.
To edit these windows networking options, the instructions to follow are :
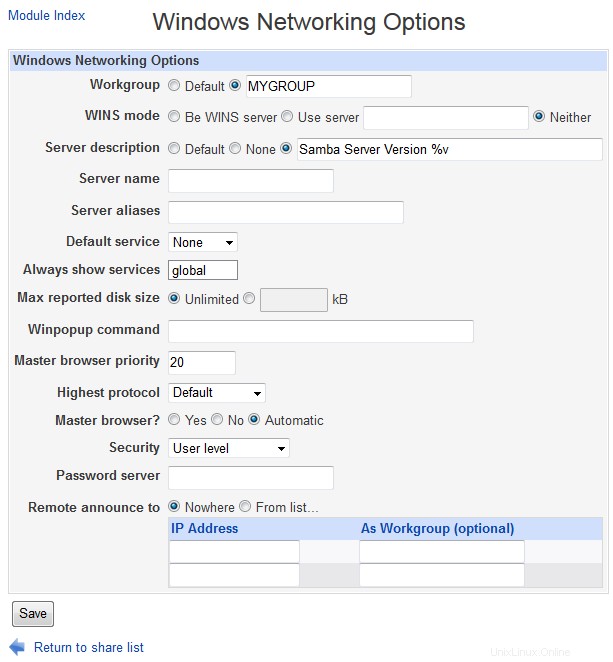
- On the module's main page, click on the Windows Networking icon in the Global Configuration section to bring up the form shown in the screenshot below.
- To set a workgroup for your server, select the second radio button in the Workgroup field and enter a short name into the text box next to it. If your network already has a few SMB servers that are members of a workgroup, this server should be made a member too.
- If your network already has a WINS protocol server, select Use server in the WINS mode field and enter its IP address. If not, you should choose Be WINS server so that Windows clients can use your system to lookup IP addresses for SMB server names. More recent versions of Windows (and Linux clients) do not need to use WINS, as they can look up server names in the DNS - assuming your network has a DNS server that has entries for all your hosts.
- To set a description for your system, fill in the Server description field with something like Corporate file server 。
- Normally, Samba will use the first part of your system's DNS name as the SMB server name. To change this, enter something else in the Server name 分野。 Clients will be able to refer to this server by whatever name you specify.
- To define alternate names that clients can use to refer to your server, fill in the Server aliases field with a space-separate list of names.
- If you want your system to be the master browser for a network (the server that maintains lists of other SMB servers and clients on the network, as seen in Window's network neighborhood), change the Master browser? はいへのフィールド 。 If you are running multiple Samba servers on the same subnet, this option should be set for only one. If there are other Windows or Samba servers on the network that want to be master browsers, the one with the highest operating system level will win the 'election' that decides who gets the job. You can increase your system's change of winning by increasing the Master browser priority field - the default of 20 will win against Windows 95 systems, but you would need to enter 65 to beat Windows NT servers.
- To have your Samba server contact another SMB server to validate passwords instead of checking its own user list, select *Password server* from the Security menu and enter the other server's hostname or IP address in the Password server 分野。 Otherwise, leave the field set to Default or User level 。 Share level security is rarely used anymore with modern clients, and Domain security is too advanced to cover in this chapter.
- Normally, an SMB server broadcasts information about itself to other servers on the network so that it can be included in browse lists. However, if your network spans multiple subnets then broadcasts from one system may not reach others. To get around this problem, the Remote announce to table can be used to specify the addresses of browser master servers to which this server's IP address and workgroup should be sent. To configure remote announcements on this page, first select the From list option above the table. Then in the IP address field of each row enter the hostname or IP address of a server to announce to, and in the As workgroup field the name of the workgroup that your server should appear under. If the second field is left empty, the servers real workgroup (set in step 2) will be used. To enter more than two remote servers you will need to save and re-open this page so that more empty rows appear in the table.
- Finally, click the Save button to activate the new networking settings.
-
 Unix Networking options
Samba also has numerous global options related to networking that control such things as the IP address to listen on, whether to send keep-alive packets and how long clients can be idle for before they are disconnected. These can be used to tune your server's performance, or limit access to only clients on a local network. To edit them, follow these steps :
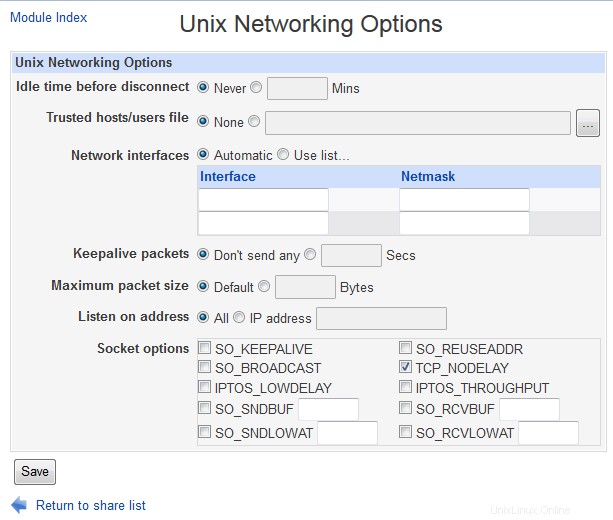
- Click on the Unix Networking icon on the module's main page.
- To have Samba disconnect clients that have been inactive for too long and do not have any files open, select the second radio button in the Idle time before disconnect field and enter a number of minutes into the adjacent text box. If Never is selected instead, clients will never be automatically cut off. Because Samba starts one server sub-process per client, this feature is useful for cutting down the amount of memory that they use up. And Windows clients will automatically re-connect if disconnected, so there is no down side to using it.
- To have Samba send packets to detect if clients have crashed without properly disconnect, select the Send every option in the Keepalive packets field and enter the number of seconds (such as 60) that a packet should be sent. Because clients can hold locks on files, a dead client may end up locking a file that other people need access to, even though it is clearly not using it. The same thing can be achieved by selecting the SO_KEEPALIVE checkbox in the Socket options 分野。 This tells the operating system kernel to do basically the same thing, and so should be used in preference. The only problem is that you cannot specify the keep-alive packet interval.
- To restrict Samba to listening for connections on a single one of your system's IP addresses, fill in the Listen on address 分野。 On a machine with one interface connected to an internal network and one connected to the Internet, this feature can be used to prevent outsiders connecting to your Samba server.
- 保存を押します button at the bottom of the page to activate the new network settings.
As you will see when you look at the actual form, there are many more fields on it than those documented above. However, the rest have extremely specialized uses and thus do not need to be touched by the average administrator.
Configuring authentication
-
 Authentication
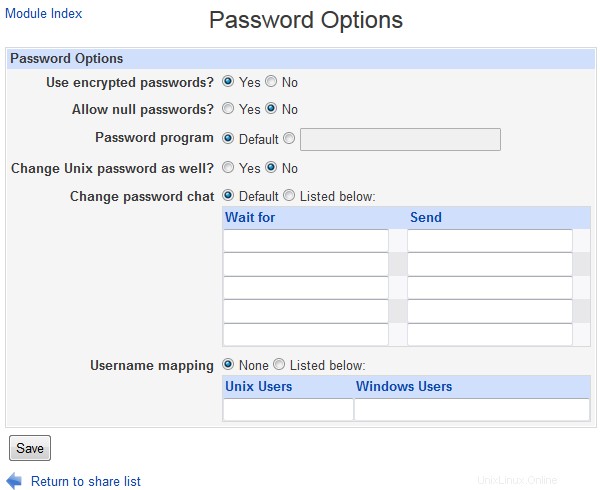
The SMB protocol allows users to change their passwords for a server from a client system. For a Samba server, this causes the encrypted passwords file to be updated, assuming one is in use (as is usually the case). You can also configure the server to change the user's Unix password as well, which makes sense if they are being kept synchronized.
Another authentication-related feature supported by Webmin is username mapping. This allows you to map fake client login names to real Unix usernames, and can be useful if users prefer to use their full names to login (like Jamie Cameron instead of jcameron ) or if you have a client that is regularly moved between two different networks, each of which has different SMB accounts.
To set these global authentication options using this module, the steps to follow are :
- On the module's main page, click on the Authentication アイコン。
- As explained in the Managing Samba users section, the *Use encrypted passwords?* field determines if Samba uses its own separate password file or the standard Unix user database. Because all recent versions of Windows use a password encryption format that is incompatible with the Unix format, this field should generally be set to Yes 。
- To allow logins by users who have no password set, select Yes for the Allow null passwords? 分野。
- The Password program field sets the program that Samba will use to change a user's Unix password if synchronization is enabled. If Default is selected /bin/passwd will be used, which is correct for most Unix systems. You can enter a different command by selecting the second radio button and fill in the text box with something like _/usr/bin/yppasswd %u_. The %u code is replaced with the name of the user whose password is being changed, and is required because the command is run as root.
- To have same change a user's Unix password when his SMB password is changed over the network, set the *Change Unix password as well?* field to Yes 。 Synchronization in the other direction is unaffected though - see the Managing Samba users section for more details on how that works.
- To define 'fake' SMB accounts, select Listed below in the Username mapping 分野。 In the table below it, each row specifies a mapping - the first field must contain a valid Unix username, and the second an SMB login name of your choice. Clients logging in with one of these made-up account names must of course provide the correct password for the associated Unix user.
- 保存を押します button at the bottom of the page to activate your new authentication settings.
Configuring printers
If you are sharing printers from your server, you will probably need to adjust the global printing options. These determine the print system commands that Samba will use to submit, list and delete jobs, the file it gets the list of printers from, and other related settings. To edit them, the steps to follow are :
- Click on the Windows To Unix Printing icon on the module's main page to bring up the printer options form.
- From the Unix print style menu select the type of print system in use on your box. Unfortunately, practically every different flavor of Unix has its own set of programs and configuration files for handling printers and print drivers, each of which must be treated differently by Samba. The options that you may want to select from are :
- BSD The traditional Unix print software, found on FreeBSD, NetBSD and older Linux distributions.
- SYSV The print system used on Solaris, UnixWare and a few other versions of Unix.
- HPUX The print system shipped with HP/UX.
- AIX The print software that comes with AIX, IBM's version of Unix.
- CUPS The superior Common Unix Print System, which is included with many new Linux distributions.
- LPRNG An improved version of the old BSD print system, used on all Linux systems that do not run CUPS. Most packages of Samba will have this option set correctly in the default configuration file. The PrinterAdministration page explains in more detail what the differences between the various print systems are, and how to select the right one for your operating system.
- Normally, Samba will find all the printers on your system and make them visible to clients when the special printers share exists. To disable this, change the Show all printers? いいえへのフィールド 代わりは。 The printers will still be accessible using an explicit \\_servername_\_printername_ path though.
- When the Printcap file field is set to Default , Samba will get the list of printers available on your system from the standard /etc/printcap file. This is fine if you want them to all show up, but sometimes you want to hide some printers from users. To do this, create a fake printers file that looks {| border="1" |- like :printer1||Description for printer 1:printer2||Description |} of second printer:And set this field to the path to this file. Only the printers listed in it will be available automatically when a printers share exists.
- Samba caches the output from whatever command is used to list waiting print jobs (such as lpq) in order to reduce the frequency with which it is run. By default this cache time is 10 seconds, but you can increase or decrease it using the *Printer status cache time* field. If your lpq command is very slow you may want to increase it.
- 保存を押します button to activate your new printing settings.
モジュールアクセス制御
As WebminUsers explains, once a Webmin user has been granted access to a module he can be further restricted to only a subset of its functions. For the Samba module, you can allow a user to edit only certain types of settings in certain shares while denying him the ability to create new shares or edit global options. This can be useful if you want to let someone edit the settings that apply to the sharing of only his own directory, while protecting the rest of the Samba server's configuration.
I would advise against granting even limited access to this module to un-trusted users though, as it has many features that could be used by a malicious to gain root access to your system. For example, someone could allow guest access to a share with root permissions, allowing the remote modification of any file. Or they could set the command run as root at client connection time to something that changes the root password.
Instead, these access control features are should only be used to limit the changes that an in-experienced but still trusted user can make. To restrict such a user to only editing a few shares, the steps to follow are :
- In the Webmin Users module, create a user with access to the module, or modify an existing user to give him access.
- Click on Samba Windows File Sharing next to the name of the user to bring up the module access control form.
- Change the Can edit module configuration? いいえへのフィールド 。
- Set all the fields from *Can apply changes? *down to *Can maintain auto UNIX to SAMBA users sync?* to No as well, as they control access to global settings that the user should not touch.
- To hide shares that he cannot access from the user, change the Hide inaccessible objects? はいへのフィールド 。 Leaving it set to No lets him see other shares, but if he tries to click on any of them an error message will appear.
- In the Access file shares field, de-select create but leave read and write 選択されました。 Do the same for the *Access print shares* field. This does not mean that he can edit all shares - later fields control exactly which ones he can configure.
- Change the Enable per-file_share acls? and *Enable per-print-share acls?* fields to Yes , so that the options set in the next step are used.
- In the Per-share ACLs table, select n/a under *Access share* and Connections for all the shares that he should not be allowed to configure. You should definitely do this for the global share as well, as it sets the defaults for all others. For the shares that you do want the user to manage, select read write in the Access share 桁。 To allow the user to kill clients connected to this share, select kill in the Connections column - or to let him only see connected clients, choose view 代わりは。 The former option is not a good idea security-wise though, as it allows the user to terminate any process on your system. The radio buttons in the security , permissions , file naming and *miscellaneous or printer* columns control which of the sub-icons on the share editing form the user has access to. For each you can choose either edit to allow editing, view to only let him look at the settings or n/a to deny access altogether.
- 保存を押します button at the bottom of the page to activate the new access control settings.
Configuring the Samba Windows File Sharing module
The module assumes that you have installed the Samba package available for your operating system or Linux distribution, or have compiled Samba from source code if no such package is available. If this is not the case (for example if you have compiled the latest version instead of using a package), the paths that it uses for the Samba programs and configuration files will be wrong. This will cause the module's main page to incorrectly display an error message about Samba not being installed.
Fortunately, these paths can be easily changed by clicking on the standard Module Config link in the top-left corner of the main page. On the form that appears if you follow this link are fields that control the module's user interface (under *Configurable options*) as well as the fields for configuration file and program paths (under System configuration )。 The first group of settings can be safely changed at any time, but those that set paths do not generally need to be adjusted as the defaults are usually correct.
コンテンツ
Edit Config File
The samba configuration file can be manually edited as well:
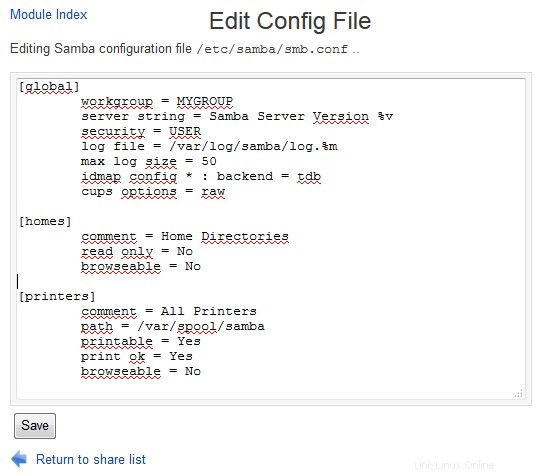 Samba - Edit Config File
 Accessing SWAT from Webmin
| Note: | Samba 4 does not contain SWAT anymore. |
SWAT (which stands for Samba Web Administration Tool) is a program similar to Webmin's Samba module, but included as standard with Samba itself. It provides a web-based administration interface to the configuration file that allows you to create and edit shares and global settings. SWAT is usually run from a super-server like inetd or xinetd, which makes it appear as a web server, usually on port 901 。 Most Samba packages for Linux include the program and an xinetd service for it, but have it disabled by default.
You can also access SWAT through this Webmin module, instead of needing to set it up to be run from inetd or xinetd. Unfortunately, this will not work if Samba has been configured to only allow connections from some IP addresses (using the Hosts to allow field) on the global Security and Access Control ページ。 Because SWAT also uses Samba's configuration files, any IP restrictions that apply globally will apply to it as well. When it is run from Webmin, SWAT is unable to determine the connecting IP address and fails if any IP restrictions are in force.
Assuming that this is not the case on your system, you can use it by following these steps :
- On the module's main page, click on the SWAT アイコン。 If this is the first time you have done so, the SWAT Login form will appear.
- If you do get the login form, enter root in the Username field and the root user's password in the Password 分野。 Because it can be used to totally re-configure your Samba server, SWAT requires users to authenticate first. Webmin will remember the login and password that you enter so that the login form will be bypassed in future.
- After you have logged in the SWAT main menu will appear. Along the top are icons for various parts of the Samba configuration, which when clicked on bring up forms for editing settings. Some things that can be configured in Webmin cannot be in SWAT, and vice versa - so you may find it superior to the Webmin interface for some tasks.
- To return to the module's main page, click on the *Return to share list* link at the bottom of any page. To have Webmin forget your SWAT password so that you can login again, hit the *Logout of SWAT* link in the bottom-right corner.
Be aware that when you login to SWAT through this module, the username and password that you enter are stored un-encrypted in the file /etc/webmin/samba/swat which is readable only by root. If this bothers you for security reasons, either do not use this feature of the module, or remember to click the Logout of SWAT link after you are done using it so that the window of exposure is limited.