ISPConfig3を使用したDebian6.0へのWeb、Eメール、およびMySQLデータベースクラスターのインストール
このチュートリアルでは、ISPConfig3コントロールパネルを使用したDebian6での冗長性、高可用性、および負荷分散に使用されるクラスター化されたWeb、電子メール、データベース、およびDNSサーバーのインストールについて説明します。 MySQLマスター/マスターレプリケーションはサーバー間でMySQLクライアントデータベースをレプリケートするために使用され、ユニゾンは/ var / www(ウェブサイト)フォルダーと/ var / vmail(メールアカウントデータ)フォルダーを同期するために使用されます。
12つのベースシステムのセットアップ
このセットアップでは、1台のマスターサーバー(ISPConfigコントロールパネルインターフェイスを実行)と、マスターサーバーのWeb(Apache)、Eメール(PostfixおよびDovecot)、データベース(MySQL)サービスをミラーリングする1台のスレーブサーバーがあります。
>クラスタ化されたセットアップをインストールするには、Debian6.0の最小インストールで2台のサーバーが必要です。基本設定については、次のチュートリアルの手順1〜8で説明します。
https://www.howtoforge.com/perfect-server-debian-squeeze-with-bind-and-dovecot-ispconfig-3
完全なサーバーチュートリアルのステップ1〜8のみをインストールし、クラスター化されたセットアップでは他のステップは異なるため、他のステップはインストールしないでください。
私の例では、2つのサーバーに次のホスト名とIPアドレスを使用しています。
マスターサーバー
ホスト名:server1.example.tld
IPアドレス:192.168.0.105
スレーブサーバー
ホスト名:server2.example.tld
IPアドレス:192.168.0.106
これらのホスト名またはIPアドレスが次のインストール手順で発生する場合は常に、サーバーのIPおよびホスト名と一致するように変更する必要があります。
22台のサーバーのインストール
次の手順は、マスターサーバーとスレーブサーバーで実行する必要があります。特定の手順がマスターまたはスレーブのみの場合は、説明に赤でメモを追加しました。
vi /etc/hosts
127.0.0.1       localhost
192.168.0.105   server1.example.tld
192.168.0.106   server2.example.tld

# The following lines are desirable for IPv6 capable hosts
::1     localhost ip6-localhost ip6-loopback
fe00::0 ip6-localnet
ff00::0 ip6-mcastprefix
ff02::1 ip6-allnodes
ff02::2 ip6-allrouters
ff02::3 ip6-allhosts
サーバーのホスト名を設定します:
echo server1.example.tld> /etc/hostname
/etc/init.d/hostname.sh start
最初のサーバーでserver1.example.tldを使用し、2番目のサーバーでserver2.example.tldを使用します。
sources.listファイルを編集します...
vi /etc/apt/sources.list
...そして/etc/apt/sources.listにsqueeze-updatesリポジトリが含まれていることを確認します(これにより、ClamAVウイルススキャナーの最新の更新を常に取得できます。このプロジェクトはリリースを頻繁に公開し、古いバージョンが機能しなくなることがあります)。
[...]
deb http://ftp.de.debian.org/debian/ squeeze-updates main
[...]
実行
apt-get update
apt-get upgrade
最新のアップデートをインストールします(ある場合)。
システムクロックをNTP( n )と同期することをお勧めします etwork t ime p rotocol)インターネット上のサーバー。単に実行する
apt-get -y install ntp ntpdate
システム時刻は常に同期されます。
サーバー1:
次に、server1.example.tldに秘密鍵と公開鍵のペアを作成します:
ssh-keygen -t dsa
example@unixlinux.online:〜#ssh-keygen -t dsa
パブリック/プライベートdsaキーペアを生成しています。
キーを保存するファイルを入力してください(/root/.ssh/id_dsa):<- -ENTER
作成されたディレクトリ'/root/.ssh'。
パスフレーズを入力します(パスフレーズがない場合は空):<-ENTER
同じパスフレーズをもう一度入力します:<-ENTER
IDは/root/.ssh/id_dsaに保存されています。
公開鍵は/root/.ssh/id_dsa.pubに保存されています。
鍵の指紋は次のとおりです。
1b: 95:bc:4a:f4:9f:d8:ea:24:31:0f:c9:72:d5:a7:80 example@unixlinux.online
キーのランダムアートイメージは次のとおりです:
+- -[DSA 1024] ---- +
| |
| o o |
| E*。 。 |
| o =o o |
| 。それで 。 |
| +O+。 |
| + + + |
| o。 |
| .o |
+ ----------------- +
example@unixlinux.online:〜#
パスフレーズを入力しないことが重要です。入力しないと、人間の操作なしではミラーリングが機能しないため、Enterキーを押すだけです。
次に、公開鍵をserver2.example.tldにコピーします:
ssh-copy-id -i $HOME/.ssh/id_dsa.pub example@unixlinux.online
example@unixlinux.online:〜#ssh-copy-id -i $ HOME / .ssh / id_dsa.pub example@unixlinux.online
ホスト「192.168.0.101(192.168.0.101)」の信頼性はできません
RSAキーの指紋は25:d8:7a:ee:c2:4b:1d:92:a7:3d:16:26:95:56:62:4eです。
よろしいですか接続を継続しますか(はい/いいえ)? <-はい(これは、server2に初めて接続する場合にのみ表示されます)
警告:既知のホストのリストに「192.168.0.101」(RSA)が恒久的に追加されました。
example @ unixlinux.onlineのパスワード:<-server2 root password
ここで、「ssh'example@unixlinux.online'」を使用してマシンにログインし、チェックインしてみてください:
.ssh/authorized_keys
to make sure we haven't added extra keys that you weren't expecting.
次に、server1の公開鍵が正しく転送されているかどうかserver2を確認します。
server2:
cat $HOME/.ssh/authorized_keys
ssh-dss AAAAB3NzaC1kc3MAAACBAPhiAexgEBexnw0rFG8lXwAuIsca/V+lhmv5lhF3BqUfAbL7e2sWlQlGhxZ8I2UnzZK8Ypffq6Ks+lp46yOs7MMXLqb7JBP9gkgqxyEWqOoUSt5hTE9ghupcCvE7rRMhefY5shLUnRkVH6hnCWe6yXSnH+Z8lHbcfp864GHkLDK1AAAAFQDddQckbfRG4C6LOQXTzRBpIiXzoQAAAIEAleevPHwi+a3fTDM2+Vm6EVqR5DkSLwDM7KVVNtFSkAY4GVCfhLFREsfuMkcBD9Bv2DrKF2Ay3OOh39269Z1rgYVk+/MFC6sYgB6apirMlHj3l4RR1g09LaM1OpRz7pc/GqIGsDt74D1ES2j0zrq5kslnX8wEWSHapPR0tziin6UAAACBAJHxgr+GKxAdWpxV5MkF+FTaKcxA2tWHJegjGFrYGU8BpzZ4VDFMiObuzBjZ+LrUs57BiwTGB/MQl9FKQEyEV4J+AgZCBxvg6n57YlVn6OEA0ukeJa29aFOcc0inEFfNhw2jAXt5LRyvuHD/C2gG78lwb6CxV02Z3sbTBdc43J6y example@unixlinux.online
1つのコマンドでpostfix、dovecot、mysqlをインストールします:
apt-get -y install postfix postfix-mysql postfix-doc mysql-client mysql-server openssl getmail4 rkhunter binutils dovecot-imapd dovecot-pop3d sudo
インストーラーから要求されたら、MySQLrootユーザーの新しいパスワードを入力します。両方のサーバーに同じパスワードを選択する必要があります。次に、以下に説明するように次の質問に答えます。
一般的なタイプの構成? <-インターネットサイト
メール名? <-server1.mydomain.tld
SSL証明書が必要です<-OK
最初のサーバーでserver1.example.tldを使用し、2番目のサーバーでserver2.example.tldを使用します。
MySQLがローカルホストだけでなくすべてのインターフェースでリッスンするようにしたいので、/ etc / mysql / my.cnfを編集して、bind-address =127.0.0.1:
の行をコメントアウトします。vi /etc/mysql/my.cnf
[...]

# Instead of skip-networking the default is now to listen only on
# localhost which is more compatible and is not less secure.
#bind-address           = 127.0.0.1

[...]
次に、MySQLを再起動します:
/etc/init.d/mysql restart
次に、mysqlマスター/マスターレプリケーション用にMySQLサーバーを準備します。
サーバー1:
シェルでMySQLにログインします...
mysql -u root -p
...そしてmysqlのインストール中に選択したMySQLルートパスワードを入力します。次に、MySQLシェルでこのコマンドを実行します:
GRANT REPLICATION SLAVEON*。*TO'slaveuser'@'%' IDENTIFIED BY'slave_user_password';
FLUSH PRIVILEGES;
quit;
'slave_user_password'を置き換えます スレーブがマスターサーバーに接続するために使用する安全なパスワードを使用します。次の手順でこのプレースホルダーを、プレースホルダーが存在する場所で選択したパスワードに置き換えます。
次に、2つのMySQLノードを構成しましょう:
サーバー1:
vi /etc/mysql/my.cnf
[mysqld]で始まるセクションを検索し、そのセクションに次のオプションを入力します(既存の競合するすべてのをコメントアウトします) オプション):
[...]
[mysqld]
server-id = 1
replicate-same-server-id = 0
auto-increment-increment = 2
auto-increment-offset = 1

master-host = 192.168.0.106
master-user = slaveuser
master-password = slave_user_password
master-connect-retry = 60

expire_logs_days        = 10
max_binlog_size         = 500M
log_bin                        = /var/log/mysql/mysql-bin.log
[...]
次に、MySQLを停止します:
/etc/init.d/mysql stop
server2でもほぼ同じことを行います...
サーバー2:
vi /etc/mysql/my.cnf
[mysqld]で始まるセクションを検索し、そのセクションに次のオプションを入力します(既存の競合するすべてのをコメントアウトします) オプション):
[...]
[mysqld]
server-id = 2
replicate-same-server-id = 0
auto-increment-increment = 2
auto-increment-offset = 2

master-host = 192.168.0.105
master-user = slaveuser
master-password = slave_user_password
master-connect-retry = 60

expire_logs_days        = 10
max_binlog_size         = 500M
log_bin                        = /var/log/mysql/mysql-bin.log
[...]
次に、MySQLを停止します:
/etc/init.d/mysql stop
次に、2つのmysqlサーバーを同期する必要があります。これを行うには、mysqlデータディレクトリをマスターからスレーブにコピーし、debian-sys-maintユーザーを含むdebian設定ファイルもコピーします。これは、両方のサーバーで以前にmysqlを停止したときに実行できます。
サーバー1:
scp -pr /var/lib/mysql/* example@unixlinux.online:/var/lib/mysql/
scp -pr /etc/mysql/debian.cnf example@unixlinux.online:/ etc / mysql / debian.cnf
ここで、マスターサーバーでMySQLを再度起動します。
/etc/init.d/mysql start
rootユーザーとしてMySQLシェルにログインします...
mysql -u root -p
...そしてMySQLシェルでこのコマンドを実行します...
SHOW MASTER STATUS;
... MySQLマスターステータスを取得するには:
mysql> SHOW MASTER STATUS;
+ ------------------ + ---------- + --------- ----- + ------------------ +
|ファイル|位置| Binlog_Do_DB | Binlog_Ignore_DB |
+ ------------------ + ---------- + ------------- -+ ------------------ +
| mysql-bin.000002 | 106 | | |
+ ------------------ + ---------- + -------------- + ------------------ +
1行セット(0.00秒)
次のステップに必要な情報は、binlogファイルmysql-bin.000002とbinlog位置106です。以下のserver2にも同じ詳細が必要です。
次に、マスターのMySQLシェルで次のコマンドを実行して、スレーブに接続します。
スレーブの停止;
マスターをMASTER_HOST='192.168.0.106'、MASTER_USER ='slaveuser'、MASTER_PASSWORD ='slave_user_password'、MASTER_LOG_FILE ='mysql-bin.000002'、MASTER_LOG_POS =106;
STARTSLAVEに変更;
次に、スレーブのステータスを確認します:
SHOW SLAVE STATUS \G
Slave_IO_RunningとSlave_SQL_Runningの両方の出力に値Yesが含まれていることが重要です。
サーバー2:
rootユーザーとしてMySQLシェルにログインします...
mysql -u root -p
...そしてMySQLシェルでこのコマンドを実行します:
スレーブの停止;
マスターをMASTER_HOST='192.168.0.105'、MASTER_USER ='slaveuser'、MASTER_PASSWORD ='slave_user_password'、MASTER_LOG_FILE ='mysql-bin.000002'、MASTER_LOG_POS=106に変更;
スレーブの開始;
次に、スレーブのステータスを確認します:
SHOW SLAVE STATUS \G
Slave_IO_RunningとSlave_SQL_Runningの両方の出力に「はい」の値が含まれていることが重要です
これでmysqlマスター/マスターレプリケーションの構成が完了し、他のソフトウェアパッケージのインストールに進みます。
ISPConfig3を使用したDebian6.0へのWeb、Eメール、およびMySQLデータベースクラスターのインストール-2ページ
次の手順は、サーバー1とサーバー2で実行する必要があります。
amavisd-new、SpamAssassin、およびClamAVをインストールするには、次のコマンドを実行します。
apt-get install amavisd-new spamassassin clamav clamav-daemon zoo unzip bzip2 arj nomarch lzop cabextract apt-listchanges libnet-ldap-perl libauthen-sasl-perl clamav-docs daemon libio-string-perl libio-socket-ssl-perl libnet-ident-perl zip libnet-dns-perl
ISPConfig 3のセットアップでは、SpamAssassinフィルターライブラリを内部的にロードするamavisdを使用するため、SpamAssassinを停止してRAMを解放できます。
/etc/init.d/spamassassin stop
update-rc.d -f spamassassin remove
次に、Apache2、PHP5、phpMyAdmin、FCGI、suExec、Pearをインストールし、mcryptは次のようにインストールできます。
apt-get -y install apache2 apache2.2-common apache2-doc apache2-mpm-prefork apache2-utils libexpat1 ssl-cert libapache2-mod-php5 php5 php5-common php5-curl php5-gd php5-mysql php5-imap phpmyadmin php5-cli php5-cgi libapache2-mod-fcgid apache2-suexec php-pear php-auth php5-mcrypt mcrypt php5-imagick imagemagick libapache2-mod-suphp libruby libapache2-mod-ruby php5-xcache libapache2-mod-perl2 sudo zip wget
次の質問が表示されます:
自動的に再構成するWebサーバー:<-apache2
dbconfig-commonを使用してphpmyadminのデータベースを構成しますか? <-いいえ
次に、次のコマンドを実行して、Apacheモジュールのsuexec、rewrite、ssl、actions、およびincludeを有効にします。
a2enmod suexec rewrite ssl actions include ruby dav_fs dav auth_digestが含まれます
PureFTPdとquotaは、次のコマンドでインストールできます:
apt-get -y install pure-ftpd-common pure-ftpd-mysql quota quotatool
ファイル/etc/ default / pure-ftpd-common ...
を編集しますvi /etc/default/pure-ftpd-common
...そして、開始モードがスタンドアロンに設定されていることを確認し、VIRTUALCHROOT =trueを設定します:
[...]
STANDALONE_OR_INETD=standalone
[...]
VIRTUALCHROOT=true
[...]
ファイル/etc/inetd.confを編集して、inetdがftpを開始しようとしないようにします。
vi /etc/inetd.conf
ftp stream tcpで始まる行がある場合は、コメントアウトします(そのようなファイルがない場合は、それで問題ありません。/etc/inetd.confを変更する必要はありません):
[...]
#:STANDARD: These are standard services.
#ftp    stream  tcp     nowait  root    /usr/sbin/tcpd /usr/sbin/pure-ftpd-wrapper
[...]
/etc/inetd.confを変更する必要がある場合は、今すぐinetdを再起動してください:
/etc/init.d/openbsd-inetd restart
次に、FTPおよびTLSセッションを許可するようにPureFTPdを構成します。 FTPは、すべてのパスワードとすべてのデータがクリアテキストで転送されるため、非常に安全でないプロトコルです。 TLSを使用することで、通信全体を暗号化できるため、FTPの安全性が大幅に向上します。
FTPおよびTLSセッションを許可する場合は、次を実行します。
echo 1 > /etc/pure-ftpd/conf/TLS
TLSを使用するには、SSL証明書を作成する必要があります。 / etc / ssl / private /に作成するので、最初にそのディレクトリを作成します:
mkdir -p /etc/ssl/private/
その後、次のようにSSL証明書を生成できます。
openssl req -x509 -nodes -days 7300 -newkey rsa:2048 -keyout /etc/ssl/private/pure-ftpd.pem -out /etc/ssl/private/pure-ftpd.pem
国名(2文字のコード)[AU]:<-国名を入力します(例:「DE」)。
州名または州名(フルネーム)[一部の州]:<-州を入力しますまたは州名。
地域名(例:市)[]:<-市区町村を入力してください。
組織名(例:会社)[Internet Widgits Pty Ltd]:<-組織名を入力してください(例:会社名)
組織単位名(例:セクション)[]:<-組織単位名(例:「IT部門」)を入力します。
一般名(例:あなたの名前)[]:<-システムの完全修飾ドメイン名を入力します(例: "server1.example.com")。
メールアドレス[]:<-メールアドレスを入力します。
SSL証明書の権限を変更します:
chmod 600 /etc/ssl/private/pure-ftpd.pem
次に、PureFTPdを再起動します:
/etc/init.d/pure-ftpd-mysql restart
/ etc/fstabを編集します。私のは次のようになります(マウントポイント/のあるパーティションに、usrjquota =aquota.user、grpjquota =aquota.group、jqfmt =vfsv0を追加しました):
vi /etc/fstab
# /etc/fstab: static file system information.
#
# Use 'blkid' to print the universally unique identifier for a
# device; this may be used with UUID= as a more robust way to name devices
# that works even if disks are added and removed. See fstab(5).
#
# <file system> <mount point>   <type>  <options>       <dump>  <pass>
proc            /proc           proc    defaults        0       0
# / was on /dev/sda1 during installation
UUID=92bceda2-5ae4-4e3a-8748-b14da48fb297 /               ext3    errors=remount-ro,usrjquota=aquota.user,grpjquota=aquota.group,jqfmt=vfsv0 0       1
# swap was on /dev/sda5 during installation
UUID=e24b3e9e-095c-4b49-af27-6363a4b7d094 none            swap    sw              0       0
/dev/scd0       /media/cdrom0   udf,iso9660 user,noauto     0       0
/dev/fd0        /media/floppy0  auto    rw,user,noauto  0       0
クォータを有効にするには、次のコマンドを実行します。
mount -o remount /
quotacheck -avugm
quote-avug
BIND DNSサーバーをインストールします:
apt-get -y install bind9 dnsutils
vlogger、webalizer、awstatsをインストールします:
apt-get -y install vlogger webalizer awstats geoip-database
その後、/ etc / cron.d/awstatsを開きます...
vi /etc/cron.d/awstats
...そしてそのファイル内の両方のcronジョブをコメントアウトします:
#*/10 * * * * www-data [ -x /usr/share/awstats/tools/update.sh ] && /usr/share/awstats/tools/update.sh

# Generate static reports:
 #10 03 * * * www-data [ -x /usr/share/awstats/tools/buildstatic.sh
Jailkitのインストール:Jailkitは、SSHユーザーをchrootする場合にのみ必要です。次のようにインストールできます(重要:JailkitはISPConfigの前にインストールする必要があります-後でインストールすることはできません!):
apt-get -y install build-essential autoconf automake1.9 libtool flex bison
cd / tmp
wget http://olivier.sessink.nl/jailkit/jailkit-2.14.tar.gz
tar xvfz jailkit-2.14.tar.gz
cd jailkit-2.14
./configure
make
make install
cd ..
rm -rf jailkit-2.14 *
fail2banのインストール:これはオプションですが、ISPConfigモニターがログを表示しようとするため、推奨されます:
apt-get install fail2ban
fail2banでPureFTPdとDovecotを監視するには、ファイル/etc/fail2ban/jail.local:
を作成します。vi /etc/fail2ban/jail.local
[pureftpd]
enabled  = true
port     = ftp
filter   = pureftpd
logpath  = /var/log/syslog
maxretry = 3

[dovecot-pop3imap]
enabled = true
filter = dovecot-pop3imap
action = iptables-multiport[name=dovecot-pop3imap, port="pop3,pop3s,imap,imaps", protocol=tcp]
logpath = /var/log/mail.log
maxretry = 5
次に、次の2つのフィルターファイルを作成します。
vi /etc/fail2ban/filter.d/pureftpd.conf
[Definition]
failregex = .*pure-ftpd: \(.*@<HOST>\) \[WARNING\] Authentication failed for user.*
ignoreregex =
vi /etc/fail2ban/filter.d/dovecot-pop3imap.conf
[Definition]
failregex = (?: pop3-login|imap-login): .*(?:Authentication failure|Aborted login \(auth failed|Aborted login \(tried to use disabled|Disconnected \(auth failed|Aborted login \(\d+ authentication attempts).*rip=(?P<host>\S*),.*
ignoreregex =
その後、fail2banを再起動します:
/etc/init.d/fail2ban restart
SquirrelMailウェブメールクライアントをインストールするには、次のコマンドを実行します:
apt-get install squirrelmail
次に、次のシンボリックリンクを作成します...
ln -s /usr/share/squirrelmail/ /var/www/webmail
...そしてSquirrelMailを設定します:
squirrelmail-configure
Dovecot-IMAP / -POP3を使用していることをSquirrelMailに通知する必要があります:
SquirrelMail Configuration:Read:config.php(1.4.0)
--------------------------------- ------------------------
メインメニュー-
1。組織の設定
2。サーバー設定
3。フォルダのデフォルト
4。一般的なオプション
5。テーマ
6。アドレス帳
7。今日のメッセージ(MOTD)
8。プラグイン
9。データベース
10。言語
D.特定のIMAPサーバー用に事前定義された設定を設定します
C色をオンにします
Sデータを保存します
Q終了します
コマンド>><-D
SquirrelMailの構成:読み取り:config.php
--------------------------- ------------------------------
SquirrelMailを構築している間に、いくつかの
設定を発見しましたこれは、他のサーバーではうまく機能しない一部のサーバーでうまく機能します。
IMAPサーバーを選択した場合、このオプションにより、そのサーバーに事前定義された設定が
設定されます。
引き続き、すべてを確認する必要があることに注意してください。
正しい。これによってすべてが変わるわけではありません。
これが変更される設定はごくわずかです。
IMAPサーバーを選択してください:
bincimap =BincIMAPサーバー
courier=クーリエIMAPサーバー
cyrus =Cyrus IMAP server
dovecot =Dovecot Secure IMAP server
exchange =Microsoft Exchange IMAP server
hmailserver =hMailServer
/ 32
uw=ワシントン大学のIMAPサーバー
gmail=Googleメール(Gmail)アカウントへのIMAPアクセス
変更しない
変更しない
-dovecot
SquirrelMailの構成:読み取り:config.php
----------------------- ----------------------------------
SquirrelMailを構築している間に、いくつかを発見しました
一部のサーバーではうまく機能し、他のサーバーではうまく機能しない
設定。 IMAPサーバーを選択した場合、このオプションにより、そのサーバーに事前定義された設定が
設定されます。
引き続き、すべてを確認する必要があることに注意してください。
正しい。これによってすべてが変わるわけではありません。
これが変更される設定はごくわずかです。
IMAPサーバーを選択してください:
bincimap =BincIMAPサーバー
courier=クーリエIMAPサーバー
cyrus =Cyrus IMAP server
dovecot =Dovecot Secure IMAP server
exchange =Microsoft Exchange IMAP server
hmailserver =hMailServer
/ 32
uw=ワシントン大学のIMAPサーバー
gmail=Googleメール(Gmail)アカウントへのIMAPアクセス
imap_server_type = dovecot
default_folder_prefix =
trash_folder = Trash
sent_folder = Sent
draft_folder = Drafts
show_prefix_option = false
default_sub_of_inbox =false
show_contain_subfolders_option =false
optional_delimiter =detect
delete_folder =false
Enterキーを押して続行します...<-Enterキーを押します
Squirrel Mail読む:config.php(1.4.0)
------------------------------------ ---------------------
メインメニュー-
1。組織の設定
2。サーバー設定
3。フォルダのデフォルト
4。一般的なオプション
5。テーマ
6。アドレス帳
7。今日のメッセージ(MOTD)
8。プラグイン
9。データベース
10。言語
D.特定のIMAPサーバー用に事前定義された設定を設定します
C色をオンにします
Sデータを保存します
Q終了します
コマンド>><-S
SquirrelMailの構成:読み取り:config.php(1.4.0)
---------------------- -----------------------------------
メインメニュー-
1。組織の設定
2。サーバー設定
3。フォルダのデフォルト
4。一般的なオプション
5。テーマ
6。アドレス帳
7。今日のメッセージ(MOTD)
8。プラグイン
9。データベース
10。言語
D.特定のIMAPサーバー用に事前定義された設定を設定します
C色をオンにします
Sデータを保存します
Q終了します
コマンド>><-Q
次に、Squirrelmailのグローバルエイリアス/ウェブメールを有効にします:
cd /etc/apache2/conf.d/
ln -s ../../squirrelmail/apache.conf squirrelmail.conf
/etc/init.d/apache2 reload
/etc/apache2/conf.d/squirrelmail.confを開きます...
vi /etc/apache2/conf.d/squirrelmail.conf
...そして次の行を
[...]
Alias /webmail /usr/share/squirrelmail
<Directory /usr/share/squirrelmail>
   Options FollowSymLinks
<IfModule mod_php5.c>
   AddType application/x-httpd-php .php
   php_flag magic_quotes_gpc Off
   php_flag track_vars On
   php_admin_flag allow_url_fopen Off
   php_value include_path .
   php_admin_value upload_tmp_dir /var/lib/squirrelmail/tmp
   php_admin_value open_basedir /usr/share/squirrelmail:/etc/squirrelmail:/var/lib/squirrelmail:/etc/hostname:/etc/mailname
   php_flag register_globals off
</IfModule>
<IfModule mod_dir.c>
   DirectoryIndex index.php
</IfModule>

# access to configtest is limited by default to prevent information leak
<Files configtest.php>
   order deny,allow
   deny from all
   allow from 127.0.0.1
</Files>
</Directory>
[...]
ディレクトリ/var/ lib / squirrelmail / tmp ...
を作成しますmkdir /var/lib/squirrelmail/tmp
...そしてそれをユーザーが所有するようにするwww-data:
chown www-data /var/lib/squirrelmail/tmp
Apacheを再度リロードします:
/etc/init.d/apache2 reload
すでにそれだけです-/etc/apache2/conf.d/squirrelmail.confは、SquirrelMailのインストールディレクトリ/ usr / share/squirrelmailを指す/squirrelmailというエイリアスを定義しています。
これで、次のようにWebサイトからSquirrelMailにアクセスできます。
http://www.example.com/squirrelmail
次のように、ISPConfigコントロールパネルのvhostからアクセスすることもできます(これにはISPConfigでの構成は必要ありません):
http://server1.example.com:8080/squirrelmail
次に、ユニゾンをインストールします。 Unisonは、マスターとスレーブの間で/ var/wwwおよび/var/vmailディレクトリを同期するために使用されます
apt-get install unison
次に、最初のサーバーにユニゾン構成ファイルをインストールします。
サーバー1:
server1に新しいファイル/root/.unison/default.prfを作成します...
mkdir /root/.unison
vi /root/.unison/default.prf
...そして次のコンテンツを追加します:
# Roots of the synchronization
root = /var
root = ssh://192.168.0.106//var/

# Paths to synchronize
path = www
path = vmail

# Some regexps specifying names and paths to ignore
#ignore = Path stats    ## ignores /var/www/stats
#ignore = Path stats/*  ## ignores /var/www/stats/*
#ignore = Path */stats  ## ignores /var/www/somedir/stats, but not /var/www/a/b/c/stats
#ignore = Name *stats   ## ignores all files/directories that end with "stats"
#ignore = Name stats*   ## ignores all files/directories that begin with "stats"
#ignore = Name *.tmp    ## ignores all files with the extension .tmp

#          When set to true, this flag causes the user interface to skip
#          asking for confirmations on non-conflicting changes. (More
#          precisely, when the user interface is done setting the
#          propagation direction for one entry and is about to move to the
#          next, it will skip over all non-conflicting entries and go
#          directly to the next conflict.)
auto=true

#          When this is set to true, the user interface will ask no
#          questions at all. Non-conflicting changes will be propagated;
#          conflicts will be skipped.
batch=true

#          !When this is set to true, Unison will request an extra
#          confirmation if it appears that the entire replica has been
#          deleted, before propagating the change. If the batch flag is
#          also set, synchronization will be aborted. When the path
#          preference is used, the same confirmation will be requested for
#          top-level paths. (At the moment, this flag only affects the
#          text user interface.) See also the mountpoint preference.
confirmbigdel=true

#          When this preference is set to true, Unison will use the
#          modification time and length of a file as a `pseudo inode
#          number' when scanning replicas for updates, instead of reading
#          the full contents of every file. Under Windows, this may cause
#          Unison to miss propagating an update if the modification time
#          and length of the file are both unchanged by the update.
#          However, Unison will never overwrite such an update with a
#          change from the other replica, since it always does a safe
#          check for updates just before propagating a change. Thus, it is
#          reasonable to use this switch under Windows most of the time
#          and occasionally run Unison once with fastcheck set to false,
#          if you are worried that Unison may have overlooked an update.
#          The default value of the preference is auto, which causes
#          Unison to use fast checking on Unix replicas (where it is safe)
#          and slow checking on Windows replicas. For backward
#          compatibility, yes, no, and default can be used in place of
#          true, false, and auto. See the section "Fast Checking" for more
#          information.
fastcheck=true

#          When this flag is set to true, the group attributes of the
#          files are synchronized. Whether the group names or the group
#          identifiers are synchronizeddepends on the preference numerids.
group=true

#          When this flag is set to true, the owner attributes of the
#          files are synchronized. Whether the owner names or the owner
#          identifiers are synchronizeddepends on the preference
#          extttnumerids.
owner=true

#          Including the preference -prefer root causes Unison always to
#          resolve conflicts in favor of root, rather than asking for
#          guidance from the user. (The syntax of root is the same as for
#          the root preference, plus the special values newer and older.)
#          This preference is overridden by the preferpartial preference.
#          This preference should be used only if you are sure you know
#          what you are doing!
prefer=newer

#          When this preference is set to true, the textual user interface
#          will print nothing at all, except in the case of errors.
#          Setting silent to true automatically sets the batch preference
#          to true.
silent=true

#          When this flag is set to true, file modification times (but not
#          directory modtimes) are propagated.
times=true
同期を自動化したいので、server1.example.tldにcronジョブを作成します:
crontab -e
*/5 * * * * /usr/bin/unison &> /dev/null
ISPConfig3を使用したDebian6.0へのWeb、電子メール、およびMySQLデータベースクラスターのインストール-3ページ
3最初の(マスター)サーバーへのISPConfigのインストール
このステップでは、マスターサーバーにISPConfigをインストールします。最新のISPConfig3安定版リリースのダウンロードURLを取得するには、ISPConfig Webサイトにアクセスしてください:http://www.ispconfig.org/ispconfig-3/download/
次に、マスターデータベースに2つの新しいmysqlルートユーザーレコードを追加して、スレーブサーバーのホスト名とIPアドレスからのルートアクセスを許可する必要があります。
server1:
rootユーザーとしてMySQLデータベースにログインします...
mysql -u root -p
...そしてこれらのmysqlクエリを実行します:
CREATE USER'root' @ '192.168.0.106' IDENTIFIED BY'myrootpassword';
GRANT ALL PRIVILEGESON*。 * TO'root' @ '192.168.0.106' IDENTIFIED BY'myrootpassword' WITH GRANT OPTION MAX_QUERIES_PER_HOUR 0 MAX_CONNECTIONS_PER_HOUR 0 MAX_UPDATES_PER_HOUR 0 MAX_USER_CONNECTIONS 0;
CREATE USER'root' @'server2.example.tld' IDENTIFIED BY'myrootpassword';
GRANT ALL PRIVILEGESON*。 * TO'root' @'server2.example.tld' IDENTIFIED BY'myrootpassword' WITH GRANT OPTION MAX_QUERIES_PER_HOUR 0 MAX_CONNECTIONS_PER_HOUR 0 MAX_UPDATES_PER_HOUR 0 MAX_USER_CONNECTIONS 0;
FLUSH PRIVILEGES;
QUIT;
上記のSQLコマンドで、192.168.0.106を2番目のサーバーのIPアドレスに置き換え、server2.example.tldを2番目のサーバーのホスト名に置き換え、「myrootpassword」を目的のルートパスワードに置き換えます。
これで、server1.example.tldのシェルに戻り、最新のISPConfig3安定版リリースをダウンロードします。
cd / tmp
wgethttp://www.ispconfig.org/downloads/ISPConfig-3-stable.tar.gz
tar xfz ISPConfig-3-stable.tar.gz
cd ispconfig3_install /インストール/
インストールスクリプトを開始します:
php -q install.php
言語の選択(en、de)[en]:<-en
インストールモード(標準、エキスパート)[標準]:<-標準
サーバーの完全修飾ホストホスト(FQDN)(例:server1) .domain.tld [server1.example.tld]:<-server1.example.tld
MySQLサーバーのホスト名[localhost]:<-localhost
MySQLルートのユーザー名[root]:<-root
MySQLルートパスワード[]:<-ここにmysqlルートパスワードを入力します
作成するMySQLデータベース[dbispconfig]:<-dbispconfig1(マスターとスレーブのローカルispconfigデータベース名は異なっている必要があります。両方のサーバーが同じデータディレクトリを共有するため)
MySQL charset [utf8]:<-utf8
国名(2文字コード)[AU]:<-DE(ここに住んでいるISO国コードを入力してください)
州または県名(フルネーム)[一部の州]:<-Niedersachsen(入力してくださいここに住んでいる州)
地域名(例:市)[]:<-リューネブルク(ここに市を入力)
組織名(例:会社)[Internet Widgits Pty Ltd]:
組織単位名(例:セクション)[]:
一般名(例:あなたの名前)[]:
メールアドレス[]:
ISPConfigのインストール
ISPConfigポート[8080]:
Do you want a secure (SSL) connection to the ISPConfig web interface (y,n) [y]:
RSA秘密鍵の生成、4096ビット長のモジュラス
........................ ++
......。 ......... ++
eは65537(0x10001)
証明書リクエストに組み込まれる
情報の入力を求められます。
入力しようとしているのは、いわゆる識別名またはDNです。
かなりの数のフィールドがありますが、空白のままにすることができます
一部のフィールドには、デフォルト値があります。
「。」を入力すると、フィールドは空白のままになります。
-----
国名(2文字のコード)[AU]:
州名または州名(完全な) name)[Some-State]:
Locality Name(eg、city)[]:
Organization Name(eg、company)[Internet Widgits Pty Ltd]:
Organizational Unit Name(eg、セクション)[]:
一般名(例:あなたの名前)[]:
メールアドレス[]:
次の「追加」属性を入力してください
証明書リクエストとともに送信されます
チャレンジパスワード[]:
オプションの会社名[]:
インストールディレクトリをクリーンアップします:
rm -rf /tmp/ispconfig3_install
rm -f /tmp/ISPConfig-3-stable.tar.gz
ISPConfig3を使用したDebian6.0へのWeb、Eメール、およびMySQLデータベースクラスターのインストール-4ページ
42番目のサーバーへのISPConfig3のインストール
このステップでは、スレーブサーバー(server2.example.tld)にISPConfigをインストールします。今回は、ISPConfigインストーラーのエキスパートモードを使用して、このノードをマスターispconfigサーバーとデータベースに追加します。 To get the download URL of the latest ISPConfig 3 stable release, please visit the ISPConfig website:http://www.ispconfig.org/ispconfig-3/download/
On server 2:
Download the latest ISPConfig 3 stable release...
cd /tmp
wgethttp://www.ispconfig.org/downloads/ISPConfig-3-stable.tar.gz
tar xfz ISPConfig-3-stable.tar.gz
cd ispconfig3_install/install/
... and start the install script:
php -q install.php
Select language (en,de) [en]:<-- en
Installation mode (standard,expert) [standard]:<-- expert
Full qualified hostname (FQDN) of the server, eg server2.domain.tld [server2.example.tld]:<-- server2.example.tld
MySQL server hostname [localhost]:<-- localhost
MySQL root username [root]:<-- root
MySQL root password []:<-- Enter your mysql root password here
MySQL database to create [dbispconfig]:<-- dbispconfig2 (the local ispconfig database name of the master and slave must be different, as both servers share the same data directory)
MySQL charset [utf8]:<-- utf8
The next two questions are about the internal ISPConfig database user and password.
It is recommended to accept the defaults which are 'ispconfig' as username and a random password.
If you use a different password, use only numbers and chars for the password.
ISPConfig mysql database username [ispconfig]:<-- ispconfig2
ISPConfig mysql database password [54c243fd3f9ca68de7b08527c81dd5ef]:<-- (press return to accept the default)
Shall this server join an existing ISPConfig multiserver setup (y,n) [n]:<-- y
MySQL master server hostname []:<-- server1.example.tld
MySQL master server root username [root]:<-- root
MySQL master server root password []:<-- Enter the root password of the master server here
MySQL master server database name [dbispconfig]:<-- dbispconfig1
Configure Mail (y,n) [y]:<-- y
Country Name (2 letter code) [AU]:<-- DE (Enter the ISO country code where you live here)
State or Province Name (full name) [Some-State]:<-- Niedersachsen (Enter the state where you live here)
Locality Name (eg, city) []:<-- Lueneburg (Enter the city here)
Organization Name (eg, company) [Internet Widgits Pty Ltd]:
Organizational Unit Name (eg, section) []:
Common Name (eg, YOUR name) []:
Email Address []:
Configure Jailkit (y,n) [y]:<-- y
Configure FTP Server (y,n) [y]:<-- y
Configure DNS Server (y,n) [y]:<-- y
Configure Apache Server (y,n) [y]:<-- y
Configure Firewall Server (y,n) [y]:<--y
Install ISPConfig Web-Interface (y,n) [y]:<--y
Installing ISPConfig
ISPConfig Port [8080]:
Enable SSL for the ISPConfig web interface (y,n) [y]:<-- y
Generating RSA private key, 4096 bit long modulus
.................++
.............................................................................................................++
e is 65537 (0x10001)
You are about to be asked to enter information that will be incorporated
into your certificate request.
What you are about to enter is what is called a Distinguished Name or a DN.
There are quite a few fields but you can leave some blank
For some fields there will be a default value,
If you enter '.', the field will be left blank.
-----
Country Name (2 letter code) [AU]:
State or Province Name (full name) [Some-State]:
Locality Name (eg, city) []:
Organization Name (eg, company) [Internet Widgits Pty Ltd]:
Organizational Unit Name (eg, section) []:
Common Name (eg, YOUR name) []:
Email Address []:
Please enter the following 'extra' attributes
to be sent with your certificate request
A challenge password []:
An optional company name []:
Clean up the install directories:
rm -rf /tmp/ispconfig3_install/install
rm -f /tmp/ISPConfig-3-stable.tar.gz
In a last configuration step, we want to connect the ISPConfig interface of the slave directly to the master database. This step is only required if you want to access ISPConfig on port 8080 on the master and on the slave server. Log into the master server as root user on the shell...
On server 1:
... and execute this command:
scp -p /usr/local/ispconfig/interface/lib/config.inc.php example@unixlinux.online:/usr/local/ispconfig/interface/lib/config.inc.php
This command has to be excuted after each ISPConfig update again after you updated ISPConfig on the master and on the slave with the normal ISPConfig update command (ispconfig_update.sh).
Installing A Web, Email &MySQL Database Cluster On Debian 6.0 With ISPConfig 3 - Page 5
5 Configure Replication In ISPConfig
Log into ISPConfig on the master server with a webbrowser:
http://192.168.0.105:8080
Click on System> Server Services> server2.example.tld:
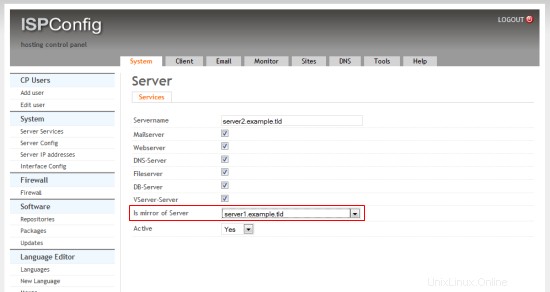
Select "server1.example.tld" in the "is mirror of" field and click on Save.
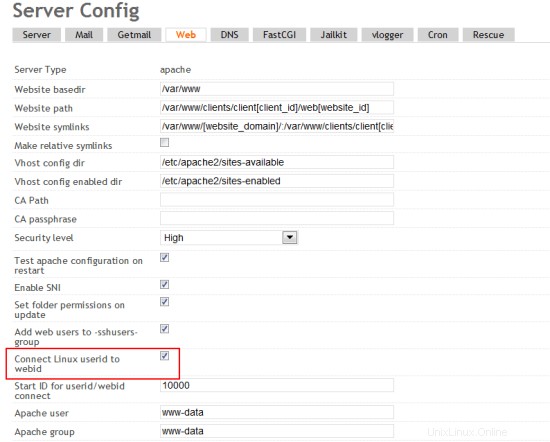
Then open System> Server Config and enable the checkbox "Connect Linux userid to webid" on the "Web" tab:
6 Additional Notes
When you want to activate a firewall on the master or slave server, ensure that you open port 3306 for MySQL on both servers.
7つのリンク
- ISPConfig Website:http://www.ispconfig.org/
- ISPConfig Forum:https://www.howtoforge.com/forums/
- ISPConfig Bugtracker:http://bugtracker.ispconfig.org/