このチュートリアルでは、Debian 9(Stretch)へのNginxWebサーバーのインストールについて説明します。 Nginx(「エンジンx」と発音)は、無料のオープンソースの高性能HTTPサーバーです。 Nginxは、その安定性、豊富な機能セット、シンプルな構成、および低リソース消費で知られています。このチュートリアルでは、PHPをサポートするNginx(PHP-FPMを介して)とMySQLおよびMariaDBのインストールについて説明します。この設定は、LEMP = Lと呼ばれることがよくあります。 inux + nginx(「 e 」と発音) ngine x ")+ M ySQL + P HP)。
このチュートリアルでは、ホスト名server1.example.comとIPアドレス192.168.1.100を使用します。これらの設定は異なる場合があるため、必要に応じて置き換える必要があります。 Debian9サーバーが必要です。このチュートリアルのベースシステムとしてDebian最小サーバーを使用します。
Nginxのセットアップを開始する前に、パッケージリストを更新し、保留中の更新をインストールすることをお勧めします。次のコマンドを実行して、保留中の更新をインストールします。
apt-get update
apt-get upgrade -y
後でnanoエディターを使用して構成ファイルを編集します。 Nanoは次のコマンドでインストールできます:
apt-get -y install nano
Nginxをインストール
Nginxは、次のコマンドでインストールできるDebian9のパッケージとして利用できます。
apt-get -y install nginx
次に、NginxWebサーバーを起動します。
systemctl start nginx.service
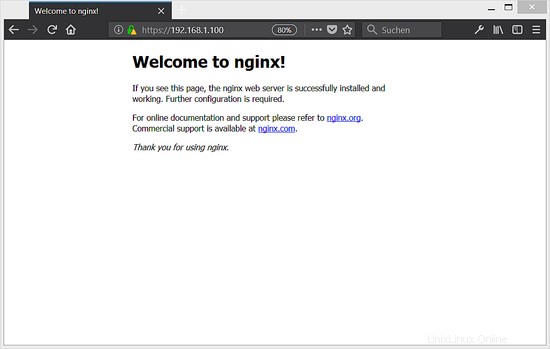
ウェブサーバーのIPアドレスまたはホスト名をブラウザ(例:http://192.168.1.100)に入力すると、次のページが表示されます:
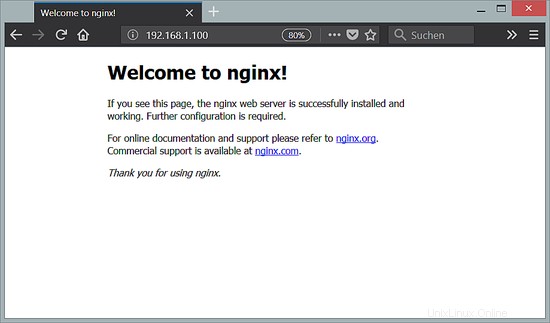
DebianLinuxのデフォルトのnginxドキュメントルートは/var/ www/htmlです。
MySQLまたはMariaDBをインストールします
このステップでは、MySQLまたはMariaDBをインストールする方法を説明します。好みのデータベースシステムを自由に選択できます。 MySQLとMariaDBを一緒にインストールするのではなく、データベースエンジンを1つだけインストールするようにしてください。
Debian 9のMySQLパッケージは、Oracleから直接入手できます。 Oracleは、Oracle MySQLリポジトリをDebianに統合するMySQLリポジトリパッケージを提供しているため、aptを使用してMySQLをインストールおよび更新できます。ダウンロードURLの変更が原因で以下のwgetのダウンロードが失敗した場合に備えて、ここでMySQLaptリポジトリパッケージを入手してください。
cd /tmp
wget https://dev.mysql.com/get/mysql-apt-config_0.8.9-1_all.deb
dpkg -i mysql-apt-config_0.8.9-1_all.deb
リストで[OK]を構成することを選択し、フッターの[OK]ボタンにフォーカスしてEnterキーを押します。これにより、現在の安定バージョンであるMySQL5.7が選択されます。

次に、パッケージリストを更新し、MySQLサーバーとクライアントパッケージをインストールします。
apt-get update
apt-get -y install mysql-community-client mysql-community-server
MySQLインストーラーは、MySQLrootユーザーのパスワードを設定するように要求します。このパスワードはMySQLデータベースへの完全な管理アクセスを許可するため、長くて安全なパスワードを選択してください。

要求に応じてパスワードを再入力します。
MariaDBをインストール
MariaDBをインストールするには、次のコマンドを実行します:
apt-get -y install mariadb-server mariadb-client
MySQLインストーラーとは異なり、MariaDBインストーラーはインストール中にrootパスワードを設定しません。 MariaDBのインストールを保護するには、匿名ユーザーを削除し、テストデータベースを無効にするには、次のコマンドを実行します。
mysql_secure_installation
次のように質問に答えてください:
Change the root password? [Y/n] <-- y
New password: <-- Enter a new MySQL root password
Re-enter new password: <-- Repeat the MySQL root password
Remove anonymous users? [Y/n] <-- y
Disallow root login remotely? [Y/n] <-- y
Remove test database and access to it? [Y/n] <-- y
Reload privilege tables now? [Y/n] <-- y
PHPのインストール
PHP-FPM(PHP FastCGI Process Manager)を介してnginxでPHPを機能させることができます。これは、あらゆるサイズのサイト、特に忙しいサイトに役立ついくつかの追加機能を備えた代替のPHPFastCGI実装です。次のようにPHP7をインストールします。
apt-get -y install php7.0-fpm
PHP-FPMは、ソケット/var/run/php/php7.0-fpm.sockでFastCGIサーバーを実行するデーモンプロセス(systemdユニットファイルphp7.0-fpm.serviceを使用)です。
Nginxの構成
Nginx構成は/etc/nginx/nginx.confにあり、これを今開いています:
nano /etc/nginx/nginx.conf
構成は簡単に理解できます(詳細については、https://www.nginx.com/resources/wiki/start/topics/examples/full/およびここ:https://www.nginx.com/をご覧ください。 resources / wiki /)
まず、keepalive_timeoutを2秒などの適切な値に設定します。
[...]
   keepalive_timeout 2;
[...]
仮想ホストはサーバー{}コンテナで定義されます。デフォルトの仮想ホストはファイル/etc/ nginx / sites-available /defaultで定義されています-次のように変更しましょう:
nano /etc/nginx/sites-available/default
[...]
server {
 listen 80 default_server;
 listen [::]:80 default_server;

 # SSL configuration
 #
 # listen 443 ssl default_server;
 # listen [::]:443 ssl default_server;
 #
 # Note: You should disable gzip for SSL traffic.
 # See: https://bugs.debian.org/773332
 #
 # Read up on ssl_ciphers to ensure a secure configuration.
 # See: https://bugs.debian.org/765782
 #
 # Self signed certs generated by the ssl-cert package
 # Don't use them in a production server!
 #
 # include snippets/snakeoil.conf;

 root /var/www/html;

 # Add index.php to the list if you are using PHP
 index index.php index.html index.htm index.nginx-debian.html;

 server_name _;

 location / {
 # First attempt to serve request as file, then
 # as directory, then fall back to displaying a 404.
 try_files $uri $uri/ =404;
 }

 # pass PHP scripts to FastCGI server
 #
 location ~ \.php$ {
 include snippets/fastcgi-php.conf;

 # With php-fpm (or other unix sockets):
 fastcgi_pass unix:/var/run/php/php7.0-fpm.sock;
 # With php-cgi (or other tcp sockets):
 # fastcgi_pass 127.0.0.1:9000;
 }

 # deny access to .htaccess files, if Apache's document root
 # concurs with nginx's one
 #
 location ~ /\.ht {
 deny all;
 }
}
[...]
サーバー名 _;これをデフォルトのキャッチオール仮想ホストにします(もちろん、www.example.comのようにここでホスト名を指定することもできます)。
index.phpをインデックス行に追加しました。ルート/var/ www / html;ドキュメントルートがディレクトリ/var/ www/htmlであることを意味します。
PHPの重要な部分は、場所〜\ .php${}スタンザです。上記のようにコメントを外して有効にします。 2つのfastcgi_pass行が含まれており、php-7.0-fpm.sockファイルの1つだけのコメントを解除します。
次に、ファイルを保存してNginxをリロードします:
systemctl reload nginx.service
次に/etc/php/7.0/fpm/php.iniを開きます...
nano /etc/php/7.0/fpm/php.ini
...そしてcgi.fix_pathinfo=0を設定します:
[...]
; cgi.fix_pathinfo provides *real* PATH_INFO/PATH_TRANSLATED support for CGI.  PHP's
; previous behaviour was to set PATH_TRANSLATED to SCRIPT_FILENAME, and to not grok
; what PATH_INFO is.  For more information on PATH_INFO, see the cgi specs.  Setting
; this to 1 will cause PHP CGI to fix its paths to conform to the spec.  A setting
; of zero causes PHP to behave as before.  Default is 1.  You should fix your scripts
; to use SCRIPT_FILENAME rather than PATH_TRANSLATED.
; http://php.net/cgi.fix-pathinfo
cgi.fix_pathinfo=0
[...]
...次に、POST制限とファイルアップロード制限を引き上げることができます:
post_max_size = 25M
upload_max_filesize = 20M
PHPで大きなファイルをアップロードする場合は、値を5億以上に上げる必要があります。 Mはここでメガバイトを表します。
最後に、タイムゾーンをローカルタイムゾーンに設定することをお勧めします。私の場合、タイムゾーンは次のとおりです。
date.timezone = 'Europe/Berlin'
サポートされているタイムゾーンのリストはここにあります。
PHP-FPMをリロードして、変更を適用します。
systemctl reload php7.0-fpm.service
次に、ドキュメントルート/ var / www /html/に次のPHPファイルを作成します。
nano /var/www/html/info.php
<?php
phpinfo();
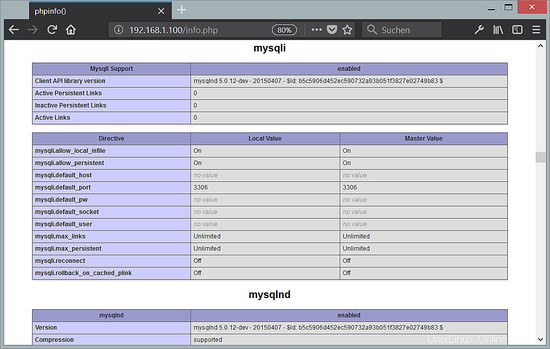
次に、そのファイルをブラウザ(http://192.168.1.100/info.phpなど)で呼び出します。

ご覧のとおり、PHP 7は機能しており、サーバーAPI行に示されているように、FPM/FastCGIを介して機能しています。さらに下にスクロールすると、PHPですでに有効になっているすべてのモジュールが表示されます。 MySQLはそこにリストされていません。つまり、PHPではMariaDB/MySQLがまだサポートされていません。
PHPでのMySQL/MariaDBサポートの取得
PHPでMySQLをサポートするには、php7.0-mysqlndパッケージをインストールします。他のPHPモジュールをインストールすることをお勧めします。また、アプリケーションでそれらが必要になる場合もあります。次のような利用可能なPHPモジュールを検索できます:
apt-cache search php7.0
必要なものを選び、次のようにインストールします:
apt-get -y install php7.0-mysqlnd php7.0-curl php7.0-gd php7.0-intl php-pear php-imagick php7.0-imap php7.0-mcrypt php-memcache php7.0-intl php7.0-pspell php7.0-recode php7.0-sqlite3 php7.0-tidy php7.0-xmlrpc php7.0-xsl
PHP-FPMをリロードします:
systemctl reload php7.0-fpm.service
次に、ブラウザにhttp://192.168.1.100/info.phpをリロードし、モジュールセクションまでスクロールダウンします。これで、MySQLiやMySQLndモジュールなど、たくさんの新しいモジュールが見つかるはずです。
PHP-FPMにTCP接続を使用させる(オプション)
デフォルトでは、PHP-FPMはソケット/var/run/php/php7.0-fpm.sockをリッスンしています。これは、PHPをNginxに接続するための推奨される最速の方法です。ただし、Nginxがネットワーク経由でPHPに接続できるようにする設定がある場合があります。 PHP-FPMにTCP接続を使用させることができます。これを行うには、/ etc / php / 7.0 / fpm / pool.d / www.conf ...
を開きます。nano /etc/php/7.0/fpm/pool.d/www.conf
...そしてリッスンラインを次のように見せます:
[...]
;listen = /var/run/php5-fpm.sock
listen = 127.0.0.1:9000
[...]
これにより、PHP-FPMはIP 127.0.0.1(localhost)のポート9000でリッスンします。システムで使用されていないポートを使用していることを確認してください。
次に、PHP-FPMをリロードします:
systemctl reload php7.0-fpm.service
次に、Nginx構成とすべてのvhostを確認し、fastcgi_pass unix:/var/run/php7.0-fpm.sock;という行を変更します。 fastcgi_pass 127.0.0.1:9000;、例:このように:
nano /etc/nginx/sites-available/default
[...]
 location ~ \.php$ {
 include snippets/fastcgi-php.conf;

 # With php-fpm (or other unix sockets):
 # fastcgi_pass unix:/var/run/php/php7.0-fpm.sock;
 # With php-cgi (or other tcp sockets):
 fastcgi_pass 127.0.0.1:9000;
 }
[...]
最後に、Nginxをリロードします:
systemctl reload nginx.service
NginxでSSLとHTTP/2を有効にする
今日のほとんどのWebサイトは、SSL(TLS)を使用して安全なアクセスを提供しています。この章では、SSL証明書を作成する方法とNginxでSSLをアクティブ化する方法を紹介します。自己署名SSL証明書を使用するか、Let'sEncryptから正式に署名されたSSL証明書を要求することができます。 Let#s暗号化SSL証明書は無料で利用できますが、DNSでサーバーを指す有効なドメイン名がすでに必要です。ドメイン名がまだない場合、またはサーバーがローカルネットワーク上にあり、外部からアクセスできない場合は、自己署名SSL証明書を使用してください。自己署名SSL証明書の手順に従うか、以下の証明書を暗号化しましょう。両方ではありません。
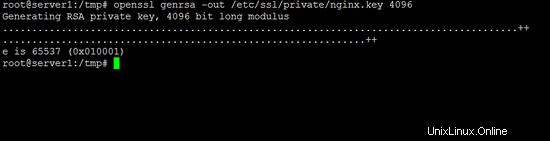
OpenSSLコマンドを使用してSSLキーファイルを作成します:
openssl genrsa -out /etc/ssl/private/nginx.key 4096
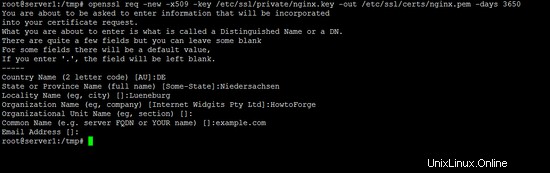
次に、自己署名SSL証明書を作成します:
openssl req -new -x509 -key /etc/ssl/private/nginx.key -out /etc/ssl/certs/nginx.pem -days 3650
コマンドは、国、州、都市、会社名、ドメイン名などの詳細を要求します。
Nginxで自己署名SSL証明書をアクティブ化します。これを行うには、nginx.confファイルをもう一度編集します:
nano / etc / nginx / sites-available / default
サーバー部分を次のようにします:
server {
 listen 80 default_server;
 listen [::]:80 default_server;

 # SSL configuration

 listen 443 ssl http2 default_server;
 listen [::]:443 ssl http2 default_server;

 ssl on;
 ssl_certificate_key /etc/ssl/private/nginx.key;
 ssl_certificate /etc/ssl/certs/nginx.pem;
 ssl_protocols TLSv1 TLSv1.1 TLSv1.2;
 ssl_ciphers 'ECDHE-ECDSA-CHACHA20-POLY1305:ECDHE-RSA-CHACHA20-POLY1305:ECDHE-ECDSA-AES128-GCM-SHA256:ECDHE-RSA-AES128-GCM-SHA256:ECDHE-ECDSA-AES256-GCM-SHA384:ECDHE-RSA-AES256-GCM-SHA384:DHE-RSA-AES128-GCM-SHA256:DHE-RSA-AES256-GCM-SHA384:ECDHE-ECDSA-AES128-SHA256:ECDHE-RSA-AES128-SHA256:ECDHE-ECDSA-AES128-SHA:ECDHE-RSA-AES256-SHA384:ECDHE-RSA-AES128-SHA:ECDHE-ECDSA-AES256-SHA384:ECDHE-ECDSA-AES256-SHA:ECDHE-RSA-AES256-SHA:DHE-RSA-AES128-SHA256:DHE-RSA-AES128-SHA:DHE-RSA-AES256-SHA256:DHE-RSA-AES256-SHA:ECDHE-ECDSA-DES-CBC3-SHA:ECDHE-RSA-DES-CBC3-SHA:EDH-RSA-DES-CBC3-SHA:AES128-GCM-SHA256:AES256-GCM-SHA384:AES128-SHA256:AES256-SHA256:AES128-SHA:AES256-SHA:DES-CBC3-SHA:!DSS';
 ssl_prefer_server_ciphers on;

 # Note: You should disable gzip for SSL traffic.
 # See: https://bugs.debian.org/773332
 #
 # Read up on ssl_ciphers to ensure a secure configuration.
 # See: https://bugs.debian.org/765782
 #
 # Self signed certs generated by the ssl-cert package
 # Don't use them in a production server!
 #
 # include snippets/snakeoil.conf;

 root /var/www/html;

 # Add index.php to the list if you are using PHP
 index index.php index.html index.htm index.nginx-debian.html;

 server_name _;

 location / {
 # First attempt to serve request as file, then
 # as directory, then fall back to displaying a 404.
 try_files $uri $uri/ =404;
 }

 # pass PHP scripts to FastCGI server
 #
 location ~ \.php$ {
 include snippets/fastcgi-php.conf;

 # With php-fpm (or other unix sockets):
 fastcgi_pass unix:/var/run/php/php7.0-fpm.sock;
 # With php-cgi (or other tcp sockets):
 # fastcgi_pass 127.0.0.1:9000;
 }

 # deny access to .htaccess files, if Apache's document root
 # concurs with nginx's one
 #
 location ~ /\.ht {
 deny all;
 }
}
Nginxを再起動して変更を適用します。
systemctl restart nginx.service
次に、ブラウザでサーバーのhttpsURLを開きます。 https://192.169.1.100/。続行するには、セキュリティ警告を受け入れる必要があります。その後、Nginxスタートページが表示されます。ブラウザのURLバーにある警告アイコンは、自己署名SSL証明書を使用していることを示しています。
この章では、無料のLet'sEncryptSSL証明書を使用してNginxサーバーを保護する方法について説明します。前提条件は、現在NginxをインストールしているサーバーのIPを指すドメイン名を所有していることです。
無料のSSL証明書を取得するために使用されるLet'sEncryptクライアントであるCertbotをインストールします。
apt-get -y install certbot python-certbot-nginx
Webサイト構成ファイル/etc/ nginx / sites-available / defaultを編集し、server_name行にドメイン名を設定します:
nano /etc/nginx/sites-available/default
編集後の行は次のようになります:
server_name example.com;
example.comを独自のドメイン名に置き換えます。複数のドメイン名またはサブドメインがある場合は、空白で区切って追加します。
server_name example.com www.example.com otherdomain.tld;
次に、Certbotのnginxプラグインを使用して暗号化してからSSL証明書を要求します。
certbot --nginx -d example.com
-dオプションを繰り返すことにより、複数のドメインを追加できます。例:
certbot certonly --webroot -d example.com -d www.example.com
Certbotは、更新通知の送信先となる電子メールアドレスを要求します。ここに有効なメールアドレスを入力してください:
Enter email address (used for urgent renewal and security notices) (Enter 'c' to cancel): [email protected]
「A」を入力してライセンス条項に同意します。
-------------------------------------------------------------------------------
Please read the Terms of Service at
https://letsencrypt.org/documents/LE-SA-v1.2-November-15-2017.pdf. You must
agree in order to register with the ACME server at
https://acme-v01.api.letsencrypt.org/directory
-------------------------------------------------------------------------------
(A)gree/(C)ancel: A
ここで、SSL証明書を要求する別のダイアログが表示されます。回答を赤で追加しました。
Saving debug log to /var/log/letsencrypt/letsencrypt.log
Obtaining a new certificate
Performing the following challenges:
http-01 challenge for example.com
http-01 challenge for www.example.com
Select the webroot for example.com:
-------------------------------------------------------------------------------
1: Enter a new webroot
-------------------------------------------------------------------------------
Press 1 [enter] to confirm the selection (press 'c' to cancel): 1
Input the webroot for example.com: (Enter 'c' to cancel):/var/www/html
Select the webroot for www.example.com:
-------------------------------------------------------------------------------
1: Enter a new webroot
2: /var/www/html
-------------------------------------------------------------------------------
Select the appropriate number [1-2] then [enter] (press 'c' to cancel): 2
Waiting for verification...
Cleaning up challenges
Generating key (2048 bits): /etc/letsencrypt/keys/0000_key-certbot.pem
Creating CSR: /etc/letsencrypt/csr/0000_csr-certbot.pem
IMPORTANT NOTES:
- Congratulations! Your certificate and chain have been saved at
/etc/letsencrypt/live/example.com/fullchain.pem. Your cert will
expire on 2018-04-23. To obtain a new or tweaked version of this
certificate in the future, simply run certbot again. To
non-interactively renew *all* of your certificates, run "certbot
renew"
- If you like Certbot, please consider supporting our work by:
Donating to ISRG / Let's Encrypt: https://letsencrypt.org/donate
Donating to EFF: https://eff.org/donate-le
Certbotの「--nginx」オプションを使用する別の方法がありますが、Let's EncryptのTLS-SNI-01の問題のため、この方法は現時点では機能していないようです。上記のように、webrootメソッドは正常に機能します。
新しく生成されたSSL証明書は、/ etc /letsencrypt /live/フォルダーのサブフォルダーにあります。正確なパスはCertbotの出力に表示されます。
次に、このSSL証明書をNginxWebサイトファイルに追加します。 Nginxのデフォルトファイルを編集します:
nano /etc/nginx/sites-available/default
SSLセクションを次のように変更します:
[...]
server {
 listen 80 default_server;
 listen [::]:80 default_server;

 # SSL configuration

 listen 443 ssl http2 default_server;
 listen [::]:443 ssl http2 default_server;

 ssl on;
 ssl_certificate_key /etc/letsencrypt/live/example.com/privkey.pem;
 ssl_certificate /etc/letsencrypt/live/example.com/fullchain.pem;
 ssl_protocols TLSv1 TLSv1.1 TLSv1.2;
 ssl_ciphers 'ECDHE-ECDSA-CHACHA20-POLY1305:ECDHE-RSA-CHACHA20-POLY1305:ECDHE-ECDSA-AES128-GCM-SHA256:ECDHE-RSA-AES128-GCM-SHA256:ECDHE-ECDSA-AES256-GCM-SHA384:ECDHE-RSA-AES256-GCM-SHA384:DHE-RSA-AES128-GCM-SHA256:DHE-RSA-AES256-GCM-SHA384:ECDHE-ECDSA-AES128-SHA256:ECDHE-RSA-AES128-SHA256:ECDHE-ECDSA-AES128-SHA:ECDHE-RSA-AES256-SHA384:ECDHE-RSA-AES128-SHA:ECDHE-ECDSA-AES256-SHA384:ECDHE-ECDSA-AES256-SHA:ECDHE-RSA-AES256-SHA:DHE-RSA-AES128-SHA256:DHE-RSA-AES128-SHA:DHE-RSA-AES256-SHA256:DHE-RSA-AES256-SHA:ECDHE-ECDSA-DES-CBC3-SHA:ECDHE-RSA-DES-CBC3-SHA:EDH-RSA-DES-CBC3-SHA:AES128-GCM-SHA256:AES256-GCM-SHA384:AES128-SHA256:AES256-SHA256:AES128-SHA:AES256-SHA:DES-CBC3-SHA:!DSS';
 ssl_prefer_server_ciphers on;

 # Note: You should disable gzip for SSL traffic.
 # See: https://bugs.debian.org/773332
 #
 # Read up on ssl_ciphers to ensure a secure configuration.
 # See: https://bugs.debian.org/765782
 #
 # Self signed certs generated by the ssl-cert package
 # Don't use them in a production server!
 #
 # include snippets/snakeoil.conf;

 root /var/www/html;

 # Add index.php to the list if you are using PHP
 index index.php index.html index.htm index.nginx-debian.html;

 server_name _;

 location / {
 # First attempt to serve request as file, then
 # as directory, then fall back to displaying a 404.
 try_files $uri $uri/ =404;
 }

 # pass PHP scripts to FastCGI server
 #
 location ~ \.php$ {
 include snippets/fastcgi-php.conf;

 # With php-fpm (or other unix sockets):
 fastcgi_pass unix:/var/run/php/php7.0-fpm.sock;
 # With php-cgi (or other tcp sockets):
 # fastcgi_pass 127.0.0.1:9000;
 }

 # deny access to .htaccess files, if Apache's document root
 # concurs with nginx's one
 #
 location ~ /\.ht {
 deny all;
 }
}
[...]
SSL証明書パスの「example.com」を独自のドメイン名に置き換えます。 Nginxを再起動して変更を適用します。
systemctl restart nginx.service
このチュートリアルは、Howtoforgeサブスクライバー向けにOVA/OVF形式ですぐに使用できる仮想マシンとして利用できます。 VM形式は、VMWareおよびVirtualboxと互換性があり、おそらくこの形式をインポートできる他のツールと互換性があります。上部の右側のメニューにダウンロードリンクがあります。ファイル名をクリックしてダウンロードを開始します。
VMのログインの詳細は次のとおりです。
SSHログイン
ユーザー名:管理者
パスワード:howtoforge
「su」を実行してrootユーザーになります。rootパスワードも「howtoforge」です。
仮想マシンイメージは、データベースサーバーとしてMySQLを使用します。
MySQLログイン
ユーザー名:root
パスワード:howtoforge
最初の起動後にパスワードを変更してください。
VMは静的IP192.168.1.100用に構成されており、IPはファイル/ etc / network/interfacesで変更できます。
- nginx:https://nginx.net/
- PHP:http://www.php.net/
- MySQL:https://www.mysql.com/
- MariaDB:https://mariadb.org/
- Debian:https://www.debian.org/