このチュートリアルでは、Ubuntu20.04LTSにLet'sEncryptSSLを使用してApacheをインストールする方法を示します。知らなかった方のために、Let'sEncryptは無料で提供する認証局です。 WebサイトのSSL証明書。Let'sEncryptが提供するすべてのSSL証明書は、コストや料金なしで本番/商用目的で使用できます。このガイドでは、Apache Webサーバーのインストール、Certbotのインストール、Certbotを使用したSSL証明書の生成について説明します。 SSLテストSSLラボからA+を取得するための追加のSSL構成を作成します。
この記事は、少なくともLinuxの基本的な知識があり、シェルの使用方法を知っていること、そして最も重要なこととして、サイトを独自のVPSでホストしていることを前提としています。インストールは非常に簡単で、ルートアカウントで実行されていますが、そうでない場合は、'sudoを追加する必要があります。 ‘ルート権限を取得するコマンドに。 Ubuntu 20.04(Focal Fossa)に無料のSSLを使用してApacheを段階的にインストールする方法を紹介します。 Ubuntu 18.04、16.04、およびLinuxMintなどの他のDebianベースのディストリビューションでも同じ手順に従うことができます。
前提条件
- 次のオペレーティングシステムのいずれかを実行しているサーバー:Ubuntu 20.04、18.04、16.04、およびLinuxMintなどの他のDebianベースのディストリビューション。
- 潜在的な問題を防ぐために、OSの新規インストールを使用することをお勧めします。
- サーバーへのSSHアクセス(またはデスクトップを使用している場合はターミナルを開く)。
non-root sudo userまたはroot userへのアクセス 。non-root sudo userとして行動することをお勧めします ただし、ルートとして機能するときに注意しないと、システムに害を及ぼす可能性があるためです。
Ubuntu 20.04 LTSFocalFossaにLet'sEncryptSSLを使用してApacheをインストールする
手順1.まず、次のaptを実行して、すべてのシステムパッケージが最新であることを確認します。 ターミナルのコマンド。
sudo apt update
sudo apt upgrade
ステップ2.Ubuntu20.04にApacheをインストールします。
デフォルトでは、ApacheはUbuntu 20.04ベースリポジトリで使用できます。次に、以下のコマンドを実行して、ApacheWebサーバーをUbuntuシステムにインストールします。
sudo apt install apache2 apache2-utils
構成を開始する前に、Apacheサービスがシステムで実行されていることを確認してください。次のコマンドを実行して、apacheサービスのステータスを確認してください。
sudo systemctl status apache2
sudo systemctl start apache2
sudo systemctl enable apache2
手順3.ファイアウォールを構成します。
以下のコマンドを実行して、ファイアウォールのポート80へのアクセスを許可します。
sudo ufw allow 80
sudo ufw allow 443
sudo ufw enable
ステップ4.Apache仮想ホストを構成します。
まず、ウェブサイトのファイルを保持するルートディレクトリを作成します:
sudo mkdir -p /var/www/html/your-domain.com/
次に、ディレクトリの所有権とグループを変更します:
sudo chown -R www-data:www-data /var/www/html/your-domain.com/
WebサイトのHTTPバージョンを提供するApache仮想ホストを作成しましょう:
sudo nano /etc/apache2/sites-available/your-domain.com.conf
次の行を追加します:
<VirtualHost *:80>

   ServerName your-domain.com
   ServerAlias www.your-domain.com
   ServerAdmin admin@your-domain.com
   DocumentRoot /var/www/html/your-domain.com

   ErrorLog ${APACHE_LOG_DIR}/your-domain.com_error.log
   CustomLog ${APACHE_LOG_DIR}/your-domain.com_access.log combined

   <Directory /var/www/html/your-domain.com>
      Options FollowSymlinks
      AllowOverride All
      Require all granted
   </Directory>

</VirtualHost>
保存して閉じてから、Apache Webサーバーを再起動して、変更を加えます。
sudo a2ensite your-domain.com.conf
sudo a2enmod ssl rewrite
sudo systemctl restart apache2
ステップ5.Let'sEncrypt SSLFreeCertificateでApacheを保護します。
Certbotをインストールする前に、システムでユニバースリポジトリを有効にします:
sudo apt install software-properties-common
sudo add-apt-repository universe
sudo apt update
次に、CertbotforApacheをUbuntuシステムにインストールします。
sudo apt install certbot python3-certbot-apache
最後に、Certbotコマンドを使用してLet’s Encrypt証明書を作成し、証明書を使用するようにApacheを構成します。
sudo certbot --apache
出力:
-------------------------------------------------------------------------------
Congratulations! You have successfully enabled https://your-domain.com and
https://www.your-domain.com

You should test your configuration at:
https://www.ssllabs.com/ssltest/analyze.html?d=your-domain.com
https://www.ssllabs.com/ssltest/analyze.html?d=www.your-domain.com
-------------------------------------------------------------------------------

IMPORTANT NOTES:
- Congratulations! Your certificate and chain have been saved at:
/etc/letsencrypt/live/idroot.us/fullchain.pem
Your key file has been saved at:
/etc/letsencrypt/live/your-domain.com/privkey.pem
Your cert will expire on 2021-10-05. To obtain a new or tweaked
version of this certificate in the future, simply run certbot again
with the "certonly" option. To non-interactively renew *all* of
your certificates, run "certbot renew"
- If you like Certbot, please consider supporting our work by:

Donating to ISRG / Let's Encrypt: https://letsencrypt.org/donate
Donating to EFF: https://eff.org/donate-le
ステップ5.自動更新CertbotSSL。
Let's Encryptの証明書の有効期間は90日であり、期限内に更新されるようにする必要があります。更新プロセスは自動化され、systemd Certbotクライアントによって提供されるサービス。この更新プロセスが正しく機能していることをテストするには、次のコマンドを実行します。
sudo certbot renew --dry-run
出力:
Saving debug log to /var/log/letsencrypt/letsencrypt.log

- - - - - - - - - - - - - - - - - - - - - - - - - - - - - - - - - - - - - - - -
Processing /etc/letsencrypt/renewal/your-domain.com
- - - - - - - - - - - - - - - - - - - - - - - - - - - - - - - - - - - - - - - -
Account registered.
Simulating renewal of an existing certificate for your-domain.com and www.your-domain.com

- - - - - - - - - - - - - - - - - - - - - - - - - - - - - - - - - - - - - - - -
Congratulations, all simulated renewals succeeded:
  /etc/letsencrypt/live/your-domain.com/fullchain.pem (success)
- - - - - - - - - - - - - - - - - - - - - - - - - - - - - - - - - - - - - - - -
ステップ7.SSLをテストします。
これで、ssllabs.com / ssltest /にアクセスして、ドメインでSSLテストを実行できます:
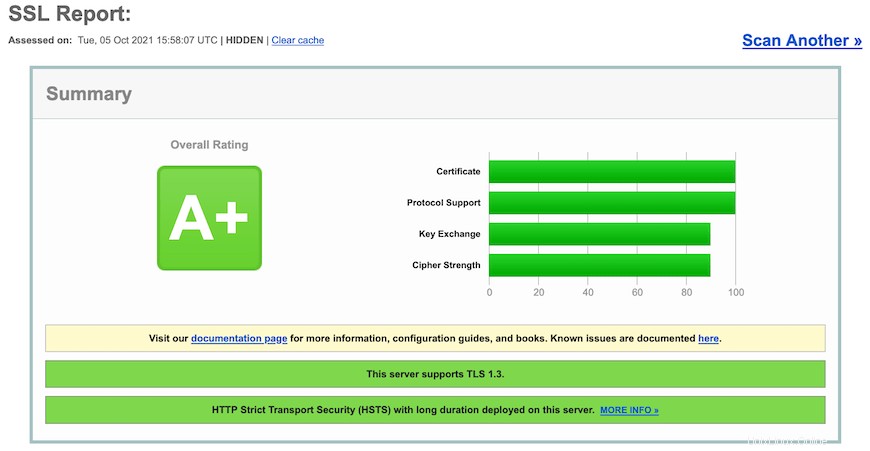
おめでとうございます!無料のSSL証明書を使用してApacheを正常にインストールしました。ApacheWebサーバーをインストールするためにこのチュートリアルを使用していただきありがとうございますUbuntu 20.04 LTSFocalFossaシステムにSSLを暗号化しましょう。 、Apacheの公式Webサイトを確認することをお勧めします。