MySQLは最も人気のあるリレーショナルデータベース管理システムです。前提として、MySQLはインターネット上で実行されている3つおきのWebサイトで使用されています。 MySQL公式チームは、UbuntuシステムにインストールするMySQL8用のDebianパッケージを提供しています。
このチュートリアルは、Ubuntu 18.04BionicBeaverシステムにMySQLサーバーをインストールするのに役立ちます。
前提条件
シェルアクセスを使用してUbuntu18.04システムにログインします。リモートシステムの場合はSSHで接続します。 Windowsユーザーは、SSH接続にPuttyまたはその他の代替アプリケーションを使用できます。
ssh [email protected]
以下のコマンドを実行して、現在のパッケージを最新バージョンにアップグレードします。
sudo apt update && sudo apt upgrade
ステップ1-MySQLPPAを構成する
MySQLチームは、Ubuntuオペレーティングシステム用の公式MySQLPPAを提供しています。パッケージをダウンロードしてUbuntu18.04システムにインストールすると、PPAファイルがシステムに追加されます。以下のコマンドを実行してPPAを有効にします。
wget http://repo.mysql.com/mysql-apt-config_0.8.10-1_all.deb
sudo dpkg -i mysql-apt-config_0.8.10-1_all.deb
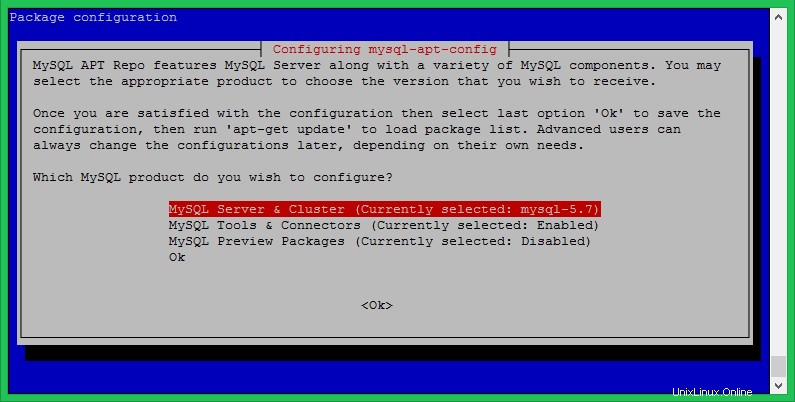
MySQLaptconfigパッケージのインストール中。以下のスクリーンショットに示すように最初の行を選択し、Enterキーを押します。ここで、システムにインストールするMySQLバージョン(8.0または5.7)を選択できます。その後、「OK」というテキストの最後の行を選択し、Enterキーを押してこれを完了します。

ステップ2–MySQL8をUbuntu18.04にインストールする
システムはMySQLインストールの準備ができています。次のコマンドを実行して、MySQLをUbuntu18.04システムにインストールします。
sudo apt-key adv --keyserver keys.gnupg.net --recv-keys 8C718D3B5072E1F5
sudo apt update
sudo apt install mysql-server
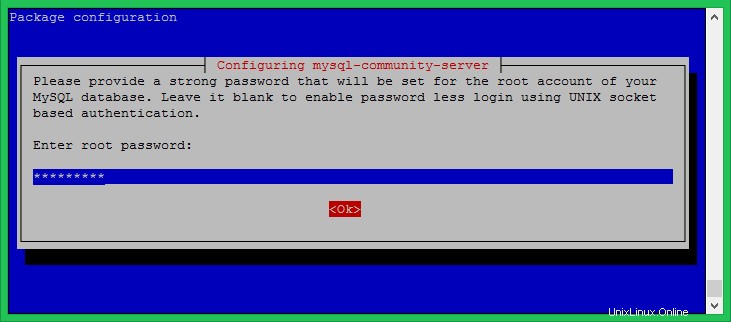
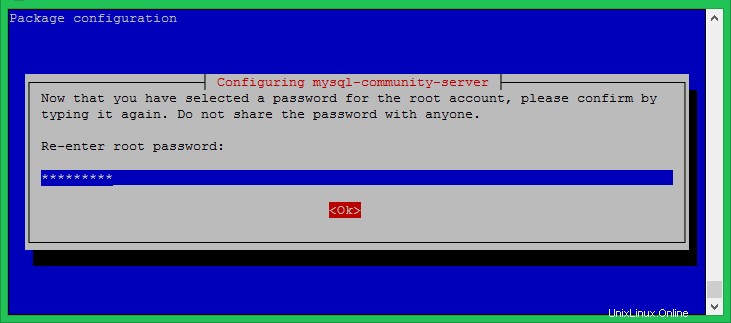
インストールプロセスでは、デフォルトとして設定するrootパスワードの入力を求められます。安全なパスワードを入力し、パスワードウィンドウを確認します。これは、MySQLサーバーにログインするために必要なMySQLrootユーザーのパスワードになります。


ステップ3–MySQLの安全なインストール
システムで以下のコマンドを実行して、データベースサーバーのセキュリティを変更します。これはいくつかの質問を促します。高度なセキュリティは、はいに対するすべての答えを提供しますか 。
sudo mysql_secure_installation
ここでは、パスワードの検証プラグインを有効/無効にし、パスワードに必要な強度を設定し、匿名ユーザーを削除し、rootログインをリモートで禁止し、テストデータベースを削除してアクセスし、変更を適用した後に再読み込み権限を再読み込みできます。
以下の出力と私が取ったアクションを参照してください:
Securing the MySQL server deployment.

Enter password for user root:

VALIDATE PASSWORD PLUGIN can be used to test passwords
and improve security. It checks the strength of password
and allows the users to set only those passwords which are
secure enough. Would you like to setup VALIDATE PASSWORD plugin?

Press y|Y for Yes, any other key for No: y

There are three levels of password validation policy:

LOW    Length >= 8
MEDIUM Length >= 8, numeric, mixed case, and special characters
STRONG Length >= 8, numeric, mixed case, special characters and dictionary file

Please enter 0 = LOW, 1 = MEDIUM and 2 = STRONG: 2
Using existing password for root.

Estimated strength of the password: 50
Change the password for root ? ((Press y|Y for Yes, any other key for No) : y

New password:

Re-enter new password:

Estimated strength of the password: 100
Do you wish to continue with the password provided?(Press y|Y for Yes, any other key for No) : y
By default, a MySQL installation has an anonymous user,
allowing anyone to log into MySQL without having to have
a user account created for them. This is intended only for
testing, and to make the installation go a bit smoother.
You should remove them before moving into a production
environment.

Remove anonymous users? (Press y|Y for Yes, any other key for No) : y
Success.


Normally, root should only be allowed to connect from
'localhost'. This ensures that someone cannot guess at
the root password from the network.

Disallow root login remotely? (Press y|Y for Yes, any other key for No) : y
Success.

By default, MySQL comes with a database named 'test' that
anyone can access. This is also intended only for testing,
and should be removed before moving into a production
environment.


Remove test database and access to it? (Press y|Y for Yes, any other key for No) : y
 - Dropping test database...
Success.

 - Removing privileges on test database...
Success.

Reloading the privilege tables will ensure that all changes
made so far will take effect immediately.

Reload privilege tables now? (Press y|Y for Yes, any other key for No) : y
Success.

All done!
ステップ4–MySQLに接続する
MySQLサーバーがシステムにインストールされています。次に、コマンドラインを使用してMySQLデータベースに接続します。上記の手順で設定したrootアカウントのパスワードを使用します。
 mysql -u root -p

Enter password:
Welcome to the MySQL monitor.  Commands end with ; or \g.
Your MySQL connection id is 8
Server version: 8.0.17 MySQL Community Server - GPL

Copyright (c) 2000, 2019, Oracle and/or its affiliates. All rights reserved.

Oracle is a registered trademark of Oracle Corporation and/or its
affiliates. Other names may be trademarks of their respective
owners.

Type 'help;' or '\h' for help. Type '\c' to clear the current input statement.

mysql>
結論
このチュートリアルは、MySQL8をUbuntu18.04LTSLinuxシステムにインストールするのに役立ちました。