Drupalは、ウェブサイトのコンテンツを作成および管理するために使用される、無料でスケーラブルなオープンプラットフォームです。大きなコミュニティがあり、世界中の何百万もの人々や組織によって使用されています。 Drupalは、個人のWebサイトから大規模なコミュニティ主導のWebサイトまで、さまざまなWebサイトを作成するのに役立つシンプルでユーザーフレンドリーなWebインターフェイスを提供します。
このガイドでは、Ubuntu20.04でNginxを使用して複数のDrupalインスタンスをデプロイする方法を示します。
- Ubuntu20.04を実行しているサーバー。
- サーバーIPを指す2つの有効なドメイン名。
- ルートパスワードはサーバーで構成されています。
ステップ1:必要な依存関係をインストールする
まず、システムパッケージを更新されたバージョンに更新し、必要な依存関係をシステムにインストールする必要があります。次のコマンドで実行できます:
apt-get update -y
apt-get install gnupg2 software-properties-common unzip git wget -y
すべての依存関係がインストールされたら、次のステップに進むことができます。
ステップ2:NginxとMariaDBをインストールする
ここでは、NginxでDrupalをホストします。したがって、Nginxをサーバーにインストールする必要があります。インストールされていない場合は、次のコマンドでインストールできます。
apt-get install nginx -y
Nginxをインストールした後、最新バージョンのMariaDBをサーバーにインストールする必要があります。デフォルトでは、MariaDBの最新バージョンはUbuntu20.04のデフォルトリポジトリに含まれていません。そのため、MariaDBリポジトリをAPTに追加する必要があります。
まず、次のコマンドでGPGキーを追加します。
apt-key adv --recv-keys --keyserver hkp://keyserver.ubuntu.com:80 0xF1656F24C74CD1D8
次に、次のコマンドを使用してMariaDBリポジトリを追加します。
add-apt-repository "deb [arch=amd64,arm64,ppc64el] http://mariadb.mirror.liquidtelecom.com/repo/10.4/ubuntu $(lsb_release -cs) main"
リポジトリが追加されたら、リポジトリを更新し、次のコマンドを使用して最新バージョンのMariaDBをインストールします。
apt-get update -y
apt-get install mariadb-server -y
MariaDBサーバーがインストールされたら、次のステップに進むことができます。
ステップ3:PHP7.4をインストールする
DrupalはPHP8.0をサポートしていません。したがって、システムにPHP7.4をインストールする必要があります。次のコマンドを使用して、PHPバージョン7.4を他の必要な拡張機能とともにインストールできます。
apt-get install php7.4 php7.4-fpm php7.4-gd php7.4-common php7.4-mysql php7.4-apcu php7.4-gmp php7.4-curl php7.4-intl php7.4-mbstring php7.4-xmlrpc php7.4-gd php7.4-xml php7.4-cli php7.4-zip -y
すべてのパッケージがインストールされたら、php.iniファイルを編集し、いくつかの変更を微調整します。
nano /etc/php/7.4/fpm/php.ini
次の行を変更します:
date.timezone = Asia/Kolkata
memory_limit = 256M
upload_max_filesize = 64M
max_execution_time = 600
cgi.fix_pathinfo = 0
ファイルを保存して閉じてから、PHP-FPMを再起動して変更を適用します。
systemctl restart php7.4-fpm
ステップ4:Drupalデータベースを作成する
次に、両方のDrupalインスタンスのデータベースとユーザーを作成する必要があります。
まず、次のコマンドを使用してMySQLに接続します。
mysql
接続したら、次のコマンドを使用して両方のDrupalインスタンスのデータベースを作成します。
MariaDB [(none)]> create database drupal1db;
MariaDB [(none)]> create database drupal2db;
次に、次のコマンドを使用して、両方のDrupalインスタンスのデータベースユーザーを作成します。
MariaDB [(none)]> create user [email protected] identified by 'password';
MariaDB [(none)]> create user [email protected] identified by 'password';
次に、次のコマンドを使用して、両方のDrupalデータベースにすべての特権を付与します。
MariaDB [(none)]> grant all privileges on drupal1db.* to [email protected] identified by 'password';
MariaDB [(none)]> grant all privileges on drupal2db.* to [email protected] identified by 'password';
次に、特権をフラッシュし、次のコマンドを使用してMySQLを終了します。
MariaDB [(none)]> flush privileges;
MariaDB [(none)]> exit;
終了したら、次のステップに進むことができます。
ステップ5:Drupalをダウンロードする
次に、Drupalの最新バージョンを公式Webサイトからダウンロードする必要があります。
まず、次のコマンドを使用して、ディレクトリをNginxWebルートに変更します。
cd /var/www/html
次に、次のコマンドを使用してDrupalの最新バージョンをダウンロードします。
wget -q https://www.drupal.org/download-latest/tar.gz -O drupal-latest.tar.gz
次に、次のコマンドを使用して、ダウンロードしたファイルを抽出します。
tar -xf drupal-latest.tar.gz
次に、extratedディレクトリをdrupal1とdrupal2にコピーします。
cp -r drupal-9.1.5 drupal1
cp -r drupal-9.1.5 drupal2
次に、次のコマンドを使用して適切な所有権を設定します。
chown -R www-data:www-data /var/www/html/drupal*
終了したら、次のステップに進むことができます。
ステップ6:Nginxを構成する
次に、Drupalインスタンスごとに2つのNginx仮想ホスト構成ファイルを作成する必要があります。
まず、最初のDrupalインスタンスのNginx仮想ホスト構成ファイルを作成します。
nano /etc/nginx/conf.d/drupal1.conf
次の行を追加します:
server {
    listen 80;
    root /var/www/html/drupal1;
    index  index.php index.html index.htm;
    server_name drupal1.example.com;

    location / {
    try_files $uri /index.php?$query_string;
    }

    location @rewrite {
               rewrite ^/(.*)$ /index.php?q=$1;
        }

    location ~ [^/]\.php(/|$) {
         include snippets/fastcgi-php.conf;
         fastcgi_pass unix:/var/run/php/php7.4-fpm.sock;
         fastcgi_param SCRIPT_FILENAME $document_root$fastcgi_script_name;
         include fastcgi_params;
    }

    location ~ ^/sites/.*/files/styles/ { # For Drupal >= 7
               try_files $uri @rewrite;
        }

    location ~ ^(/[a-z\-]+)?/system/files/ { # For Drupal >= 7
        try_files $uri /index.php?$query_string;
        }
}
終了したら、ファイルを保存して閉じます。
次に、2番目のDrupalインスタンスのNginx仮想ホスト構成ファイルを作成します。
nano /etc/nginx/conf.d/drupal2.conf
次の行を追加します:
server {
    listen 80;
    root /var/www/html/drupal2;
    index  index.php index.html index.htm;
    server_name drupal2.example.com;

    location / {
    try_files $uri /index.php?$query_string;
    }

    location @rewrite {
               rewrite ^/(.*)$ /index.php?q=$1;
        }

    location ~ [^/]\.php(/|$) {
         include snippets/fastcgi-php.conf;
         fastcgi_pass unix:/var/run/php/php7.4-fpm.sock;
         fastcgi_param SCRIPT_FILENAME $document_root$fastcgi_script_name;
         include fastcgi_params;
    }

    location ~ ^/sites/.*/files/styles/ { # For Drupal >= 7
               try_files $uri @rewrite;
        }

    location ~ ^(/[a-z\-]+)?/system/files/ { # For Drupal >= 7
        try_files $uri /index.php?$query_string;
        }
}
終了したらファイルを保存して閉じ、次のコマンドを使用して構文エラーがないかNginxを確認します。
nginx -t
次の出力が表示されます。
nginx: the configuration file /etc/nginx/nginx.conf syntax is ok
nginx: configuration file /etc/nginx/nginx.conf test is successful
次に、Nginxサービスを再起動して、変更を適用します。
systemctl restart nginx
次のコマンドを使用して、Nginxのステータスを確認することもできます。
systemctl status nginx
次の出力が得られるはずです:
? nginx.service - A high performance web server and a reverse proxy server
     Loaded: loaded (/lib/systemd/system/nginx.service; enabled; vendor preset: enabled)
     Active: active (running) since Tue 2021-03-23 08:50:47 UTC; 6s ago
       Docs: man:nginx(8)
    Process: 19946 ExecStartPre=/usr/sbin/nginx -t -q -g daemon on; master_process on; (code=exited, status=0/SUCCESS)
    Process: 19959 ExecStart=/usr/sbin/nginx -g daemon on; master_process on; (code=exited, status=0/SUCCESS)
   Main PID: 19964 (nginx)
      Tasks: 2 (limit: 2353)
     Memory: 2.7M
     CGroup: /system.slice/nginx.service
             ??19964 nginx: master process /usr/sbin/nginx -g daemon on; master_process on;
             ??19965 nginx: worker process

Mar 23 08:50:47 ubuntu2004 systemd[1]: Starting A high performance web server and a reverse proxy server...
Mar 23 08:50:47 ubuntu2004 systemd[1]: Started A high performance web server and a reverse proxy server.
ステップ7:Drupalにアクセスする
次に、Webブラウザーを開き、URL http://drupal1.example.comを入力します。 またはhttp://drupal2.example.com 。以下に示すように、DrupalWebインストールウィザードにリダイレクトされます。

言語を選択し、保存して続行をクリックします ボタン。次のページが表示されます:
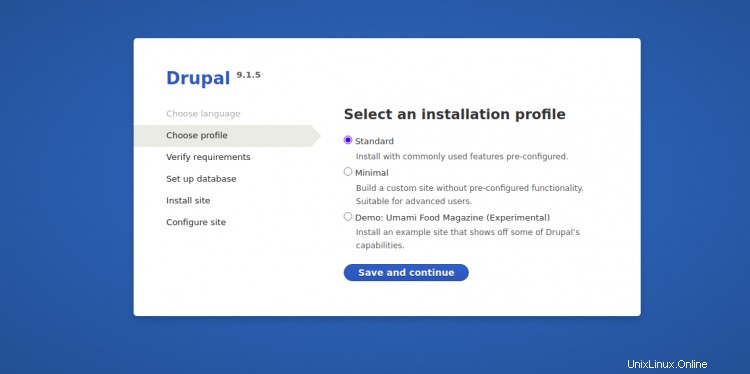
標準のインストールタイプを選択し、保存して続行をクリックします ボタン。次のページが表示されます:
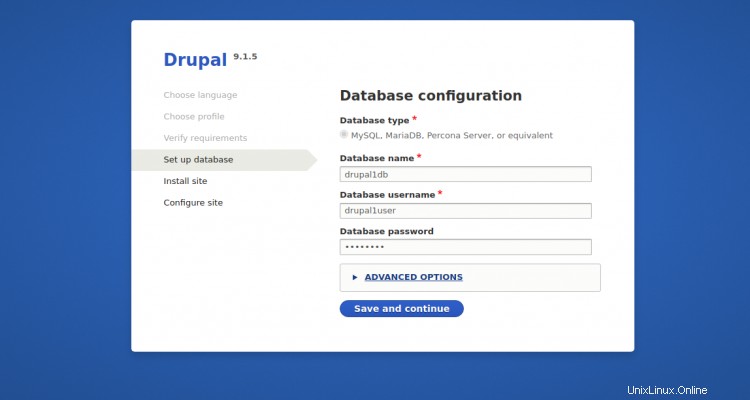
データベースの詳細を入力し、保存して続行をクリックします ボタン。次のページが表示されます:
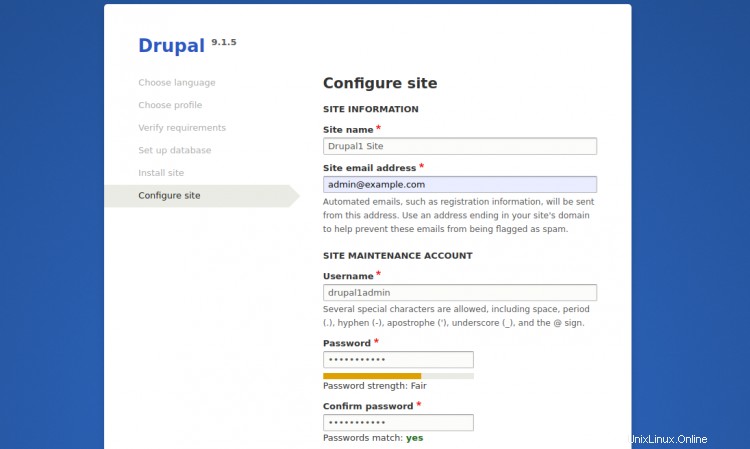
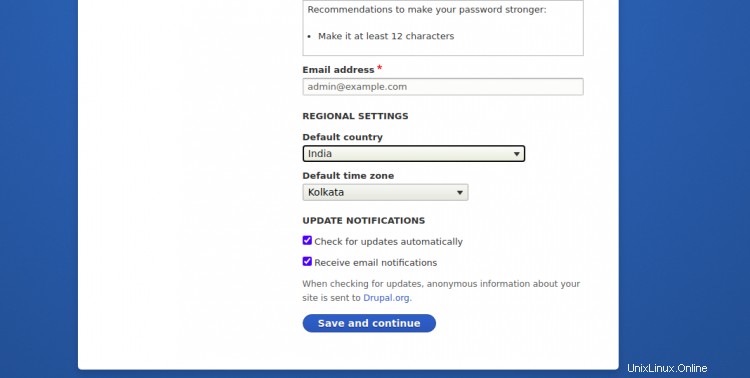
サイト情報を入力し、保存して続行をクリックします ボタン。次のページにDrupalダッシュボードが表示されます。

上記の投稿では、Ubuntu20.04サーバーにNginxを使用して複数のDrupalインスタンスをデプロイする方法を学びました。これで、サーバーに任意の数のDrupalインスタンスをデプロイできます。新しいDrupalインスタンスごとにドメイン名とDrupalインストールパスを定義する必要があります。ご不明な点がございましたら、お気軽にお問い合わせください。