Spiderfootは、ハッカーによる攻撃を減らすのに役立つ無料のオープンソースの脆弱性テストツールです。 Linuxサーバーの脆弱性と悪意のある機能を分析するために使用されます。これは、LinuxおよびWindowsマシンをサポートし、GitHubと連携できるクロスプラットフォームのソフトウェアツールです。 Pythonで記述されており、データベースのバックエンドとしてSQLiteを使用します。 Webブラウザを介して複数のターゲットの侵入テストを同時に実行するためのWebベースのインターフェイスを提供します。
このチュートリアルでは、Ubuntu20.04サーバーにSpiderfootをインストールする方法を紹介します。
- Ubuntu20.04を実行しているサーバー。
- ルートパスワードがサーバーに設定されます。
開始する前に、パッケージキャッシュを最新バージョンに更新することをお勧めします。次のコマンドで更新できます:
apt-get update -y
すべてのパッケージが最新になったら、次のコマンドを使用して他の必要なパッケージをインストールします。
apt-get install python3 python3-pip -y
すべてのパッケージがインストールされたら、次のステップに進むことができます。
まず、Gitリポジトリから最新バージョンのSpiderfootをダウンロードする必要があります。次のコマンドでダウンロードできます:
wget https://github.com/smicallef/spiderfoot/archive/v3.3.tar.gz
ダウンロードが完了したら、次のコマンドを使用してダウンロードしたファイルを抽出します。
tar -xvzf v3.3.tar.gz
次に、ディレクトリを抽出したディレクトリに変更し、次のコマンドを使用してすべてのPython依存関係をインストールします。
cd spiderfoot-3.3
pip3 install -r requirements.txt
インストールすると、次のコマンドを使用してSpiderFootで使用可能なすべてのオプションを一覧表示できます。
python3 sf.py --help
次の出力が得られるはずです:
usage: sf.py [-h] [-d] [-l IP:port] [-m mod1,mod2,...] [-M] [-s TARGET] [-t type1,type2,...] [-T] [-o tab|csv|json] [-H] [-n] [-r]
             [-S LENGTH] [-D DELIMITER] [-f] [-F type1,type2,...] [-x] [-q]

SpiderFoot 3.3: Open Source Intelligence Automation.

optional arguments:
  -h, --help          show this help message and exit
  -d, --debug         Enable debug output.
  -l IP:port          IP and port to listen on.
  -m mod1,mod2,...    Modules to enable.
  -M, --modules       List available modules.
  -s TARGET           Target for the scan.
  -t type1,type2,...  Event types to collect (modules selected automatically).
  -T, --types         List available event types.
  -o tab|csv|json     Output format. Tab is default. If using json, -q is enforced.
  -H                  Don't print field headers, just data.
  -n                  Strip newlines from data.
  -r                  Include the source data field in tab/csv output.
  -S LENGTH           Maximum data length to display. By default, all data is shown.
  -D DELIMITER        Delimiter to use for CSV output. Default is ,.
  -f                  Filter out other event types that weren't requested with -t.
  -F type1,type2,...  Show only a set of event types, comma-separated.
  -x                  STRICT MODE. Will only enable modules that can directly consume your target, and if -t was specified only those events
                      will be consumed by modules. This overrides -t and -m options.
  -q                  Disable logging. This will also hide errors!
SpiderFootをWebUIモードで実行する
この時点で、SpiderFootがサーバーにインストールされます。次に、WebブラウザからSpiderFootにアクセスするには、WebUIモードでSpiderFootを起動する必要があります。
次のコマンドで実行できます:
python3 sf.py -l your-server-ip:5001
次の出力が得られるはずです:
2021-03-01 11:16:53,927 [INFO] Starting web server at 45.58.43.9:5001 ...
2021-03-01 11:16:53,937 [WARNING]
********************************************************************
Warning: passwd file contains no passwords. Authentication disabled.
Please consider adding authentication to protect this instance!
Refer to https://www.spiderfoot.net/documentation/#security.
********************************************************************


*************************************************************
 Use SpiderFoot by starting your web browser of choice and
 browse to http://45.58.43.9:5001/
*************************************************************

2021-03-01 11:16:53,996 [INFO] [01/Mar/2021:11:16:53] ENGINE Listening for SIGTERM.
2021-03-01 11:16:53,996 [INFO] [01/Mar/2021:11:16:53] ENGINE Listening for SIGHUP.
2021-03-01 11:16:53,996 [INFO] [01/Mar/2021:11:16:53] ENGINE Listening for SIGUSR1.
2021-03-01 11:16:53,996 [INFO] [01/Mar/2021:11:16:53] ENGINE Bus STARTING
2021-03-01 11:16:54,099 [INFO] [01/Mar/2021:11:16:54] ENGINE Serving on http://45.58.43.9:5001
2021-03-01 11:16:54,100 [INFO] [01/Mar/2021:11:16:54] ENGINE Bus STARTED
ご覧のとおり、SpiderFootが起動し、ポート5001でリッスンします。CTRL+Cを押してSpiderFootを停止します。
SpiderFoot認証を構成する
デフォルトでは、SpiderFootは認証なしでアクセスできます。したがって、基本認証を有効にすることをお勧めします。
これを行うには、次のコマンドを使用してディレクトリをSpiderFootに変更します。
cd spiderfoot-3.3
次に、次のコマンドを使用して、passwdファイルにユーザー名とパスワードを追加します。
echo "admin:yourpassword" > passwd
次に、次のコマンドを使用して、WebUIモードでSpiderFootを再起動します。
python3 sf.py -l your-server-ip:5001
次の出力が得られるはずです:
2021-03-01 11:17:56,108 [INFO] Starting web server at 45.58.43.9:5001 ...
2021-03-01 11:17:56,118 [INFO] Enabling authentication based on supplied passwd file.

*************************************************************
 Use SpiderFoot by starting your web browser of choice and
 browse to http://45.58.43.9:5001/
*************************************************************

2021-03-01 11:17:56,138 [INFO] [01/Mar/2021:11:17:56] ENGINE Listening for SIGTERM.
2021-03-01 11:17:56,138 [INFO] [01/Mar/2021:11:17:56] ENGINE Listening for SIGHUP.
2021-03-01 11:17:56,138 [INFO] [01/Mar/2021:11:17:56] ENGINE Listening for SIGUSR1.
2021-03-01 11:17:56,138 [INFO] [01/Mar/2021:11:17:56] ENGINE Bus STARTING
2021-03-01 11:17:56,240 [INFO] [01/Mar/2021:11:17:56] ENGINE Serving on http://45.58.43.9:5001
2021-03-01 11:17:56,241 [INFO] [01/Mar/2021:11:17:56] ENGINE Bus STARTED
次に、Webブラウザーを開き、URL http:// your-server-ip:5001を使用してSpiderFootWebインターフェースにアクセスします。 。 SpiderFootログインページにリダイレクトされます:

管理者のユーザー名とパスワードを入力し、サインインをクリックします ボタン。ログインすると、次のページにSpiderFootダッシュボードが表示されます。

次に、新しいスキャンをクリックします ボタンをクリックして、新しいスキャンを作成します。次のページが表示されます:
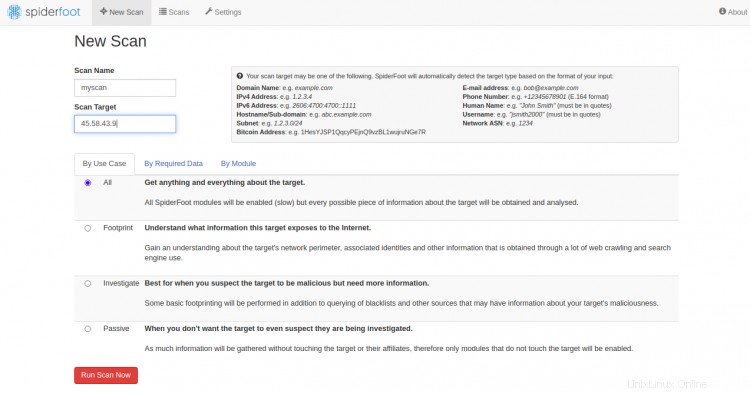
ターゲットサーバーのIPを入力し、[今すぐスキャンを実行]をクリックします。 。次のページが表示されます:
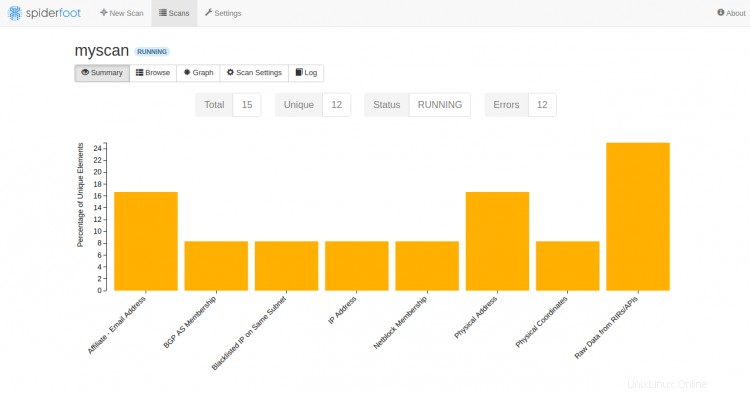
これで、Ubuntu20.04サーバーにSpiderFootが正常にインストールされました。これで、SpiderFootダッシュボードを介して、リモートコンピューターをスキャンして脆弱性を見つけることができます。ご不明な点がございましたら、お気軽にお問い合わせください。