Mattermostは、チャット、ファイル共有、検索、統合に使用されるオープンソースのセルフホストメッセージングアプリケーションです。これは、チームのすべてのコミュニケーションを1か所にまとめるSlackチャットの代替手段です。 ReactとGolangで記述されており、バックエンドでPostgreSQLまたはMySQLデータベースを使用します。プッシュ通知、無制限の検索履歴、カスタム絵文字、Webhookとコマンド、Active Directory、マルチノードデータベース展開サポート、フォーラム、ディスカッション掲示板などの豊富な機能セットを提供します。
このチュートリアルでは、MattermostwithNginxとLet'sEncryptSSLをUbuntu20.04にインストールする方法を紹介します。
- Ubuntu20.04を実行しているサーバー。
- サーバーIPで指定された有効なドメイン名。
- ルートパスワードはサーバーで構成されています。
まず、システムパッケージを最新バージョンに更新することをお勧めします。次のコマンドを実行して更新できます:
apt-get update -y
すべてのパッケージが更新されたら、次のコマンドを実行して、他の必要な依存関係をインストールします。
apt-get install curl wget vim git unzip gnupg2 -y
必要なパッケージをすべてインストールしたら、次の手順に進むことができます。
MariaDBのインストールと構成
Mattermostは、データベースバックエンドとしてMySQL/MariaDBを使用します。したがって、MariaDBサーバーをサーバーにインストールする必要があります。インストールされていない場合は、次のコマンドでインストールできます。
apt-get install mariadb-server -y
MariaDBサーバーをインストールした後、次のコマンドを使用してMariaDBにログインします。
mysql
ログインしたら、次のコマンドを使用してMattermostのデータベースとユーザーを作成します。
MariaDB [(none)]> CREATE DATABASE mattermostdb;
MariaDB [(none)]> CREATE USER 'mattermost'@'%' IDENTIFIED BY 'password';
次に、次のコマンドを使用して、Mattermostにすべての権限を付与します。
MariaDB [(none)]> GRANT ALL PRIVILEGES ON mattermostdb.* TO 'mattermost'@'%';
次に、特権をフラッシュし、次のコマンドを使用してMariaDBシェルを終了します。
MariaDB [(none)]> FLUSH PRIVILEGES;
MariaDB [(none)]> EXIT;
MariaDBデータベースを構成したら、次のステップに進むことができます。
Mattermostのインストールと構成
まず、公式WebサイトからMattermostの最新バージョンをダウンロードする必要があります。次のコマンドでダウンロードできます:
wget https://releases.mattermost.com/5.24.2/mattermost-5.24.2-linux-amd64.tar.gz
ダウンロードしたら、次のコマンドを使用してダウンロードしたファイルを抽出します。
tar -xvzf mattermost-5.24.2-linux-amd64.tar.gz
次に、抽出したディレクトリを/ opt:
にコピーします。cp -r mattermost /opt
次に、Mattermostのデータディレクトリを作成します:
mkdir /opt/mattermost/data
次に、Mattermostを実行するための別のユーザーを作成する必要があります。次のコマンドで作成できます:
useradd --system --user-group mattermost
次に、mattermostディレクトリの所有権をmattermostに変更し、次のコマンドを使用して適切な権限を付与します。
chown -R mattermost:mattermost /opt/mattermost
chmod -R g+w /opt/mattermost
次に、Mattermostのデフォルト構成ファイルを編集し、データベース設定とサイトURLを定義します。
nano /opt/mattermost/config/config.json
必要に応じて、次の行を変更します。
    "SiteURL": "https://mattermost.linuxbuz.com",

    "DriverName": "mysql",
    "DataSource": "mattermost:[email protected](localhost:3306)/mattermostdb?charset=utf8mb4,utf8\u0026readTimeout=30s\u0026writeTimeout=30s",
終了したら、ファイルを保存して閉じます。
MattermostのSystemdサービスファイルを作成する
次に、Mattermostサービスを管理するためのsystemdサービスファイルを作成する必要があります。次のコマンドで作成できます:
nano /lib/systemd/system/mattermost.service
次の行を追加します:
[Unit]
Description=Mattermost
After=network.target
After=mysql.service
Requires=mysql.service

[Service]
Type=notify
User=mattermost
Group=mattermost
ExecStart=/opt/mattermost/bin/mattermost
TimeoutStartSec=3600
Restart=always
RestartSec=10
WorkingDirectory=/opt/mattermost
LimitNOFILE=49152

[Install]
WantedBy=mariadb.service
ファイルを保存して閉じてから、次のコマンドを使用してsystemdデーモンを再起動します。
systemctl daemon-reload
次に、Mattermostサービスを開始し、次のコマンドを使用してシステムの再起動時に開始できるようにします。
systemctl start mattermost
systemctl enable mattermost
次に、次のコマンドを使用してMattermostサービスのステータスを確認します。
systemctl status mattermost
次の出力が得られるはずです:
? mattermost.service - Mattermost
     Loaded: loaded (/lib/systemd/system/mattermost.service; disabled; vendor preset: enabled)
     Active: active (running) since Sat 2020-08-01 09:12:52 UTC; 17s ago
   Main PID: 4106 (mattermost)
      Tasks: 20 (limit: 2353)
     Memory: 85.9M
     CGroup: /system.slice/mattermost.service
             ??4106 /opt/mattermost/bin/mattermost
             ??4198 plugins/com.mattermost.nps/server/dist/plugin-linux-amd64

Aug 01 09:12:52 ubuntu2004 mattermost[4106]: {"level":"info","ts":1596273172.131499,"caller":"mlog/sugar.go:19","msg":"Sent notification of ne>
Aug 01 09:12:52 ubuntu2004 mattermost[4106]: {"level":"info","ts":1596273172.1841655,"caller":"jobs/workers.go:73","msg":"Starting workers"}
Aug 01 09:12:52 ubuntu2004 mattermost[4106]: {"level":"info","ts":1596273172.1842792,"caller":"bleveengine/bleve.go:267","msg":"UpdateConf Ble>
Aug 01 09:12:52 ubuntu2004 mattermost[4106]: {"level":"info","ts":1596273172.1930475,"caller":"jobs/schedulers.go:74","msg":"Starting schedule>
Aug 01 09:12:52 ubuntu2004 mattermost[4106]: {"level":"info","ts":1596273172.20063,"caller":"app/web_hub.go:83","msg":"Starting websocket hubs>
Aug 01 09:12:52 ubuntu2004 mattermost[4106]: {"level":"info","ts":1596273172.2099638,"caller":"app/license.go:37","msg":"License key from http>
Aug 01 09:12:52 ubuntu2004 mattermost[4106]: {"level":"info","ts":1596273172.2205582,"caller":"app/server.go:525","msg":"Starting Server..."}
Aug 01 09:12:52 ubuntu2004 mattermost[4106]: {"level":"info","ts":1596273172.2208374,"caller":"app/server.go:594","msg":"Server is listening o>
Aug 01 09:12:52 ubuntu2004 mattermost[4106]: {"level":"info","ts":1596273172.2211802,"caller":"commands/server.go:106","msg":"Sending systemd >
Aug 01 09:12:52 ubuntu2004 systemd[1]: Started Mattermost.
この時点で、Mattermostはポート8065で実行され、リッスンしています。
Nginxをリバースプロキシとして構成する
次に、NginxxをMattermostのリバースプロキシとして構成する必要があります。まず、次のコマンドを使用してNginxパッケージをインストールします。
apt-get install nginx -y
インストールしたら、次のコマンドを使用してNginx仮想ホスト構成ファイルを作成します。
nano /etc/nginx/sites-available/mattermost.conf
次の行を追加します:
upstream mattermost {
   server localhost:8065;
   keepalive 32;
}

proxy_cache_path /var/cache/nginx levels=1:2 keys_zone=mattermost_cache:10m max_size=3g inactive=120m use_temp_path=off;

server {
   listen 80;
   server_name mattermost.linuxbuz.com;

   location ~ /api/v[0-9]+/(users/)?websocket$ {
       proxy_set_header Upgrade $http_upgrade;
       proxy_set_header Connection "upgrade";
       client_max_body_size 50M;
       proxy_set_header Host $http_host;
       proxy_set_header X-Real-IP $remote_addr;
       proxy_set_header X-Forwarded-For $proxy_add_x_forwarded_for;
       proxy_set_header X-Forwarded-Proto $scheme;
       proxy_set_header X-Frame-Options SAMEORIGIN;
       proxy_buffers 256 16k;
       proxy_buffer_size 16k;
       client_body_timeout 60;
       send_timeout 300;
       lingering_timeout 5;
       proxy_connect_timeout 90;
       proxy_send_timeout 300;
       proxy_read_timeout 90s;
       proxy_pass http://mattermost;
   }

   location / {
       client_max_body_size 50M;
       proxy_set_header Connection "";
       proxy_set_header Host $http_host;
       proxy_set_header X-Real-IP $remote_addr;
       proxy_set_header X-Forwarded-For $proxy_add_x_forwarded_for;
       proxy_set_header X-Forwarded-Proto $scheme;
       proxy_set_header X-Frame-Options SAMEORIGIN;
       proxy_buffers 256 16k;
       proxy_buffer_size 16k;
       proxy_read_timeout 600s;
       proxy_cache mattermost_cache;
       proxy_cache_revalidate on;
       proxy_cache_min_uses 2;
       proxy_cache_use_stale timeout;
       proxy_cache_lock on;
       proxy_http_version 1.1;
       proxy_pass http://mattermost;
   }
}
ファイルを保存して閉じてから、次のコマンドを使用して仮想ホスト構成をアクティブ化します。
ln -s /etc/nginx/sites-available/mattermost.conf /etc/nginx/sites-enabled/mattermost.conf
次に、構成エラーがないかNginxを確認します:
nginx -t
次の出力が得られるはずです:
nginx: the configuration file /etc/nginx/nginx.conf syntax is ok
nginx: configuration file /etc/nginx/nginx.conf test is successful
最後に、Nginxサービスを再起動して、変更を適用します。
systemctl restart nginx
SSLを暗号化して、Mattermostを保護
まず、Let's Encrypt SSLを管理するために、システムにCertbotクライアントをインストールする必要があります。次のコマンドでインストールできます:
apt-get install python3-certbot-nginx -y
Certbotをインストールした後、次のコマンドを実行して、WebサイトにLet'sEncryptSSLをインストールします。
certbot --nginx -d mattermost.linuxbuz.com
以下に示すように、有効なメールアドレスを入力し、利用規約に同意するよう求められます。
Saving debug log to /var/log/letsencrypt/letsencrypt.log
Plugins selected: Authenticator nginx, Installer nginx
Enter email address (used for urgent renewal and security notices) (Enter 'c' to
cancel): [email protected]

- - - - - - - - - - - - - - - - - - - - - - - - - - - - - - - - - - - - - - - -
Please read the Terms of Service at
https://letsencrypt.org/documents/LE-SA-v1.2-November-15-2017.pdf. You must
agree in order to register with the ACME server at
https://acme-v02.api.letsencrypt.org/directory
- - - - - - - - - - - - - - - - - - - - - - - - - - - - - - - - - - - - - - - -
(A)gree/(C)ancel: A

- - - - - - - - - - - - - - - - - - - - - - - - - - - - - - - - - - - - - - - -
Would you be willing to share your email address with the Electronic Frontier
Foundation, a founding partner of the Let's Encrypt project and the non-profit
organization that develops Certbot? We'd like to send you email about our work
encrypting the web, EFF news, campaigns, and ways to support digital freedom.
- - - - - - - - - - - - - - - - - - - - - - - - - - - - - - - - - - - - - - - -
(Y)es/(N)o: Y
Obtaining a new certificate
Performing the following challenges:
http-01 challenge for mattermost.linuxbuz.com
Waiting for verification...
Cleaning up challenges
Deploying Certificate to VirtualHost /etc/nginx/sites-enabled/mattermost.conf
次に、HTTPトラフィックをHTTPSにリダイレクトするかどうかを選択します。
- - - - - - - - - - - - - - - - - - - - - - - - - - - - - - - - - - - - - - - -
1: No redirect - Make no further changes to the webserver configuration.
2: Redirect - Make all requests redirect to secure HTTPS access. Choose this for
new sites, or if you're confident your site works on HTTPS. You can undo this
change by editing your web server's configuration.
- - - - - - - - - - - - - - - - - - - - - - - - - - - - - - - - - - - - - - - -
Select the appropriate number [1-2] then [enter] (press 'c' to cancel): 2
2と入力し、Enterキーを押して、ドメインにLet'sEncryptSSLをインストールします。インストールすると、次の出力が表示されます。
Redirecting all traffic on port 80 to ssl in /etc/nginx/sites-enabled/mattermost.conf

- - - - - - - - - - - - - - - - - - - - - - - - - - - - - - - - - - - - - - - -
Congratulations! You have successfully enabled https://mattermost.linuxbuz.com

You should test your configuration at:
https://www.ssllabs.com/ssltest/analyze.html?d=mattermost.linuxbuz.com
- - - - - - - - - - - - - - - - - - - - - - - - - - - - - - - - - - - - - - - -

IMPORTANT NOTES:
 - Congratulations! Your certificate and chain have been saved at:
   /etc/letsencrypt/live/mattermost.linuxbuz.com/fullchain.pem
   Your key file has been saved at:
   /etc/letsencrypt/live/mattermost.linuxbuz.com/privkey.pem
   Your cert will expire on 2020-10-30. To obtain a new or tweaked
   version of this certificate in the future, simply run certbot again
   with the "certonly" option. To non-interactively renew *all* of
   your certificates, run "certbot renew"
 - Your account credentials have been saved in your Certbot
   configuration directory at /etc/letsencrypt. You should make a
   secure backup of this folder now. This configuration directory will
   also contain certificates and private keys obtained by Certbot so
   making regular backups of this folder is ideal.
 - If you like Certbot, please consider supporting our work by:

   Donating to ISRG / Let's Encrypt:   https://letsencrypt.org/donate
   Donating to EFF:                    https://eff.org/donate-le

 - We were unable to subscribe you the EFF mailing list because your
   e-mail address appears to be invalid. You can try again later by
   visiting https://act.eff.org.
次に、Webブラウザーを開き、URLhttps://mattermost.linuxbuz.comを入力します。 Mattermostのサインアップ画面にリダイレクトされます:
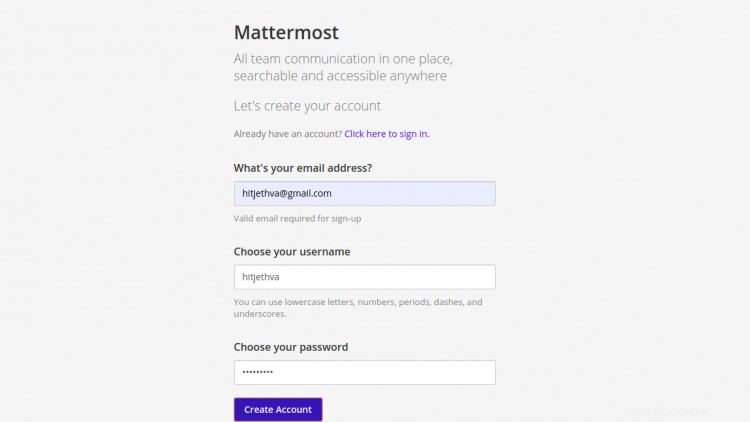
メールアドレス、名前、パスワードを入力し、アカウントの作成をクリックします ボタン。次の画面が表示されます。
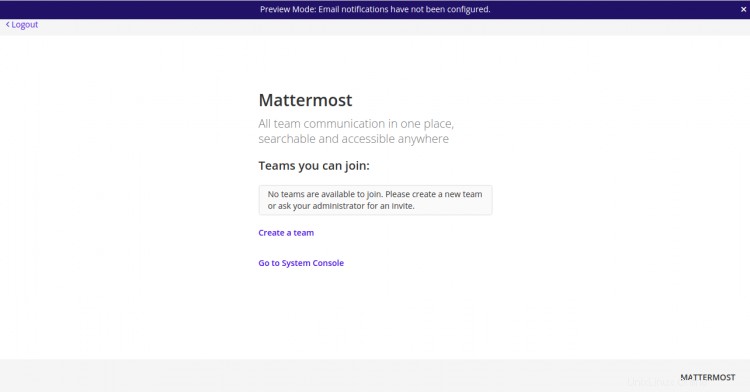
作成をクリックします a チーム ボタン。次の画面が表示されます。
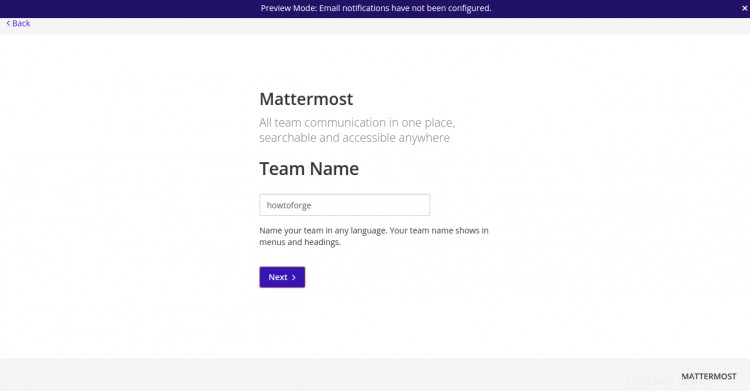
チーム名を入力して、次へをクリックします ボタン。次の画面が表示されます。
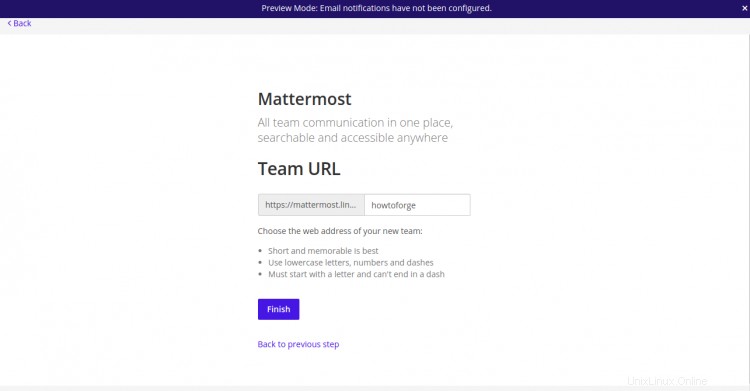
チームのURLを入力し、完了をクリックします ボタン。 MattermostWelcome画面が表示されます:
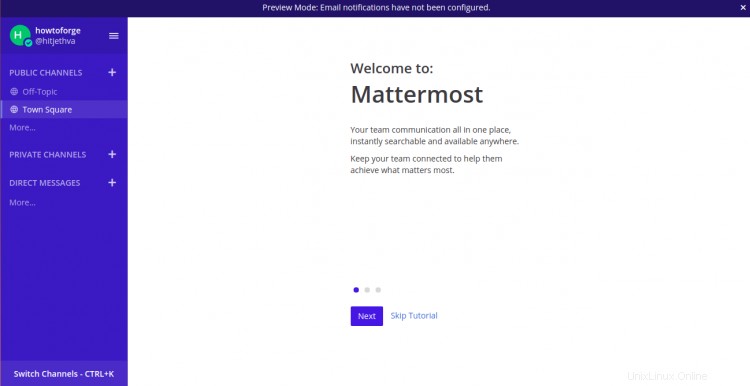
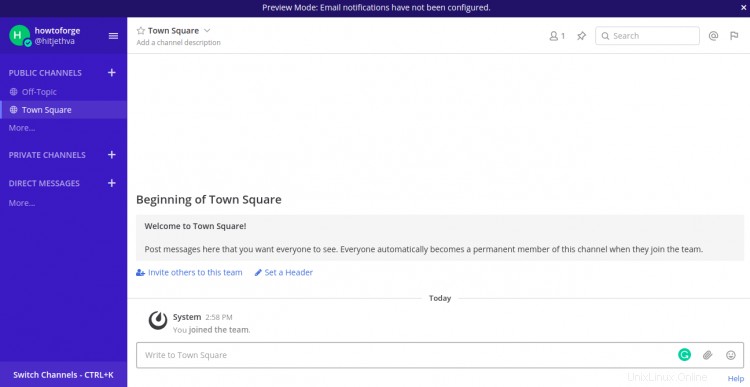
スキップをクリックします チュートリアル ボタン。次の画面にMattermostダッシュボードが表示されます。
このガイドでは、Ubuntu20.04サーバーにMattermostTeamMessagingアプリケーションをインストールする方法を学びました。また、Nginxをリバースプロキシとして構成し、Let'sEncryptSSLで保護する方法も学びました。これで、Mattermostサービスを探索し、チームと協力することができます。