OpenShiftは、RedHatによって開発された無料のオープンソースのクラウド開発Platformasa Service(PaaS)であり、開発者はクラウドインフラストラクチャでアプリケーションを開発およびデプロイできます。 。これはKubernetesのコミュニティディストリビューションであり、アプリケーションの開発とリリースのサイクルを高速化できます。コンテナリソース、コンテナの状態、コンテナが存在するノード、ノードのIPアドレスなどを監視できるシンプルで使いやすいWebインターフェイスが付属しています。
このチュートリアルでは、Ubuntu20.04サーバーにOpenShiftOriginをインストールする方法を説明します。
- Ubuntu20.04を実行しているサーバー。
- ルートパスワードはサーバーで構成されています。
DockerCEをインストールする
まず、DockerコンテナですべてのOKDサービスを実行するには、システムにDockerCEをインストールする必要があります。デフォルトでは、DockerCEの最新バージョンはUbuntu20.04デフォルトリポジトリで利用できます。次のコマンドを実行するだけでインストールできます:
apt-get install docker.io -y
Dockerがインストールされたら、Dockerサービスを開始し、次のコマンドを使用して起動時に開始できるようにします。
systemctl start docker
systemctl enable docker
次のコマンドを使用して、Dockerサービスのステータスを確認することもできます。
systemctl status docker
次の出力が表示されます。
? docker.service - Docker Application Container Engine
     Loaded: loaded (/lib/systemd/system/docker.service; disabled; vendor preset: enabled)
     Active: active (running) since Fri 2020-05-29 12:25:47 UTC; 2s ago
TriggeredBy: ? docker.socket
       Docs: https://docs.docker.com
   Main PID: 48433 (dockerd)
      Tasks: 10
     Memory: 36.5M
     CGroup: /system.slice/docker.service
             ??48433 /usr/bin/dockerd -H fd:// --containerd=/run/containerd/containerd.sock

May 29 12:25:47 ubuntu2004 dockerd[48433]: time="2020-05-29T12:25:47.215078550Z" level=warning msg="Your kernel does not support swap memory l>
May 29 12:25:47 ubuntu2004 dockerd[48433]: time="2020-05-29T12:25:47.215139097Z" level=warning msg="Your kernel does not support cgroup blkio >
May 29 12:25:47 ubuntu2004 dockerd[48433]: time="2020-05-29T12:25:47.215169580Z" level=warning msg="Your kernel does not support cgroup blkio >
May 29 12:25:47 ubuntu2004 dockerd[48433]: time="2020-05-29T12:25:47.215721944Z" level=info msg="Loading containers: start."
May 29 12:25:47 ubuntu2004 dockerd[48433]: time="2020-05-29T12:25:47.418058547Z" level=info msg="Default bridge (docker0) is assigned with an >
May 29 12:25:47 ubuntu2004 dockerd[48433]: time="2020-05-29T12:25:47.515158041Z" level=info msg="Loading containers: done."
May 29 12:25:47 ubuntu2004 dockerd[48433]: time="2020-05-29T12:25:47.545778830Z" level=info msg="Docker daemon" commit=afacb8b7f0 graphdriver(>
May 29 12:25:47 ubuntu2004 dockerd[48433]: time="2020-05-29T12:25:47.546068892Z" level=info msg="Daemon has completed initialization"
May 29 12:25:47 ubuntu2004 dockerd[48433]: time="2020-05-29T12:25:47.599029431Z" level=info msg="API listen on /run/docker.sock"
May 29 12:25:47 ubuntu2004 systemd[1]: Started Docker Application Container Engine.
この時点で、Dockerがインストールされて実行されています。これで、次のステップに進むことができます。
OpenShiftOriginをダウンロード
このチュートリアルを書いている時点では、OpenShiftOriginの最新バージョンはv3.11.0です。次のコマンドを使用して、GitHubリポジトリからダウンロードできます。
wget https://github.com/openshift/origin/releases/download/v3.11.0/openshift-origin-client-tools-v3.11.0-0cbc58b-linux-64bit.tar.gz
ダウンロードが完了したら、次のコマンドを使用してダウンロードしたファイルを抽出します。
tar -xvzf openshift-origin-client-tools-v3.11.0-0cbc58b-linux-64bit.tar.gz
次に、ディレクトリを抽出したディレクトリに変更し、kubectlとocバイナリを/ usr / local/binディレクトリにコピーします。
cd openshift-origin-client-tools-v3.11.0-0cbc58b-linux-64bit
cp oc kubectl /usr/local/bin/
次に、次のコマンドを使用して、OpenShiftクライアントユーティリティのインストールを確認します。
oc version
次の出力が表示されます。
oc v3.11.0+0cbc58b
kubernetes v1.11.0+d4cacc0
features: Basic-Auth GSSAPI Kerberos SPNEGO
次に、新しいdaemon.jsonファイルを作成し、安全でないDockerレジストリの使用を許可する必要があります。
nano /etc/docker/daemon.json
次の行を追加します:
 {
     "insecure-registries" : [ "172.30.0.0/16" ]
 }
ファイルを保存して閉じてから、Dockerサービスを再起動して変更を実装します。
systemctl restart docker
OpenShifOriginクラスターを開始
次に、システムのIPを指定してOpenShiftOriginクラスターを開始します。
oc cluster up --public-hostname=your-server-ip
サーバーが正常に起動すると、次の出力が表示されます。
Login to server ...
Creating initial project "myproject" ...
Server Information ...
OpenShift server started.

The server is accessible via web console at:
    https://your-server-ip:8443

You are logged in as:
    User:     developer
    Password:

To login as administrator:
    oc login -u system:admin
次に、次のコマンドを使用して、管理者ユーザーとしてクラスターにログインします。
oc login -u system:admin
ログインすると、次の出力が表示されます。
Logged into "https://your-server-ip:8443" as "system:admin" using existing credentials. You have access to the following projects and can switch between them with 'oc project': default kube-dns kube-proxy kube-public kube-system * myproject openshift openshift-apiserver openshift-controller-manager openshift-core-operators openshift-infra openshift-node openshift-service-cert-signer openshift-web-console Using project "myproject".
次に、次のコマンドを使用してデフォルトのプロジェクトに変更します。
oc project default
出力:
Now using project "default" on server "https://your-server-ip:8443".
次に、次のコマンドを使用してプロジェクトの現在のステータスを確認します。
oc status
次の出力が得られるはずです:
In project default on server https://your-server-ip:8443

svc/docker-registry - 172.30.1.1:5000
  dc/docker-registry deploys docker.io/openshift/origin-docker-registry:v3.11
    deployment #1 deployed 2 minutes ago - 1 pod

svc/kubernetes - 172.30.0.1:443 -> 8443

svc/router - 172.30.94.157 ports 80, 443, 1936
  dc/router deploys docker.io/openshift/origin-haproxy-router:v3.11
    deployment #1 deployed 2 minutes ago - 1 pod

View details with 'oc describe /' or list everything with 'oc get all'.
OpenShiftでプロジェクトを作成
次に、次のコマンドを使用して、開発者ユーザーでOpenShiftにログインします。
oc login
以下に示すように、ユーザー名とパスワードを入力するように求められます。
Authentication required for https://your-server-ip:8443 (openshift)
Username: developer
Password:
開発者としてのユーザー名と開発者としてのパスワードを入力し、Enterキーを押します。次の出力が表示されます。
Login successful.

You have one project on this server: "myproject"

Using project "myproject".
新しいプロジェクトを作成するには、次のコマンドを実行します。
oc new-project dev --display-name="Project - Dev" --description="My Project"
次の出力が表示されます。
Now using project "dev" on server "https://your-server-ip:8443".

You can add applications to this project with the 'new-app' command. For example, try:

    oc new-app centos/ruby-25-centos7~https://github.com/sclorg/ruby-ex.git

to build a new example application in Ruby.
OpenShiftWebコンソールにアクセスする
次に、Webブラウザーを開き、URL https:// your-server-ip:8443/consoleを入力します。 OpenShiftログインページが表示されます:

開発者のユーザー名とパスワードを入力し、ログをクリックします で ボタン。次のページが表示されます:
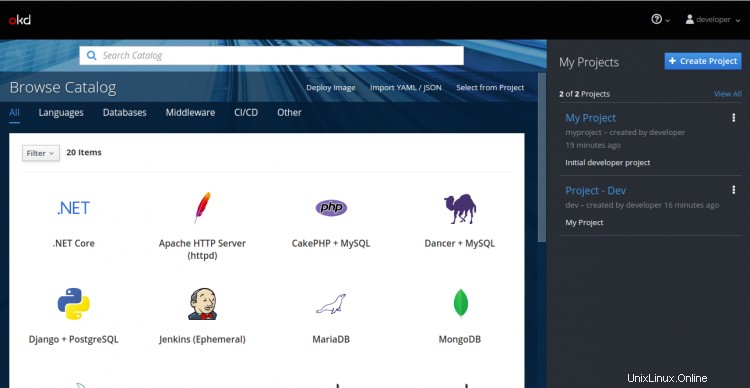
作成をクリックします プロジェクト ボタン。次のページが表示されます:
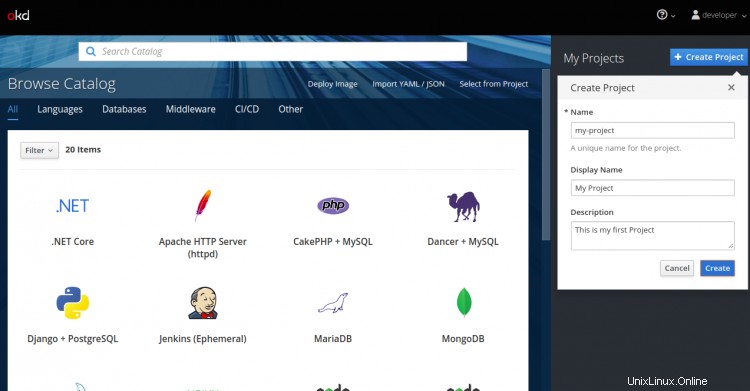
必要な情報をすべて入力し、作成をクリックします ボタンをクリックして新しいプロジェクトを作成します。
OpenShiftOriginにアプリケーションをデプロイする
まず、次のコマンドを実行して、開発者ユーザーでOpenShiftにログインします。
oc login
以下に示すように、開発者ユーザーでログインします:
Authentication required for https://your-server-ip:8443 (openshift) Username: developer Password: Login successful. You have access to the following projects and can switch between them with 'oc project': * dev my-project myproject Using project "dev".
ログインしたら、プロジェクトをOpenShiftWebコンソールで作成したmy-projectに切り替えます。
oc project my-project
出力:
Now using project "my-project" on server "https://your-server-ip:8443".
次に、次のコマンドを使用して現在のプロジェクトのステータスを確認します。
oc status
出力:
In project My Project (my-project) on server https://your-server-ip:8443

You have no services, deployment configs, or build configs.
Run 'oc new-app' to create an application.
次に、次のコマンドを使用してDockerHubレジストリのアプリケーションイメージにタグを付けます。
oc tag --source=docker openshift/deployment-example:v2 deployment-example:latest
出力:
Tag deployment-example:latest set to openshift/deployment-example:v2.
次に、次のコマンドを使用してアプリケーションをOpenShiftにデプロイします。
oc new-app deployment-example
次の出力が表示されます。
--> Found image da61bb2 (4 years old) in image stream "my-project/deployment-example" under tag "latest" for "deployment-example"

    * This image will be deployed in deployment config "deployment-example"
    * Port 8080/tcp will be load balanced by service "deployment-example"
      * Other containers can access this service through the hostname "deployment-example"
    * WARNING: Image "my-project/deployment-example:latest" runs as the 'root' user which may not be permitted by your cluster administrator

--> Creating resources ...
    deploymentconfig.apps.openshift.io "deployment-example" created
    service "deployment-example" created
--> Success
    Application is not exposed. You can expose services to the outside world by executing one or more of the commands below:
     'oc expose svc/deployment-example'
    Run 'oc status' to view your app.
次に、次のコマンドを使用してアプリケーションの展開ステータスを確認します。
oc status
次の出力が表示されます。
In project My Project (my-project) on server https://your-server-ip:8443

svc/deployment-example - 172.30.87.146:8080
  dc/deployment-example deploys istag/deployment-example:latest
    deployment #1 deployed 36 seconds ago - 1 pod


2 infos identified, use 'oc status --suggest' to see details.
サービスに関する情報を取得するには、次のコマンドを実行します。
oc get svc
出力:
NAME TYPE CLUSTER-IP EXTERNAL-IP PORT(S) AGE deployment-example ClusterIP 172.30.87.1468080/TCP 1m
詳細情報を取得するには、次のコマンドを実行します。
oc describe svc deployment-example
出力:
Name:              deployment-example
Namespace:         my-project
Labels:            app=deployment-example
Annotations:       openshift.io/generated-by=OpenShiftNewApp
Selector:          app=deployment-example,deploymentconfig=deployment-example
Type:              ClusterIP
IP:                172.30.87.146
Port:              8080-tcp  8080/TCP
TargetPort:        8080/TCP
Endpoints:         172.17.0.10:8080
Session Affinity:  None
Events:
次のコマンドを使用して、ポッドのステータスを確認することもできます。
oc get pods
出力:
NAME                         READY     STATUS    RESTARTS   AGE
deployment-example-1-b9prf   1/1       Running   0          2m
次に、次のコマンドを使用して、アプリケーションを外部アクセス用に公開します。
oc expose service/deployment-example
出力:
route.route.openshift.io/deployment-example exposed
ルート情報を表示するには、次のコマンドを実行します。
oc get routes
次の出力が得られるはずです:
NAME                 HOST/PORT                                           PATH      SERVICES             PORT       TERMINATION   WILDCARD
deployment-example   deployment-example-my-project.your-server-ip.nip.io             deployment-example   8080-tcp                 None
これで、アプリケーションは外部アクセスの準備が整いました。 Webブラウザーを開き、上記のURLhttp://deployment-example-my-project.your-server-ip.nip.ioを入力します。次のページにアプリケーションが表示されます:

アプリケーションを削除する場合は、次のコマンドを実行します。
oc delete all -l app=deployment-example
次の出力が表示されます。
pod "deployment-example-1-b9prf" deleted
replicationcontroller "deployment-example-1" deleted
service "deployment-example" deleted
deploymentconfig.apps.openshift.io "deployment-example" deleted
route.route.openshift.io "deployment-example" deleted
この記事では、Ubuntu20.04にシングルノードのOpenShiftOriginを正常にインストールして設定しました。これで、OpenShift環境で最初のアプリケーションの開発を開始できます。ご不明な点がございましたら、お気軽にお問い合わせください。