Mailtrainは、MySQL / MariaDBデータベースバックエンドをサポートするNode.jsから構築された、無料のオープンソースのセルフホストニュースレターアプリケーションです。 Mailtrainを使用すると、APIを介して手動でサブスクライバーを追加したり、CSVファイルからインポートしたりできます。 Mailtrainには、テンプレートエディタ、自動化、カスタムフィールド、RSSキャンペーン、HTMLコードエディタなどの豊富な機能セットが付属しています。サブスクライバーのリストが長く、簡単に管理したい場合は、Mailtrainが最適です。
このチュートリアルでは、Ubuntu18.04サーバーにDockerを使用してMailtrainニュースレターアプリケーションをインストールする方法を示します。
- Ubuntu18.04を実行しているサーバー。
- サーバーIPで指定された有効なドメイン名。
- ルートパスワードはサーバーで構成されています。
開始する前に、システムを最新バージョンに更新する必要があります。これを行うには、次のコマンドを実行します。
apt-get update -y
apt-get upgrade -y
次に、システムを再起動して変更を適用します。
DockerとDockerComposeをインストールする
デフォルトでは、最新バージョンのDockerはUbuntu18.04のデフォルトリポジトリでは利用できません。そのため、Dockerリポジトリをシステムに追加する必要があります。
まず、次のコマンドを使用して必要なパッケージをインストールします。
apt-get install curl git apt-transport-https ca-certificates -y
次に、次のコマンドを使用してDockerのPGPキーをダウンロードして追加します。
curl -fsSL https://download.docker.com/linux/ubuntu/gpg | apt-key add -
次に、/ etc / apt/sources.listファイルを編集してDockerCEリポジトリを追加します。
nano /etc/apt/sources.list
ファイルの最後に次の行を追加します。
deb [arch=amd64] https://download.docker.com/linux/ubuntu bionic stable
終了したら、ファイルを保存して閉じます。次に、リポジトリを更新し、次のコマンドを使用してDockerCEをインストールします。
apt-get update -y
apt-get install docker-ce -y
インストールが正常に完了したら、次のコマンドを使用してDockerサービスのステータスを確認できます。
systemctl status docker
次の出力が表示されます。
Docker Application Container Engine
   Loaded: loaded (/lib/systemd/system/docker.service; enabled; vendor preset: enabled)
   Active: active (running) since Thu 2019-10-24 16:15:25 UTC; 21min ago
     Docs: https://docs.docker.com
 Main PID: 1402 (dockerd)
    Tasks: 45
   CGroup: /system.slice/docker.service
           ?? 1402 /usr/bin/dockerd -H fd:// --containerd=/run/containerd/containerd.sock
           ??10312 /usr/bin/docker-proxy -proto tcp -host-ip 0.0.0.0 -host-port 3000 -container-ip 172.18.0.4 -container-port 3000

Oct 24 16:23:04 ubuntu1804 dockerd[1402]: time="2019-10-24T16:23:04.817021656Z" level=info msg="Layer sha256:b875b006eb8ffb0434ce3a26cb04c9017c
Oct 24 16:24:09 ubuntu1804 dockerd[1402]: time="2019-10-24T16:24:09.879265134Z" level=info msg="ignoring event" module=libcontainerd namespace=
Oct 24 16:24:10 ubuntu1804 dockerd[1402]: time="2019-10-24T16:24:10.065610315Z" level=warning msg="20676b10252b4a484e32a7d7534b3b386cc2a1e5efd1
Oct 24 16:25:52 ubuntu1804 dockerd[1402]: time="2019-10-24T16:25:52.649551513Z" level=info msg="Layer sha256:903ab9000f0a93e49537d5d00c5c8a8cab
Oct 24 16:26:47 ubuntu1804 dockerd[1402]: time="2019-10-24T16:26:47.428865652Z" level=info msg="Layer sha256:903ab9000f0a93e49537d5d00c5c8a8cab
Oct 24 16:27:41 ubuntu1804 dockerd[1402]: time="2019-10-24T16:27:41.603287585Z" level=info msg="Layer sha256:903ab9000f0a93e49537d5d00c5c8a8cab
次に、以下に示すように、pipコマンドを使用して最新バージョンのdockercomposeをインストールします。
apt-get install python-pip
apt-get install docker-compose
インストールが完了したら、次の手順に進むことができます。
Dockerを使用してMailtrainをインストールする
まず、次のコマンドを使用して、Gitリポジトリから最新バージョンのMailtrainをダウンロードします。
git clone git://github.com/Mailtrain-org/mailtrain.git
次に、ディレクトリをmailtrainに変更し、デフォルトのdocker-composeファイルの名前を変更します。
cd mailtrain
mv docker-compose.override.yml.tmpl docker-compose.override.yml
次に、次のコマンドを使用してMailtraindockerコンテナを起動します。
docker-compose up -d
このコマンドは、以下に示すように、mailtrain、mysql、およびredisコンテナーをダウンロードして開始します。
Creating network "mailtrain_default" with the default driver
Creating volume "mailtrain_mailtrain-node-config" with default driver
Creating volume "mailtrain_mailtrain-node-data" with default driver
Creating volume "mailtrain_mailtrain-redis-data" with default driver
Creating volume "mailtrain_mailtrain-node-reports" with default driver
Creating volume "mailtrain_mailtrain-mysq-data" with default driver
Pulling redis (redis:3.0)...
3.0: Pulling from library/redis
f5cc0ee7a6f6: Pull complete
5fc25ed18e87: Pull complete
e025bc8872f6: Pull complete
77c68b51b836: Pull complete
7c403ece3755: Pull complete
0a653bd338f4: Pull complete
31531fd948c6: Pull complete
Digest: sha256:730b765df9fe96af414da64a2b67f3a5f70b8fd13a31e5096fee4807ed802e20
Status: Downloaded newer image for redis:3.0
Pulling mysql (mysql:5.7)...
5.7: Pulling from library/mysql
80369df48736: Pull complete
e8f52315cb10: Pull complete
cf2189b391fc: Pull complete
cc98f645c682: Pull complete
27a27ac83f74: Pull complete
fa1f04453414: Pull complete
d45bf7d22d33: Pull complete
c7d49ffebc56: Pull complete
511a8052b204: Pull complete
5d5df4c12444: Pull complete
d482603a2922: Pull complete
Digest: sha256:44b33224e3c406bf50b5a2ee4286ed0d7f2c5aec1f7fdb70291f7f7c570284dd
Status: Downloaded newer image for mysql:5.7
Building mailtrain
:
:
Removing intermediate container 20676b10252b
 ---> 0abdb4121f54
Step 6/9 : COPY . /app
 ---> c8af7560e844
Step 7/9 : EXPOSE 3000
 ---> Running in 3ff55179a229
Removing intermediate container 3ff55179a229
 ---> d83b49d4b24b
Step 8/9 : ENTRYPOINT ["bash", "/app/docker-entrypoint.sh"]
 ---> Running in e5baf6a1ea2e
Removing intermediate container e5baf6a1ea2e
 ---> c4f899a0f8f9
Step 9/9 : CMD ["node", "index.js"]
 ---> Running in fe94519d2bd3
Removing intermediate container fe94519d2bd3
 ---> 2808c2972f20
Successfully built 2808c2972f20
Successfully tagged mailtrain:latest
WARNING: Image for service mailtrain was built because it did not already exist. To rebuild this image you must use `docker-compose build` or `docker-compose up --build`.
Creating mailtrain_redis_1 ... done
Creating mailtrain_mysql_1 ... done
Creating mailtrain_mailtrain_1 ... done
これで、次のコマンドを使用して、実行中のすべてのコンテナーを確認できます。
docker ps
次の出力が表示されます。
CONTAINER ID        IMAGE               COMMAND                  CREATED              STATUS              PORTS                    NAMES
0e837c586c39        mailtrain:latest    "bash /app/docker-en…"   About a minute ago   Up 55 seconds       0.0.0.0:3000->3000/tcp   mailtrain_mailtrain_1
49a4e69a09c6        mysql:5.7           "docker-entrypoint.s…"   About a minute ago   Up About a minute   3306/tcp, 33060/tcp      mailtrain_mysql_1
a1449b64a196        redis:3.0           "docker-entrypoint.s…"   About a minute ago   Up About a minute   6379/tcp                 mailtrain_redis_1
MailtrainWebインターフェイスにアクセス
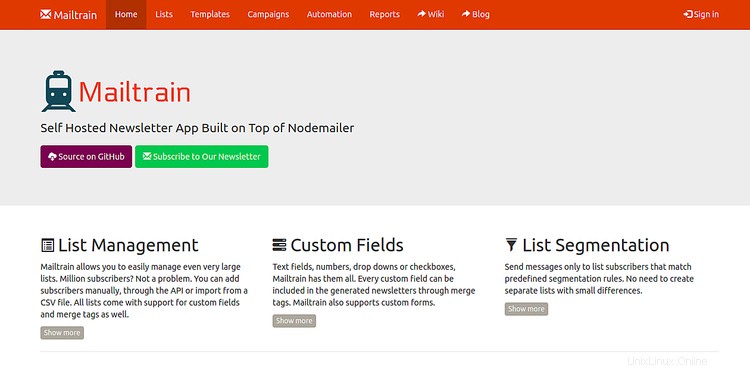
これで、メールトレインコンテナが起動し、ポート3000でリッスンします。次に、Webブラウザを開き、URL http:// your-server-ip:3000を入力します。 。次のページにMailtrainのデフォルトのダッシュボードが表示されます。
次に、ログインをクリックします ボタン。次のページが表示されます:
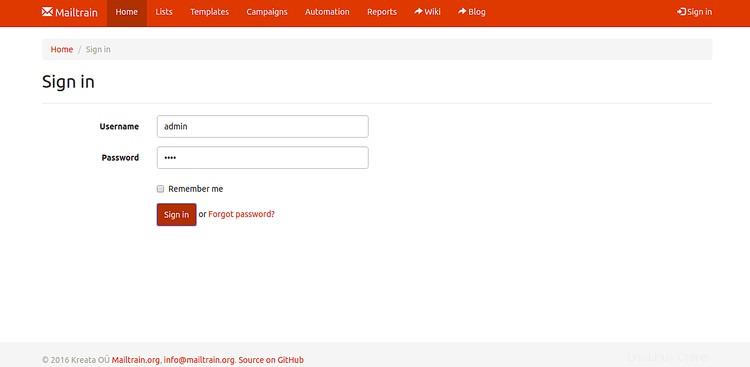
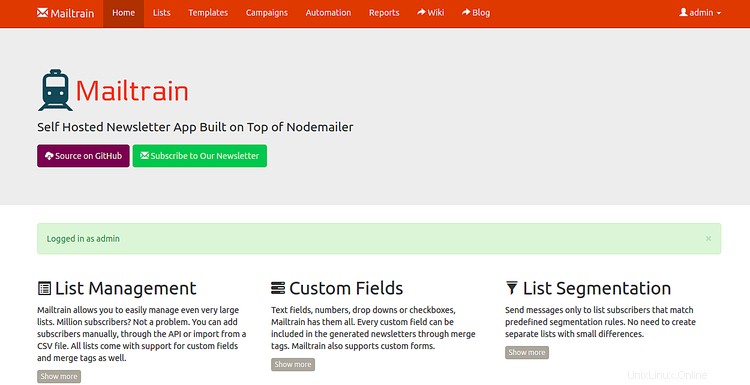
デフォルトのユーザー名とパスワードをadmin/adminとして指定し、ログインをクリックします ボタン。次のページにMailtrainのデフォルトのダッシュボードが表示されます。
Nginxをメールトレインのリバースプロキシとして構成する
次に、ポート3000でMailtrainのリバースプロキシとしてNginxを作成する必要があります。これを行うには、最初に次のコマンドを実行してNginxWebサーバーをインストールします。
apt-get install nginx -y
次に、次のコマンドを使用してNginx仮想ホスト構成ファイルを作成します。
nano /etc/nginx/sites-available/mailtrain.conf
次の行を追加します:
upstream mailtrain {
  server 127.0.0.1:3000 weight=100 max_fails=5 fail_timeout=5;
}

server {
  listen          80;
  server_name     example.com;

  location / {
        proxy_set_header X-Forwarded-Host $host;
        proxy_set_header X-Forwarded-Server $host;
        proxy_set_header X-Forwarded-For $proxy_add_x_forwarded_for;
        proxy_pass http://mailtrain/;
  }
}
終了したら、ファイルを保存して閉じます。次に、次のコマンドを使用して、構文エラーがないかNginxを確認します。
nginx -t
次の出力が表示されます。
nginx: the configuration file /etc/nginx/nginx.conf syntax is ok
nginx: configuration file /etc/nginx/nginx.conf test is successful
次に、次のコマンドを使用してNginx仮想ホストファイルを有効にします。
ln -s /etc/nginx/sites-available/mailtrain.conf /etc/nginx/sites-enabled/
最後に、Nginx Webサーバーを再起動して、構成を適用します。
systemctl restart nginx
次に、Certbotクライアントをインストールして、Let'sEncryptの無料SSLでMailtrainを保護する必要があります。デフォルトでは、Certbotの最新バージョンはUbuntu18.04デフォルトリポジトリでは利用できません。したがって、次のコマンドを実行してCertbotリポジトリを追加します。
add-apt-repository ppa:certbot/certbot
次に、リポジトリを更新し、次のコマンドを使用してCertbotをインストールします。
apt-get update -y
apt-get install certbot python-certbot-nginx -y
インストールしたら、次のコマンドを実行して、ドメインexample.comのLet's Encryptの無料SSLをダウンロードし、この証明書を使用するようにNginxを構成します。
certbot --nginx -d example.com
メールアドレスを入力し、利用規約に同意します。証明書が正常にインストールされると、次の出力が表示されます。
- - - - - - - - - - - - - - - - - - - - - - - - - - - - - - - - - - - - - - - -
Congratulations! You have successfully enabled https://example.com

You should test your configuration at:
https://www.ssllabs.com/ssltest/analyze.html?d=example.com
- - - - - - - - - - - - - - - - - - - - - - - - - - - - - - - - - - - - - - - -

IMPORTANT NOTES:
 - Congratulations! Your certificate and chain have been saved at:
   /etc/letsencrypt/live/example.com/fullchain.pem
   Your key file has been saved at:
   /etc/letsencrypt/live/example.com/privkey.pem
   Your cert will expire on 2020-01-22. To obtain a new or tweaked
   version of this certificate in the future, simply run certbot again
   with the "certonly" option. To non-interactively renew *all* of
   your certificates, run "certbot renew"
 - Your account credentials have been saved in your Certbot
   configuration directory at /etc/letsencrypt. You should make a
   secure backup of this folder now. This configuration directory will
   also contain certificates and private keys obtained by Certbot so
   making regular backups of this folder is ideal.
 - If you like Certbot, please consider supporting our work by:

   Donating to ISRG / Let's Encrypt:   https://letsencrypt.org/donate
   Donating to EFF:                    https://eff.org/donate-le
これで、URL https://example.comを使用してMailtrainアプリケーションに安全にアクセスできます。 。
上記のチュートリアルでは、Ubuntu18.04サーバーにdockerを使用してMailtrainをインストールする方法を学びました。また、NginxをMailtrainのリバースプロキシとして構成し、Let'sEncryptの無料SSLを使用してMailtrainを保護する方法も学びました。ご不明な点がございましたら、お気軽にお問い合わせください。