Gibbonは、教師と生徒の日常の問題を解決するために使用できる、無料のオープンソースのWebベースの教育管理システムです。 Gibbonは、オンライン申請フォーム、メッセンジャー、プランナー、外部評価など、多くの機能を備えた非常に柔軟性があり、拡張性があり、使いやすいアプリケーションです。テナガザルは、教師が各科目の各生徒の浮き沈みを簡単に理解するのに役立ち、あらゆる方法で生徒を支援することができます。 Gibbonには、さまざまな種類の学校で一般的に必要とされる機能を拡張するために使用される多くのモジュールが付属しています。要件に応じて、各モジュールを簡単にオンまたはオフにできます。
このチュートリアルでは、Ubuntu16.04サーバーにGibbonを段階的にインストールします。
- システムにインストールされているUbuntu16.04サーバー。
- サーバーでの静的IPアドレス192.168.15.189の設定
- サーバーにsudoユーザーが設定されているroot以外のユーザー。
Gibbonをインストールする前に、システムを最新の安定バージョンで更新することをお勧めします。これを行うには、次のコマンドを実行します。
sudo apt-get update -y
sudo apt-get upgrade -y
システムが更新されたら、システムを再起動し、sudoユーザーでログインします。
ApacheWebサーバーをインストールする
Gibbonをインストールするには、ApacheWebサーバーが必要です。次のコマンドを実行すると、Apacheやその他の必要なライブラリを簡単にインストールできます。
sudo apt-get install apache2 apache2-bin libapache2-mod-php7.0 -y
Apache Webサーバーがインストールされたら、次のコマンドを使用してapacheサービスを開始し、起動時に開始できるようにします。
sudo systemctl start apache2
sudo systemctl enable apache2
完了したら、PHPのインストールに進むことができます。
PHPをインストールする
Gibbonには、PHPおよびその他のPHPライブラリも必要です。次のコマンドを実行して、それらすべてをインストールできます。
sudo apt-get install php7.0 php7.0-mcrypt php7.0-curl php7.0-gd php7.0-json php7.0-mysql php7.0-xml php7.0-zip -y
PHPをインストールした後、PHP設定を微調整する必要があります。これを行うには、php.iniファイルを編集します:
sudo nano /etc/php/7.0/cli/php.ini
次の変更を行います:
file_uploads = On
allow_url_fopen = On
dispaly_errors = Off
error_reporting = E_ALL & ~E_NOTICE
register_globals = off
magic_quotes_gpc = Off
set max_input_vars = 4000
終了したら、ファイルを保存して閉じます。
MariaDBのインストールと構成
次に、Gibbonのデータベースを保存するためにMariaDBが必要です。次のコマンドを実行してインストールできます:
sudo apt-get install mariadb-server mariadb-client -y
MariaDBをインストールした後、最初にそれを保護する必要があります。次のコマンドを実行することで保護できます:
sudo mysql_secure_installation
以下に示すように、すべての質問に答えてください。
NOTE: RUNNING ALL PARTS OF THIS SCRIPT IS RECOMMENDED FOR ALL MariaDB
      SERVERS IN PRODUCTION USE!  PLEASE READ EACH STEP CAREFULLY!

In order to log into MariaDB to secure it, we'll need the current
password for the root user.  If you've just installed MariaDB, and
you haven't set the root password yet, the password will be blank,
so you should just press enter here.

Enter current password for root (enter for none):
OK, successfully used password, moving on...

Setting the root password ensures that nobody can log into the MariaDB
root user without the proper authorisation.

You already have a root password set, so you can safely answer 'n'.

Change the root password? [Y/n] n

 ... skipping.

By default, a MariaDB installation has an anonymous user, allowing anyone
to log into MariaDB without having to have a user account created for
them.  This is intended only for testing, and to make the installation
go a bit smoother.  You should remove them before moving into a
production environment.

Remove anonymous users? [Y/n] Y
 ... Success!

Normally, root should only be allowed to connect from 'localhost'.  This
ensures that someone cannot guess at the root password from the network.

Disallow root login remotely? [Y/n] Y
 ... Success!

By default, MariaDB comes with a database named 'test' that anyone can
access.  This is also intended only for testing, and should be removed
before moving into a production environment.

Remove test database and access to it? [Y/n] Y
 - Dropping test database...
 ... Success!
 - Removing privileges on test database...
 ... Success!

Reloading the privilege tables will ensure that all changes made so far
will take effect immediately.

Reload privilege tables now? [Y/n] Y
 ... Success!

Cleaning up...

All done!  If you've completed all of the above steps, your MariaDB
installation should now be secure.

Thanks for using MariaDB!
MariaDBが保護されたら、次のコマンドを使用してMariaDBコンソールにログインします。
mysql -u root -p
ルートパスワードを入力し、次のコマンドを使用してGibbonのデータベースを作成します。
MariaDB [(none)]>CREATE DATABASE gibbon_db;
Gibbonのデータベースを作成したら、次のコマンドを使用してユーザー名とパスワードを作成します。
MariaDB [(none)]>CREATE USER 'gibbon'@'localhost' IDENTIFIED BY 'password';
次に、次のコマンドを使用して、Gibbonデータベースに特権を付与します。
MariaDB [(none)]>GRANT ALL PRIVILEGES ON gibbon_db.* TO 'gibbon'@'localhost';
次に、FLUSH PRIVILEGESコマンドを実行して、特権テーブルがMariaDBによって再ロードされ、新しいクレデンシャルを使用できるようにします。
MariaDB [(none)]>FLUSH PRIVILEGES;
最後に、次のコマンドを使用してMariaDBコンソールを終了します。
MariaDB [(none)]>\q
あなたは彼らの公式ウェブサイトからギボンの最新バージョンをダウンロードすることができます。次のコマンドを実行してダウンロードします。
wget https://github.com/GibbonEdu/core/archive/v14.0.00.zip
Gibbonをダウンロードした後、次のコマンドを使用してダウンロードしたファイルを抽出します。
unzip v14.0.00.zip
次に、抽出したディレクトリをApacheWebルートディレクトリに移動します。
sudo mv core-14.0.00 /var/www/html/gibbon
次に、gibbonディレクトリの所有権を変更し、それに必要な権限を与える必要があります:
sudo chown -R www-data:www-data /var/www/html/gibbon
sudo chmod -R 777 /var/www/html/gibbon
次に、Gibbon用のApache仮想ホストファイルを作成する必要があります。これを行うには、/ etc / apache2 /sites-available/ディレクトリ内にgibbon.confファイルを作成します。
sudo nano /etc/apache2/sites-available/gibbon.conf
次の行を追加します:
<VirtualHost *:80>
ServerAdmin [email protected]
DocumentRoot "/var/www/html/gibbon/"
ServerName yourdomain.com
ServerAlias www.yourdomain.com
<<Directory "/var/www/html/gibbon/">
Options FollowSymLinks
AllowOverride All
Order allow,deny
allow from all
</Directory>
ErrorLog /var/log/apache2/gibbon-error_log
CustomLog /var/log/apache2/gibbon-access_log common
</VirtualHost>
終了したらファイルを保存して閉じ、次のコマンドで仮想ホストファイルを有効にします。
sudo a2ensite gibbon
最後に、apache2サービスを再起動して、新しい仮想ホスト構成を読み取ります。
sudo systemctl restart apache2
Gibbonはポート80で実行されるため、Gibbonにアクセスする前に、UFWファイアウォールを介してポート80を許可する必要があります。デフォルトでは、UFWファイアウォールはUbuntu 16.04で無効になっているため、最初に有効にする必要があります。
sudo ufw enable
次に、次のコマンドを実行して、ポート80がUFWファイアウォールを通過できるようにします。
sudo ufw allow 80
ファイアウォールが構成されたら、Webブラウザーを開き、URL http://yourdomain.comに移動すると、次の画像に示すように、GibbonWebインストールウィザードにリダイレクトされます。
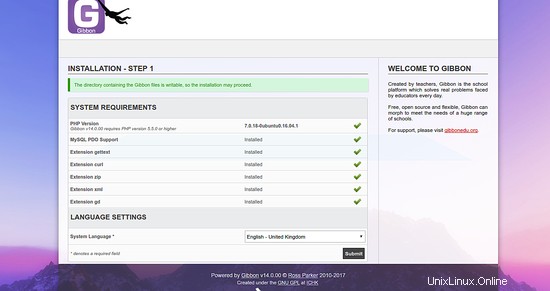
ここで、すべてのシステム要件を確認し、システム言語として英語を選択してから、[送信]ボタンをクリックすると、次の画像が表示されます。
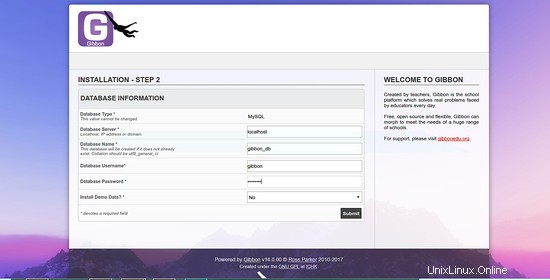
データベース構成ページで、データベース名、ユーザー名、およびパスワードを入力し、[送信]ボタンをクリックすると、次のページが表示されます。
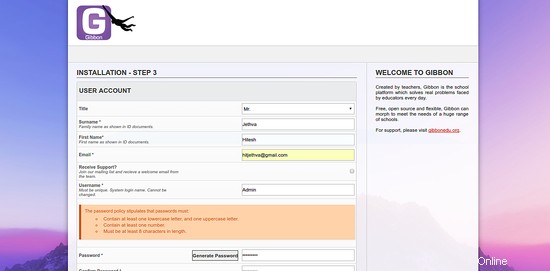
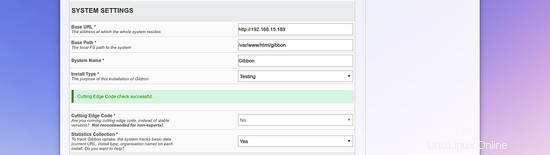
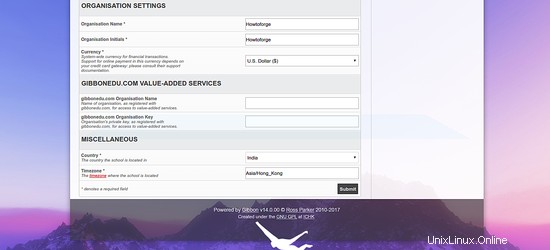
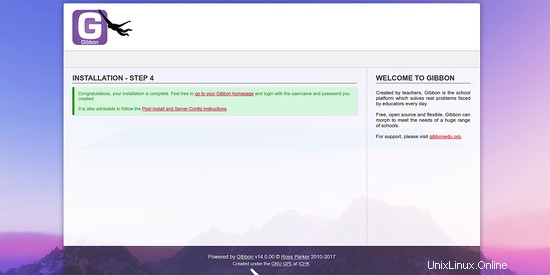
アカウント構成、システム設定、および組織設定で、必要なすべての情報を入力し、[送信]ボタンをクリックします。 Gibbonが正常にインストールされると、次のページが表示されます。
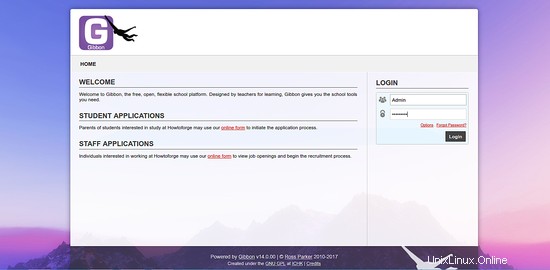
次に、[Gibbonホームページに移動]をクリックすると、次の画像にGibbonログインページが表示されます。
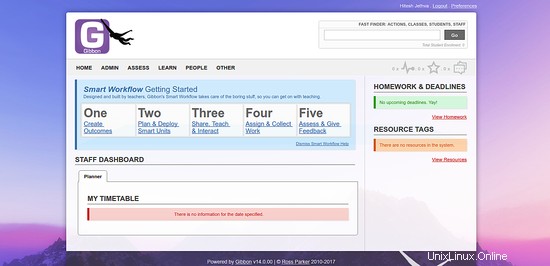
管理者の資格情報を入力して[ログイン]ボタンをクリックすると、次の画像にGibbonのデフォルトのダッシュボードが表示されます。
Gibbonをインストールした後、すべてのGibbonファイルのアクセス許可を設定して、それらが公に書き込み可能にならないようにすることをお勧めします。これを行うには、次のコマンドを実行します。
sudo chmod -R 755 /var/www/html/gibbon
おめでとう!これで、Ubuntu16.04サーバーにGibbonが正常にインストールおよび構成されました。追加のヘルプや役立つ情報については、Gibbonの公式Webサイトを確認してください。