RTMPは、Macromediaによって開発されたリアルタイムメッセージングプロトコルであり、インターネットを介してオーディオ、ビデオ、およびデータをストリーミングするために使用できます。 Nginx RTMPは、H264 / AACサポート、FFmpegを使用したオンライントランスコーディング、HTTPコールバックサポート、オーディオ/ビデオを記録するためのHTTP制御モジュールなどの多くの機能を備えたNginxベースのメディアストリーマーです。
このチュートリアルでは、RTMPモジュールを使用してNginxをコンパイルし、CentOS8でRTMPライブストリームを作成する方法を示します。
前提条件
- Atlantic.Netクラウドプラットフォーム上の新しいCentOS8VPS
- サーバーで構成されているrootパスワード
ステップ1–Atlantic.Netクラウドサーバーを作成する
まず、Atlantic.Netクラウドサーバーにログインします。 2 GB以上のRAMを搭載したオペレーティングシステムとしてCentOS8を選択して、新しいサーバーを作成します。 SSH経由でクラウドサーバーに接続し、ページの上部で強調表示されているクレデンシャルを使用してログインします。
CentOS 8サーバーにログインしたら、次のコマンドを実行して、ベースシステムを最新の利用可能なパッケージで更新します。
yum update -y
ステップ2–必要な依存関係をインストールする
開始する前に、RTMPサポートを使用してNginxをコンパイルするために必要な依存関係をインストールする必要があります。まず、次のコマンドを使用して開発ツールグループパッケージをインストールします。
yum groupinstall 'Development Tools' -y
次に、次のコマンドを使用してEPELリポジトリをインストールします。
yum install epel-release -y
インストールしたら、次のコマンドを使用して他の必要な依存関係をインストールします。
yum install wget git unzip perl perl-devel perl-ExtUtils-Embed libxslt libxslt-devel libxml2
libxml2-devel gd gd-devel pcre-devel GeoIP GeoIP-devel -y
すべてのパッケージがインストールされたら、Nginxのコンパイルに進むことができます。
ステップ3–必要なコンポーネントをダウンロードする
まず、RTMPをサポートするNginxをコンパイルするために必要なコンポーネントをダウンロードする必要があります。
まず、次のコマンドを使用してNginxの最新の安定バージョンをダウンロードします。
wget http://nginx.org/download/nginx-1.18.0.tar.gz
ダウンロードしたら、次のコマンドを使用して解凍します。
tar -xvzf nginx-1.18.0.tar.gz
次に、次のコマンドを使用してPCREとZlibをダウンロードします。
wget https://ftp.pcre.org/pub/pcre/pcre-8.42.zip
wget https://www.zlib.net/zlib-1.2.11.tar.gz
ダウンロードしたら、次のコマンドでそれらを抽出します。
unzip pcre-8.42.zip
tar -xvzf zlib-1.2.11.tar.gz
両方が抽出されたら、次のコマンドを使用してOpenSSLをダウンロードします。
wget https://www.openssl.org/source/openssl-1.1.0h.tar.gz
次に、次のコマンドを使用して、ダウンロードしたパッケージを抽出します。
tar -xzvf openssl-1.1.0h.tar.gz
次に、次のコマンドを使用して、Gitリポジトリから最新バージョンのNginxRTMPモジュールをダウンロードします。
git clone https://github.com/sergey-dryabzhinsky/nginx-rtmp-module.git
すべてのコンポーネントがダウンロードされたら、次のステップに進むことができます。
ステップ4–RTMPをサポートするNginxをインストールする
まず、次のコマンドを使用してディレクトリをNginxに変更します。
cd nginx-1.18.0/
次に、次のコマンドを使用して、RTMPサポートを使用してNginxを構成します。
./configure --prefix=/etc/nginx \
--sbin-path=/usr/sbin/nginx \
--modules-path=/usr/lib64/nginx/modules \
--conf-path=/etc/nginx/nginx.conf \
--error-log-path=/var/log/nginx/error.log \
--pid-path=/var/run/nginx.pid \
--lock-path=/var/run/nginx.lock \
--user=nginx \
--group=nginx \
--build=CentOS \
--builddir=nginx-1.18.0 \
--with-select_module \
--with-poll_module \
--with-threads \
--with-file-aio \
--with-http_ssl_module \
--with-http_v2_module \
--with-http_realip_module \
--with-http_addition_module \
--with-http_xslt_module=dynamic \
--with-http_image_filter_module=dynamic \
--with-http_geoip_module=dynamic \
--with-http_sub_module \
--with-http_dav_module \
--with-http_flv_module \
--with-http_mp4_module \
--with-http_gunzip_module \
--with-http_gzip_static_module \
--with-http_auth_request_module \
--with-http_random_index_module \
--with-http_secure_link_module \
--with-http_degradation_module \
--with-http_slice_module \
--with-http_stub_status_module \
--http-log-path=/var/log/nginx/access.log \
--http-client-body-temp-path=/var/cache/nginx/client_temp \
--http-proxy-temp-path=/var/cache/nginx/proxy_temp \
--http-fastcgi-temp-path=/var/cache/nginx/fastcgi_temp \
--http-uwsgi-temp-path=/var/cache/nginx/uwsgi_temp \
--http-scgi-temp-path=/var/cache/nginx/scgi_temp \
--with-mail=dynamic \
--with-mail_ssl_module \
--with-stream=dynamic \
--with-stream_ssl_module \
--with-stream_realip_module \
--with-stream_geoip_module=dynamic \
--with-stream_ssl_preread_module \
--with-compat \
--with-pcre=../pcre-8.42 \
--with-pcre-jit \
--with-zlib=../zlib-1.2.11 \
--with-openssl=../openssl-1.1.0h \
--with-openssl-opt=no-nextprotoneg \
--add-module=../nginx-rtmp-module \
--with-debug
構成プロセスが完了すると、次の出力が表示されます。
Configuration summary
+ using threads
+ using PCRE library: ../pcre-8.42
+ using OpenSSL library: ../openssl-1.1.0h
+ using zlib library: ../zlib-1.2.11

nginx path prefix: "/etc/nginx"
nginx binary file: "/usr/sbin/nginx"
nginx modules path: "/usr/lib64/nginx/modules"
nginx configuration prefix: "/etc/nginx"
nginx configuration file: "/etc/nginx/nginx.conf"
nginx pid file: "/var/run/nginx.pid"
nginx error log file: "/var/log/nginx/error.log"
nginx http access log file: "/var/log/nginx/access.log"
nginx http client request body temporary files: "/var/cache/nginx/client_temp"
nginx http proxy temporary files: "/var/cache/nginx/proxy_temp"
nginx http fastcgi temporary files: "/var/cache/nginx/fastcgi_temp"
nginx http uwsgi temporary files: "/var/cache/nginx/uwsgi_temp"
nginx http scgi temporary files: "/var/cache/nginx/scgi_temp"
次に、次のコマンドを使用してNginxをインストールします。
make
make install
Nginxをインストールした後、次のコマンドを使用して、インストールされているNginxのバージョンを確認します。
nginx -V
次の出力が得られるはずです:
nginx version: nginx/1.18.0 (CentOS)
built by gcc 8.3.1 20191121 (Red Hat 8.3.1-5) (GCC)
built with OpenSSL 1.1.0h 27 Mar 2018
TLS SNI support enabled
configure arguments: --prefix=/etc/nginx --sbin-path=/usr/sbin/nginx --modules-
path=/usr/lib64/nginx/modules --conf-path=/etc/nginx/nginx.conf --error-log-
path=/var/log/nginx/error.log --pid-path=/var/run/nginx.pid --lock-path=/var/run/nginx.lock --
user=nginx --group=nginx --build=CentOS --builddir=nginx-1.14.0 --with-select_module --with-
poll_module --with-threads --with-file-aio --with-http_ssl_module --with-http_v2_module --with-
http_realip_module --with-http_addition_module --with-http_xslt_module=dynamic --with-
http_image_filter_module=dynamic --with-http_geoip_module=dynamic --with-http_sub_module --
with-http_dav_module --with-http_flv_module --with-http_mp4_module --with-
http_gunzip_module --with-http_gzip_static_module --with-http_auth_request_module --with-
http_random_index_module --with-http_secure_link_module --with-http_degradation_module --
with-http_slice_module --with-http_stub_status_module --http-log-path=/var/log/nginx/access.log -
-http-client-body-temp-path=/var/cache/nginx/client_temp --http-proxy-temp-
path=/var/cache/nginx/proxy_temp --http-fastcgi-temp-path=/var/cache/nginx/fastcgi_temp --http-
uwsgi-temp-path=/var/cache/nginx/uwsgi_temp --http-scgi-temp-path=/var/cache/nginx/scgi_temp
--with-mail=dynamic --with-mail_ssl_module --with-stream=dynamic --with-stream_ssl_module --
with-stream_realip_module --with-stream_geoip_module=dynamic --with-
stream_ssl_preread_module --with-compat --with-pcre=../pcre-8.42 --with-pcre-jit --with-
zlib=../zlib-1.2.11 --with-openssl=../openssl-1.1.0h --with-openssl-opt=no-nextprotoneg --add-
module=../nginx-rtmp-module --with-debug
ステップ5–NginxのSystemdサービスファイルを作成する
次に、Nginxサービスを管理するためのNginxサービスファイルを作成する必要があります。次のコマンドで作成できます:
nano /lib/systemd/system/nginx.service
次の行を追加します:
[Unit]
Description=nginx - high performance web server
Documentation=https://nginx.org/en/docs/
After=network-online.target remote-fs.target nss-lookup.target
Wants=network-online.target

[Service]
Type=forking
PIDFile=/var/run/nginx.pid
ExecStartPre=/usr/sbin/nginx -t -c /etc/nginx/nginx.conf
ExecStart=/usr/sbin/nginx -c /etc/nginx/nginx.conf
ExecReload=/bin/kill -s HUP $MAINPID
ExecStop=/bin/kill -s TERM $MAINPID

[Install]
WantedBy=multi-user.target
終了したらファイルを保存して閉じ、次のコマンドでsystemdデーモンをリロードします。
systemctl daemon-reload
次に、次のコマンドを使用してNginxを起動し、システムの再起動時に起動できるようにします。
systemctl start nginx
systemctl enable nginx
ステップ6–RTMPを使用するようにNginxを構成する
First, create a backup copy of the Nginx main configuration file with the following command:

mv /etc/nginx/nginx.conf /etc/nginx/nginx.conf.bak
次に、次のコマンドを使用して新しいNginx構成ファイルを作成します。
nano /etc/nginx/nginx.conf
次の行を追加します:
worker_processes auto;
events {
worker_connections 1024;
}

# RTMP configuration
rtmp {
server {
listen 1935; # Listen on standard RTMP port
chunk_size 4000;

# Define the Application
application show {
live on;
# Turn on HLS
hls on;
hls_path /mnt/hls/;
hls_fragment 3;
hls_playlist_length 60;
# disable consuming the stream from nginx as rtmp
deny play all;
}

}
}

http {
sendfile off;
tcp_nopush on;
aio on;
directio 512;
default_type application/octet-stream;

server {
listen 8080;

location / {
# Disable cache
add_header 'Cache-Control' 'no-cache';

# CORS setup
add_header 'Access-Control-Allow-Origin' '*' always;
add_header 'Access-Control-Expose-Headers' 'Content-Length';

# allow CORS preflight requests
if ($request_method = 'OPTIONS') {
add_header 'Access-Control-Allow-Origin' '*';
add_header 'Access-Control-Max-Age' 1728000;
add_header 'Content-Type' 'text/plain charset=UTF-8';
add_header 'Content-Length' 0;
return 204;
}

types {
application/dash+xml mpd;
application/vnd.apple.mpegurl m3u8;
video/mp2t ts;
}

root /mnt/;
}
}
}
ファイルを保存して閉じてから、HLS構成用の新しいディレクトリを作成し、適切な所有権を付与します。
mkdir -p /mnt/hls
chown -R nginx:nginx /mnt/hls
終了したら、ファイルを保存して閉じます。
ステップ7–RTMPライブストリームを作成する
次に、RTMPストリームビデオを作成し、新しいライブRTMPストリームを作成する必要があります。これを行うには、Nginxのメイン構成ファイルを編集します。
nano /etc/nginx/nginx.conf
次の行を見つけます:
hls_playlist_length 60;
# disable consuming the stream from nginx as rtmp
deny play all;
}
上記の行のすぐ下に次の行を追加します。
application vod {
play /mnt/mp4s;
}

# RTMP stream using OBS
application stream {
live on;
}
ファイルを保存して閉じてから、次のコマンドでNginxサービスを再起動します。
systemctl restart nginx
次に、MP4ビデオを保存するディレクトリを作成します:
mkdir -p /mnt/mp4s
次に、次のコマンドを使用してサンプルビデオをダウンロードします。
cd /mnt/mp4s
wget https://file-examples-com.github.io/uploads/2017/04/file_example_MP4_480_1_5MG.mp4 -O
myfile.mp4
次に、/ mnt/mp4sディレクトリに適切な所有権を付与します。
chown -R nginx:nginx /mnt/mp4s
ステップ8–FFmpegをインストールしてストリーミングサーバーを開始する
まず、サーバーにFFmpegをインストールする必要があります。デフォルトでは、CentOS 8のデフォルトリポジトリにインストールされていないため、システムでPowertoolリポジトリを有効にする必要があります。次のコマンドで有効にできます:
yum install epel-release dnf-utils
yum-config-manager --set-enabled PowerTools
yum-config-manager --add-repo=https://negativo17.org/repos/epel-multimedia.repo
次に、次のコマンドでFFmpegをインストールします:
yum install ffmpeg -y
FFmpegがインストールされたら、次のコマンドでストリーミングサーバーを起動します。
ffmpeg -re -i /mnt/mp4s/myfile.mp4 -vcodec libx264 -vprofile baseline -g 30 -acodec aac -strict -2 -
f flv rtmp://your-server-ip:1935/show/vod
ステップ9–RTMPストリーミングをテストする
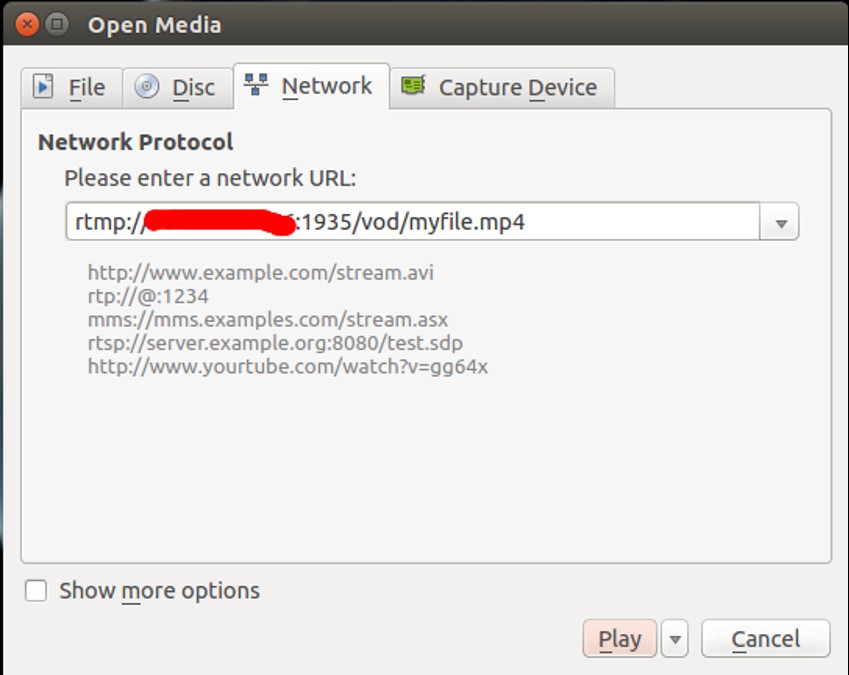
次に、VLCメディアプレーヤーを使用してRTMPVODストリームをテストする必要があります。
クライアントシステムが表示されたら、VLSメディアプレーヤーを開き、VLCメディア=>ネットワークストリームを開くに移動します。 。次の画面が表示されます。

RTMPストリーミングサーバーのURLを入力し、再生をクリックします ボタン。
接続に成功すると、次の画面にMP4ビデオが表示されます。

結論
上記のチュートリアルでは、RTMPをサポートするNginxをインストールする方法を学びました。また、MP4ビデオをストリーミングし、リモートシステムからVLCメディアプレーヤーで再生するようにNginxを構成する方法も学びました。今すぐAtlantic.NetのVPSホスティングにRTMPをサポートするNginxをインストールしてみてください!
VPSホスティングサービスと仮想プライベートサーバーの詳細をご覧ください。