Splunkは、Webブラウザーからマシンで生成されたビッグデータを検索、監視、分析するために使用される強力なログ分析ツールです。サーバーやネットワークデバイスからのログデータを、簡単に読み取って要約できる単純な形式に単純化するのに役立ちます。 Splunkは、Windows、Linux、MacOSを含むすべての主要なオペレーティングシステムをサポートしています。簡単に拡張でき、完全に統合されており、ローカルとリモートの両方のデータソースをサポートします。
このチュートリアルでは、Ubuntu20.04にSplunkLogAnalyzerToolをインストールする方法を紹介します。
前提条件
- Atlantic.netクラウドプラットフォーム上の新しいUbuntu20.04VPS
- サーバーで構成されているrootパスワード
ステップ1-Atlantic.Netクラウドサーバーを作成する
まず、Atlantic.Netクラウドサーバーにログインします。少なくとも1GBのRAMを搭載したオペレーティングシステムとしてUbuntu20.04を選択して、新しいサーバーを作成します。 SSH経由でクラウドサーバーに接続し、ページの上部で強調表示されているクレデンシャルを使用してログインします。
Ubuntu 20.04サーバーにログインしたら、次のコマンドを実行して、ベースシステムを最新の利用可能なパッケージで更新します。
apt-get update -y
ステップ2–Splunkをインストールする
まず、SplunkをUbuntuサーバーにダウンロードする必要があります。
- Splunk Webサイトにログインして、最新バージョンのSplunkパッケージをダウンロードします。
- ウェブサイトの「FreeSplunk」ロゴをクリックします。
- 簡単な登録フォームに記入してアカウントを作成します。
- ダウンロードが完了したら、お気に入りのFTPクライアントを使用してファイルをサーバーに転送します。

注– FTPの使用方法がわからない場合は、次のいずれかのガイドにアクセスしてください。
- FileZilla
- またはMonstaFTP
ダウンロードが完了したら、次のコマンドを使用してダウンロードしたファイルをインストールします。
dpkg -i splunk-8.0.5-a1a6394cc5ae-linux-2.6-amd64.deb
インストールが完了したら、次のコマンドを使用して、システムの起動時にSplunkサービスを有効にします。
/opt/splunk/bin/splunk enable boot-start
以下に示すように、使用許諾契約に同意する必要があります。
"Personnel" means any employee, consultant, contractor, or
subcontractor of Splunk.

"Splunk Preexisting IP" means, with respect to any C&I Services
Materials, all associated Splunk Technology and all Intellectual Property
Rights created or acquired: (a) prior to the date of the Statement of
Work that includes such C&I Services Materials, or (b) after the date of
such Statement of Work but independently of the C&I Services provided
under such Statement of Work.

"Statement of Work" means the statements of work and/or any all
applicable Orders that describe the specific services to be performed by
Splunk, including any materials and deliverables to be delivered by
Splunk.

SPLUNK GENERAL TERMS (v1.2020)

Do you agree with this license? [y/n]: y
yと入力します Enterを押します 続ける。以下に示すように、管理者アカウントを作成し、パスワードを設定するように求められます。
This appears to be your first time running this version of Splunk.

Splunk software must create an administrator account during startup. Otherwise, you cannot log in.
Create credentials for the administrator account.
Characters do not appear on the screen when you type in credentials.

Please enter an administrator username: admin
Password must contain at least:
* 8 total printable ASCII character(s).
Please enter a new password:
Please confirm new password:
管理者のユーザー名とパスワードを入力し、 Enterを押します 。次の出力が表示されます。
Copying '/opt/splunk/etc/openldap/ldap.conf.default' to '/opt/splunk/etc/openldap/ldap.conf'.
Generating RSA private key, 2048 bit long modulus
.........+++++
..+++++
e is 65537 (0x10001)
writing RSA key
Generating RSA private key, 2048 bit long modulus
.+++++
..................................................................................................................................................+++++
e is 65537 (0x10001)
writing RSA key

Moving '/opt/splunk/share/splunk/search_mrsparkle/modules.new' to
'/opt/splunk/share/splunk/search_mrsparkle/modules'.
Init script installed at /etc/init.d/splunk.
Init script is configured to run at boot.
ステップ3–Splunkサービスを開始する
この時点で、Splunkがシステムにインストールされています。次に、次のコマンドでSplunkサービスを開始します。
service splunk start
次のコマンドを使用して、Splunkサービスのステータスを確認できます。
service splunk status
次の出力が得られるはずです:
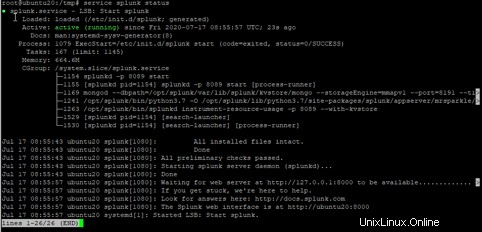
この時点で、Splunkが起動し、ポート8000でリッスンしています。
ステップ4–SplunkWebインターフェイスにアクセスする
次に、Webブラウザーを開き、URL http:// your-server-ip:8000を使用してSplunkインターフェースにアクセスします。 。次の画面が表示されます。
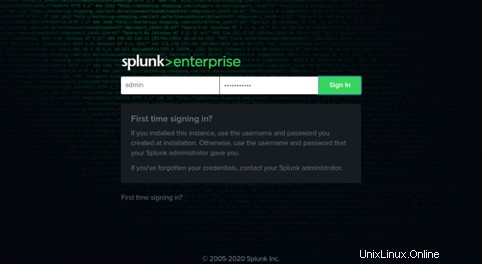
管理者のユーザー名とパスワードを入力し、署名をクリックします で ボタン。次の画面にSplunkダッシュボードが表示されます。

結論
おめでとう!これで、Ubuntu20.04にSplunkが正常にインストールされました。 Splunkは、ログの処理、収集、分析に非常に役立つソリューションです。 Atlantic.NetのVPSホスティングアカウントでSplunkを使用してLinux環境を監視します。