このチュートリアルでは、 Apache HTTPを保護する方法を学習します TLS / SSLを備えたサーバー Let’s Encryptが提供する証明書 FreeBSD 11.x 。 Lets’Encryptの証明書更新プロセスを自動化する方法についても説明します。
また読む :FreeBSDにLet’s EncryptforNginxをインストールする
TLS / SSL 証明書は、Apache Webサーバーがエンドノード間の通信を暗号化するために使用するか、セキュリティを提供するためにサーバーとクライアント間の通信を暗号化するために使用されます。 Let'sEncryptはcertbotを提供します コマンドラインユーティリティ。信頼できる証明書を無料で取得する方法を容易にするアプリケーションです。
要件:
- FreeBSD11.xのインストール
- FreeBSDのインストール後に行うべき10のこと
- FreeBSDにApache、MariaDB、PHPをインストールする方法
ステップ1:FreeBSDでApacheSSLを設定する
1。 certbotユーティリティのインストールを開始し、 ApacheのTSL構成ファイルを作成する前に 、最初に sites-availableという名前の2つの異なるディレクトリを作成します およびサイト対応 以下のコマンドを発行して、Apacheルート構成ディレクトリに移動します。
これら2つのディレクトリの目的は、メインのApache httpd.conf を変更することなく、システムでの仮想ホスティング構成管理を容易にすることです。 新しい仮想ホストを追加するたびに構成ファイル。
# mkdir /usr/local/etc/apache24/sites-available
# mkdir /usr/local/etc/apache24/sites-enabled
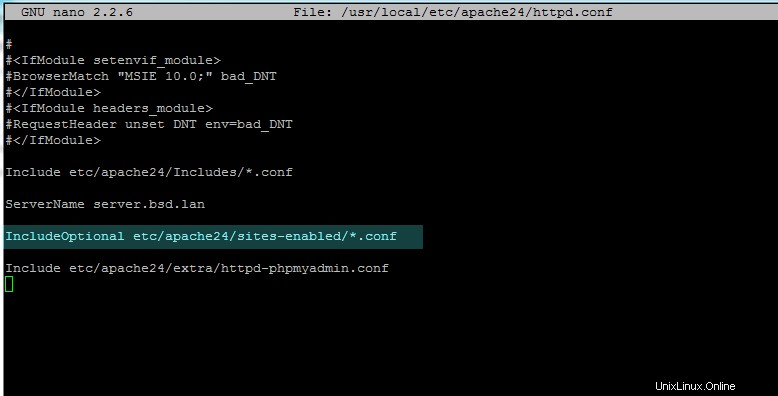
2。 両方のディレクトリを作成したら、Apache httpd.confを開きます。 以下に示すように、テキストエディタでファイルを作成し、ファイルの末尾近くに次の行を追加します。
# nano /usr/local/etc/apache24/httpd.conf
次の行を追加します:
IncludeOptional etc/apache24/sites-enabled/*.conf
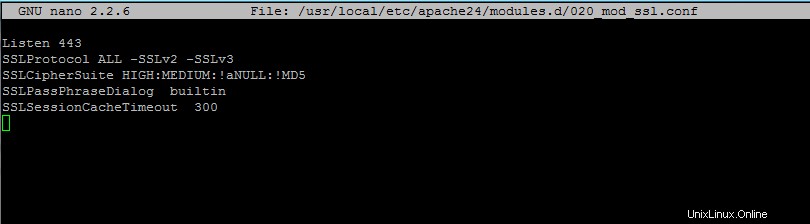
3。 次に、 TLSを有効にします 020_mod_ssl.confという名前の次の新しいファイルを作成してApache用のモジュール modules.dで 次の内容のディレクトリ。
# nano /usr/local/etc/apache24/modules.d/020_mod_ssl.conf
次の行をファイル020_mod_ssl.confに追加します 。
Listen 443
SSLProtocol ALL -SSLv2 -SSLv3
SSLCipherSuite HIGH:MEDIUM:!aNULL:!MD5
SSLPassPhraseDialog  builtin
SSLSessionCacheTimeout  300
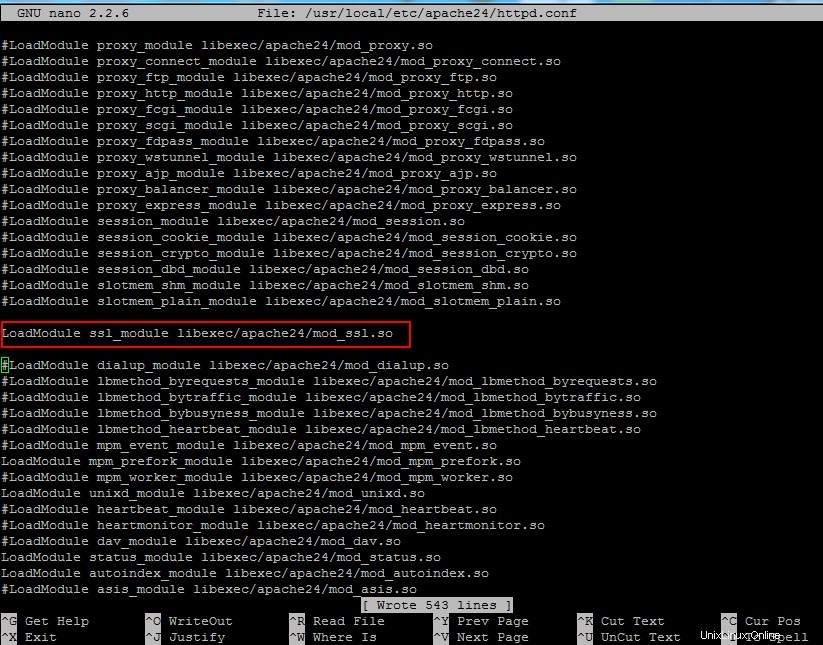
4。 次に、 SSLのコメントを解除します /usr/local/etc/apache24/httpd.confからのモジュール 以下に示すように、次の行の先頭からハッシュタグを削除してファイルを作成します。
LoadModule ssl_module libexec/apache24/mod_ssl.so
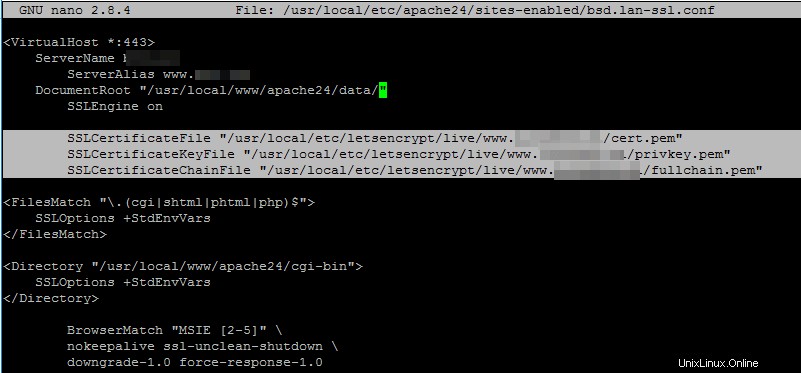
5。 次に、 TLSを作成します サイトで利用可能なドメインの構成ファイル 以下の抜粋に示されているように、ディレクトリ、できればドメイン名を使用してください:
# nano /usr/local/etc/apache24/sites-available/bsd.lan-ssl.conf
次の仮想ホスト構成をファイルbsd.lan-ssl.confに追加します 。
<VirtualHost *:443>
    ServerName www.yourdomain.com
	ServerAlias yourdomain.com
                DocumentRoot "/usr/local/www/apache24/data/"
	SSLEngine on

	SSLCertificateFile "/usr/local/etc/letsencrypt/live/www.yourdomain.com/cert.pem"
	SSLCertificateKeyFile "/usr/local/etc/letsencrypt/live/www.yourdomain.com/privkey.pem"
	SSLCertificateChainFile "/usr/local/etc/letsencrypt/live/www.yourdomain.com/fullchain.pem"

<FilesMatch "\.(cgi|shtml|phtml|php)$">
    SSLOptions +StdEnvVars
</FilesMatch>

<Directory "/usr/local/www/apache24/cgi-bin">
    SSLOptions +StdEnvVars
</Directory>

	BrowserMatch "MSIE [2-5]" \
        nokeepalive ssl-unclean-shutdown \
        downgrade-1.0 force-response-1.0

	CustomLog "/var/log/apache/httpd-ssl_request.log" \
          "%t %h %{SSL_PROTOCOL}x %{SSL_CIPHER}x \"%r\" %b"

	<Directory "/usr/local/www/apache24/data/">
            Options Indexes FollowSymLinks MultiViews
        #AllowOverride controls what directives may be placed in .htaccess files.
                        AllowOverride All
        #Controls who can get stuff from this server file
                        Require all granted
        </Directory>

    ErrorLog "/var/log/apache/yourdomain.ssl-error.log"
    CustomLog "/var/log/apache/yourdomain.ssl-access_log" combined

</VirtualHost>
ServerNameのドメイン名変数を必ず置き換えてください 、 ServerAlias 、 ErrorLog 、 CustomLog それに応じてステートメント。
ステップ2:Lets’EncryptをFreeBSDにインストールする
6。 次のステップで、 certbot をインストールするには、次のコマンドを発行します Let’s Encryptが提供するユーティリティ 、 Apache TSLを取得するために使用されます ドメインの無料証明書。
certbotのインストール中 一連のプロンプトが画面に表示されます。以下のスクリーンショットを使用して、 certbotを構成します 効用。また、マシンのリソースによっては、certbotユーティリティのコンパイルとインストールに時間がかかる場合があります。
# cd /usr/ports/security/py-certbot
# make install clean

7。 コンパイルプロセスが終了したら、 certbot を更新するために、以下のコマンドを発行します ユーティリティとcertbot 必要な依存関係。
# pkg install py27-certbot
# pkg install py27-acme
8。 ドメインの証明書を生成するには、次の図のようにコマンドを発行します。 Webサイトファイルがファイルシステムに保存されている正しいWebルートの場所を指定してください( DocumentRoot ドメイン構成ファイルからのディレクティブ)-wを使用 国旗。複数のサブドメインがある場合は、それらすべてを-dで追加します フラグ。
# certbot certonly --webroot -w /usr/local/www/apache24/data/ -d yourdomain.com -d www.yourdomain.com
証明書を取得する際に、証明書を更新するためのメールアドレスを入力し、aを押して、Let’sEncryptの利用規約とnに同意します。 メールアドレスを共有しないようにLet’sEncryptパートナー。
Saving debug log to /var/log/letsencrypt/letsencrypt.log Enter email address (used for urgent renewal and security notices) (Enter 'c' to cancel):[email protected] There seem to be problems with that address. Enter email address (used for urgent renewal and security notices) If you really want to skip this, you can run the client with --register-unsafely-without-email but make sure you then backup your account key from /etc/letsencrypt/accounts (Enter 'c' to cancel):[email protected] ------------------------------------------------------------------------------- Please read the Terms of Service at https://letsencrypt.org/documents/LE-SA-v1.1.1-August-1-2016.pdf. You must agree in order to register with the ACME server at https://acme-v01.api.letsencrypt.org/directory ------------------------------------------------------------------------------- (A)gree/(C)ancel:a------------------------------------------------------------------------------- Would you be willing to share your email address with the Electronic Frontier Foundation, a founding partner of the Let's Encrypt project and the non-profit organization that develops Certbot? We'd like to send you email about EFF and our work to encrypt the web, protect its users and defend digital rights. ------------------------------------------------------------------------------- (Y)es/(N)o:nObtaining a new certificate Performing the following challenges: http-01 challenge for www.domain.com Using the webroot path /usr/local/www/apache24/data for all unmatched domains. Waiting for verification... Cleaning up challenges IMPORTANT NOTES: - Congratulations! Your certificate and chain have been saved at /usr/local/etc/letsencrypt/live/www.yourdomain.com/fullchain.pem. Your cert will expire on 2017-11-15. To obtain a new or tweaked version of this certificate in the future, simply run certbot again. To non-interactively renew *all* of your certificates, run "certbot renew" - Your account credentials have been saved in your Certbot configuration directory at /usr/local/etc/letsencrypt. You should make a secure backup of this folder now. This configuration directory will also contain certificates and private keys obtained by Certbot so making regular backups of this folder is ideal. - If you like Certbot, please consider supporting our work by: Donating to ISRG / Let's Encrypt: https://letsencrypt.org/donate Donating to EFF: https://eff.org/donate-le
9。 ドメインの証明書を取得したら、lsコマンドを実行して、以下の例に示すように、すべての証明書のコンポーネント(チェーン、秘密鍵、証明書)を一覧表示できます。
# ls -al /usr/local/etc/letsencrypt/live/www.yourdomain.com/

ステップ3:FreeBSDでApacheTLS証明書を更新する
10。 Let’s Encrypt証明書をWebサイトに追加するには、ドメインのapache構成ファイルを開き、発行された証明書のパスを反映するように次の行を更新します。
# nano /usr/local/etc/apache24/sites-available/bsd.lan-ssl.conf
次のTLS証明書行を追加します:
SSLCertificateFile "/usr/local/etc/letsencrypt/live/www.yourdomain.com/cert.pem"
	SSLCertificateKeyFile "/usr/local/etc/letsencrypt/live/www.yourdomain.com/privkey.pem"
	SSLCertificateChainFile "/usr/local/etc/letsencrypt/live/www.yourdomain.com/fullchain.pem"
11。 最後に、ドメインTLS構成ファイルのサイト対応へのシンボリックリンクを作成して、TLS構成ファイルを有効にします。 ディレクトリで、構文エラーの可能性についてApache構成を確認し、構文に問題がない場合は、以下のコマンドを発行してApacheデーモンを再起動します。
# ln -sf /usr/local/etc/apache24/sites-available/bsd.lan-ssl.conf /usr/local/etc/apache24/sites-enabled/
# apachectl -t
# service apache24 restart
12。 ApacheサービスがHTTPSをリッスンしているかどうかを確認するため ポート443 、次のコマンドを発行して、httpdネットワークソケットを一覧表示します。
# sockstat -4 | grep httpd
13。 Let’s Encrypt証明書が正常に適用されたことを確認するために、HTTPSプロトコルを介してブラウザからドメインアドレスに移動できます。
https://www.yourdomain.com
14。 発行されたLet’s Encrypt証明書に関する追加情報をコマンドラインから取得するには、 opensslを使用します。 次のようにコマンドを実行します。
# openssl s_client -connect www.yourdomain.com:443
15。 Let’s Encrypt CAが提供する有効な証明書を使用してトラフィックが暗号化されているかどうかを確認することもできます。 以下のモバイルスクリーンショットに示すように、モバイルデバイスから。
それで全部です!サーバーとクライアントのブラウザ間を流れるトラフィックが暗号化されているため、クライアントは安全にWebサイトにアクセスできるようになりました。 certbotユーティリティに関するより複雑なタスクについては、次のリンクにアクセスしてください:https://certbot.eff.org/