はじめに
JIRAは、Atlassianによって開発されたプロジェクト管理ツールです。また、ソフトウェア開発やその他のプロジェクトに関連する問題追跡やバグ追跡にも使用されます。このガイドでは、CentOS 8 / RHEL8LinuxへのJiraのインストールについて説明します。
Javaのインストール
Jiraを実行するには、CentOS 8 /RHEL8マシンにJavaがインストールされている必要があります。したがって、このコマンドを実行してjava-openjdkをインストールします。
[root@unixcop ~]# yum install java-11-openjdk.x86_64Javaバージョンでインストールを確認します:
[root@unixcop ~]# java -version
openjdk version "11.0.12" 2021-07-20 LTS
OpenJDK Runtime Environment 18.9 (build 11.0.12+7-LTS)
OpenJDK 64-Bit Server VM 18.9 (build 11.0.12+7-LTS, mixed mode, sharing)
[root@unixcop ~]#
JiraはMySQL8データベースサーバーでは動作しないため、MySQL5.7をインストールします。
データベースサーバーがインストールされたら、それを起動してrootユーザーとしてログインし、Jiraのデータベースとユーザーを作成します。
[root@unixcop ~]# mysql -u root -p
Enter password:
Welcome to the MySQL monitor.  Commands end with ; or \g.
Your MySQL connection id is 8
Server version: 8.0.21 Source distribution

Copyright (c) 2000, 2020, Oracle and/or its affiliates. All rights reserved.

Oracle is a registered trademark of Oracle Corporation and/or its
affiliates. Other names may be trademarks of their respective
owners.

Type 'help;' or '\h' for help. Type '\c' to clear the current input statement.

mysql>
mysql> CREATE DATABASE jira CHARACTER SET utf8mb4 COLLATE utf8mb4_bin;
Query OK, 1 row affected (0.01 sec)

mysql> CREATE USER 'jira'@'localhost' IDENTIFIED BY 'strong@UnIxcop(PasswoRD@';
Query OK, 0 rows affected (0.00 sec)

mysql> GRANT ALL ON jira.* TO 'jira'@'localhost';
Query OK, 0 rows affected (0.01 sec)

mysql> FLUSH PRIVILEGES;
Query OK, 0 rows affected (0.00 sec)

mysql> \q
Bye
[root@unixcop ~]#
JIRAをダウンロードしてインストールする
Javaとデータベースサーバーをインストールしました。次のアクションは、JIRAのバイナリファイルをダウンロードすることです。 Jiraダウンロードページで最新バージョンを確認してください。
現在の最新のjiraバージョンは8.18xです。ただし、jira-8.13は長期的なサポートであるため、ダウンロードしてインストールします。
[root@unixcop ~]# wget https://product-downloads.atlassian.com/software/jira/downloads/atlassian-jira-software-8.8.1-x64.bin -O atlassian-jira-software.bin

--2021-08-23 11:00:13--  https://product-downloads.atlassian.com/software/jira/downloads/atlassian-jira-software-8.8.1-x64.bin
Resolving product-downloads.atlassian.com (product-downloads.atlassian.com)... 52.222.144.160, 2600:9000:20fe:a600:1f:ab86:b4a:17e1, 2600:9000:20fe:4200:1f:ab86:b4a:17e1, ...
Connecting to product-downloads.atlassian.com (product-downloads.atlassian.com)|52.222.144.160|:443... connected.
HTTP request sent, awaiting response... 200 OK
Length: 402401644 (384M) [application/octet-stream]
Saving to: 'atlassian-jira-software.bin'

atlassian-jira-software.bin           100%[=======================================================================>] 383.76M   943KB/s    in 12m 54s

2021-08-23 11:13:07 (263 KB/s) - 'atlassian-jira-software.bin' saved [402401644/402401644]

[root@unixcop ~]#
ファイルの実行許可を与える
chmod +x atlassian-jira-software.bin次に、インストーラーを起動します:
Jiraセットアップを開始するには、Enterキーを押します:
次に、[1]を押して、エクスプレスインストール設定を使用します。
iと入力します キーまたはEnterキーを押してインストールを開始します。
最後に、Jiraサービスの開始を受け入れます。
[root@unixcop ~]# ./atlassian-jira-software.bin
Unpacking JRE ...
Starting Installer ...
This will install Jira Software 8.8.1 on your computer.
OK [o, Enter], Cancel [c]
Click Next to continue, or Cancel to exit Setup.
Choose the appropriate installation or upgrade option.
Please choose one of the following:
Express Install (use default settings) [1], Custom Install (recommended for advanced users) [2, Enter], Upgrade an existing Jira installation [3]
1
Select the folder where you would like Jira Software to be installed.
Where should Jira Software be installed?
[/opt/atlassian/jira]
Default location for Jira Software data
[/var/atlassian/application-data/jira]
Configure which ports Jira Software will use.
Jira requires two TCP ports that are not being used by any other
applications on this machine. The HTTP port is where you will access Jira
through your browser. The Control port is used to startup and shutdown Jira.
Use default ports (HTTP: 8080, Control: 8005) - Recommended [1, Enter], Set custom value for HTTP and Control ports [2]
Jira can be run in the background.
You may choose to run Jira as a service, which means it will start
automatically whenever the computer restarts.
Install Jira as Service?
Yes [y, Enter], No [n]
Details on where Jira Software will be installed and the settings that will be used.
Installation Directory: /opt/atlassian/jira
Home Directory: /var/atlassian/application-data/jira
HTTP Port: 8080
RMI Port: 8005
Install as service: Yes
Install [i, Enter], Exit [e]
i
Extracting files ...
Please wait a few moments while Jira Software is configured.
Installation of Jira Software 8.8.1 is complete
Start Jira Software 8.8.1 now?
Yes [y, Enter], No [n]
Please wait a few moments while Jira Software starts up.
Launching Jira Software ...
Installation of Jira Software 8.8.1 is complete
Your installation of Jira Software 8.8.1 is now ready and can be accessed
via your browser.
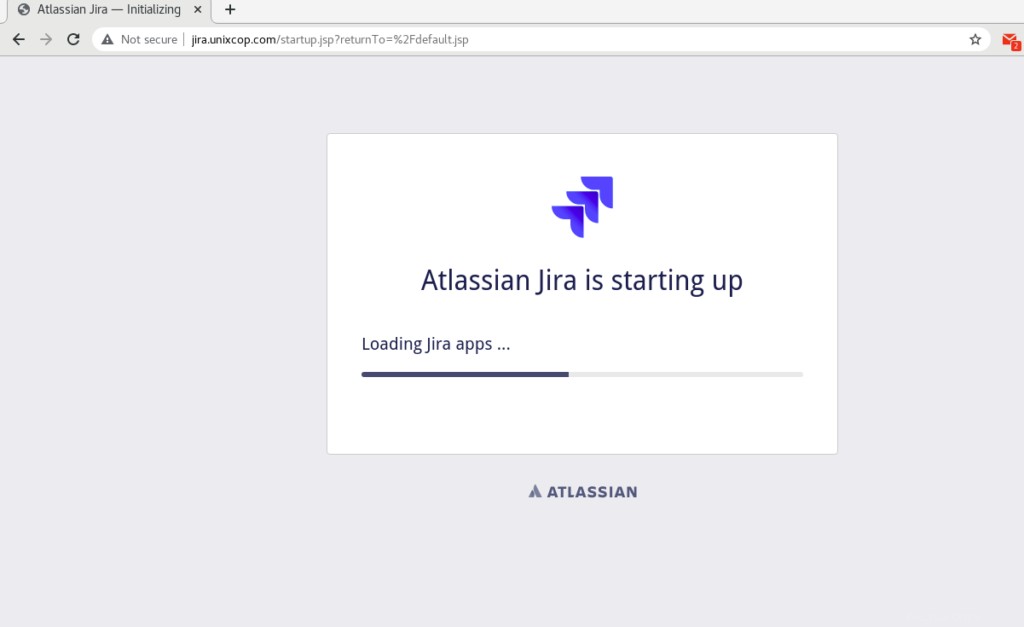
Jira Software 8.8.1 can be accessed at http://localhost:8080
Finishing installation ...
[root@unixcop ~]# JavaMySQLコネクタをインストールします
[root@unixcop ~]# wget https://dev.mysql.com/get/Downloads/Connector-J/mysql-connector-java-8.0.18.zip
--2021-08-23 11:32:23--  https://dev.mysql.com/get/Downloads/Connector-J/mysql-connector-java-8.0.18.zip
Resolving dev.mysql.com (dev.mysql.com)... 137.254.60.11
Connecting to dev.mysql.com (dev.mysql.com)|137.254.60.11|:443... connected.
HTTP request sent, awaiting response... 302 Found
Location: https://cdn.mysql.com//archives/mysql-connector-java-8.0/mysql-connector-java-8.0.18.zip [following]
--2021-08-23 11:32:24--  https://cdn.mysql.com//archives/mysql-connector-java-8.0/mysql-connector-java-8.0.18.zip
Resolving cdn.mysql.com (cdn.mysql.com)... 2.18.1.85
Connecting to cdn.mysql.com (cdn.mysql.com)|2.18.1.85|:443... connected.
HTTP request sent, awaiting response... 200 OK
Length: 4573467 (4.4M) [application/zip]
Saving to: 'mysql-connector-java-8.0.18.zip'

mysql-connector-java-8.0.18.zip       100%[=======================================================================>]   4.36M   333KB/s    in 13s

2021-08-23 11:32:37 (357 KB/s) - 'mysql-connector-java-8.0.18.zip' saved [4573467/4573467]

[root@unixcop ~]#
次に、次のコマンドを使用してJiraを再起動します。
やめて。
# /etc/init.d/jira stop次に、次のように開始します:
[root@unixcop ~]# /etc/init.d/jira start

To run Jira in the foreground, start the server with start-jira.sh -fg
executing using dedicated user: jira

                  `sMMMMMMMMMMMMMM+
                     MMMMMMMMMMMMMM
                     :sdMMMMMMMMMMM
                             MMMMMM
          `sMMMMMMMMMMMMMM+  MMMMMM
             MMMMMMMMMMMMMM  +MMMMM
              :sMMMMMMMMMMM   MMMMM
                     MMMMMM    `UOJ
   `sMMMMMMMMMMMMM+  MMMMMM
     MMMMMMMMMMMMMM  +MMMMM
      :sdMMMMMMMMMM   MMMMM
             MMMMMM    `UOJ
             MMMMMM
             +MMMMM
              MMMMM
               `UOJ

      Atlassian Jira
      Version : 8.8.1


If you encounter issues starting or stopping Jira, please see the Troubleshooting guide at https://docs.atlassian.com/jira/jadm-docs-088/Troubleshooting+installation


Server startup logs are located in /opt/atlassian/jira/logs/catalina.out
Using CATALINA_BASE:   /opt/atlassian/jira
Using CATALINA_HOME:   /opt/atlassian/jira
Using CATALINA_TMPDIR: /opt/atlassian/jira/temp
Using JRE_HOME:        /opt/atlassian/jira/jre/
Using CLASSPATH:       /opt/atlassian/jira/bin/bootstrap.jar:/opt/atlassian/jira/bin/tomcat-juli.jar
Using CATALINA_PID:    /opt/atlassian/jira/work/catalina.pid
Tomcat started.
[root@unixcop ~]#
JIRA用のNginxプロキシの構成
Nginxをインストールして、サービスを有効にします。
# yum -y install nginx
# systemctl enable --now nginx
Nginxを構成する
Jira用の新しいNginx構成ファイルを作成します。
# vim /etc/nginx/conf.d/jira.conf次を追加します:
server {
    listen 80;
    server_name jira.unixcop.com;
    location / {
        proxy_set_header X-Forwarded-Host $host;
        proxy_set_header X-Forwarded-Server $host;
        proxy_set_header X-Forwarded-For $proxy_add_x_forwarded_for;
        proxy_pass http://localhost:8080;
        client_max_body_size 10M;
    }
}
Nginxを無効にして、Jiraに加えて再起動します
# setenforce 0
# systemctl restart jira
# systemctl restart nginx
また、ファイアウォールでhttpポートを許可します:
[root@unixcop ~]# firewall-cmd --add-service=http --permanent
success
[root@unixcop ~]# firewall-cmd --reload
success
[root@unixcop ~]#
インストールが完了したら、 jira.unixcop.comにアクセスします ブラウザでセットアッププロセスを開始します。
MyAltassianのインストール方法「セットアップしてください」:
デフォルトの選択は「セットアップしてください」です。
以下に示すように、MyAtlassianは簡単なセットアップを行います。

次に、クリックして続行します o MyAtlassian 。

[次へ]をクリックして、アプリケーションのプロパティを設定します。
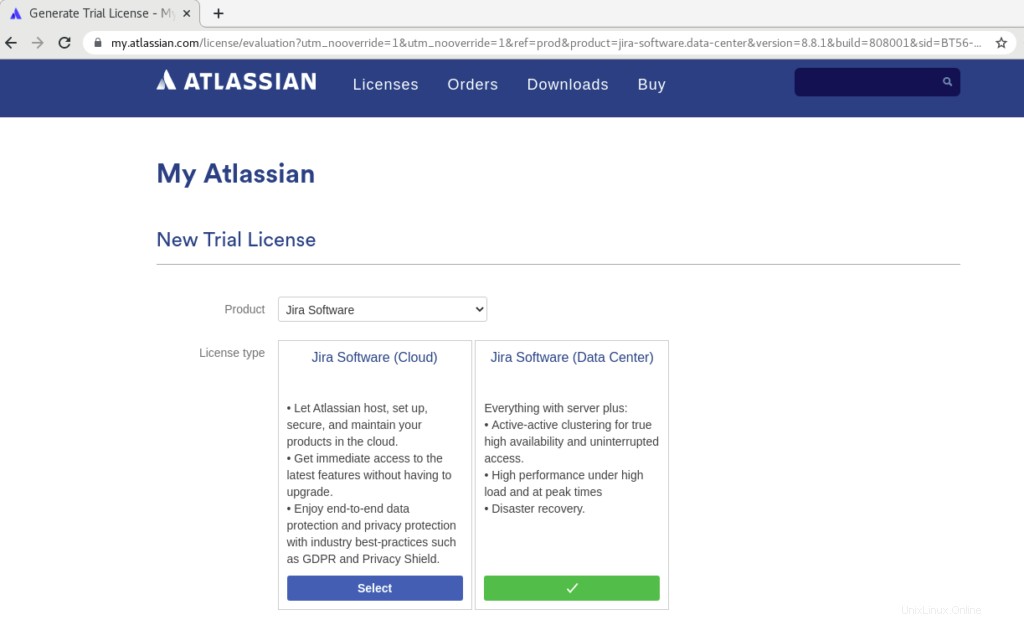
公式ウェブサイトATLASSIANにリダイレクトされます 上記のように新しいトライアルライセンスを取得します。
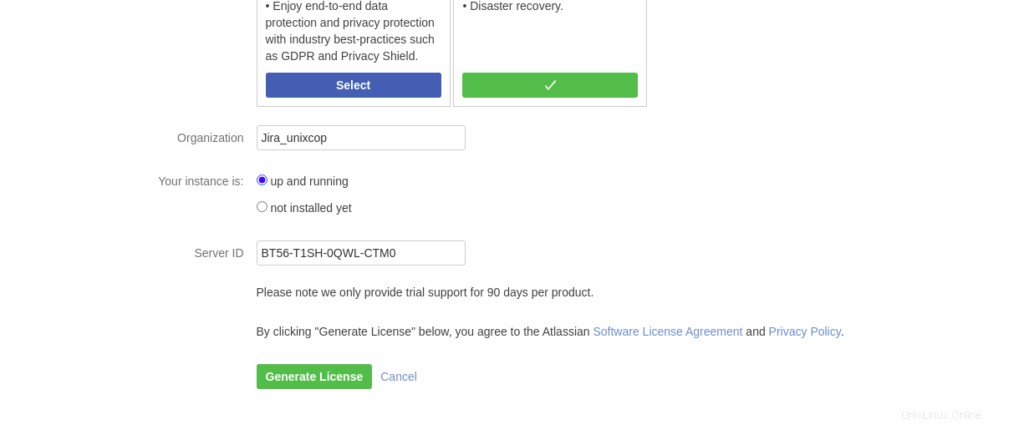
組織名を追加し、[ライセンスの生成]をクリックします 。
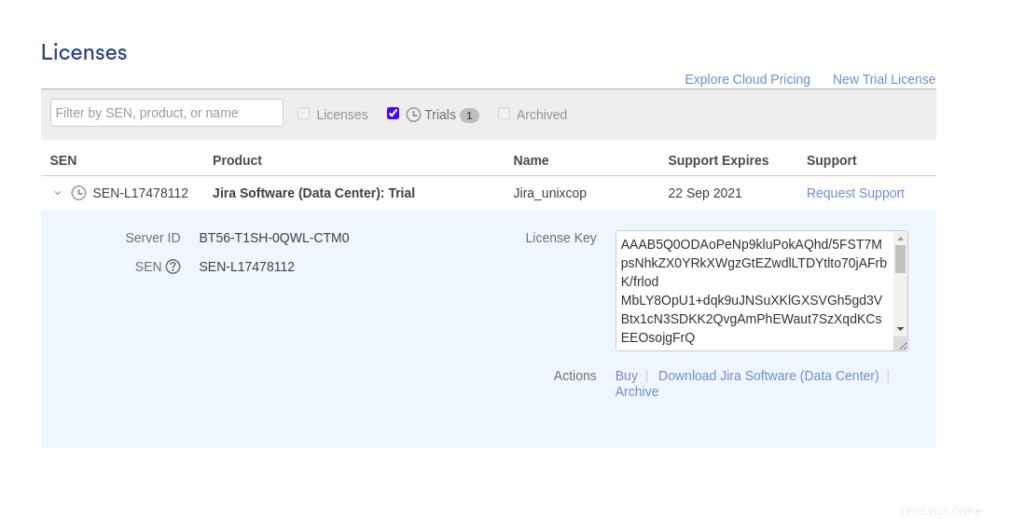
ライセンスキーをコピーしてから、戻ってセットアップを続行します。
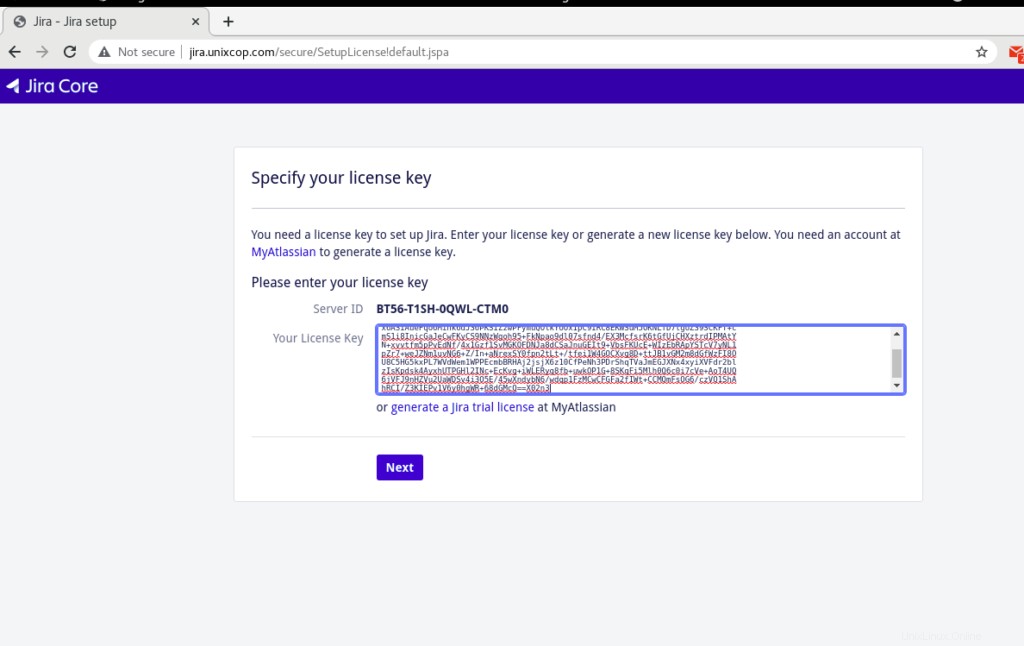
上記のようにライセンスキーを貼り付けて、[次へ]をクリックします。
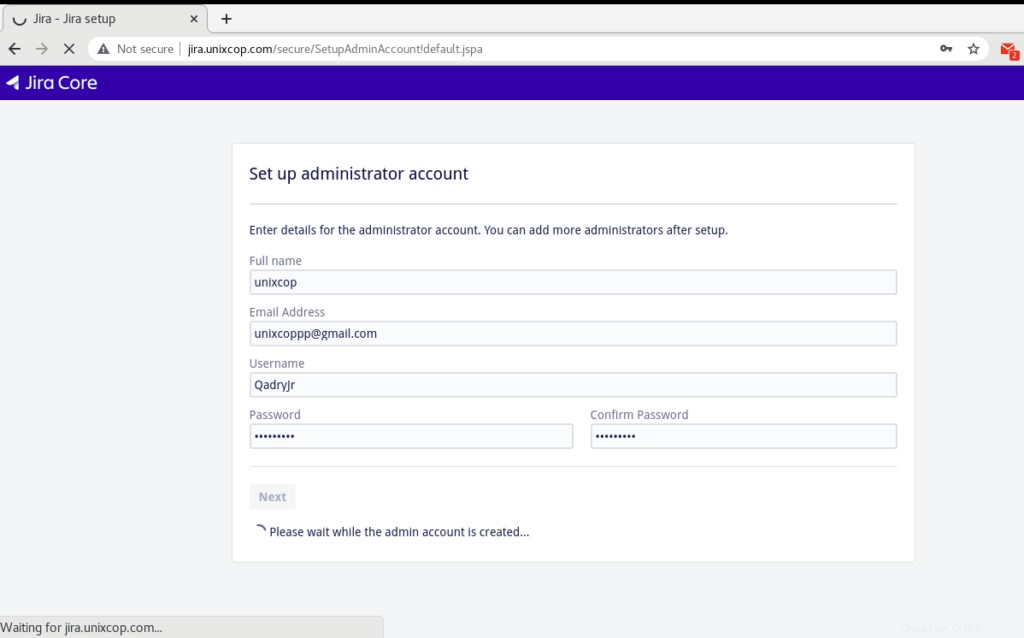
最後に、管理者アカウントを設定します。
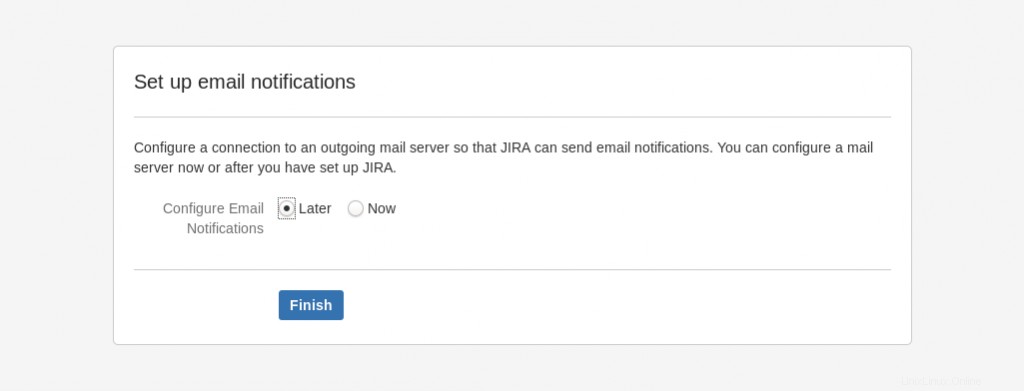
次に、メール通知を設定するかどうかを選択し、[完了]ボタンをクリックします。
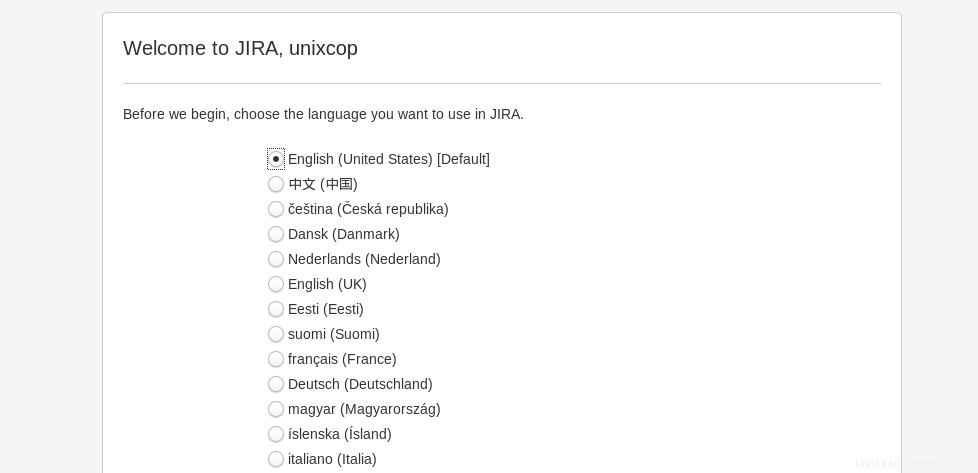
言語を選択し、以下に示すように[次へ]をクリックします。

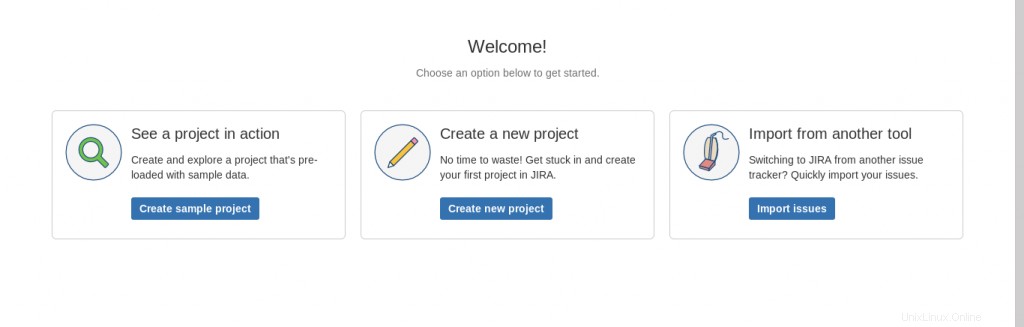
次に、ダッシュボードに移動します。
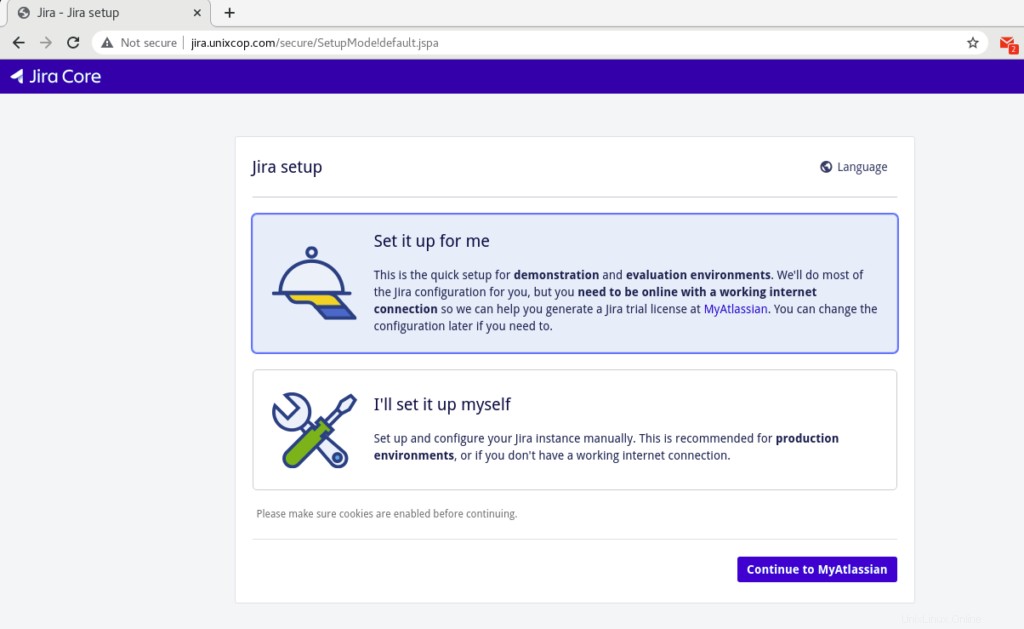
自分で設定しますインストール方法:
また、「自分で設定します」を選択することもできます 「インストールの最初のステップで、以下のスクリーンショットをご覧ください。
「次へ」をクリックして、MySQLデータベースの資格情報を入力します。タイプには、「自分のデータベース」を選択します
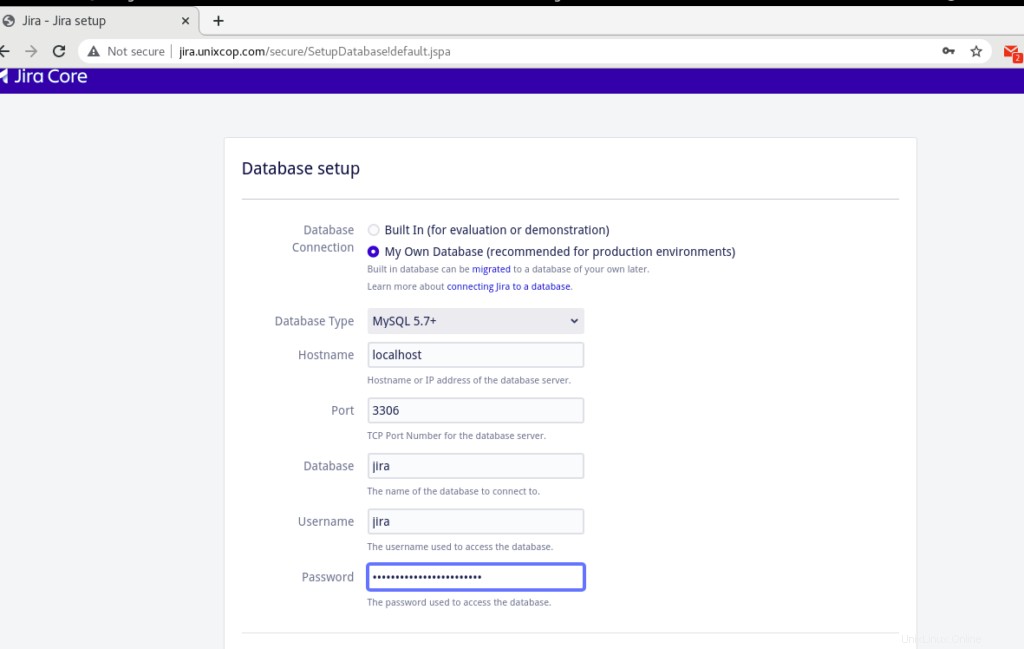
[接続のテスト]をクリックすると、接続が成功したというメッセージが表示されます。
次のページで、「アプリケーションタイトル」に入力します ‘、‘モード ‘、JIRAライセンス、管理者アカウント、メール通知。最後のページでは、デフォルトの言語を選択するように求められます。
次に、Jira管理ダッシュボードにアクセスして、より多くのユーザーを作成します。
結論
JIRAは、優れた情報源になるか、実行中のプロジェクトのステータスを知ることができます。チーム全体がそれに取り組んでいるので、それに言及されている点に同意するでしょう。リマインダーを出したり、プロジェクトの実行状態で更新したりし続けます。したがって、JIRAを初めて使用し、ソフトウェア開発またはテストに取り組んでいて、JIRAを効果的にインストールして使用する方法を知らない場合は、このチュートリアルの最後に、問題なくJIRAをインストールできるようになったことを願っています。それでも問題が解決しない場合は、こちらからお気軽にお問い合わせください。