はじめに
PostgreSQL は最も高度なRDBMSであり、 pgAdmin PostgresのWebUIです。ここでは、CentOS /RHEL8にpgAdminを使用してPostgreSQLをインストールする方法を説明します。
PostgreSQLとは何ですか?
PostgreSQL( Postgres とも呼ばれます )は、拡張性とSQLコンプライアンスを強調する無料のオープンソースリレーショナルデータベース管理システム(RDBMS)です。PostgreSQLは元々POSTGRESと呼ばれ、その起源を Ingresの後継として参照しています。 データベース。 1996年に、SQLのサポートを反映して、プロジェクトの名前がPostgreSQLに変更されました。
PostgreSQLは、Atomicity、Consistency、Isolation、Durability(ACID)プロパティ、自動的に更新可能なビュー、マテリアライズドビュー、トリガー、外部キー、およびストアドプロシージャを備えたトランザクションを備えています。単一のマシンから、多数の同時ユーザーがいるデータウェアハウスやWebサービスまで、さまざまなワークロードを処理するように設計されています。これは、 macOSのデフォルトのデータベースです。 サーバーであり、Linux、FreeBSD、OpenBSD、およびWindowsでも使用できます。
pgAdminとは何ですか?
pgAdminは、Postgresデータベースサーバー用の無料のオープンソースグラフィカルユーザーインターフェイス(GUI)管理ツールです。
さらに、pgAdminはデスクトップおよびWebインターフェイスで利用できます。 pgAdminは機能が豊富で、PostgreSQLの他の管理ツールの中で最も人気があります。
Linuxサーバーパッケージの更新
したがって、 dnfを使用してLinuxサーバーパッケージを更新します コマンド。
# dnf update -yPostgresOfficialのインストール
最新バージョンをインストールするには、LinuxサーバーにPostgreSQLの公式yumリポジトリを追加する必要があります。
[root@unixcop ~]# dnf install https://download.postgresql.org/pub/repos/yum/reporpms/EL-8-x86_64/pgdg-redhat-repo-latest.noarch.rpm
Failed to set locale, defaulting to C.UTF-8
Last metadata expiration check: 21:31:22 ago on Sun Aug  8 10:39:31 2021.
pgdg-redhat-repo-latest.noarch.rpm               18 kB/s |  12 kB     00:00
Dependencies resolved.
================================================================================
 Package                 Architecture  Version        Repository           Size
================================================================================
Installing:
 pgdg-redhat-repo        noarch        42.0-19        @commandline         12 k

Transaction Summary
================================================================================
Install  1 Package

Total size: 12 k
Installed size: 12 k
Is this ok [y/N]: y
Downloading Packages:
Running transaction check
Transaction check succeeded.
Running transaction test
Transaction test succeeded.
Running transaction
  Preparing        :                                                        1/1
  Installing       : pgdg-redhat-repo-42.0-19.noarch                        1/1
  Verifying        : pgdg-redhat-repo-42.0-19.noarch                        1/1

Installed:
  pgdg-redhat-repo-42.0-19.noarch

Complete!
[root@unixcop ~]#
次のコマンドを実行して、標準のyumリポジトリでPostgreSQLモジュールを無効にします。
# dnf -qy module disable postgresqlCentOS8へのPostgresデータベースサーバーのインストール
したがって、 dnf を使用して、LinuxサーバーにPostgresデータベースサーバー13(この記事の執筆時点で最新)をインストールします。 コマンド。
[root@unixcop ~]# dnf install -y postgresql13-server
Last metadata expiration check: 0:01:38 ago on Mon Aug  9 10:31:26 2021.
Dependencies resolved.
======================================================================================================================================================
 Package                                    Architecture                  Version                                 Repository                     Size
======================================================================================================================================================
Installing:
 postgresql13-server                        x86_64                        13.3-2PGDG.rhel8                        pgdg13                        5.5 M
Installing dependencies:
 libicu                                     x86_64                        60.3-2.el8_1                            baseos                        8.8 M
 postgresql13                               x86_64                        13.3-2PGDG.rhel8                        pgdg13                        1.5 M
 postgresql13-libs                          x86_64                        13.3-2PGDG.rhel8                        pgdg13                        413 k

Transaction Summary
======================================================================================================================================================
Install  4 Packages

Total download size: 16 M
Installed size: 63 M
Downloading Packages:
(1/4): postgresql13-libs-13.3-2PGDG.rhel8.x86_64.rpm                                                                   69 kB/s | 413 kB     00:06
(2/4): postgresql13-13.3-2PGDG.rhel8.x86_64.rpm                                                                        92 kB/s | 1.5 MB     00:16
(3/4): postgresql13-server-13.3-2PGDG.rhel8.x86_64.rpm                                                                158 kB/s | 5.5 MB     00:35
(4/4): libicu-60.3-2.el8_1.x86_64.rpm                                                                                 190 kB/s | 8.8 MB     00:47
------------------------------------------------------------------------------------------------------------------------------------------------------
Total                                                                                                                 345 kB/s |  16 MB     00:48
warning: /var/cache/dnf/pgdg13-e81daebfc8b779ec/packages/postgresql13-13.3-2PGDG.rhel8.x86_64.rpm: Header V4 DSA/SHA1 Signature, key ID 442df0f8: NOKEY
PostgreSQL 13 for RHEL/CentOS 8 - x86_64                                                                              1.6 MB/s | 1.7 kB     00:00
Importing GPG key 0x442DF0F8:
 Userid     : "PostgreSQL RPM Building Project <pgsql-pkg-yum@postgresql.org>"
 Fingerprint: 68C9 E2B9 1A37 D136 FE74 D176 1F16 D2E1 442D F0F8
 From       : /etc/pki/rpm-gpg/RPM-GPG-KEY-PGDG
Key imported successfully
Running transaction check
Transaction check succeeded.
Running transaction test
Transaction test succeeded.
Running transaction
  Preparing        :                                                                                                                              1/1
  Installing       : postgresql13-libs-13.3-2PGDG.rhel8.x86_64                                                                                    1/4
  Running scriptlet: postgresql13-libs-13.3-2PGDG.rhel8.x86_64                                                                                    1/4
  Installing       : libicu-60.3-2.el8_1.x86_64                                                                                                   2/4
  Running scriptlet: libicu-60.3-2.el8_1.x86_64                                                                                                   2/4
  Installing       : postgresql13-13.3-2PGDG.rhel8.x86_64                                                                                         3/4
  Running scriptlet: postgresql13-13.3-2PGDG.rhel8.x86_64                                                                                         3/4
  Running scriptlet: postgresql13-server-13.3-2PGDG.rhel8.x86_64                                                                                  4/4
  Installing       : postgresql13-server-13.3-2PGDG.rhel8.x86_64                                                                                  4/4
  Running scriptlet: postgresql13-server-13.3-2PGDG.rhel8.x86_64                                                                                  4/4
  Verifying        : libicu-60.3-2.el8_1.x86_64                                                                                                   1/4
  Verifying        : postgresql13-13.3-2PGDG.rhel8.x86_64                                                                                         2/4
  Verifying        : postgresql13-libs-13.3-2PGDG.rhel8.x86_64                                                                                    3/4
  Verifying        : postgresql13-server-13.3-2PGDG.rhel8.x86_64                                                                                  4/4

Installed:
  libicu-60.3-2.el8_1.x86_64                          postgresql13-13.3-2PGDG.rhel8.x86_64         postgresql13-libs-13.3-2PGDG.rhel8.x86_64
  postgresql13-server-13.3-2PGDG.rhel8.x86_64

Complete!
[root@unixcop ~]#
Postgresデータベースを初期化するには、次のコマンドを1回実行する必要があります。
[root@unixcop ~]# /usr/pgsql-13/bin/postgresql-13-setup initdb
Initializing database ... OK

[root@unixcop ~]#
また、これらのコマンドを使用して、Postgresデータベースのステータスを有効にし、開始し、確認します。
[root@unixcop ~]# systemctl start postgresql-13
[root@unixcop ~]# systemctl enable postgresql-13
Created symlink /etc/systemd/system/multi-user.target.wants/postgresql-13.service → /usr/lib/systemd/system/postgresql-13.service.
[root@unixcop ~]# systemctl status postgresql-13
● postgresql-13.service - PostgreSQL 13 database server
   Loaded: loaded (/usr/lib/systemd/system/postgresql-13.service; enabled; vendor preset: disabled)
   Active: active (running) since Mon 2021-08-09 08:21:20 EDT; 21s ago
     Docs: https://www.postgresql.org/docs/13/static/
 Main PID: 2178 (postmaster)
    Tasks: 8 (limit: 11426)
   Memory: 16.8M
   CGroup: /system.slice/postgresql-13.service
           ├─2178 /usr/pgsql-13/bin/postmaster -D /var/lib/pgsql/13/data/
           ├─2179 postgres: logger
           ├─2181 postgres: checkpointer
           ├─2182 postgres: background writer
           ├─2183 postgres: walwriter
           ├─2184 postgres: autovacuum launcher
           ├─2185 postgres: stats collector
           └─2186 postgres: logical replication launcher

Aug 09 08:21:20 unixcop systemd[1]: Starting PostgreSQL 13 database server...
Aug 09 08:21:20 unixcop postmaster[2178]: 2021-08-09 08:21:20.237 EDT [2178] LOG:  redirecting log output to logging collector process
Aug 09 08:21:20 unixcop postmaster[2178]: 2021-08-09 08:21:20.237 EDT [2178] HINT:  Future log output will appear in directory "log".
Aug 09 08:21:20 unixcop systemd[1]: Started PostgreSQL 13 database server.
[root@unixcop ~]# systemctl is-enabled postgresql-13
enabled
[root@unixcop ~]#
インストールされているPostgreSQLのバージョンも確認してください。
[root@unixcop ~]# psql -V
psql (PostgreSQL) 13.3
[root@unixcop ~]# postgresに切り替えます ユーザーとpsqlに接続します 管理者ユーザーのパスワードを設定するシェル。
[root@unixcop ~]# su - postgres
[postgres@unixcop ~]$ psql
psql (13.3)
Type "help" for help.

postgres=# ALTER USER postgres WITH PASSWORD 'unixcop';
ALTER ROLE
postgres=# \q
[postgres@unixcop ~]$ exit
logout
[root@unixcop ~]#
Postgresデータベースサービスのネットワークアクセスを構成する
PostgreSQLサービスは最初はローカルホストインターフェイスでのみ実行されていることに気付くかもしれません。
したがって、 vimでPostgreSQL構成ファイルを編集する必要があります テキストエディタ。
# vi /var/lib/pgsql/13/data/postgresql.confその中の次のディレクティブを検索します。
# listen_addresses = 'localhost'そして、それを次のディレクティブに置き換えます。
listen_addresses = '*'これで、Postgresデータベースサービスがすべてのネットワークインターフェイスでリッスンするように構成されました。
ネットワーククライアントがpg_hba.confのPostgreSQLサービスにアクセスできるようにします ファイル。
# echo "host all all 192.168.13.0/24 md5" >> /var/lib/pgsql/13/data/pg_hba.confPostgresデータベースサービスを再起動して変更を適用します。
# systemctl restart postgresql-13.servicePostgresサービスは現在すべてのネットワークインターフェースで実行されています。
Postgresデータベース用にLinuxファイアウォールを構成する
Firewall-cmdコマンドを使用してPostgreサービスを許可します。
[root@unixcop ~]# firewall-cmd --permanent --add-service=postgresql
success
[root@unixcop ~]# firewall-cmd --reload
success
[root@unixcop ~]#
そのため、PostgresデータベースサーバーがLinuxサーバーにインストールされました。
CentOS8へのpgAdminYumリポジトリのインストール
pgAdmin PostgreSQLデータベースのデータベース管理によく使用されるWebインターフェイスです。
pgAdminはPostgreSQLの公式yumリポジトリ内でも提供されていますが。ただし、CentOS8サーバーでは機能しません。
したがって、 pgAdminの最新の安定バージョンをインストールします pgAdminの公式yumリポジトリから。
このyumリポジトリを追加するため、最初にLinuxサーバーからPostgreSQLyumリポジトリを削除する必要があります。
# dnf remove -y pgdg-redhat-repo次のコマンドを使用して、LinuxオペレーティングシステムにpgAdmin公式yumリポジトリを追加します。
[root@unixcop ~]#  dnf install -y https://ftp.postgresql.org/pub/pgadmin/pgadmin4/yum/pgadmin4-redhat-repo-1-1.noarch.rpm
Last metadata expiration check: 1 day, 0:04:44 ago on Sun Aug  8 10:39:31 2021.
pgadmin4-redhat-repo-1-1.noarch.rpm                                                                                   5.6 kB/s | 6.6 kB     00:01
Dependencies resolved.
======================================================================================================================================================
 Package                                      Architecture                   Version                       Repository                            Size
======================================================================================================================================================
Installing:
 pgadmin4-redhat-repo                         noarch                         1-1                           @commandline                         6.6 k

Transaction Summary
======================================================================================================================================================
Install  1 Package

Total size: 6.6 k
Installed size: 4.0 k
Downloading Packages:
Running transaction check
Transaction check succeeded.
Running transaction test
Transaction test succeeded.
Running transaction
  Preparing        :                                                                                                                              1/1
  Installing       : pgadmin4-redhat-repo-1-1.noarch                                                                                              1/1
  Verifying        : pgadmin4-redhat-repo-1-1.noarch                                                                                              1/1

Installed:
  pgadmin4-redhat-repo-1-1.noarch

Complete!
[root@unixcop ~]#
また、pgAdminには、標準のyumリポジトリでは利用できないソフトウェアパッケージが必要です。
dnfコマンドを使用して、EPELyumリポジトリをインストールします。
# dnf install -y epel-release次のコマンドを使用して、新しくインストールされたyumリポジトリのキャッシュを構築します:
[root@unixcop ~]# dnf makecache
CentOS Linux 8 - AppStream                                                                                            2.6 kB/s | 4.3 kB     00:01
CentOS Linux 8 - BaseOS                                                                                               5.4 kB/s | 3.9 kB     00:00
CentOS Linux 8 - Extras                                                                                               2.8 kB/s | 1.5 kB     00:00
Extra Packages for Enterprise Linux Modular 8 - x86_64                                                                 21 kB/s |  36 kB     00:01
Extra Packages for Enterprise Linux 8 - x86_64                                                                         22 kB/s |  33 kB     00:01
pgadmin4                                                                                                              704  B/s | 833  B     00:01
pgadmin4                                                                                                              3.8 MB/s | 3.8 kB     00:00
Importing GPG key 0x210976F2:
 Userid     : "Package Manager (Package Signing Key) <packages@pgadmin.org>"
 Fingerprint: E869 7E2E EF76 C02D 3A63 3277 8881 B2A8 2109 76F2
 From       : /etc/pki/rpm-gpg/PGADMIN_PKG_KEY
Is this ok [y/N]: y
pgadmin4                                                                                                              117 kB/s | 441 kB     00:03
Metadata cache created.
pgAdminWebUIのインストール
:
を使用してpgAdminをインストールできるようになりました# dnf install -y pgadmin4重要な注意:
SELinuxポリシーを設定するには、pgAdminセットアップスクリプトに semanageが必要です。 コマンド。policycoreutils-python-utilsパッケージで提供されます。 したがって、pgAdminセットアップスクリプトを実行する前にインストールする必要があります。
また、このリンクにアクセスして、この問題を正しく修正することもできます。CentOSで「semanagecommand」が見つからないというエラーを修正する方法
# dnf install -y policycoreutils-python-utilspgAdminソフトウェアには、pgAdminWebサービスを構成するための適切に記述された構成スクリプトが付属しています。これを実行して、pgAdminWebサービスをデプロイするための管理者ユーザーとApacheWebサーバーを作成します。
[root@unixcop ~]# /usr/pgadmin4/bin/setup-web.sh
Setting up pgAdmin 4 in web mode on a Redhat based platform...
Creating configuration database...
NOTE: Configuring authentication for SERVER mode.

Enter the email address and password to use for the initial pgAdmin user account:

Email address: qadry@postgres-01.unixcop.com
Password:
Retype password:
pgAdmin 4 - Application Initialisation
======================================

Creating storage and log directories...
Configuring SELinux...

The Apache web server is not running. We can enable and start the web server for you to finish pgAdmin 4 installation. Continue (y/n)? y
Created symlink /etc/systemd/system/multi-user.target.wants/httpd.service → /usr/lib/systemd/system/httpd.service.
Apache successfully enabled.
Apache successfully started.
You can now start using pgAdmin 4 in web mode at http://127.0.0.1/pgadmin4
[root@unixcop ~]#
httpdサービスを開始、有効化、およびステータスを確認します。
[root@unixcop ~]# systemctl start httpd
[root@unixcop ~]# systemctl enable httpd
Created symlink /etc/systemd/system/multi-user.target.wants/httpd.service → /usr/lib/systemd/system/httpd.service.
[root@unixcop ~]# systemctl status httpd
● httpd.service - The Apache HTTP Server
   Loaded: loaded (/usr/lib/systemd/system/httpd.service; enabled; vendor preset: disabled)
   Active: active (running) since Mon 2021-08-09 08:48:49 EDT; 16s ago
     Docs: man:httpd.service(8)
 Main PID: 3881 (httpd)
   Status: "Running, listening on: port 80"
    Tasks: 241 (limit: 11426)
   Memory: 44.2M
   CGroup: /system.slice/httpd.service
           ├─3881 /usr/sbin/httpd -DFOREGROUND
           ├─3882 /usr/sbin/httpd -DFOREGROUND
           ├─3883 /usr/sbin/httpd -DFOREGROUND
           ├─3884 /usr/sbin/httpd -DFOREGROUND
           ├─3885 /usr/sbin/httpd -DFOREGROUND
           └─3886 /usr/sbin/httpd -DFOREGROUND

Aug 09 08:48:47 unixcop systemd[1]: Starting The Apache HTTP Server...
Aug 09 08:48:47 unixcop httpd[3881]: [Mon Aug 09 08:48:47.749981 2021] [so:warn] [pid 3881:tid 140142522952000] AH01574: module wsgi_module is alread>
Aug 09 08:48:49 unixcop httpd[3881]: AH00558: httpd: Could not reliably determine the server's fully qualified domain name, using fe80::20c:29ff:feca>
Aug 09 08:48:49 unixcop systemd[1]: Started The Apache HTTP Server.
Aug 09 08:48:52 unixcop httpd[3881]: Server configured, listening on: port 80
lines 1-21/21 (END)
ApacheWebサーバーへの着信トラフィックを許可するようにLinuxファイアウォールを構成します
[root@unixcop ~]# firewall-cmd --permanent --add-service=http
success
[root@unixcop ~]# firewall-cmd --reload
success
[root@unixcop ~]# URLを開くhttp:// your_ip_address / pgadmin4 / Webブラウザで。
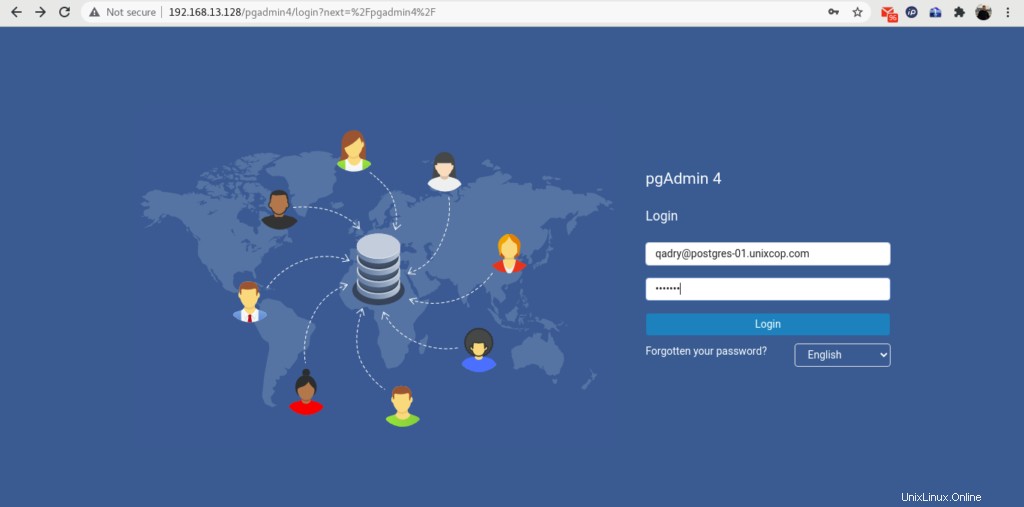
setup-web.shによって作成した管理ユーザーとしてpgAdminにログインします。 スクリプト。
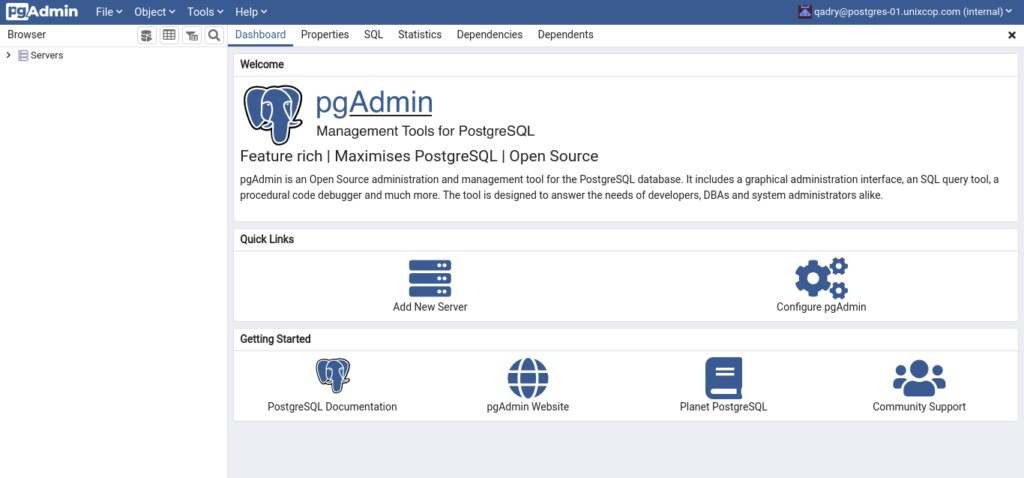
PostgreSQLデータベースサーバーをpgAdminインベントリに追加するには、[新しいサーバーの追加]をクリックします。
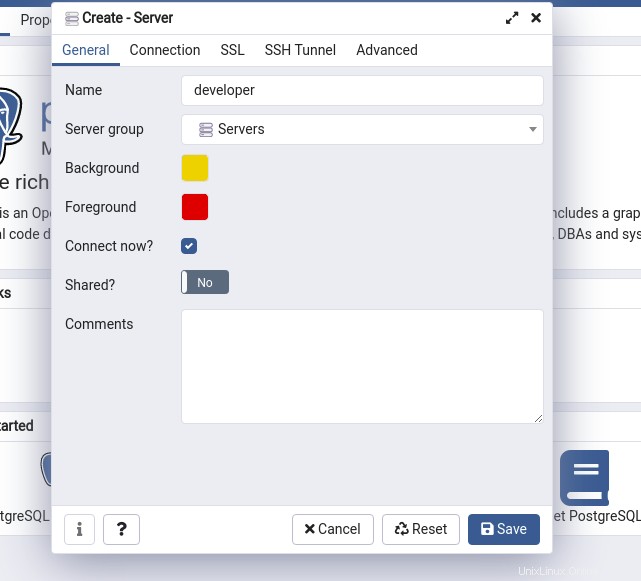
サーバー名を入力し、「接続」をクリックします タブ。
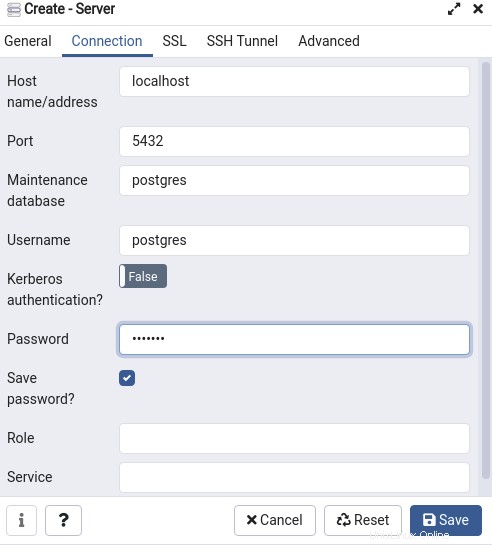
作成したこのダイアログボックスにデータベース接続情報を入力します。
次に、[保存]をクリックします。
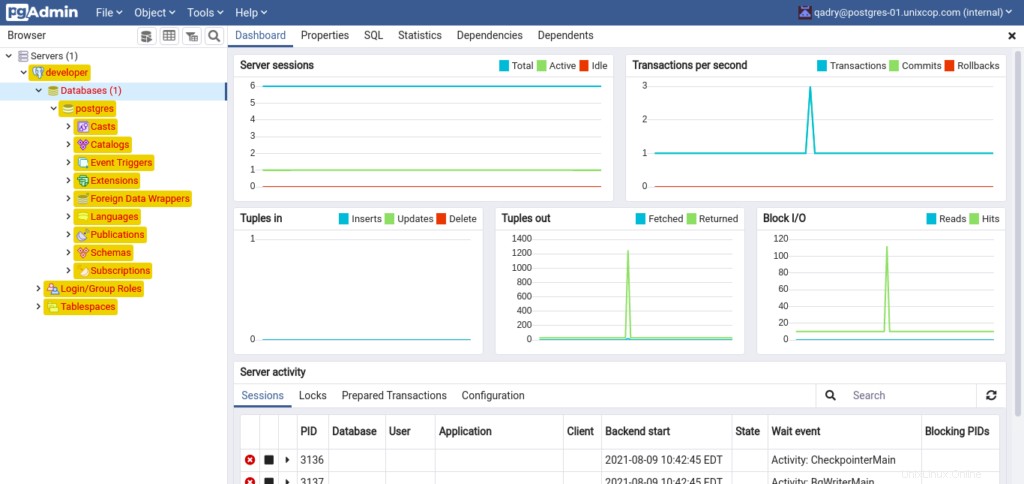
PostgresデータベースサーバーがpgAdminに追加されました。左側のパネルにデータベースサーバーのツリーが表示されます。
結論
このチュートリアルでは、CentOS8サーバーにpgAdminを使用してPostgreSQLをインストールする方法を学習しました。