webERPは、無料のオープンソースの完全なWebベースの会計およびビジネス管理システムです。 webERPを使用するには、WebブラウザとPDFリーダーが必要です。 webERPを使用すると、発注書、Webストア、製造、販売、総勘定元帳、出荷など、多くのことを管理できます。 PHPで記述されており、MariaDBをデータベースバックエンドとして使用します。このチュートリアルでは、Apacheを使用してwebERPをインストールし、CentOS8にSSLを暗号化する方法を説明します。
- CentOS8を実行しているサーバー。
- サーバーIPで指定された有効なドメイン名。
- ルートパスワードはサーバーで構成されています。
LAMPサーバーをインストールする
まず、次のコマンドを使用して、Apache、MariaDB、PHP、およびその他のPHP拡張機能をインストールします。
dnf install httpd mariadb-server php php-mysqli php-curl php-json php-cgi php-xmlrpc php-gd php-mbstring unzip -y
すべてのパッケージがインストールされたら、ApacheおよびMariaDBサービスを開始し、次のコマンドを使用してシステムの再起動時にそれらを開始できるようにします。
systemctl start httpd mariadb
systemctl enable httpd mariadb
終了したら、次のステップに進むことができます。
次に、MariaDBルートパスワードを設定し、MariaDBインストールを保護する必要があります。次のコマンドで実行できます:
mysql_secure_installation
以下に示すように、すべての質問に答えてください。
Enter current password for root (enter for none):
Set root password? [Y/n] Y
New password:
Re-enter new password:
Remove anonymous users? [Y/n] Y
Disallow root login remotely? [Y/n] Y
Remove test database and access to it? [Y/n] Y
Reload privilege tables now? [Y/n] Y

All done!  If you've completed all of the above steps, your MariaDB
installation should now be secure.

Thanks for using MariaDB!
次に、次のコマンドを使用してMariaDBシェルにログインします。
mysql -u root -p
接続したら、次のコマンドを使用してwebERPのデータベースとユーザーを作成します。
MariaDB [(none)]> create database weberp;
MariaDB [(none)]> create user [email protected] identified by 'password';
次に、次のコマンドを使用して、webERPデータベースにすべての権限を付与します。
MariaDB [(none)]> grant all privileges on weberp.* to [email protected] identified by 'password';
次に、特権をフラッシュし、次のコマンドでMariaDBを終了します。
MariaDB [(none)]> flush privileges;
MariaDB [(none)]> exit;
終了したら、次のステップに進むことができます。
webERPをインストールする
まず、次のコマンドを使用して最新バージョンのwebERPをダウンロードします。
wget https://sourceforge.net/projects/web-erp/files/webERP_4.15.zip
ダウンロードが完了したら、次のコマンドを使用して、ダウンロードしたファイルをApacheWebルートディレクトリに抽出します。
unzip webERP_4.15.zip -d /var/www/html
次に、次のコマンドを使用して適切な権限と所有権を設定します。
chown -R apache:apache /var/www/html/webERP
chmod -R 755 /var/www/html/webERP
終了したら、次のステップに進むことができます。
webERP用にApacheを設定
次に、webERPをホストするための新しいApache仮想ホスト構成ファイルを作成する必要があります。次のコマンドを使用して作成できます:
nano /etc/httpd/conf.d/weberp.conf
次の行を追加します:
<VirtualHost *:80>
ServerAdmin [email protected]
DocumentRoot /var/www/html/webERP
ServerName weberp.example.com
<Directory /var/www/html/webERP/>
Options FollowSymLinks
AllowOverride All
Order allow,deny
allow from all
</Directory>
ErrorLog /var/log/httpd/weberp.org-error_log
CustomLog /var/log/httpd/weberp.org-access_log common
</VirtualHost>
終了したら、ファイルを保存して閉じます。次に、Apacheサービスを再起動して、変更を適用します。
systemctl restart httpd
次に、次のコマンドを使用してApacheのステータスを確認します。
systemctl status httpd
次の出力が得られるはずです:
? httpd.service - The Apache HTTP Server
   Loaded: loaded (/usr/lib/systemd/system/httpd.service; disabled; vendor preset: disabled)
  Drop-In: /usr/lib/systemd/system/httpd.service.d
           ??php-fpm.conf
   Active: active (running) since Sat 2021-05-01 05:57:27 EDT; 13s ago
     Docs: man:httpd.service(8)
 Main PID: 4896 (httpd)
   Status: "Running, listening on: port 80"
    Tasks: 213 (limit: 25014)
   Memory: 24.8M
   CGroup: /system.slice/httpd.service
           ??4896 /usr/sbin/httpd -DFOREGROUND
           ??4898 /usr/sbin/httpd -DFOREGROUND
           ??4899 /usr/sbin/httpd -DFOREGROUND
           ??4900 /usr/sbin/httpd -DFOREGROUND
           ??4901 /usr/sbin/httpd -DFOREGROUND

May 01 05:57:27 centos8 systemd[1]: Stopped The Apache HTTP Server.
May 01 05:57:27 centos8 systemd[1]: Starting The Apache HTTP Server...
この時点で、ApacheWebサーバーはwebERPをホストするように構成されています。これで、次のステップに進むことができます。
次に、Certbotクライアントをインストールして、Let's Encrypt SSLforwebERPをインストールする必要があります。次のコマンドでインストールできます:
dnf install letsencrypt python3-certbot-apache
次に、次のコマンドを使用して、ドメインのSSL証明書を取得してインストールします。
certbot --apache -d weberp.example.com
メールアドレスを入力し、利用規約に同意するよう求められます:
Saving debug log to /var/log/letsencrypt/letsencrypt.log
Plugins selected: Authenticator apache, Installer apache
Enter email address (used for urgent renewal and security notices)
 (Enter 'c' to cancel): [email protected]

- - - - - - - - - - - - - - - - - - - - - - - - - - - - - - - - - - - - - - - -
Please read the Terms of Service at
https://letsencrypt.org/documents/LE-SA-v1.2-November-15-2017.pdf. You must
agree in order to register with the ACME server. Do you agree?
- - - - - - - - - - - - - - - - - - - - - - - - - - - - - - - - - - - - - - - -
(Y)es/(N)o: Y

- - - - - - - - - - - - - - - - - - - - - - - - - - - - - - - - - - - - - - - -
Would you be willing, once your first certificate is successfully issued, to
share your email address with the Electronic Frontier Foundation, a founding
partner of the Let's Encrypt project and the non-profit organization that
develops Certbot? We'd like to send you email about our work encrypting the web,
EFF news, campaigns, and ways to support digital freedom.
- - - - - - - - - - - - - - - - - - - - - - - - - - - - - - - - - - - - - - - -
(Y)es/(N)o: Y
Account registered.
Requesting a certificate for weberp.example.com
Performing the following challenges:
http-01 challenge for weberp.example.com
Waiting for verification.
Cleaning up challenges
Deploying Certificate to VirtualHost /etc/httpd/conf.d/weberp.conf
Redirecting all traffic on port 80 to ssl in /etc/httpd/conf.d/weberp.conf

- - - - - - - - - - - - - - - - - - - - - - - - - - - - - - - - - - - - - - - -
Congratulations! You have successfully enabled https://weberp.example.com
- - - - - - - - - - - - - - - - - - - - - - - - - - - - - - - - - - - - - - - -
Subscribe to the EFF mailing list (email: [email protected]).


IMPORTANT NOTES:
 - Congratulations! Your certificate and chain have been saved at:
   /etc/letsencrypt/live/weberp.example.com/fullchain.pem
   Your key file has been saved at:
   /etc/letsencrypt/live/weberp.example.com/privkey.pem
   Your certificate will expire on 2021-06-09. To obtain a new or
   tweaked version of this certificate in the future, simply run
   certbot again with the "certonly" option. To non-interactively
   renew *all* of your certificates, run "certbot renew"
 - If you like Certbot, please consider supporting our work by:

   Donating to ISRG / Let's Encrypt:   https://letsencrypt.org/donate
   Donating to EFF:                    https://eff.org/donate-le
これで、URL https://weberp.example.comを使用してWebサイトに安全にアクセスできます。 。
次に、ポート80と443がファイアウォールを通過できるようにする必要があります。次のコマンドで許可できます:
firewall-cmd --permanent --add-service=http
firewall-cmd --permanent --add-service=https
次に、ファイアウォールをリロードして変更を適用します。
firewall-cmd --reload
webERPWebインターフェイスにアクセス
次に、Webブラウザーを開き、URL https://weberp.example.comを使用してwebERPWebインターフェースにアクセスします。 。次のページが表示されます:

言語を選択して、次のステップをクリックします 。次のページが表示されます:

データベース名、ユーザー、パスワードを入力し、次のステップをクリックします 。次のページが表示されます:
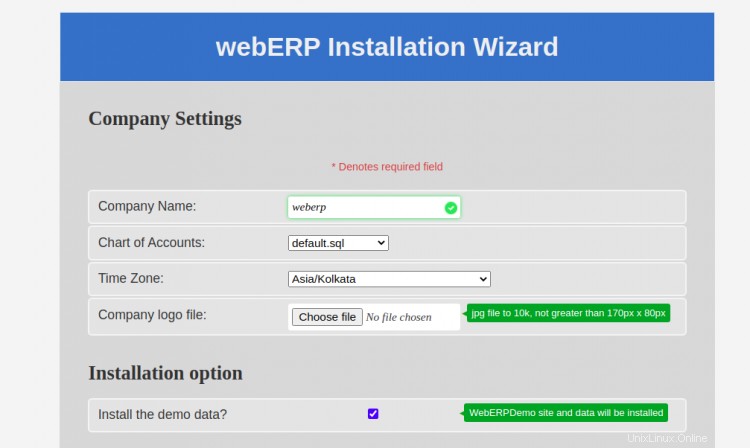

会社名、タイムゾーン、管理者のユーザー名、パスワードを入力し、インストールをクリックします ボタン。インストールが完了すると、次のページが表示されます。

管理者のユーザー名とパスワードを入力し、ログインをクリックします ボタン。 webERPダッシュボードにリダイレクトされます:
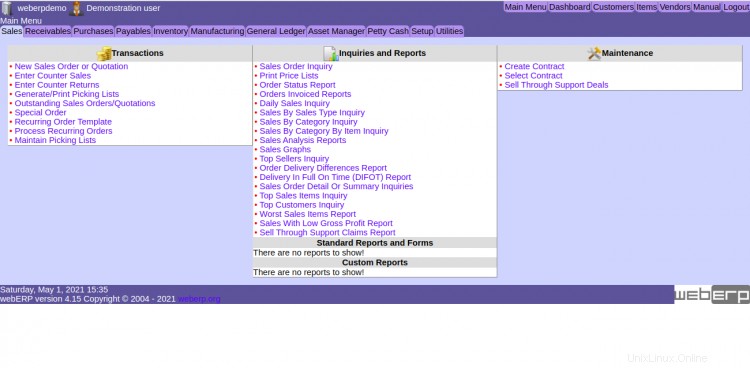
おめでとう!これで、CentOS8にApacheとLet'sEncrypt SSLを使用してwebERPが正常にインストールされました。これで、webERPでその他の機能を調べて、実稼働環境に実装できます。