OTRS(オープンソーストラブルチケットシステムソフトウェア)は、顧客サポート、ヘルプデスク、コールセンターなどに関連する業務を改善するために企業が使用する洗練されたオープンソースソフトウェアです。 OTRSはPERLで書かれており、以下の重要な機能を提供します:
- 顧客は、顧客ポータルを介して、および各キュー(出席者/技術者のポストボックス)で電子メール、電話、およびファックスでチケットを登録および作成/対話できます。
- チケットは、優先度、割り当て、送信、およびフォローアップによって管理できます。チケットの分割、マージ、一括アクションの適用、相互リンクおよび通知の設定が可能です。サービスは、サービスカタログを介して構成できます。
- チームのキャパシティを増やすために、自動メール(自動回答)、テキストテンプレート、署名を設定できます。システムは、チケットのメモと添付ファイルをサポートしています。
- その他の機能には、統計とレポート(CSV / PDF)、SLA、およびその他の多くの機能が含まれます。
この記事では、OTRS5のインストールと基本構成について説明します。この記事は、次の環境に基づいて作成されました:CENTOS 7 Minimal、2 GB RAM、8 GB HD、2つのネットワークインターフェース(ホストのみとNAT)を備えたVirtualBoxVM。
Centos 7 Minimalの新規インストールを使用する場合、OTRSをインストールする前に、次のコマンドを実行してシステムを更新し、追加のパッケージをインストールします。
yum update
Transaction Summary ================================================================================ Install 1 Package Upgrade 39 Packages Total download size: 91 M Is this ok [y/d/N]: y
テキストエディタをインストールするか、VIを使用します。この記事ではVIMを使用し、次のコマンドを実行してインストールします。
yum install vim
WGETパッケージをインストールするには、次のコマンドを実行します。
yum install wget
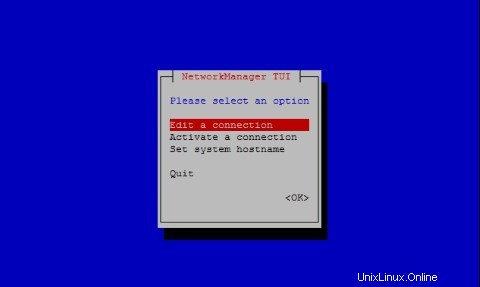
Centos 7ネットワークを構成するには、次のコマンドを実行してNMTUI(Network Managerテキストユーザーインターフェイス)ツールを開き、必要に応じてインターフェイスとホスト名を編集します。
nmtui
CentOS 7でネットワーク設定とホスト名を設定した後、次のコマンドを実行して変更を適用します。
service networks restart
ネットワーク情報を確認するには、次のコマンドを実行します。
ip addr
私のシステムでは、出力は次のようになります。
1: lo: <LOOPBACK,UP,LOWER_UP> mtu 65536 qdisc noqueue state UNKNOWN qlen 1
    link/loopback 00:00:00:00:00:00 brd 00:00:00:00:00:00
    inet 127.0.0.1/8 scope host lo
       valid_lft forever preferred_lft forever
    inet6 ::1/128 scope host
       valid_lft forever preferred_lft forever
2: enp0s3: <BROADCAST,MULTICAST,UP,LOWER_UP> mtu 1500 qdisc pfifo_fast state UP qlen 1000
    link/ether 08:00:27:67:bc:73 brd ff:ff:ff:ff:ff:ff
    inet 10.0.2.15/24 brd 10.0.2.255 scope global dynamic enp0s3
       valid_lft 84631sec preferred_lft 84631sec
    inet6 fe80::9e25:c982:1091:90eb/64 scope link
       valid_lft forever preferred_lft forever
3: enp0s8: <BROADCAST,MULTICAST,UP,LOWER_UP> mtu 1500 qdisc pfifo_fast state UP qlen 1000
    link/ether 08:00:27:68:88:f3 brd ff:ff:ff:ff:ff:ff
    inet 192.168.56.101/24 brd 192.168.56.255 scope global dynamic enp0s8
       valid_lft 1044sec preferred_lft 1044sec
    inet6 fe80::a00:27ff:fe68:88f3/64 scope link
       valid_lft forever preferred_lft forever
Centos 7でSELINUX(Security Enhanced Linux)を無効にし、次の構成ファイルを編集します。
vim /etc/selinux/config
"/etc/selinux/config" 14L, 547C# This file controls the state of SELinux on the system.
# SELINUX= can take one of these three values:
#     enforcing - SELinux security policy is enforced.
#     permissive - SELinux prints warnings instead of enforcing.
#     disabled - No SELinux policy is loaded.
SELINUX=enforcing
# SELINUXTYPE= can take one of three two values:
#     targeted - Targeted processes are protected,
#     minimum - Modification of targeted policy. Only selected processes are prootected.
#     mls - Multi Level Security protection.
SELINUXTYPE=targeted
値を強制に変更します ディレクティブSELINUXの無効への移行 、ファイルを保存してサーバーを再起動します。
Centos 7でSELinuxのステータスを確認するには、次のコマンドを実行します。
getenforce
出力は次のとおりである必要があります:
Disabled
Centos7にMariaDBをインストールする
Centos 7にMariaDBをインストールするには、次のコマンドを実行します。
yum -y install mariadb-server
zotrs.cnfという名前でファイルを作成します 次のディレクトリにあります:
/etc/my.cnf.d/
ファイルを作成および編集するには、次のコマンドを実行します。
vim /etc/my.cnf.d/zotrs.cnf
ファイルに次の内容を入力して保存します:
max_allowed_packet = 20M
query_cache_size = 32M
innodb_log_file_size = 256M
MariaDBを起動するには、次のコマンドを実行します。
systemctl start mariadb
MariaDBのセキュリティを強化するには、次のコマンドを実行します。
/usr/bin/mysql_secure_installation
次の出力に従ってオプションを設定します。
NOTE: RUNNING ALL PARTS OF THIS SCRIPT IS RECOMMENDED FOR ALL MariaDB
      SERVERS IN PRODUCTION USE!  PLEASE READ EACH STEP CAREFULLY!

In order to log into MariaDB to secure it, we'll need the current
password for the root user.  If you've just installed MariaDB, and
you haven't set the root password yet, the password will be blank,
so you should just press enter here.

Enter current password for root (enter for none):<Press Enter>
OK, successfully used password, moving on... Setting the root password ensures that nobody can log into the MariaDB root user without the proper authorisation. Set root password? [Y/n] <Press Y>
ルートパスワードを設定します:
New password:
Re-enter new password:
Password updated successfully!
Reloading privilege tables..
 ... Success!

By default, a MariaDB installation has an anonymous user, allowing anyone
to log into MariaDB without having to have a user account created for
them.  This is intended only for testing, and to make the installation
go a bit smoother.  You should remove them before moving into a
production environment.

Remove anonymous users? [Y/n] <Press Y>
 ... Success!

Normally, root should only be allowed to connect from 'localhost'.  This
ensures that someone cannot guess at the root password from the network.

Disallow root login remotely? [Y/n] <Choose acording your needs>
 ... Success!

By default, MariaDB comes with a database named 'test' that anyone can
access.  This is also intended only for testing, and should be removed
before moving into a production environment.

Remove test database and access to it? [Y/n] <Press Y>
 - Dropping test database...
 ... Success!
 - Removing privileges on test database...
 ... Success!

Reloading the privilege tables will ensure that all changes made so far
will take effect immediately.

Reload privilege tables now? [Y/n] <Press Y>
 ... Success!

Cleaning up...

All done!  If you've completed all of the above steps, your MariaDB
installation should now be secure.

Thanks for using MariaDB!
起動時に自動的に起動するようにMariaDBを設定します:
systemctl enable mariadb.service
OTRSをダウンロードするには、次のコマンドを実行します:
wget http://ftp.otrs.org/pub/otrs/RPMS/rhel/7/otrs-5.0.15-01.n oarch.rpm
EPELをインストールする
OTRSをインストールする前に、Centos 7にEPELリポジトリをセットアップします。これを行うには、次のコマンドを実行します。
[[email protected] ~]# yum -y http://mirror.globo.com/epel/7/x86_64/e/epel-r release-7-9.noarch.rpm
次のコマンドでOTRSをインストールします:
yum install -nogpgcheck otrs-5.0.15-01.noarch.rpm
ソフトウェアパッケージのリストがインストールされます。 Apacheとすべての依存関係は、出力の最後にYを押すと自動的に解決されます:
Transaction Summary
================================================================================
Install  1 Package (+143 Dependent packages)

Total size: 148 M
Total download size: 23 M
Installed size: 181 M
Is this ok [y/d/N]: y
Apache(httpd)を起動するには、次のコマンドを実行します。
systemctl start httpd.service
Centos7でsystemdを使用してApache(httpd)の起動を有効にするには、次のコマンドを実行します。
systemctl enable httpd.service
ApacheでSSLを有効にし、自己署名証明書を構成します。 Apache HTTPサーバー用のMod_SSLモジュールをインストールし、次のコマンドを実行します。
yum -y install mod_ssl
自己署名SSL証明書を生成するには、次のディレクトリに移動します。
cd /etc/pki/tls/certs/
そして、次のコマンドを実行してキーを生成します(centos7.keyは私の証明書の名前です。自由に変更してください):
make centos7.key
umask 77 ; \ /usr/bin/openssl genrsa -aes128 2048 > centos7.key Generating RSA private key, 2048 bit long modulus .+++ .........................................................................................+++ e is 65537 (0x10001) Enter pass phrase: <Insert your Own Password>
Verifying - Enter pass phrase:<Retype the Password>
OpenSSLを使用してサーバーSSL秘密鍵を生成するには、次のコマンドを実行します。
openssl rsa -in centos7.key -out centos7.key
Enter pass phrase for centos7.key: <Type the Password> writing RSA key
次のコマンドを実行して、CSR(証明書署名要求)ファイルを作成します(centos7.csrは私の証明書の名前です。自由に変更してください):
make centos7.csr
ニーズに応じて質問に答えてください:
umask 77 ; \ /usr/bin/openssl req -utf8 -new -key centos7.key -out centos7.csr You are about to be asked to enter information that will be incorporated into your certificate request. What you are about to enter is what is called a Distinguished Name or a DN. There are quite a few fields but you can leave some blank For some fields there will be a default value, If you enter '.', the field will be left blank. -----
Country Name (2 letter code) [XX]:
State or Province Name (full name) []:
Locality Name (eg, city) [Default City]:
Organization Name (eg, company) [Default Company Ltd]:
Organizational Unit Name (eg, section) []:
Centos7 Common Name (eg, your name or your server's hostname) []:
Email Address []:
Please enter the following 'extra' attributes to be sent with your certificate request A challenge password []: <press enter>
An optional company name []:
OpenSSLツールを使用してサーバーのCSR(証明書署名要求)を生成します:
openssl x509 -in centos7.csr -out centos7.crt -req -signkey centos7.key
出力は次のとおりです。
Signature ok subject=/C=BR/ST=SP/L=Campinas/O=Centos7/OU=Centos7/CN=centos7.local Getting Private key
ssl.confファイルを編集する前に、次のコマンドを使用してファイルのコピーを作成します。
cp /etc/httpd/conf.d/ssl.conf /etc/httpd/conf.d/ssl.conf.old
次に、ファイルを編集します:
vim /etc/httpd/conf.d/ssl.conf
次のディレクティブを見つけ、それぞれのコメントを外して、次のように編集します。
SSLCertificateKeyFile /etc/pki/tls/certs/centos7.key
SSLCertificateFile /etc/pki/tls/certs/centos7.csr
SSLProtocol -All +TLSv1 +TLSv1.1 +TLSv1.2
ServerName centos7.local:443
次のコマンドでApacheを再起動します。
systemctl restart httpd
OTRSを強制的にhttpsモードで実行するには、次のファイルを編集します:
vim /etc/httpd/conf/httpd.conf
ファイルの最後で、次のディレクティブを削除します。
IncludeOptional conf.d/*.conf
ファイルzzz_otrs.confを編集します:
vim /etc/httpd/conf.d/zzz_otrs.conf
26行目以降(行モジュールmod_version.cの前)に次のディレクティブを追加します。
RewriteEngine On
RewriteCond %{HTTPS} off
RewriteRule (.*) https://%{HTTP_HOST}%{REQUEST_URI}
Apacheを再起動します:
[[email protected] ~]# systemctl restart httpd
OTRSで拡張機能を使用するには、いくつかのPERLモジュールをインストールする必要があります。次のコマンドを実行してインストールします。
yum -y install "perl(Text::CSV_XS)" "perl(Crypt::Eksblowfish::Bcrypt)" "perl(YAML::XS)" "perl(JSON::XS)" "perl(Encode::HanExtra)" "perl(Mail::IMAPClient)" "perl(ModPerl::Util)"
OTRSシステムにはPERLモジュールをチェックするツールがあり、このように実行してシステム要件を確認します:
cd /opt/otrs/bin
実行:
./otrs.CheckModules.pl
構成の出力は次のようになります。
o Apache::DBI......................ok (v1.12) o Apache2::Reload..................ok (v0.13) o Archive::Tar.....................ok (v1.92) o Archive::Zip.....................ok (v1.30) o Crypt::Eksblowfish::Bcrypt.......ok (v0.009) o Crypt::SSLeay....................ok (v0.64) o Date::Format.....................ok (v2.24) o DBI..............................ok (v1.627) o DBD::mysql.......................ok (v4.023) o DBD::ODBC........................Not installed! (optional - Required to connect to a MS-SQL database.) o DBD::Oracle......................Not installed! (optional - Required to connect to a Oracle database.) o DBD::Pg..........................Not installed! Use: 'yum install "perl(DBD::Pg)"' (optional - Required to connect to a PostgreSQL database.) o Digest::SHA......................ok (v5.85) o Encode::HanExtra.................ok (v0.23) o IO::Socket::SSL..................ok (v1.94) o JSON::XS.........................ok (v3.01) o List::Util::XS...................ok (v1.27) o LWP::UserAgent...................ok (v6.13) o Mail::IMAPClient.................ok (v3.37) o IO::Socket::SSL................ok (v1.94) o ModPerl::Util....................ok (v2.000010) o Net::DNS.........................ok (v0.72) o Net::LDAP........................ok (v0.56) o Template.........................ok (v2.24) o Template::Stash::XS..............ok (undef) o Text::CSV_XS.....................ok (v1.00) o Time::HiRes......................ok (v1.9725) o Time::Piece......................ok (v1.20_01) o XML::LibXML......................ok (v2.0018) o XML::LibXSLT.....................ok (v1.80) o XML::Parser......................ok (v2.41) o YAML::XS.........................ok (v0.54)
「otrs」ユーザーでOTRSデーモンを起動するには、次のコマンドを実行します:
su -c "/opt/otrs/bin/otrs.Daemon.pl start" -s /bin/bash otrs
CentOS 7ファイアウォールを無効にするには、次のコマンドを実行します。
systemctl stop firewalld
CentOS 7ファイアウォールを無効にして自動的に起動するには、次のコマンドを実行します。
systemctl disable firewalld.service
OTRSデーモンを次のように開始します:
su -c "/opt/otrs/bin/otrs.Daemon.pl start" -s /bin/bash otrsCron.sh
コマンドの出力は次のとおりです。
/opt/otrs/bin Cron.sh - start/stop OTRS cronjobs Copyright (C) 2001-2012 OTRS AG, http://otrs.org/ (using /opt/otrs) done
OTRSデーモンのステータスを確認したい場合は、次のコマンドを実行してください:
su -c "/opt/otrs/bin/otrs.Daemon.pl status" -s /bin/bash otrsCron.sh
crontabでOTRSを設定します。ユーザーrootをotrsに変更し、crontabの編集を開始します:
su otrs
crontab -e
crontabに次のコンテンツを入力して保存します:
# --
# Copyright (C) 2001-2016 OTRS AG, http://otrs.com/
# --
# This software comes with ABSOLUTELY NO WARRANTY. For details, see
# the enclosed file COPYING for license information (AGPL). If you
# did not receive this file, see http://www.gnu.org/licenses/agpl.txt.
# --

# Who gets the cron emails?
MAILTO="[email protected]"
# --
# Copyright (C) 2001-2016 OTRS AG, http://otrs.com/
# --
# This software comes with ABSOLUTELY NO WARRANTY. For details, see
# the enclosed file COPYING for license information (AGPL). If you
# did not receive this file, see http://www.gnu.org/licenses/agpl.txt.
# --

# check OTRS daemon status
*/5 * * * *    $HOME/bin/otrs.Daemon.pl start >> /dev/null
CentOS7でOTRSを構成する
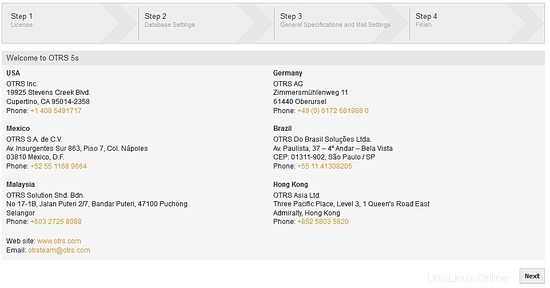
ウェブブラウザを開き、URLhttps://centos7.local/otrs/installer.plを開きます。 centos7.localは私のサーバーの名前であり、ホスト名またはIPアドレスを挿入してください。最初の画面は、OTRSのインストールを完了するための4つのステップを示しています。次へを押してください。
ライセンス:続行するには、ライセンスを読み、同意して続行します:

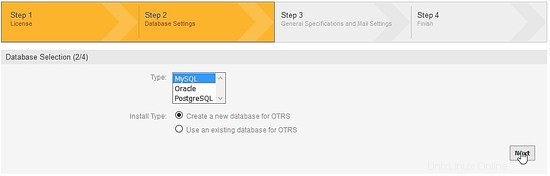
データベースの選択:オプション MySQL を選択します そして、インストールタイプで、OTRS用の新しいデータベースを作成するオプションをマークし、次のボタンをクリックします:
MySQLの構成:ユーザー、パスワード、ホストのフィールドに入力し(作成したMariaDB構成のデータを覚えておいてください)、データベース設定の確認を押します:

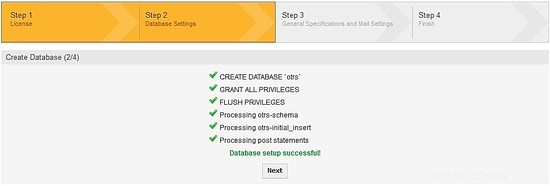
OTRSインストーラーはMariaDBにデータベースを作成します。次のボタンを押してください:
OTRSデータベースが正常に作成されました:
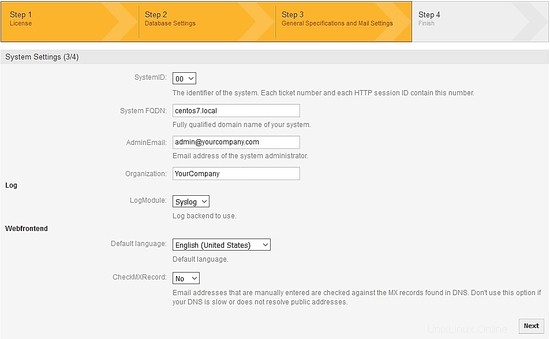
システム設定の構成:フィールドに独自の情報を入力し、[次へ]を押します:
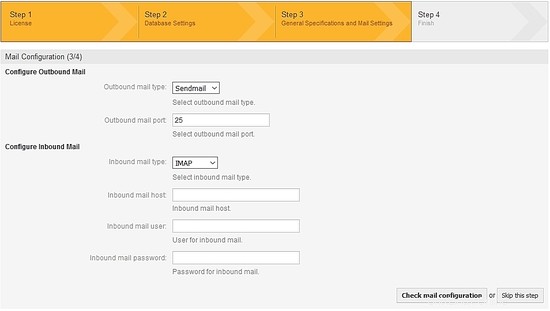
OTRS電子メール設定:電子メールサーバーに応じてフィールドに入力します。私の設定では、アウトバウンドメールにはSMPTTLSとポート587を使用し、インバウンドメールにはpop3を使用します。メールアカウントが必要です。メール設定を確認するか、次の手順をスキップしてください:
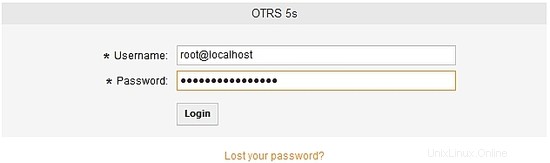
終了するには、OTRSにアクセスするためのユーザーとパスワードについてメモしてください。ログイン後にパスワードを変更できます:
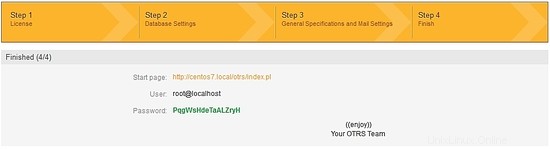
OTRSのURLログインはhttps://centos7.local/otrs/index.pl?です。 centos7.localは私のサーバーの名前です。ホスト名またはIPアドレスを挿入してください。:
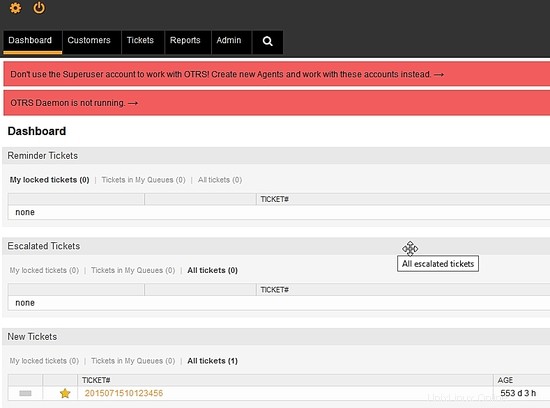
OTRSでログイン:
OTRSがインストールされ、サポートルールまたはビジネスモデルで構成する準備ができています。