Pacemakerは、オペレーティングシステムのようなLinux用の高可用性クラスターソフトウェアです。Pacemakerは、「クラスターリソースマネージャー」として知られています。 ‘、クラスターノード間でリソースのフェイルオーバーを実行することにより、クラスターリソースの最大の可用性を提供します。
Pacemakerは、クラスターコンポーネント間のハートビートと内部通信にcorosyncを使用し、Corosyncはクラスター内のクォーラムも処理します。
この記事では、CentOS 7でPacemakerを使用した2ノードのApache(httpd)Webサーバークラスタリングのインストールと構成について説明します。
私のセットアップでは、Fedoraサーバーの2つの仮想マシンと共有ストレージを使用します(2つのディスクが共有され、1つのディスクがフェンシングデバイスとして使用され、もう1つのディスクがWebサーバーの共有ストレージとして使用されます)
- node1.linuxtechi.com(192.168.1.51)— CentOS 7.x
- node2.linuxtechi.com(192.168.1.52)— CentOS 7.x
ステップ:1「/ etc/hosts」ファイルを更新
両方のノードの/etc/hostsファイルに次の行を追加します。
192.168.1.51 node1.linuxtechi.com node1
192.168.1.52 node2.linuxtechi.com node2
ステップ:2クラスターとその他の必要なパッケージをインストールします。
両方のノードで以下のyumコマンドを使用して、クラスターパッケージ(pcs)、fence-agents、およびWebサーバー(httpd)をインストールします
[[email protected] ~]# yum -y update
[[email protected] ~]# yum -y install pcs fence-agents-all iscsi-initiator-utils httpd

[[email protected] ~]# yum -y update
[[email protected] ~]# yum -y install pcs fence-agents-all iscsi-initiator-utils httpd
手順:3パスワードを「hacluster」ユーザーに設定します
両方のノードで「hacluster」ユーザーの同じパスワードを使用することをお勧めします。
[[email protected] ~]# echo <new-password> | passwd --stdin hacluster
[[email protected] ~]# echo <new-password> | passwd --stdin hacluster
ステップ:4ファイアウォールで高可用性ポートを許可します。
「firewall-cmd」を使用します 両方のノードで‘コマンドを実行して、OSファイアウォールで高可用性ポートを開きます。
[[email protected] ~]# firewall-cmd --permanent --add-service=high-availability
success
[[email protected] ~]# firewall-cmd --reload
success
[[email protected] ~]#

[[email protected] ~]# firewall-cmd --permanent --add-service=high-availability
success
[[email protected] ~]# firewall-cmd --reload
success
[[email protected] ~]#
ステップ:5クラスターサービスを開始し、ノードがクラスターに参加することを承認します。
両方のノードでクラスターサービスを開始しましょう
[[email protected] ~]# systemctl start pcsd.service
[[email protected] ~]# systemctl enable pcsd.service
ln -s '/usr/lib/systemd/system/pcsd.service' '/etc/systemd/system/multi-user.target.wants/pcsd.service'
[[email protected] ~]#

[[email protected] ~]# systemctl start pcsd.service
[[email protected] ~]# systemctl enable pcsd.service
ln -s '/usr/lib/systemd/system/pcsd.service' '/etc/systemd/system/multi-user.target.wants/pcsd.service'
[[email protected] ~]#
いずれかのノードで以下のコマンドを使用して、ノードがクラスターに参加することを承認します。
[[email protected] ~]# pcs cluster auth node1 node2
Username: hacluster
Password:
node1: Authorized
node2: Authorized
[[email protected] ~]#
ステップ:6クラスターを作成してクラスターサービスを有効にする
いずれかのクラスターノードで以下のpcsコマンドを使用して、「 apachecluster」という名前のクラスターを作成します ‘およびnode1とnode2はクラスターノードです。
[[email protected] ~]# pcs cluster setup --start --name apachecluster node1 node2
Shutting down pacemaker/corosync services...
Redirecting to /bin/systemctl stop pacemaker.service
Redirecting to /bin/systemctl stop corosync.service
Killing any remaining services...
Removing all cluster configuration files...
node1: Succeeded
node2: Succeeded
Starting cluster on nodes: node1, node2...
node2: Starting Cluster...
node1: Starting Cluster...
Synchronizing pcsd certificates on nodes node1, node2...
node1: Success
node2: Success
Restaring pcsd on the nodes in order to reload the certificates...
node1: Success
node2: Success
[[email protected] ~]#
以下のpcsコマンドを使用してクラスターサービスを有効にします:
[[email protected] ~]# pcs cluster enable --all
node1: Cluster Enabled
node2: Cluster Enabled
[[email protected] ~]#
クラスターサービスを確認します
[[email protected] ~]# pcs cluster status

ステップ:7両方のノードのFedoraサーバーでiscsi共有ストレージをセットアップします。
Fedora23サーバーのIPアドレス=192.168.1.21
最初に必要なパッケージをインストールします。
[[email protected] ~]# dnf -y install targetcli
フェドーラサーバーにサイズ11GBの新しいディスク(/ dev / sdb)があり、その上にFecing用とApacheファイルシステム用の2つのLVを作成しました。
[[email protected] ~]# pvcreate /dev/sdb
 Physical volume "/dev/sdb" successfully created
[[email protected] ~]# vgcreate cluster_data /dev/sdb
 Volume group "cluster_data" successfully created
[[email protected] ~]# lvcreate -L 1G -n fence_storage cluster_data
 Logical volume "fence_storage" created.
[[email protected] ~]# lvcreate -L 10G -n apache_storage cluster_data
 Logical volume "apache_storage" created.
[[email protected] ~]#
両方のノードのイニシエーター名を取得します。
[[email protected] ~]# cat /etc/iscsi/initiatorname.iscsi
InitiatorName=iqn.1994-05.com.redhat:63ba7391df7f
[[email protected] ~]#

[[email protected] ~]# cat /etc/iscsi/initiatorname.iscsi
InitiatorName=iqn.1994-05.com.redhat:d4337e65531e
[[email protected] ~]#
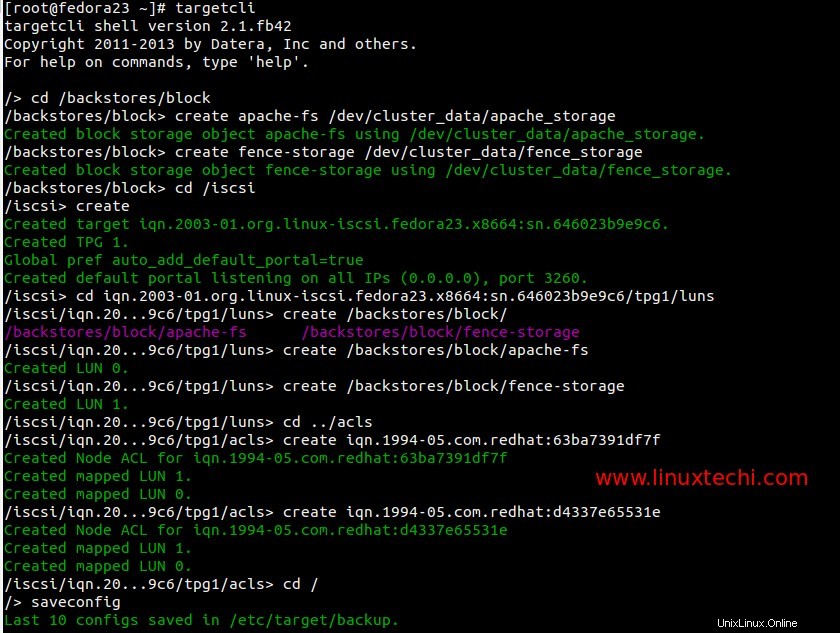
次に、「 targetcli」を使用します ‘両方のノードのiSCSIストレージを構成するコマンド。
[[email protected] ~]# targetcli
/> cd /backstores/block
/backstores/block> create apache-fs /dev/cluster_data/apache_storage
/backstores/block> create fence-storage /dev/cluster_data/fence_storage
/backstores/block> cd /iscsi
/iscsi> create
/iscsi> cd iqn.2003-01.org.linux-iscsi.fedora23.x8664:sn.646023b9e9c6/tpg1/luns
/iscsi/iqn.20...9c6/tpg1/luns> create /backstores/block/apache-fs
/iscsi/iqn.20...9c6/tpg1/luns> create /backstores/block/fence-storage
/iscsi/iqn.20...9c6/tpg1/luns> cd ../acls
/iscsi/iqn.20...9c6/tpg1/acls> create iqn.1994-05.com.redhat:63ba7391df7f
/iscsi/iqn.20...9c6/tpg1/acls> create iqn.1994-05.com.redhat:d4337e65531e
/iscsi/iqn.20...9c6/tpg1/acls> cd /
/> saveconfig
/> exit
ターゲットサービスを開始して有効にする
[[email protected] ~]# systemctl start target.service
[[email protected] ~]# systemctl enable target.service
[[email protected] ~]#
OSファイアウォールでiSCSIポートを開きます。
[[email protected] ~]# firewall-cmd --permanent --add-port=3260/tcp
success
[[email protected] ~]# firewall-cmd --reload
success
[[email protected] ~]#
次に、両方のノードでiscsiストレージをスキャンします:
両方のノードで以下のコマンドを実行します
# iscsiadm --mode discovery --type sendtargets --portal 192.168.1.21
# iscsiadm -m node -T iqn.2003-01.org.linux-iscsi.fedora23.x8664:sn.646023b9e9c6 -l -p 192.168.1.21:3260
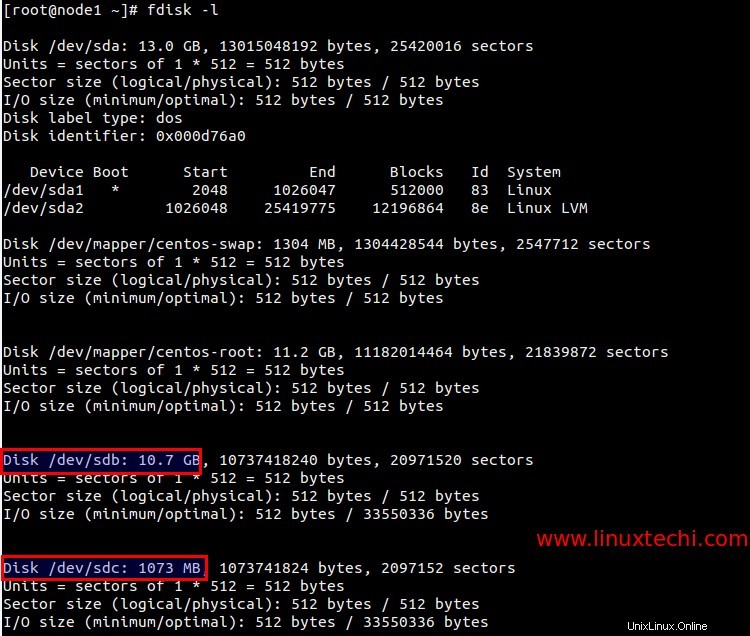
設定に従って、ターゲットの「iqn」と「ipaddress」を置き換えます。上記のコマンドを実行すると、「fdisk-l」コマンドの出力に2つの新しいディスクが表示されます。
新しくスキャンしたiSCSIディスクのIDを一覧表示します。
[[email protected] ~]# ls -l /dev/disk/by-id/
total 0
..........
lrwxrwxrwx. 1 root root 9 Feb 21 03:22 wwn-0x60014056e8763c571974ec3b78812777 -> ../../sdb
lrwxrwxrwx. 1 root root 9 Feb 21 03:22 wwn-0x6001405ce01173dcd7c4c0da10051405 -> ../../sdc
[[email protected] ~]#
両方のノードでiscsiサービスを開始して有効にします。
[[email protected] ~]# systemctl start iscsi.service
[[email protected] ~]# systemctl enable iscsi.service
[[email protected] ~]# systemctl enable iscsid.service
ln -s '/usr/lib/systemd/system/iscsid.service' '/etc/systemd/system/multi-user.target.wants/iscsid.service'
[[email protected] ~]#

[[email protected] ~]# systemctl start iscsi.service
[[email protected] ~]# systemctl enable iscsi.service
[[email protected] ~]# systemctl enable iscsid.service
ln -s '/usr/lib/systemd/system/iscsid.service' '/etc/systemd/system/multi-user.target.wants/iscsid.service'
[[email protected] ~]#
ステップ:8クラスターリソースを作成します。
stonithを定義する (ヘッド内の他のノードを撃ちます)クラスターのフェンシングデバイス。これは、ノードが応答しなくなったときにノードをクラスターから分離する方法です。
1 GBのiSCSIストレージ( / dev / sdc )を使用しています )フェンシング用。
いずれかのノードで次のコマンドを実行します:
[[email protected] ~]# pcs stonith create scsi_fecing_device fence_scsi pcmk_host_list="node1 node2" pcmk_monitor_action="metadata" pcmk_reboot_action="off" devices="/dev/disk/by-id/wwn-0x6001405ce01173dcd7c4c0da10051405" meta provides="unfencing"
[[email protected] ~]#
[[email protected] ~]# pcs stonith show
 scsi_fecing_device (stonith:fence_scsi): Started node1
[[email protected] ~]#
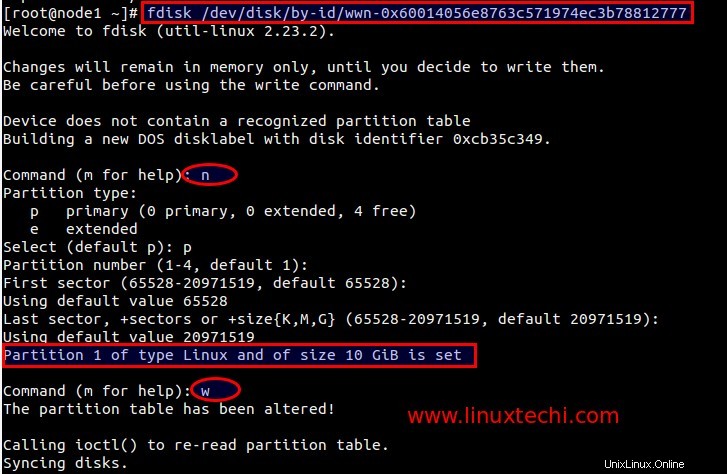
次に、2番目のiSCSIストレージ( / dev / sdb )にパーティションを作成します )これは、Webサーバーのドキュメントルートとして使用されます。
[[email protected] ~]# fdisk /dev/disk/by-id/wwn-0x60014056e8763c571974ec3b78812777
新しく作成したパーティションをフォーマットします:
[[email protected] ~]# mkfs.ext4 /dev/disk/by-id/wwn-0x60014056e8763c571974ec3b78812777-part1
新しいファイルシステムを一時的に/var/ wwwにマウントし、サブフォルダーを作成してselinuxルールを設定します。
[[email protected] html]# mount /dev/disk/by-id/wwn-0x60014056e8763c571974ec3b78812777-part1 /var/www/
[[email protected] html]# mkdir /var/www/html
[[email protected] html]# mkdir /var/www/cgi-bin
[[email protected] html]# mkdir /var/www/error
[[email protected] html]# restorecon -R /var/www
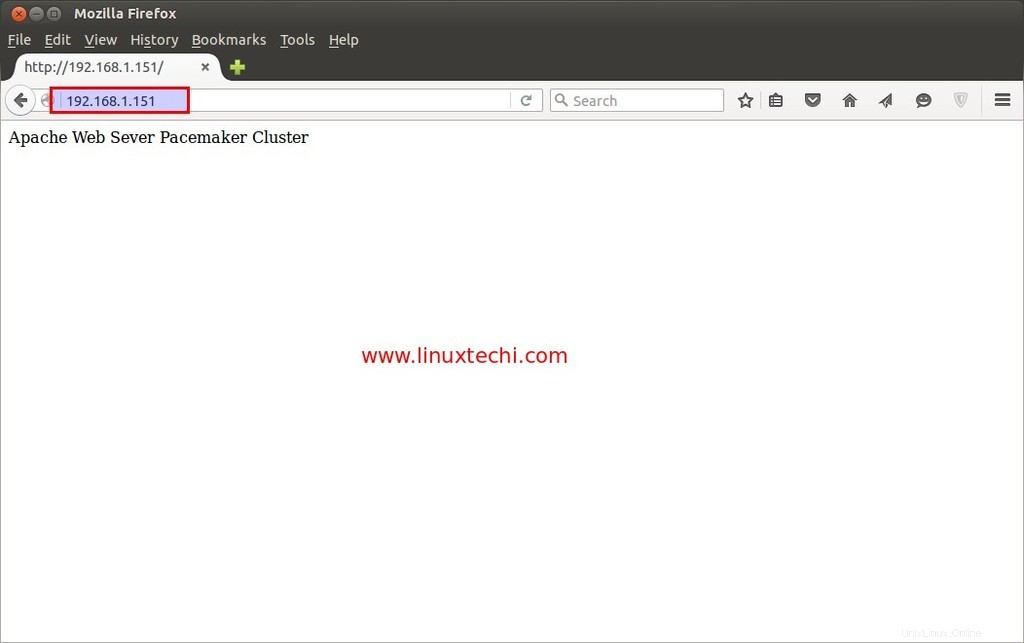
[[email protected] html]# echo "Apache Web Sever Pacemaker Cluster" > /var/www/html/index.html
クラスタは必要に応じてファイルシステムをマウントするため、ここでファイルシステムをアンマウントします。
[[email protected] html]# umount /var/www/
[[email protected] html]#
Webサーバーファイルシステムクラスタリソースを作成します 以下のpcsコマンドを使用します。
[[email protected] html]# pcs resource create webserver_fs Filesystem device="/dev/disk/by-id/wwn-0x60014056e8763c571974ec3b78812777-part1" directory="/var/www" fstype="ext4" --group webgroup
[[email protected] html]#
[[email protected] html]# pcs resource show
 Resource Group: webgroup
 webserver_fs (ocf::heartbeat:Filesystem): Started node1
[[email protected] html]#
両方のノードの「/etc/httpd/conf/httpd.conf」ファイルに次の行を追加します。
<Location /server-status>
 SetHandler server-status
 Order deny,allow
 Deny from all
 Allow from 127.0.0.1
</Location>
両方のノードのOSファイアウォールでhttpdまたはWebサーバーのポートを開きます
[[email protected] ~]# firewall-cmd --permanent --add-service=http
success
[[email protected] ~]# firewall-cmd --reload
success

[[email protected] ~]#
[[email protected] ~]# firewall-cmd --permanent --add-service=http
success
[[email protected] ~]# firewall-cmd --reload
success
[[email protected] ~]#
仮想IP(IPaddr2)クラスターリソースを作成します 以下のコマンドを使用します。いずれかのノードで次のコマンドを実行します。
[[email protected] ~]# pcs resource create vip_res IPaddr2 ip=192.168.1.151 cidr_netmask=24 --group webgroup
[[email protected] ~]#
Apacheクラスターリソースを作成します 以下のコマンドを使用:
[[email protected] ~]# pcs resource create apache_res apache configfile="/etc/httpd/conf/httpd.conf" statusurl="http://127.0.0.1/server-status" --group webgroup
[[email protected] ~]#
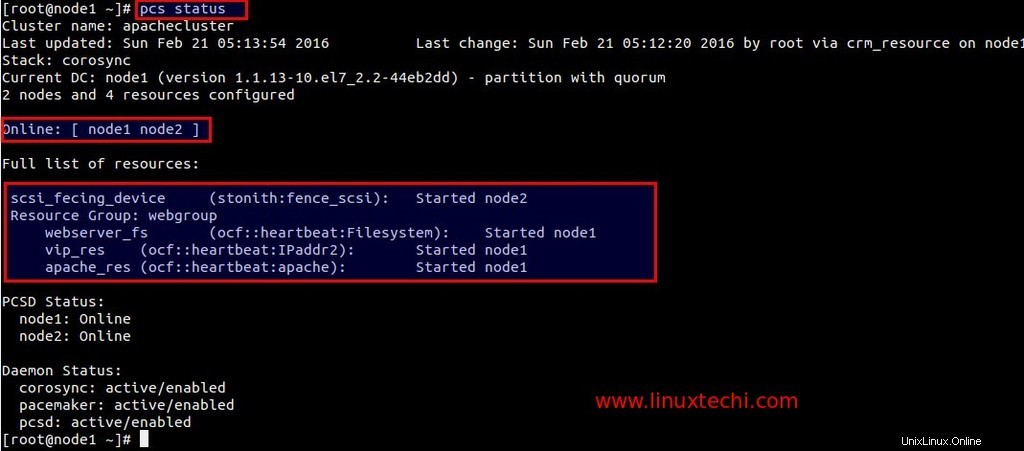
クラスタステータスを確認する:
[[email protected] ~]# pcs status
「df」を使用します ‘および‘ ip add ‘コマンドを使用してファイルシステムとIPアドレスのフェイルオーバーを確認します。
VIP(192.168.1.151)を使用してWebサイトにアクセスする
。 
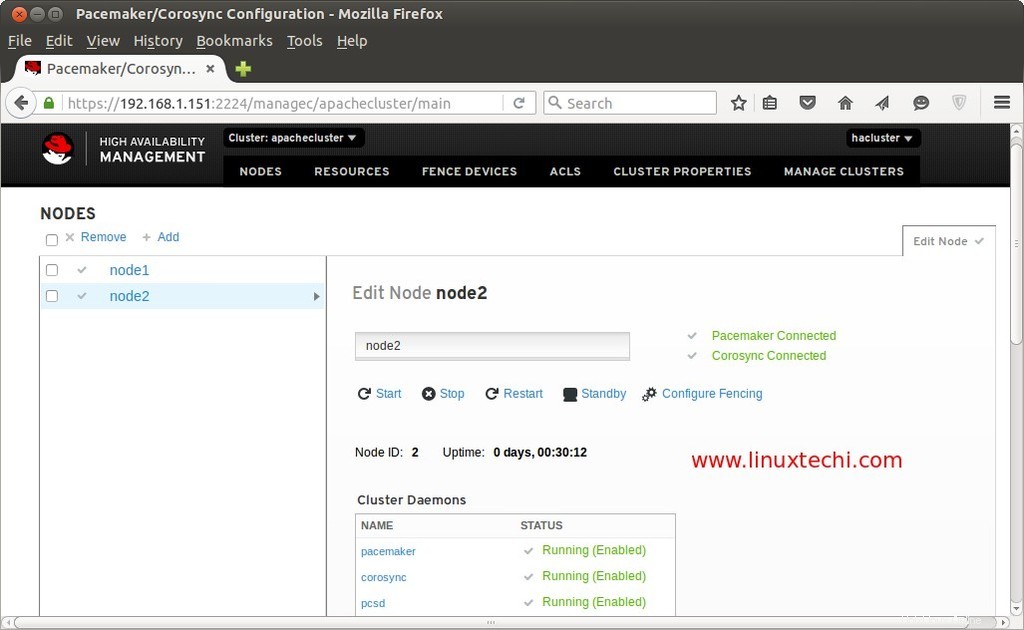
ペースメーカーGUI:
PacemakerのGUIには、vipを使用してWebブラウザからアクセスできます。
https://192.168.1.151:2224/
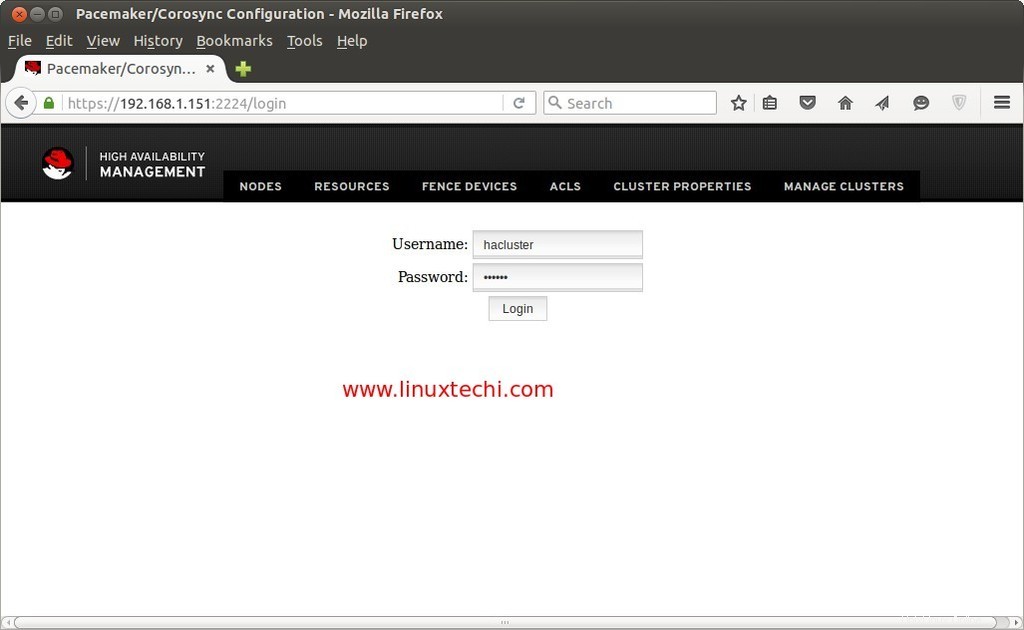
上記の手順で設定したユーザー名「hacluster」とそのパスワードを使用します。
既存のクラスターノードを追加します。
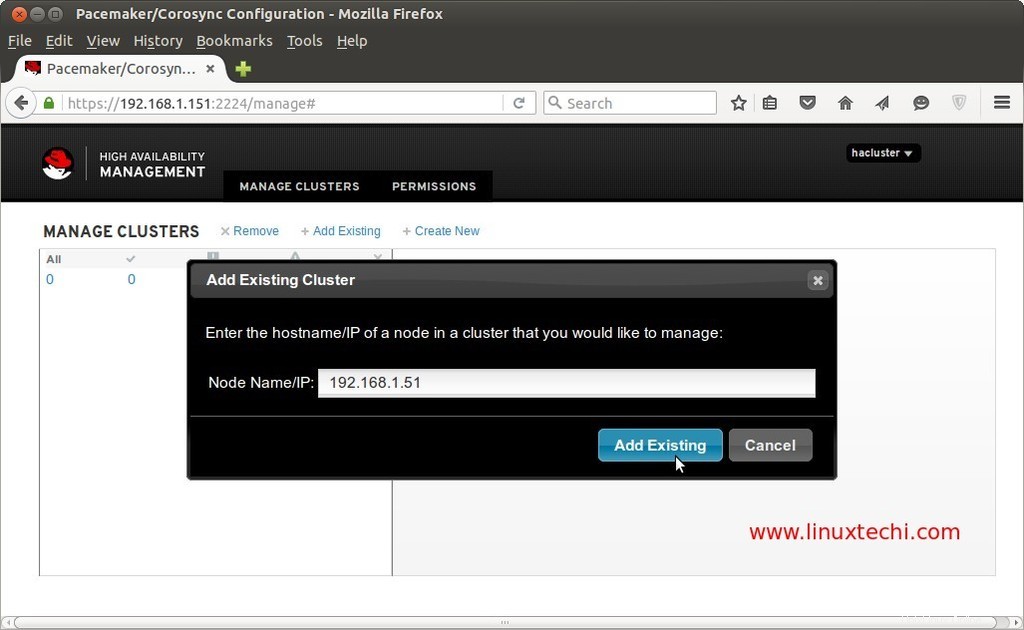
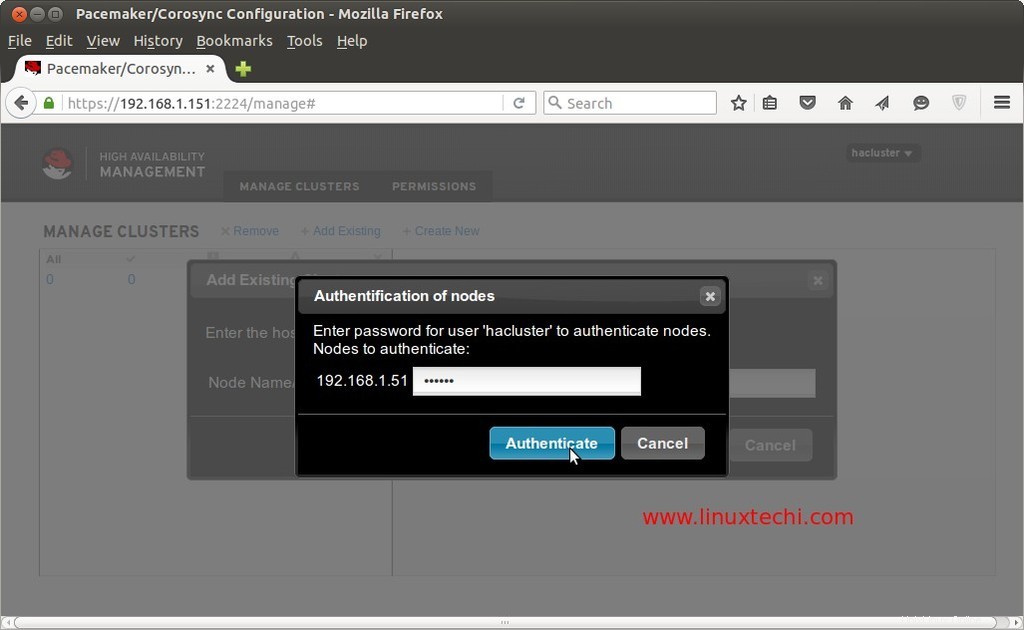
Pacemakerのインストールと構成が完了しました。これで、手順を楽しんでいただければ幸いです。貴重なフィードバックとコメントを共有してください🙂
参照: http://clusterlabs.org/quickstart-redhat.html